Bosch Security PoE midspans User manual

PoE midspans for PTZ cameras
en Installation Manual


PoE midspans for PTZ cameras Table of contents | en 3
Bosch Security Systems 2020-11 | 1.0 |
Table of contents
1Safety 4
1.1 About this Manual 4
1.2 Legal Information 4
1.3 Safety Precautions 5
1.4 Important Safety Instructions 6
1.5 Customer Support and Service 8
2Unpacking 9
2.1 Parts List 9
2.2 Parts List 9
2.3 Additional Parts Required 9
2.4 Tools Required 10
2.5 Additional Parts Recommended But Not Required 11
3System overview 12
4Installation (Indoor models) 13
5Installation (Outdoor model) 15
5.1 Installation overview 15
5.2 Connect the midspan to ground 16
5.3 Install the midspan directly to a wall 17
5.4 Install the midspan to a pole mount adapter 19
5.5 Connect the AC cable 24
5.6 Connect the RJ45 cable 25
6Connection 26
7Troubleshooting 29
8Disposal 33

4en | Safety PoE midspans for PTZ cameras
2020-11 | 1.0 | Bosch Security Systems
1 Safety
1.1 About this Manual
This manual has been compiled with great care and the
information it contains has been thoroughly verified. The text
was complete and correct at the time of printing. Because of the
ongoing development of products, the content of the manual
may change without notice. Bosch Security Systems accepts no
liability for damage resulting directly or indirectly from faults,
incompleteness, or discrepancies between the manual and the
product described.
1.2 Legal Information
Copyright
This manual is the intellectual property of Bosch Security
Systems, and is protected by copyright. All rights reserved.
Trademarks
All hardware and software product names used in this document
are likely to be registered trademarks and must be treated
accordingly.

PoE midspans for PTZ cameras Safety | en 5
Bosch Security Systems 2020-11 | 1.0 |
1.3 Safety Precautions
In this manual, the following symbols and notations are used to
draw attention to special situations:
Danger!
High risk: This symbol indicates an imminently hazardous
situation such as “Dangerous Voltage” inside the product. If not
avoided, this will result in an electrical shock, serious bodily
injury, or death.
!
Warning!
Medium risk: Indicates a potentially hazardous situation. If not
avoided, this may result in minor or moderate injury.
!
Caution!
Low risk: Indicates a potentially hazardous situation. If not
avoided, this may result in property damage or risk of damage
to the unit.
i
Notice!
This symbol indicates information or a company policy that
relates directly or indirectly to the safety of personnel or
protection of property.

6en | Safety PoE midspans for PTZ cameras
2020-11 | 1.0 | Bosch Security Systems
1.4 Important Safety Instructions
Important safety information
– The unit should be connected to PoE networks only,
without routing to the outside plant.
– Only qualified personnel can install or remove the unit.
– Follow basic electricity safety measures whenever
connecting the unit to its power source.
– A voltage mismatch can cause equipment damage and may
pose a fire hazard. If the voltage indicated on the label is
different from the power outlet voltage, do not connect the
unit to this power outlet.
– Read the installation instructions before connecting the
unit to its power source.
EMC compliance
– FCC Part 15 class B and EN 55022 class B
– EN55024
– VCCI
Safety compliance
– UL/cUL per 60950-1
– GS mark
– Installation and removal of the midspan must be carried out
by qualified personnel only.
– Follow basic electricity safety measures whenever
connecting the midspan to its power source.
– A voltage mismatch can cause equipment damage and may
pose a fire hazard. If the voltage indicated on the label is
different from the power outlet voltage, do not connect the
midspan to this power outlet.
– The PoE injector "Data In" and "Data & Power Out" ports
are shielded RJ45 data sockets. They cannot be used as
Plain Old Telephone Service (POTS) telephone sockets.
Only RJ45 data connectors can be connected to these
sockets.

PoE midspans for PTZ cameras Safety | en 7
Bosch Security Systems 2020-11 | 1.0 |
– The Data In and Data & Power Out interfaces are qualified
as SELV (Safety Extra-Low Voltage) circuits according to
IEC 60950-1. These interfaces can only be connected to
SELV interfaces on other equipment.
– This product is not intended to become a permanent part
of the building structure.
– Do not attach the power supply cord to the building
surface.
– Do not run the power supply cord through walls, ceilings,
floors, or similar openings in the building structure.
– Take appropriate measures to prevent physical damage to
the power supply cord, including proper routing.
– This device is not suitable for installation in corrosive
environments with salt water. Installers must make sure
that the installation location does not expose the device
housing directly to salt water.
– This device is not suitable for installation or operation in an
environment with SO₂.
For more information, refer to the installation manual, available
at http://www.boschsecurity.com/catalog_overview.htm

8en | Safety PoE midspans for PTZ cameras
2020-11 | 1.0 | Bosch Security Systems
1.5 Customer Support and Service
If this unit needs service, contact the nearest Bosch Security
Systems Service Center for authorization to return and shipping
instructions.
USA and Canada
Telephone: 800-289-0096, option 5
Fax: 800-366-1329
Email: [email protected]
Customer Service
Telephone: 800-289-0096, option 3
Fax: 800-315-0470
Email: [email protected]
Technical Support
Telephone: 800-289-0096, option 4
Fax: 800-315-0470
Email: [email protected]
Europe, Middle East, Africa, and Asia Pacific Regions
Please contact your local distributor or Bosch sales office. Use
this link:
https://www.boschsecurity.com/corporate/where-to-buy/
index.html
More Information
For more information, please contact the nearest Bosch Security
Systems location or visit www.boschsecurity.com.

PoE midspans for PTZ cameras Unpacking | en 9
Bosch Security Systems 2020-11 | 1.0 |
2 Unpacking
2.1 Parts List
The package containing the midspan should include the
following items:
Quantit
y
Component
1 60W midspan
1 120 V power cord
1 230 V power cord
1 Quick installation guide
Quantit
y
Component
1 High PoE Midspan 95 W, indoor model
1 120 VAC power plug
1 230 VAC power plug
1 Quick Installation Guide
Quantity Component
1 High PoE Midspan 95 W, outdoor model
1 120 -240 VAC power plug
2 Waterproof cap covers for male RJ45 port plugs
1 Quick Installation Guide
2.2 Parts List
2.3 Additional Parts Required
The following table lists additional parts (not supplied by
Bosch) required to install the midspan:

10 en | Unpacking PoE midspans for PTZ cameras
2020-11 | 1.0 | Bosch Security Systems
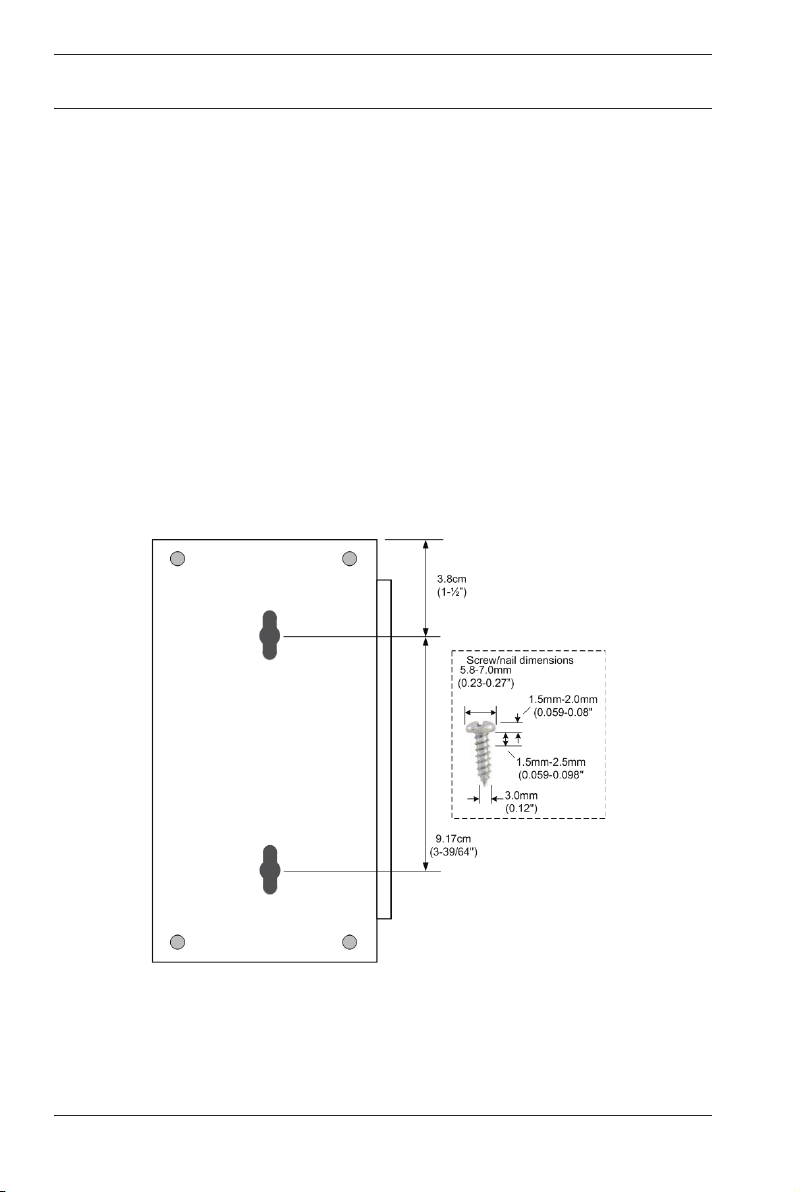
Quantity Part Size Notes
2 Mounting
screws;
Select either
size
(but not both).
Head diameter:
5.8 mm
(0.23 in.)
1.5 mm (0.059 in.)
clearance from mounting
surface
Head diameter:
7 mm
(0.27 in.)
Head height:
2 mm
(0.08 in.)
2.5 mm (0.098 in.)
clearance from mounting
surface
2 CAT5 cables Not to exceed
100 m (333 ft)
each
1 cable to connect to the
“Data & Power Out“
port.
1 cable to connect to the
“Data In” port.
Quantity Part Size Notes
4 Mounting
screws
2 CAT5 cables Not to exceed
100 m (333 ft)
each
1 cable to connect to the
“Data & Power Out“
port.
1 cable to connect to the
“Data In” port.
2 RJ45
connectors,
male
2.4 Tools Required
Screwdriver

PoE midspans for PTZ cameras Unpacking | en 11
Bosch Security Systems 2020-11 | 1.0 |
2.5 Additional Parts Recommended But Not
Required
The following table lists additional parts (not supplied by
Bosch) recommended to install the midspan:
Quantity Part
1 Surge suppressor
1 Splitter
1 Universal Power Supply (UPS)

12 en | System overview PoE midspans for PTZ cameras
2020-11 | 1.0 | Bosch Security Systems
3 System overview
60 W Midspan
The 60 W midspan enables remote High Power over Ethernet
(High PoE) for various Bosch IP/HD PTZ cameras. Generating a
maximum of 60 W, it complies to both the IEEE 802.3af and the
IEEE 802.3at standards, while doubling the available power.
This model of midspan is necessary to supply power to the
heater for an outdoor AUTODOME 7000 camera.
It can also supply power to:
– standard models of MIC7000
– models of MIC IP starlight 7000i without an illuminator
accessory
– models in the AUTODOME 4000 and 5000 product families
The 95 W midspan is a high-power PoH (Power Over HDBase T)
device that provides data and power between an Ethernet
switch and an IP camera.
This model of midspan can supply power to all models of
MIC7000, MIC IP starlight 7000i, and MIC IP fusion 9000i.
95 W Outdoor midspan
This model is designed for outdoor use and can supply power to
AUTODOME 7000 and MIC IP cameras with or without
illuminators. This model is required for High PoE power for MIC
IP cameras with illuminators.

PoE midspans for PTZ cameras Installation (Indoor models) | en 13
Bosch Security Systems 2020-11 | 1.0 |
4 Installation (Indoor models)
!
Caution!
Installation must be made by qualified personnel and conform
to ANSI/NFPA 70 (the National Electrical Code® (NEC)),
Canadian Electrical Code, Part I (also called CE Code or CSA
C22.1), and all applicable local codes. Bosch Security Systems
accepts no liability for any damages or losses caused by
incorrect or improper installation.
!
Warning!
FOR INDOOR USE ONLY
Notes
Note: Do NOT use cross-over cable between the Data & Power
Out port and the camera!
Note: The midspan is not a repeater and does not amplify the
Ethernet data signal.
Note: The total length of Cat5e/Cat6 Shielded Twisted Pair
(STP) cable must be less than 100 m (328 ft) between the
camera and the head-end system.
Before mounting the midspan to a fixed location, note the
following:
– Do not cover the midspan or block the airflow to the PoE
with any foreign objects.
– Keep the midspan away from excessive heat and humidity
and free from vibration and dust.
– Ensure that the cable length from the Ethernet network
source to the terminal does not exceed 100meters (333
feet). The midspan is not a repeater and does not amplify
the Ethernet data signal.
– No “on-off” switch exists; simply plug the midspan into an
AC power source.
14 en | Installation (Indoor models) PoE midspans for PTZ cameras
2020-11 | 1.0 | Bosch Security Systems
Place the midspan on a desktop, or mount it to a wall, a bench,
or a shelf using the mounting holes in the bottom of the device.
Mount the Unit Directly to a Flat Surface
1. Select the mounting location and surface. Ensure that the
selected surface will be able to support the weight of the
unit (400 g (0.88 lb) for 95 W models; 340 g (0.75 lb) for 60
W models). Note that this unit is intended only for
installation in a Restricted Access Location.
2. Install two mounting screws (user-supplied) in the selected
mounting surface, at the appropriate distance apart from
the center of each screw (9.17 cm / 91.7 mm (3.61 in.) for
95 W models).
3. Align the mounting holes on the unit to the screws.
4. Slide the unit into place.
Stack One Unit on Top or on the Side of Another Unit (95 W
models only)
Slide the rail on the right side (when facing the ports) of one
unit to the left side (when facing the ports) of a second unit.

PoE midspans for PTZ cameras Installation (Outdoor model) | en 15
Bosch Security Systems 2020-11 | 1.0 |
5 Installation (Outdoor model)
5.1 Installation overview
!
Caution!
Installation must be made by qualified personnel and conform
to ANSI/NFPA 70 (the National Electrical Code® (NEC)),
Canadian Electrical Code, Part I (also called CE Code or CSA
C22.1), and all applicable local codes. Bosch Security Systems
accepts no liability for any damages or losses caused by
incorrect or improper installation.
!
Caution!
Risk of electrostatic discharge
Connect the Earth ground screw to Earth ground in all types of
installations.
1. Select a secure installation location for the midspan.
Ideally, this is a location where no one can interfere with
the device, either intentionally or accidentally.
2. Connect the midspan to ground.
3. Install the midspan. You have these options to install the
midspan:
– To a wall directly.
– To a wall or to a pole with the pole mount adapter
(NDA-9501-PMA, sold separately).
4. Connect the AC cable.
5. Connect the RJ45 cable.

16 en | Installation (Outdoor model) PoE midspans for PTZ cameras
2020-11 | 1.0 | Bosch Security Systems
5.2 Connect the midspan to ground
1. Connect the chassis bolt to the Earth ground point on the
rear of the midspan.
1.1 Nm - 1.7 Nm
(10 - 15 Lb-in.)
2. Tighten the screw to 1.1 Nm to 1.7 Nm (0.83lbfft to
1.25lbfft/10lbfin. to 15lbfin.) to prevent water ingress.
3. Connect the other end of the ground wire to Earth ground
at your installation point.
1.1 Nm - 1.7 Nm
(10 - 15 Lb-in.)

PoE midspans for PTZ cameras Installation (Outdoor model) | en 17
Bosch Security Systems 2020-11 | 1.0 |
5.3 Install the midspan directly to a wall
1. Using the screw holes of the midspan as a template, put
marks on the mounting surface (a wall of wood, brick, or
concrete) to show where to drill holes to install the
midspan.
2. Drill the four (4) holes.
3. Insert four mounting screws (not supplied) into the screw
holes (items 1 through 4 in the figure that follows).

18 en | Installation (Outdoor model) PoE midspans for PTZ cameras
2020-11 | 1.0 | Bosch Security Systems
4. Tighten each screw until the midspan is attached safely to
the mounting surface.

PoE midspans for PTZ cameras Installation (Outdoor model) | en 19
Bosch Security Systems 2020-11 | 1.0 |
5.4 Install the midspan to a pole mount
adapter
Before you start installation, make sure that all the parts listed
in the Parts List below are included. If any items are missing,
notify your Sales or Customer Service Representative from
Bosch Security Systems.
Parts List, pole mount adapter
Quantity Component
1 Mounting bracket
2 Worm clamp [to install on a pole of 3 in. to 8 in.]
2 Omega clamp [to install on a pole of 1 in. to 3
in.]
6 Screw with pan head, M5mm x 16mm [to attach
the midspan to the metal bracket]
4 Screw with hex head, M6mm x 110mm [to
install on a pole of 1 in. to 3 in.]
4 Hex nut, M6 [to use with the Screw with hex
head, M6mm x 110mm]
8 Flat washer, M6 [to use with the Screw with hex
head, M6mm x 110mm]
6 Flat washer, M5 [to connect the ground cable
and/or to attach the midspan to the metal
bracket]
4 Spring lock washer, M6 [to use with the Screw
with hex head, M6mm x 110mm]
6 Washer lock tooth, M5

20 en | Installation (Outdoor model) PoE midspans for PTZ cameras
2020-11 | 1.0 | Bosch Security Systems
i
Notice!
Earth grounding necessary for lightening suppression
When using a pole mount adapter, make sure to ground the
pole to earth for lightning suppression.
1. Install the midspan onto the mounting bracket of the pole
mount adapter, using four (4) pan head screws.
2. Install the mounting bracket onto the wall or onto the pole.
Use the appropriate components depending on the
diameter of the pole.
Table of contents
Popular Security System manuals by other brands

Swann
Swann SW344-DPS Specifications

Protect America
Protect America Simon XT Installation manual and user's guide

Philio
Philio PSE04 quick start guide

LEGRAND
LEGRAND 5739 35 user manual

GeoVision
GeoVision GV-NAS SYSTEM quick start guide

Digital Security Controls
Digital Security Controls PC1616 Reference manual

Bosch
Bosch DIP-6083-8HD Quick installation guide

Vision
Vision ZM1601IN-5 Installation & operation manual

visual engineering
visual engineering Guardian VIP user manual

SmokeCloak
SmokeCloak VALI V5 Installation and operating instrictions

Sentrol
Sentrol ZX400 Installation

Setec
Setec SKM-03.2 Technical description


