BOSSCO 20810 User manual
Important:
- Please read these instructions carefully prior to installation.
- Check the contents of this kit before commencing fitment and report any discrepancies.
- Do not use power tools. Only tighten with the provided allen key to avoid stripping the
bolt heads or cross threading the bolts.
- Do not fully tighten bolts until the end of the assembly.
- Problems and losses which occur due to improper installation and use are not covered
by our warranty
- All pictures in the instructions are for reference only, pictures may vary from product to
product, however, the installation method is the same.
- Please check regularly if all fittings connected to the car are loose to ensure safe use.
-
Place these instructions in the vehicle’s glove box after installation is complete.
Flat Roof Platform SKU: 20810, 20811 or 20812
Maximum carrying capacity: 150kg including the weight of the rack system.
Please refer to your vehicle handbook for maximum carrying capacity – many dual cab utes are roughly around 85kg
carrying capacity. Always use the lower the lower of the two figures. Load must be evenly distributed over the entire
basket.
Recommendations: It is essential that all bolt connections are checked after driving a short distance when you first install
your roof racks. Bolt connections should be checked at regular intervals (once a week is enough, depending on road
conditions, usage, loads and distance travelled). You should also check the roof racks each time they are re-fitted. Always
make sure to fasten your load securely. Please also ensure that the centre of gravity is kept as low as possible. Contents
must be entirely contained within the extents of the roof racks. Rack system should be removed when using an automatic
car wash.
Off-road use: Our racks can be used in off road applications, however a safety factor of 1.5 is enforced. That is, maximum
permissible off-road load is 100kg. Extreme care must be taken in off road conditions
Note for Dealers and Fitters:
Please ensure that fitting instructions are given to the end user or client.
These instructions remain the property of Bossco Auto Parts & Accessories Pty Ltd and may not be used or changed for any
other purpose than intended.
Installation Video
https://youtu.be/zhugLkbnNo8
Follow us on our youtube channel for more installation tips and content. Share your rig with us and
we’ll share it on our social medias!
@bosscoautoofficial
@bosscoautoofficial
Assembly
1- Parts List:
NO. NAME QTY SPEC NO. NAME QTY SPEC
1 FRONT/REAR
BAR 2 Front and rear
are the same
7 END HEAD COVER 4 All end head covers
are the same
2 SIDE BARS 2 Both bars are
identical
8 M6*15 ALLEN KEY
HEAD BOLT
16 M6*15mm
3
MIDDLE BAR 4
All 4 middle
bars are
identical
9 M6*25 ALLEN KEY
HEAD BOLT
14 M6*25mm
4 CROSS BAR 2 Both cross bars
are identical
10 ALLEN KEY HEAD
BOLTS
24 M5*10mm
5
PLASTIC SPACER 10
ALL plastic
spacers are
identical
11
SPRING WASHERS
30 D6
6 END CAP 4 All end caps are
identical
12 FLAT WASHERS 30 D6
Aluminium Roof Platform Assembly
Instructions
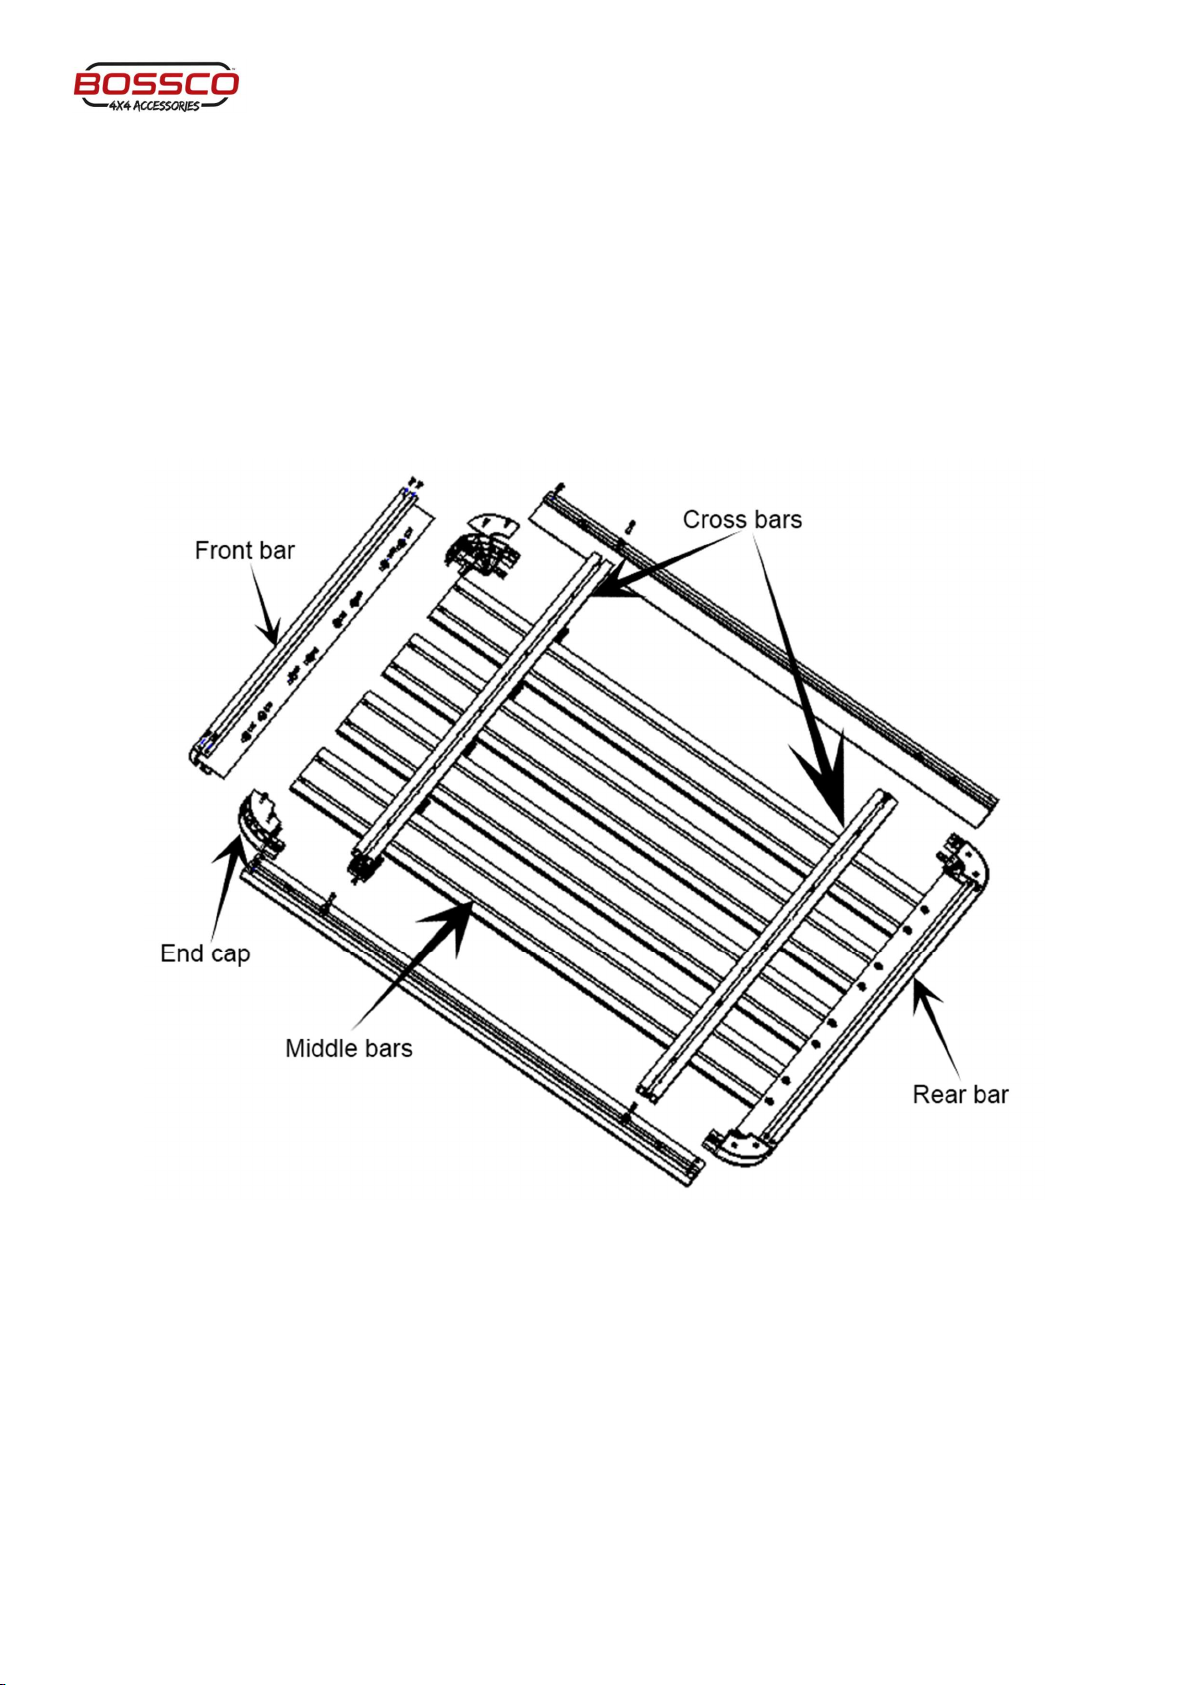
1. Prepare all parts for installation. It is recommended to start assembling with the product
upside-down.
2. Using the provided M5*10 allen key head bolts, connect the front/rear bars (1) with the side
bars (2) using the provided end caps. Make sure the slotted holes on the bars are facing
upward.
3. Carefully place and align all 4 middle bars (3) on the slotted holes and hand tighten with the
provided M6*15 allen key head bolts (8). Repeat for all 4 middle bars.
4. Place each cross bar (4) on the inner two slotted holes as seen in figure… and hand tighten
with M6 15mm allen key head bolts (8). Make sure that the channel is facing upwards (the
channel will be facing downwards once installed on the roof).
5. Flip over the roof platform.
6. Bolt on the plastic spacers between the 4 middle bars using the provided M6*25 allen key
head bolts. Make sure that the lip of the middle bars sits in the slots of the plastic spacers.

7. Fully tighten all bolts - start with the plastic spacers then flip over and tighten the rest. For
an even finish, make sure to align all bolts in the middle of the slotted holes before
tightening.
(Figure 1)
(Figure 2)
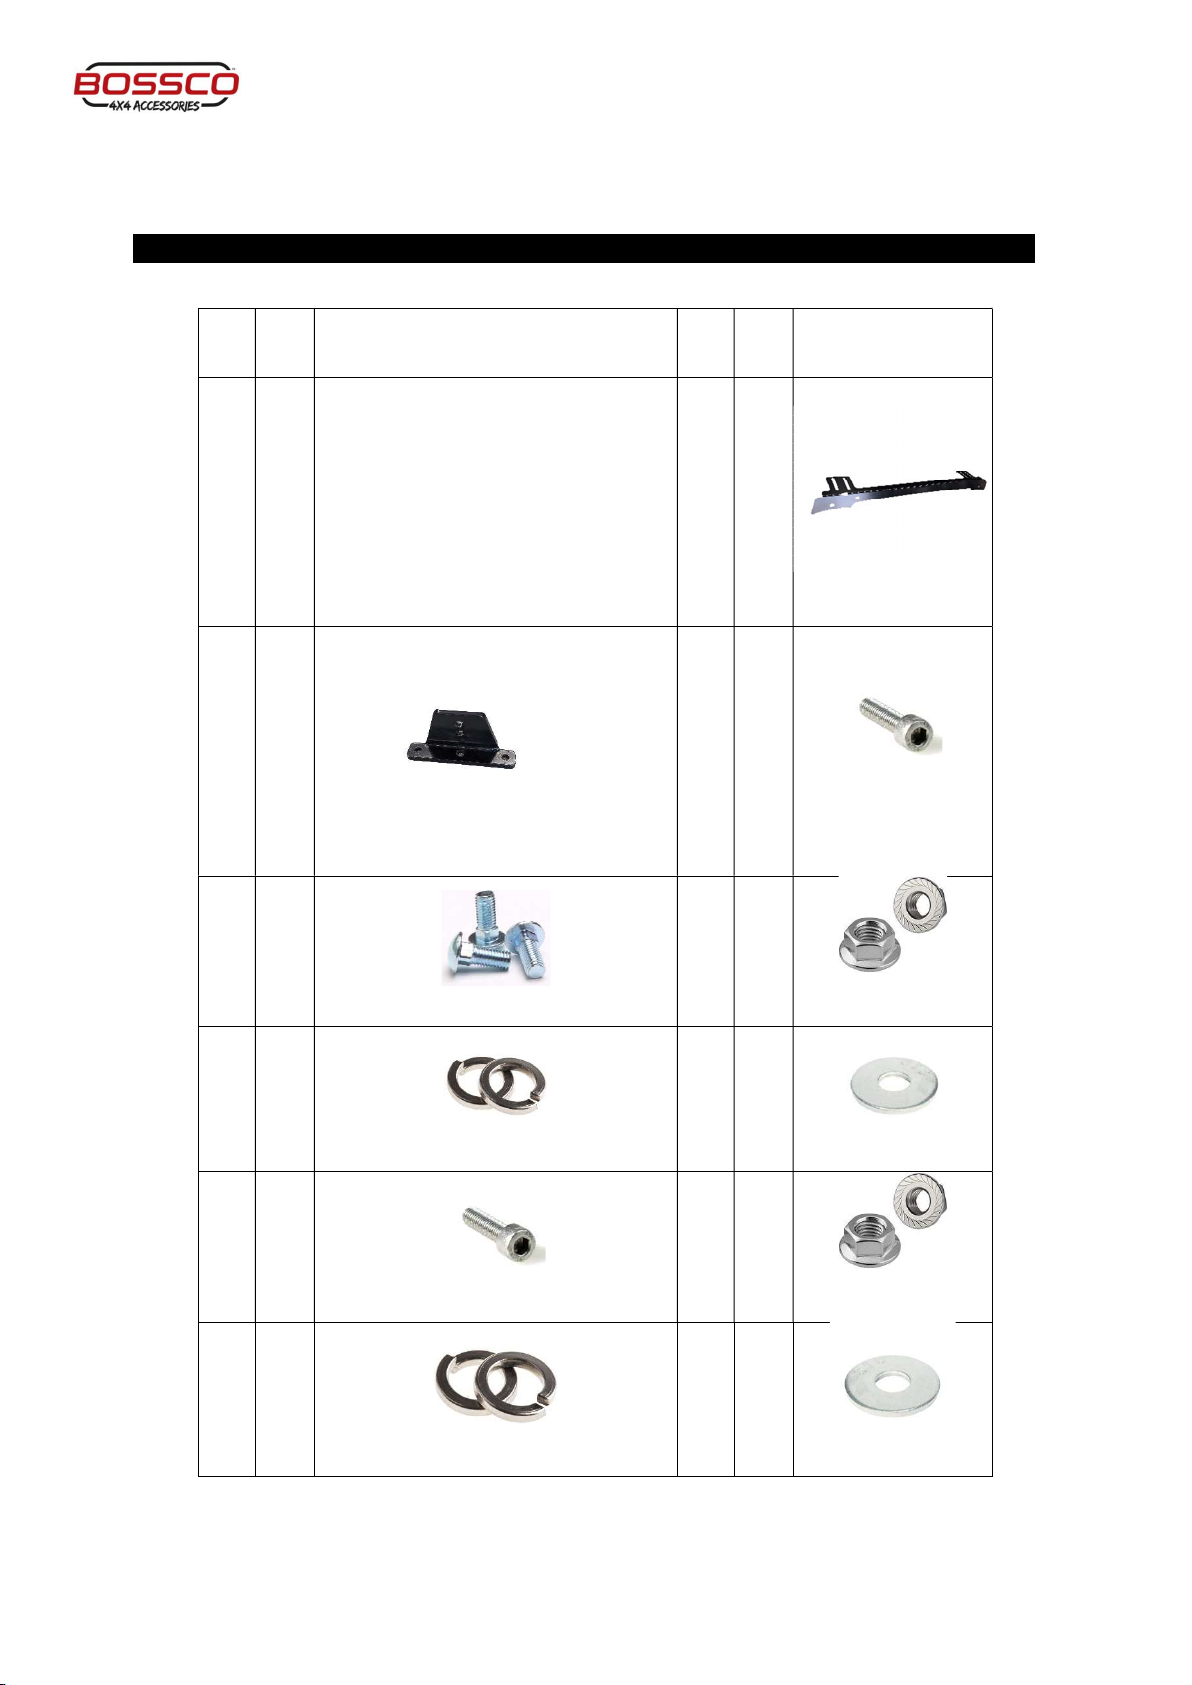
Parts List
NO.
QTY
IMAGE NO.
QTY
IMAGE
1 1 Roof Tray/Basket 2 2
Backbone bracket
3 4
Triangle
base brackets
4 4
M8 X 30MM Hex
Bolt
5 16
M8 Carriage Bolt
6 20
M8 Serrated Flange
Nut
7 4
M8 Spring Washers
8 4
M8x20 Washer
9 8
M6 x 30MM Hex Bolt
10 8
M6 Serrated Flange
Nut
11 8
M6 Spring Washer
12 8
M6x18 Washer

13 4
Adhesive Foam
14 1 Instruction manual
Backbone
& Aluminium Roof Platform
Instructions
1. Please see ‘special cars’ list below for any extra notes specific to your car.
2. Access behind roof lining by pulling down door trim rubber. You may have to uninstall grab
handles and/or sun visors to give sufficient access into roof lining. You only need about 1
hand’s depth up to where the black rubber roof moulding would be.
3. Check under the roof (where drilling will take place) for obstructions such as grab handle
mounts, airbags or centre light wires.
4. Assemble (2) backbone bracket with (3) triangle base brackets loosely attached using the
(4,6,7,8) M8*30 Allen Head bolt and nuts.
5. Using the assembled backbone bracket, find a suitable spot clear of obstructions for drilling.
Make sure to check for windscreen overhang and antenna position.
6. Mark holes and drill 2x M6 holes using the (3) triangle base bracket as a template.
7. Vacuum out drill shavings.
8. Apply some paint or anti-rust to exposed metal surface.
9. Squeeze Sikaflex 227 on and around drilled holes.
10. Disassemble backbone bracket and install lower triangle brackets. Pushing the (9,11,12)
M6*30 bolt through the layer of Sikaflex will help spread it around the hole and saturate the
thread of the bolt. This will prevent water leaks. The (10) M6 flange nuts go on the inside of
the car roof lining. No washers are used as the flange nut must bite into metal to secure
tightly.
11. Reassemble backbone bracket using (4,6,7,8) M8 Allen Head bolt and nuts.
12. Using (5,6) M8 carriage bolts and nuts, loosely screw on the backbone onto the triangle base
brackets (3).
13. Slide the provided m8 hex bolts (with 12mm head) into the channel on the roof basket.
14. Rest roof tray/basket on backbone and line up the previously installed M8 hex bolts (with
12mm head) with the holes in the backbone.
15. Using the provided serrated flange nuts, bolt on the roof platform to the backbone.
16. Tighten the rest of the
17. Install using (5,6) M8 carriage bolts and nuts.
18. Complete
Special cars:
Car
Special instructions
Mitsubishi Triton MQ, MR
2015+
-
Use factory mounting holes hidden under black rubber roof
moulding
- 1x M8 bolt per triangle base bracket (separately packaged)
- Drilling an M8 sized hole in the rubber trim allows for cleaner
install (the way we recommend). Make sure to cut out thin
aluminium piece running inside trim to allow for a clean hole
to be drilled
- Use the 2 closer holes on the backbone bracket as they are

made to size
Holden Colorado RG 12+
-
Some
C
olorado
’
s have factory mounting holes. They are
hidden under roof trim and may have some body paint
covering it.
- 1x M8 bolt per triangle base bracket (separately packaged)
- There are 4 holes per side of the car. Our brackets use the 2
inner holes.
- If there are no holes, new holes will have to be drilled
Isuzu D
-
Max 12+
-
Some D
-
Max’s have
factory mounting holes. They are hidden
under roof trim and may have some body paint covering it.
- 1x M8 bolt per triangle base bracket (separately packaged)
- There are 4 holes per side of the car. Our brackets use the 2
inner holes.
- If there are no holes, new holes will have to be drilled
V
olkswagen
Amarok
-
Uses factory mounting holes inside ‘pop off’ section
- 1x M6 bolt & 1x 3-nut-plate per triangle base bracket
(separately packaged)
- 3-nut-plate is used a spacer to fill void in the roof so that the
base bracket can sit flush. Base bracket is not able to sit
inside the void by itself. The bolt does not thread into the 3-
nut-plate.
Toyota Hilux 2015+
-
This car has a very narrow roof moulding. If you were to
remove the roof moulding and try to fit the triangle base
bracket in the gap, it would not fit.
- The solution is to make a hole in the roof moulding and sit
the triangle base bracket on top of the roof moulding so that
it is raised up and flush with the roof. This also looks a lot
neater and cleaner.
- A bit of clear 3M tape is recommended so that the edge of
the triangle base bracket is not scratching the paint
This manual suits for next models
2
Other BOSSCO Automobile Accessories manuals


Popular Automobile Accessories manuals by other brands


ULTIMATE SPEED
ULTIMATE SPEED 279746 Assembly and Safety Advice

SSV Works
SSV Works DF-F65 manual

ULTIMATE SPEED
ULTIMATE SPEED CARBON Assembly and Safety Advice

Witter
Witter F174 Fitting instructions

WeatherTech
WeatherTech No-Drill installation instructions

TAUBENREUTHER
TAUBENREUTHER 1-336050 Installation instruction