BOSSCO TPST501 User manual
1
Instruction Manual
TPST501 (569568) - BOSSTM Universal Programmable Room Thermostat (Wired)
(7 day, 5/2 day and 24 hour programme options)
Thank you for purchasing this product. If installing for someone else, please ensure that the
instructions are handed to the householder.
Please read this manual prior to installation or use.
Always isolate the AC MAINS supply before removing the unit from the back plate.
Do not mix old and new batteries. Do not use rechargeable batteries.
Please leave these instructions with the end user where they should be kept in a safe place for future
reference
Installation
The ideal position to locate the TPST501 Programmable Room Thermostat is about 1.5m above
floor level, in a location where the thermostat is accessible, reasonably lit and free from extremes of
temperature and draughts. Do not mount the thermostat on an outside wall, above a radiator or in a
location where it may be subjected to direct sunlight.
The electrical connections to the TPST501 are made to the standard backplate supplied.
This simplifies installation, as no connections are made to the controller itself. Connection details are
shown below – no Earth connection is required for the correct and safe operation of the TPST501,
but a parking terminal is provided to connect an Earth wire if one is present.
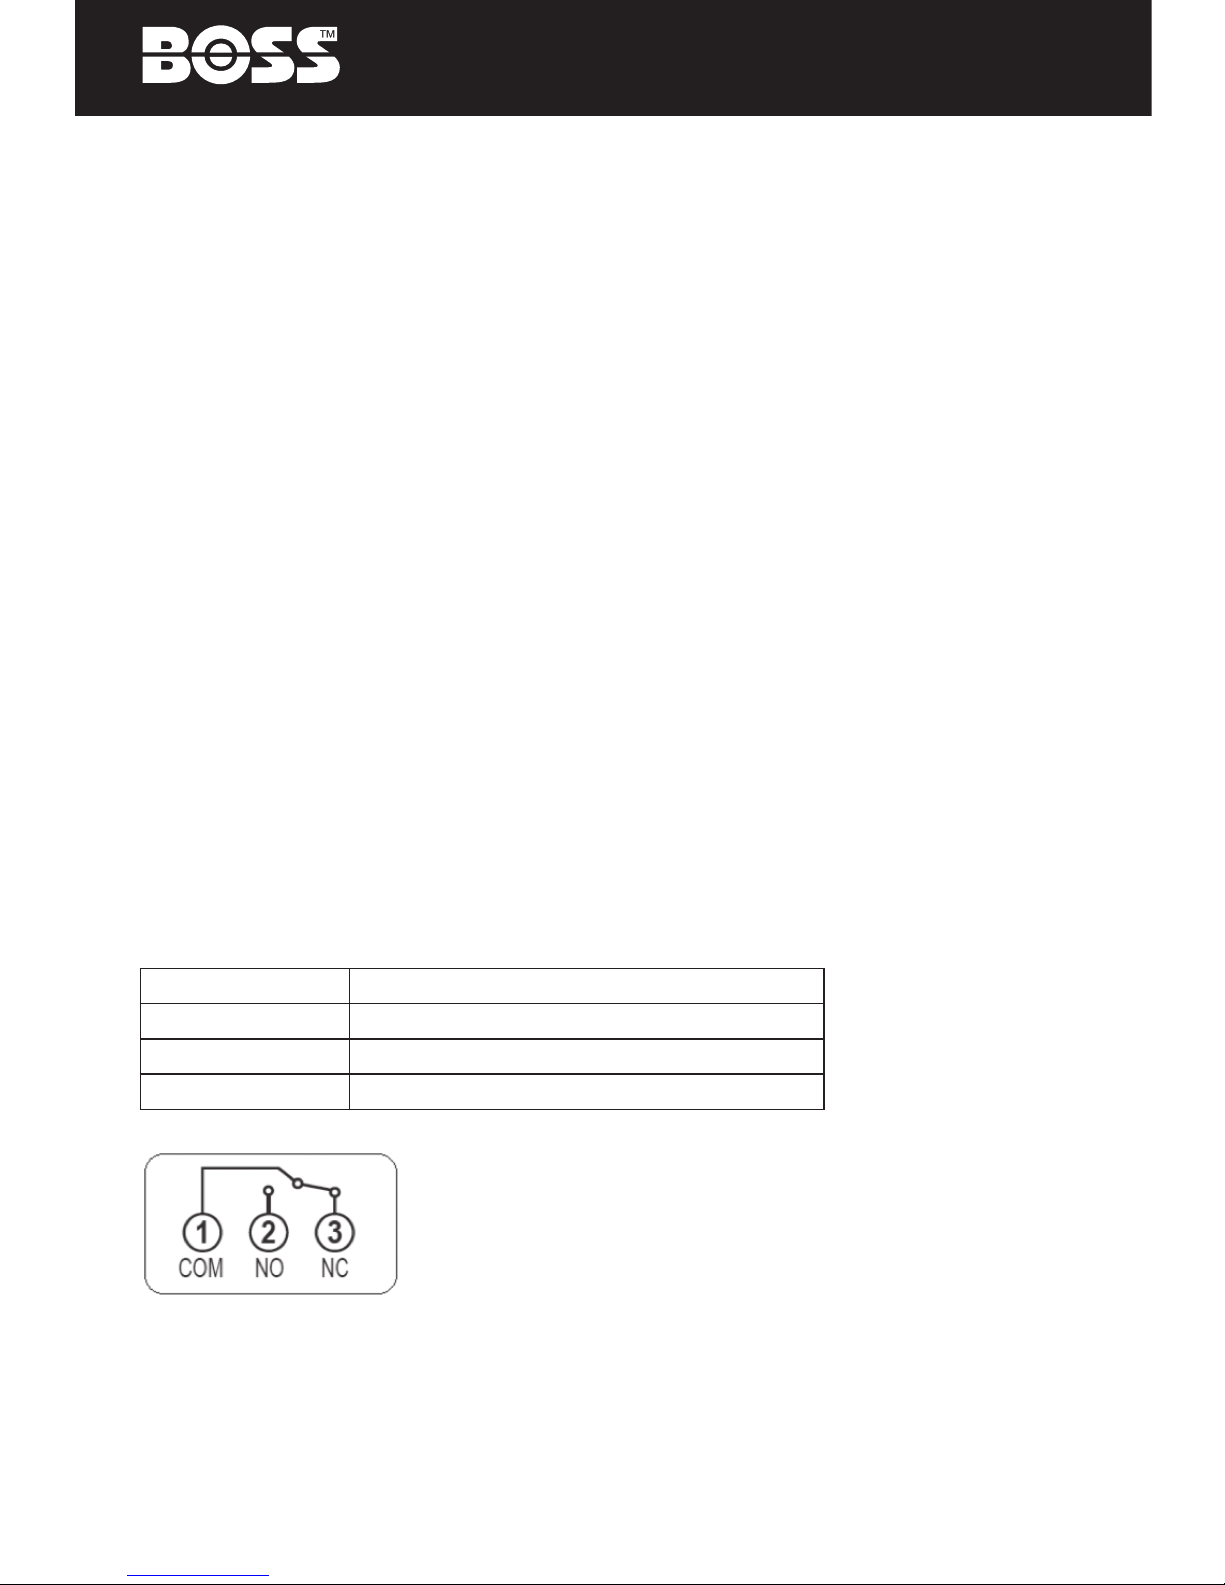
Backplate Connections
Terminal Name Function
1:COM Switch common terminal
2:NO Normally open (Volt-Free Contact)
3:NC Normally closed (Volt-Free Contact)
After installing the backplate in a suitable location, wiring connections can be made as shown above.
The following criteria apply to the installation:
• The loading power supply should be 230V AC and fused at 5 amps
• Optimum cable size for installation is 1.5mm2, wiring colours should be in accordance with the
current requirements of the IEE Wiring Regulations
• Cable entry should be from the rear of the backplate
• All wiring connections should be securely made, and be firmly gripped between the square
brass washers on each terminal

2
The TPST501 requires two “AA” alkaline batteries to function correctly. Ensure that the batteries
are inserted correctly, paying careful attention to the polarity markings and next to the battery
holders.
Do not restore the mains supply to the system until all associated items are fully installed.
NOTE: All electrical installation work should be carried out by a suitably qualified Electrician or
other competent person. If you are not sure how to install this thermostat consult either with a
qualified electrician, heating engineer or your boiler / heating system supplier for advice on how
to continue.
Do not remove or refit the TPST501 onto the backplate without the mains supply to the system
being isolated.
Jumper Settings
Changes to the jumper settings should only be made by the Engineer carrying out the installation
or other qualified person
Jumpers Description
Span 3x1 pins jumper for +/-0.5°C or 1.0°C (factory default setting) selection
It is used to define the system to run at +/-0.5°C or 1.0°C difference to the set temperature
User Instructions
User Control Function Summary
Key Function
Increase temperature setting
Decrease temperature setting
Changes unit to comfort mode
Changes unit to economy mode
DSet the day of the week
HSet the hour of day
MSet the minute
Set Key for Program settings
Select Key for Program settings
ON/OFF Short Press: Power off mode
Long press for 3 seconds: user setting selection for Offset
Reset To reset the thermostat
3
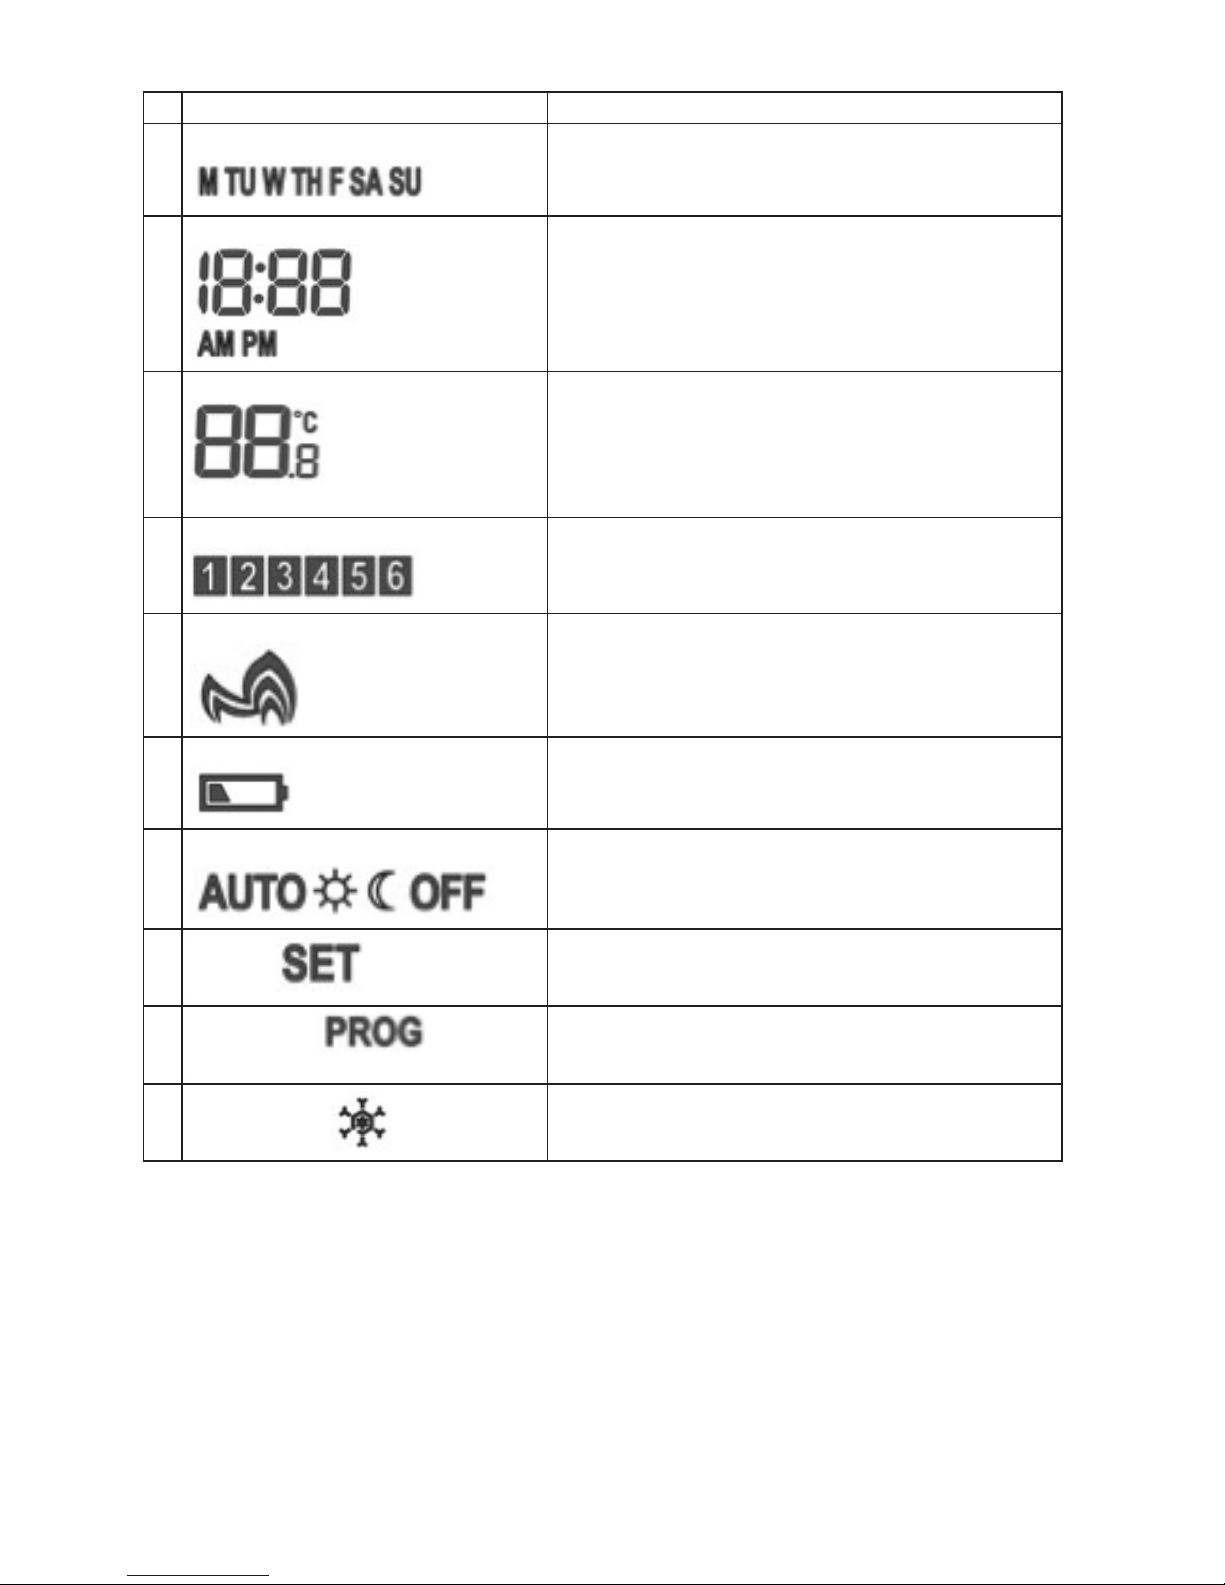
Function of indicator
Indicator Function
1
Day of week indicator
1. show the current day in normal mode
2. show the program day in program mode
2
Real time clock
1. show the current time
2. show the set time during program mode
3
Temperature
1. show the room temperature in the resolution
of 0.5°C
2. show the set temperature during program mode
in the resolution of 0.5°C.
4
Program No. indicator
Show the current program number
5
Heat indicator
Indicates the channel is turned on for heating
6
Low-batt indicator
Indicates battery replacement is required.
7
Auto/Comf/Econ/Off mode indicator
Indicates current mode: Auto/Comfort/Economy/Off
8Set icon Indicates unit in setting mode.
9Program icon Indicates unit in programming mode.
Both SET and PROG are sown at the same time as
SET PROG
10 Snowflake icon Indicates when unit is in OFF mode
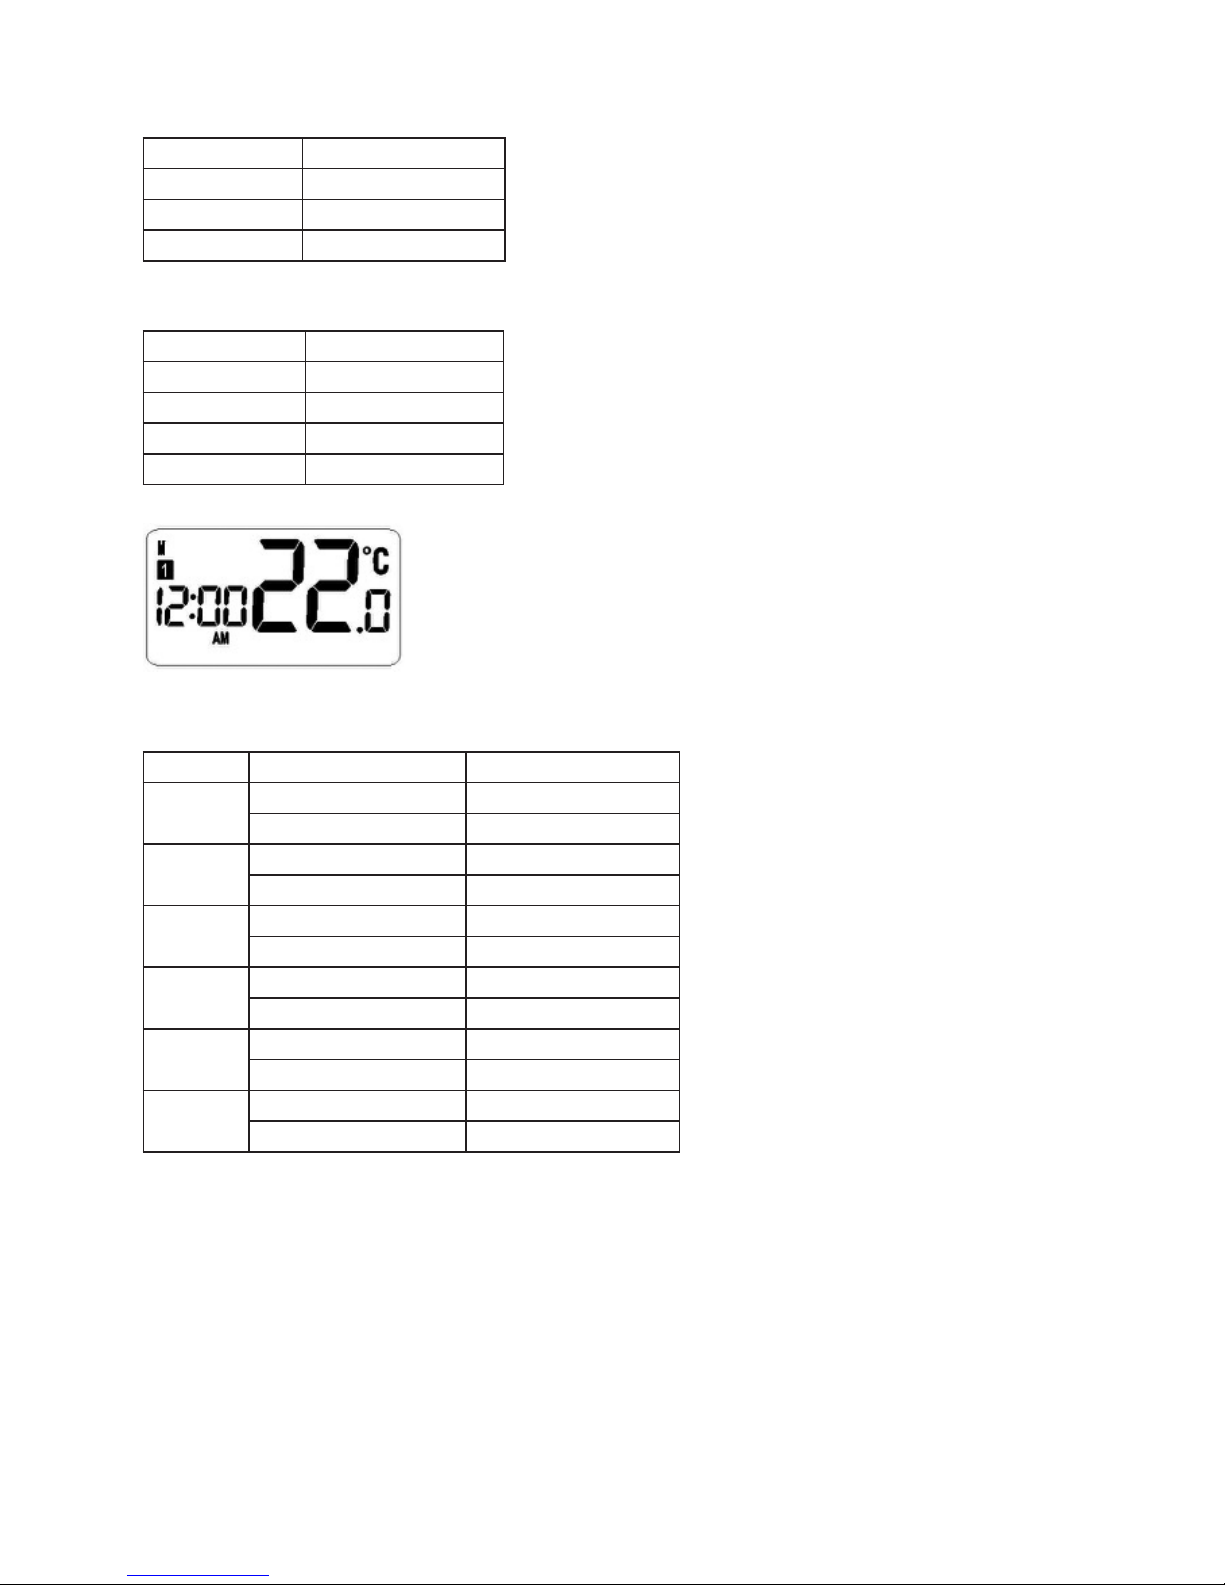
Initial Power Up:
• After power up or Reset is pressed, the thermostat is reset.
• During system reset, all LCD segments are turned on for 2 seconds or until any key is pressed.
After 2 seconds and all keys are released, the thermostat is initialized. The typical reset display is
shown below.
4
Following table is the setting of the thermostat after reset.
Default Operation Mode Setpoint
Mode Default settings
Comf mode 21°C
Econ mode 16°C
Off mode 5°C
Default Clock and Operation Mode
Item Default values
Clock 12:00AM
Day of week Monday
Mode AUTO
Program 5/2 days
Default Program Setpoint Temperatures
Program Weekday (Mon to Fri) Weekend (Sat to Sun)
1 Time: 06:30 Time: 08:00
Temp: 21°C Temp: 21°C
2 Time: 08:00 Time: 10:00
Temp: 18°C Temp: 21°C
3 Time: 12:00 Time: 12:00
Temp: 21°C Temp: 21°C
4 Time: 14:00 Time: 14:00
Temp: 18°C Temp: 21°C
5 Time: 18:00 Time: 18:00
Temp: 21°C Temp: 21°C
6 Time: 22:30 Time: 23:00
Temp: 16°C Temp: 16°C
Day/Time Setting
• To set the day, press D repeatedly to step through. Press and hold the key 2 seconds, the Day of
the Week will change continuously.
• To set the hour, press H repeatedly to step through. Press and hold the key, the numbers will
change continuously.
• To set the minute, press M repeatedly to step through. Press and hold the key 2 seconds, the
numbers will change continuously.

5
View/Change temperature setting mode
• In the home screen in Auto/Comfort/Economy/Off mode, press or o enter View/Change
temperature settings.
• The LCD will show the current temperature setting with flashing numbers and the SET icon is
displayed.
• Press or again to increase or decrease the set temperature in 0.5°C steps.
• Press and Hold or for 2 seconds to enter fast advance in 1.0°C steps.
• In Auto/Comfort/Economy mode, the temperature can be set from 5°C to 30°C. In OFF mode, the
temperature is set at 5°C and cannot be changed.
• During changing the set temperature, only , and Set have functionality.
• If the Set key is pressed or no further keys have been pressed after 5 seconds, the setting is saved
and it will return to the home screen automatically.
Change Operation Mode
The thermostat can operate in four different modes: AUTO, COMF, ECON or OFF. The default mode
is AUTO.
1) COMF mode
• Press anytime in other modes to enter COMF mode. The screen displays and the
setting flashes for 5 seconds. When the temperature flashes, the setting can be changed (default
21°C) by using ᴧ or ᴧ in increments of 0.5°C. Press and hold the buttons, the setting will change
continuously in increments of 1.0°C.
• Wait 5 seconds to confirm the temperature. Next time the thermostat is in COMF Mode, this
setting will be remembered.
• Anytime during the COMF mode press , it will go back to the AUTO (automatic) mode.
Symbol on the LCD will be off, icon will be displayed.
2) ECON mode
• Press anytime to change into ECON mode. will be displayed on the LCD. Change the setting
(default 16°C) the same as in COMF mode. Anytime during the ECON mode, press to return to
AUTO (automatic) mode
3) AUTO mode
• Automatic mode sets the thermostat to follow the temperature program. is displayed on
LCD. Change the setting the same as in COMF mode.
4) OFF mode
• Off mode sets the thermostat to maintain a minimum temperature of 5°C (default) that acts as a
frost protection measure. This value cannot be changed.
• In AUTO / COMF / ECON mode, pressing ON/OFF will change to OFF mode.
• In OFF mode, press ON/OFF again to revert to the previous mode.
• In OFF mode, press to change into COMF mode. Press again to change to Auto mode.
• In OFF mode, press to change into ECON mode. Press again to change to Auto mode.
Temporary Override Mode
• During AUTO mode, the programmed temperature can be adjusted manually by pressing the
or buttons. The setting will flash for 5 seconds, then return to the home screen.
• This temperature override is cancelled at the next programmed temperature change.
• During Temporary Override mode, the program number is not displayed.
• Temporary Override mode remains active until the clock or program settings are adjusted, COMF/
ECON/OFF mode is activated, or the next program time is reached.

6
Program Setting Mode
You can change the program setting as follows:
1. Press Set to enter programming mode. Days will flash on the LCD for 10 seconds. Press or
repeatedly to step through the days, in consequent of 7 day, 5/2 day and 24 hour programme
options:
--- [M], [TU], [W], [TH], [F], [SA], [SU] -- [M, TU, W, TH, F], [SA, SU] -- [M, TU, W, TH, F, SA, SU] …
2. Press Select at any time to confirm the selection.
• Press Set to return to the home screen.
3. Program 1 will display with the Hours flashing. Press or to change.
• Press Select to set the hour.
• Press Set to return to the home screen and store the setting.
4. Program 1 will be displayed with the Minutes flashing, press or to change
• Press Select to set the minute
• Press Set to return to the home screen and store the setting.
5. Program 1 will display with the temperature flashing, press or to change
• Press Select to set the temperature.
• Press Set to return to the home screen and store the setting.
6. Program 1 and its temperature is set, Program 2 and the Hour will flash for 10 seconds to allow
you to set, repeat steps 3 to 5 (above).
7. After Program 6 is set, the next Day will flash as in step 1.
8. Repeat step 1 to 6 to set the rest days.
Note:
• During steps 1-8 (above), only or , Select and Set have functionality.
• During steps 1-8 (above), if there is no key press within 10 seconds, the unit will store the
current setting and return to AUTO mode.
Chronological sequence of programming
• If you set the start time of a programme to be later than a subsequent set programme, the
subsequent programme start time will be changed to the same.
• Similarly, if you set the time earlier than the previous program, the previous program start time
will be changed. The temperature setting will also be changed. See examples below:
Here is an example:
Original
Program
1 Time: 06:30am Temp: 21°C
2 Time: 08:00am Temp: 18°C
3 Time: 10:00am Temp: 23°C
4 Time: 12:00pm Temp: 21°C
5 Time: 6:00pm Temp: 21°C
6 Time: 10:30pm Temp: 16°C
Now if you change program 2 start time from 8.00am to 1.00pm, the new program setting is as
below and uses the temperature setting of the last period as the current setting i.e. use 21˚C in
our example.

7
New
Program
1 Time: 06:30am Temp: 21°C
2 Time: 1:00pm Temp: 18°C
3 Time: 1:00pm Temp: 23°C
4 Time: 1:00pm Temp: 21°C
5 Time: 6:00pm Temp: 21°C
6 Time: 10:30pm Temp: 16°C
Similarly, if you set the time earlier than a previous program time, similar changes are applied. For
example:
Original
Program
1 Time: 06:30am Setpoint Temp: 21°C
2 Time: 08:00am Setpoint Temp: 18°C
3 Time: 10:00am Setpoint Temp: 23°C
4 Time: 12:00pm Setpoint Temp: 21°C
5 Time: 6:00pm Setpoint Temp: 19°C
6 Time: 10:30pm Setpoint Temp: 16°C
If you change program 5 start time from 6pm to 7am. The new program setting is as below using
the temperature setting of the last conflicting programme i.e. uses 19°C in our example.
New
Program
1 Time: 06:30am Setpoint Temp: 21°C
2 Time: 7:00am Setpoint Temp: 18°C
3 Time: 7:00am Setpoint Temp: 23°C
4 Time: 7:00am Setpoint Temp: 21°C
5 Time: 7:00am Setpoint Temp: 19°C
6 Time: 10:30pm Setpoint Temp: 16°C
Installer Setting Mode:
There is one setting for installer:
• Offset from -3.0°C to +3.0°C.
1. Press and hold ON/OFF over 2 seconds, the unit is in Offset selection. LCD will display OFS and
stored offset temperature.
2. Press or to change offset by 0.5°C steps.
3. Press Select to save the value and return to the home screen.
Note: During any time if there is no subsequent key press within 10 seconds or Set is pressed, the
unit will store the setting and return to the home screen.
Temperature measurement
• Temperature Sampling Rate: Every 15 seconds while backlight is off
• Temperatures exceeding the measurement range (0.0°C - 35°C) will be indicated by
“HI” and “LO”.

8
Control Status Indication:
Heating indicator is displayed when the heat channel is switched ON.
Low Battery
• When battery voltage below 2.4V, the low battery indicator will be displayed
on LCD.
• When low battery occurs, the backlight will not illuminate.
Battery Cut-off Handling
• When the batteries reach cut-off voltage 2.1V, the LCD will turn off.
• After battery cut-off occurs, the thermostat will enter a cut-off state until new batteries have
been fitted.
BOSS™ is a registered trademark of the Travis Perkins Group
Registered Office: Travis Perkins plc, Lodge Way House, Lodge Way, Harlestone Road,
Northampton. NN5 7UG
Table of contents
Other BOSSCO Thermostat manuals


