Botanicare HGC707001 User manual

SYSTEM
GUTTERTRAY
ASSEMBLYINSTRUCTIONS
USE INTANDEMWITH SLIDEBENCH ASSEMBLY INSTRUCTIONS. THESEINSTRUCTIONS CANBE FOUND AT
www.botanicare.com/products/gutter-trays/
REFERENCEPNS:
HGC707001, HGC707002,HGC707003, HGC707004,HGC707005, HGC707006,
HGC707007,HGC707008, HGC707009,HGC707010,MC2571,MC2572, MC2573
4ft
5ft
REVISION1 LB22254

Important Safety Precautions
Before You Get Started
Tools Needed:
Please take the time to read all the assembly instructions before attempting to assemble your
Botanicare® Gutter Tray system. Remove the Botanicare® Original Grow Trays before proceeding with installation.
The following tools and supplies are required to complete the assembly of the Gutter Tray system to an already
assembled bench:
Read and follow all warnings and instructions before using the bench. Failure to heed direction could lead to serious
personal injury, damage to the bench, or property damage. All safety precautions that apply for bench assembly also
apply to this product.
TECHNICALSUPPORT 1-888-808-4826
PAGE| 2
Isopropyl (Rubbing) Alcohol Clean Cloth Rags Caulk Gun
1 3/8* Step Drill Bit Masking Tape

Parts List:
5f Gutter Tray Support, Outer
(Color: Green)
MC2571
5f Gutter Tray Support, Inner
(Color: Blue)
MC2572
4f Gutter Tray Support
(Color: Blue)
MC2573
Gutter Tray, Drain
HGC707001
Gutter Tray, Mid
HGC707002
Gutter Tray, 5' L End
HGC707003
Gutter Tray, 4' L End
HGC707004
Gutter Tray, 3' L End
HGC707005
Gutter Tray, 2' L End
HGC707006
Gutter Manifold - 3 Drain
(Hose and Grommets included)
HGC707007
Gutter Manifold - 4 Drain
(Hose and Grommets included)
HGC707008
Irrigation Line Lock
(Sold in packs of 25)
HGC707009
Header Lock
(Sold in packs of 10)
HGC707010
TECHNICALSUPPORT 1-888-808-4826
PAGE| 3
A A
B B
C C
D D
E E
F F
G G
H H
8
8
7
7
6
6
5
5
4
4
3
3
2
2
1
1
A A
B B
C C
D D
E E
F F
G G
H H
8
8
7
7
6
6
5
5
4
4
3
3
2
2
1
1
A A
B B
C C
D D
E E
F F
G G
H H
8
8
7
7
6
6
5
5
4
4
3
3
2
2
1
1
A A
B B
C C
D D
E E
F F
G G
H H
8
8
7
7
6
6
5
5
4
4
3
3
2
2
1
1
A A
B B
C C
D D
E E
F F
G G
H H
8
8
7
7
6
6
5
5
4
4
3
3
2
2
1
1
A A
B B
C C
D D
E E
F F
G G
H H
8
8
7
7
6
6
5
5
4
4
3
3
2
2
1
1
A A
B B
C C
D D
E E
F F
G G
H H
8
8
7
7
6
6
5
5
4
4
3
3
2
2
1
1
A A
B B
C C
D D
E E
F F
G G
H H
8
8
7
7
6
6
5
5
4
4
3
3
2
2
1
1
A A
B B
C C
D D
E E
F F
G G
H H
8
8
7
7
6
6
5
5
4
4
3
3
2
2
1
1
A A
B B
C C
D D
E E
F F
G G
H H
8
8
7
7
6
6
5
5
4
4
3
3
2
2
1
1
A A
B B
C C
D D
E E
F F
G G
H H
8
8
7
7
6
6
5
5
4
4
3
3
2
2
1
1
A A
B B
C C
D D
E E
F F
G G
H H
8
8
7
7
6
6
5
5
4
4
3
3
2
2
1
1
A A
B B
C C
D D
E E
F F
G G
H H
8
8
7
7
6
6
5
5
4
4
3
3
2
2
1
1

4ft Gutter Tray Support
Inner (Blue)
Table Tubes
Step A: Install Gutter Tray Supports
Step B: Dry Fit Gutter Trays
Gutter Tray Supports are used to lock the Gutter Trays in place and provide additional support. Insert the Supports on the
Table Tubes with the arrows on the Gutter Tray Supports pointing towards the outside of the bench.
Dry fit all trays on the table to make sure all tray seams fall into the recess in the table extrusions and nest in the Gutter Tray
Supports as shown below. For reference, the Botanicare raindrop on each tray should be facing the same direction.
TECHNICALSUPPORT 1-888-808-4826
PAGE| 4
TIP:
2ft and 3ft
Ends do not
receive Gutter
Tray Supports.
4FT SYSTEM
4FT SYSTEM
5FT SYSTEM
5FT SYSTEM
Table Tubes
Table Tubes
5ft Gutter Tray Support
Inner (Blue)
5ft Gutter Tray Support
Outter (Green)
Table Tubes
4ft Gutter
Tray Support
Inner (Blue)
5ft Gutter
Tray Support
Inner (Blue)
5ft Gutter
Tray Support
Outer (Green)

Parts List:
Parts List:
TECHNICALSUPPORT 1-888-808-4826
PAGE| 5
Step C: Attach Botanicare Bulkhead Fittings
Step D: Assemble Hose to the Drain Manifold
Drill out the holes in the Drain tray to a diameter of 1-3/8" (35mm). Do not drill out to a size larger than 1-1/2" (38mm).
Clean the area of any plastic chips that may interfere with the seal of the bulkhead fitting. If using the Botanicare Gutter
Tray Drain Manifold, assemble the provided 3/4" Barbed Bulkhead to the drain hole of the Gutter Tray. Assemble the drain
screen to the top of the drain tray.
Attach the provided flexible hose to the hose barb of the Drain Manifold.
A A
B B
C C
D D
E E
F F
G G
H H
8
8
7
7
6
6
5
5
4
4
3
3
2
2
1
1
A A
B B
C C
D D
E E
F F
G G
H H
8
8
7
7
6
6
5
5
4
4
3
3
2
2
1
1
TIPS:
• Slightly twist the hose clockwise as you push it onto the barb.
• Be sure to allow enough slack in the hose for the travel of the benching!
• To remove the hose from the Drain Manifold, rotate the hose clockwise as you pull.
CAUTION:
Not using the provided flexible hose will reduce the lifespan of the Drain Manifold.
This hose was selected to allow for the flex required to reduce stress on the Drain
Manifold and prevent unwanted disassembly or breakage.
Spa Tube / Flexible PVC (DO NOT USE) Provided Flexible Hose (USE)
Flexible Vinyl Tube (DO NOT USE)

Parts List:
Parts List:
TECHNICALSUPPORT 1-888-808-4826
PAGE| 6
Step E: Attach the Drain Manifold to the Bench
Line up the holes of the Drain Manifold to the bulkheads and push them into place until you hear and feel a light “click” - the
Drain Manifold should hang level and securely. Note, another person may be required to apply downward pressure on the
Drain Trays while the Drain Manifold is being installed. Route the provided flexible hose to your drain.
TIP:
When the Drain Manifold is disassembled from the bulkheads, the grommets will
remain attached to the bulkhead fittings. When reinstalling, simply push the grom-
mets and bulkheads back into the holes of the Drain Manifold until it is flush with the
surface of the Drain Manifold.
A A
B B
C C
D D
E E
F F
G G
H H
8
8
7
7
6
6
5
5
4
4
3
3
2
2
1
1
A A
B B
C C
D D
E E
F F
G G
H H
8
8
7
7
6
6
5
5
4
4
3
3
2
2
1
1

Parts List:
Parts List:
TECHNICALSUPPORT 1-888-808-4826
PAGE| 7
Step F: Bond Gutter Trays with Botanicare ® BOND THREE Tray Sealant
Perform tray assembly according to the bench assembly instructions.
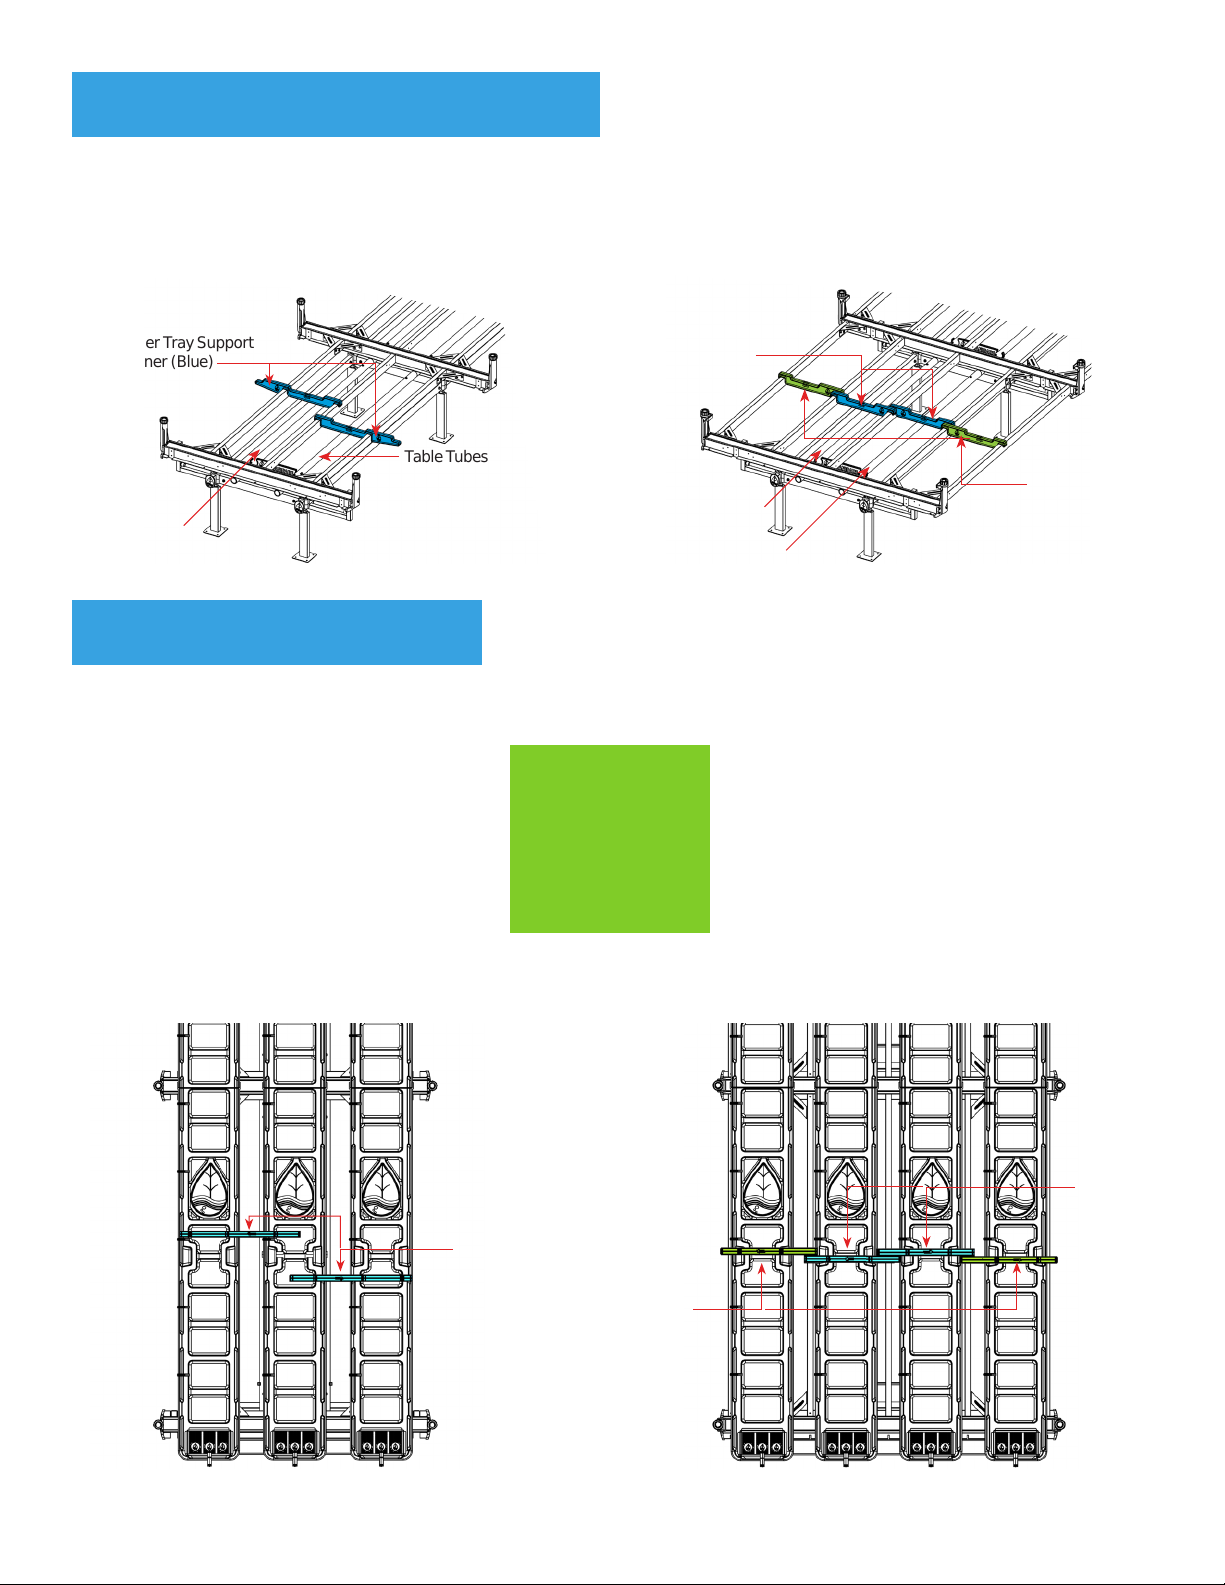
Starting at the Drain tray, bond the tray seams together and use the Gutter Tray Supports to help keep trays
aligned and the tray joints held tightly. The tray seam should nest inside the detent in the Table Extrusion.
TIP:
When bonding tray seams, make sure the Drain Manifold and Gutter Tray Supports
are installed properly to help keep trays aligned and the tray joints held tightly.
CAUTION:
Before using BOND THREE Lap Tray Sealant Adhesive, carefully read and follow
all warnings and directions for use, located on package and in instructions.
Clean all surfaces that will be bonded using Isopropyl Alcohol and clean cloths.
TIP:
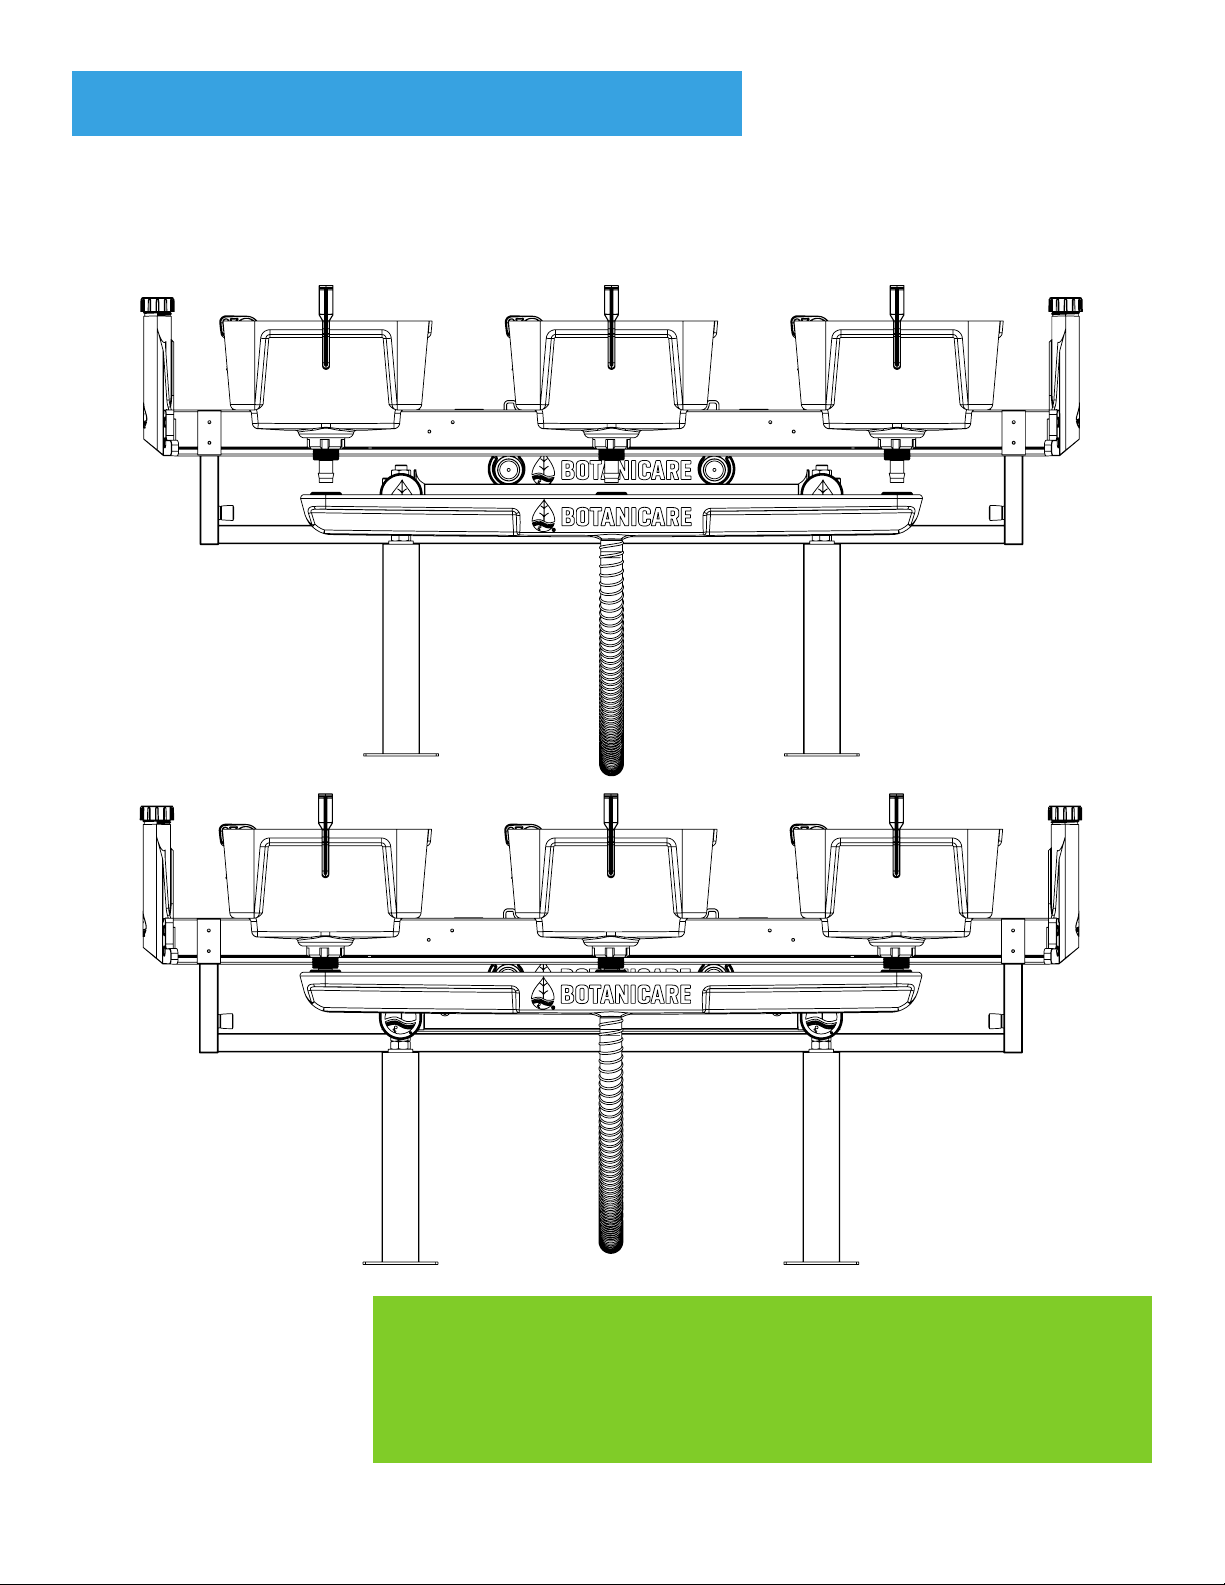
Do not apply too much pressure when bonding the trays together! BOND THREE is a sealant with adhesive properties
that requires surface-to-surface bonding to be eective. Don’t squeeze the trays too hard together forcing the sealant
out of the lapped joint or the BOND THREE will lose its eectiveness.
Installation manual can be found at:
https://www.botanicare.com/documentation/
TIP:
Another person may be required to spread the walls of the receiving tray to keep the BOND THREE seal clean and
uniform on the tray walls. Masking tape can be used to keep the tray walls engaged as the BOND THREE is curing.
A A
B B
C C
D D
E E
F F
G G
H H
8
8
7
7
6
6
5
5
4
4
3
3
2
2
1
1
3/8” x 3/8”
Sealant Bead
Nested in Table
Extrusion
A A
B B
C C
D D
E E
F F
G G
H H
8
8
7
7
6
6
5
5
4
4
3
3
2
2
1
1
Wipe smooth
Apply light pressure
CAUTION:
Complete all tray
adjustments within 15
minutes of applying
sealant. After 15
minutes, do not move
or handle trays for 24
hours.

Parts List:
TECHNICALSUPPORT 1-888-808-4826
PAGE| 8
Parts List:
Step G: Attach Irrigation Line Locks (Optional)
Push the Irrigation Line Lock over the edge of the tray until you hear and feel a “click”.
A A
B B
C C
D D
E E
F F
G G
H H
8
8
7
7
6
6
5
5
4
4
3
3
2
2
1
1
A A
B B
C C
D D
E E
F F
G G
H H
8
8
7
7
6
6
5
5
4
4
3
3
2
2
1
1
Insert irrigation lines into the proper hole size. Latch the Irrigation Line Lock closed. Continue this procedure
down the length of the bench with 12” or 24” spacing between Line Locks.

Parts List:
Parts List:
TECHNICALSUPPORT 1-888-808-4826
PAGE| 9
Parts List:
Step H: Attach Header Locks (Optional)
Push the Header Lock over the edge of each Drain Tray until you hear and feel a “click” (similar to the Irrigation Line Locks).
Insert headers (designed for nominal 3/4” and 1” SCH-40 PVC or similarly sized rigid pipe) into the correct size receptacle.
Smaller sized pipe or flexible tubing may not allow the Header Locks to function as intended.
A A
B B
C C
D D
E E
F F
G G
H H
8
8
7
7
6
6
5
5
4
4
3
3
2
2
1
1

TECHNICALSUPPORT:1-888-808-4826
HGC LB22254BotanicareGutterTraySystem Instructions230301aSD
LIMITED WARRANTY:When purchased froman authorized Hawthornedealer, thisproduct iscoveredbya LIMITEDWARRANTY,
availableat hawthornegc.com/warranties. You canalso obtaintheTerms ofSaleand LimitedWarranty
bycalling Hawthornetoll-freeat: 1-888-478-6544or writingHawthorne at:
HawthorneHydroponicsLLC,3204 NW 38th Circle,Vancouver,WA98660, Attn:Customer Service.

THIS PAGE
DOES NOT PRINT
FOR TITLE
BLOCK ONLY
Sheri Deane 136038
2023 - New Packaging - HGC - Botanicare Gutter Trays Instruction Manual
Instruction Book
2023 - New Packaging - HGC - Botanicare Gutter Trays Instruction Manual
01/20/23
8.5x11
OBF /
HGC_LBXXXXX_BotanicareGutterTraySystem_Instructions_for_edit_230120aSD.indd
000
000
000
000
6
THIS PAGE PRINTS AT 00% REDUCTION OF THE ORIGINAL LABEL TO FIT ON 11” x 17” PAGE
1
OBF Project #:
OBF Job #:
Wave: UPC #:
UPC SIZE: UPC BW:
SKU #:
Component #:
This manual suits for next models
12
Table of contents
Other Botanicare Lawn And Garden Equipment manuals
Popular Lawn And Garden Equipment manuals by other brands

The Greenhouse People
The Greenhouse People 4 Tier instructions

EUROM
EUROM Fly Away Metal 16 LED instruction manual

Gardena
Gardena WT 1030 operating instructions

Taurus
Taurus MOSQUITO HUNTER manual

Sunnydaze Decor
Sunnydaze Decor OUTDOOR FLOWER BOX manual

Land Pride
Land Pride Quick Hitch CA25 Series datasheet