8
HAK FUNCTIE
1. Plaats aandrijfas 1 (7) op de basisunit (1).
2. Plaats de kom (3) op de basisunit (1) en draai 30
graden met de klok mee totdat deze vastklikt.
3. Plaats aandrijfas 2 (13) op de aandrijfas 1 (7).
4. Plaats mes (9) op de aandrijfas 2 (13).
LET OP: voorzichtig vastpakken alleen aan de
kunststof delen, om letsel te voorkomen. De
messen zijn zeer scherp.
5. Snijd de ingredienten in stukken zodat deze goed
onderin de kom passen. Plaats de ingrediënten in
de kom (3).
6. Plaats de deksel (4) op de kom (3) en draai 30
graden met de klok mee totdat deze vastklikt.
Opmerkingen!
• Voor het kleinsnijden / hakken wordt
geadviseerd de Pulse (P) functie kort te
gebruiken ipv stand 1 of 2.
SNIJSCHIJF FUNCTIES
1. Plaats aandrijfas 1 (7) op de basisunit (1).
2. Plaats de kom (3) op de basisunit (1) en draai 30
graden met de klok mee totdat deze vastklikt.
3. Plaats mes (10,11 of 12, met de gewenste
snijfunctie aan de bovenkant) op de aandrijfas 1 (7).
LET OP: voorzichtig vastpakken alleen aan de
kunststof delen, om letsel te voorkomen. De
messen zijn zeer scherp.
4. Plaats de deksel (4) op de kom (3) en draai 30
graden kloksgewijs totdat deze vastklikt.
5. Schakel het apparaat aan (stand: pulse, 1 of 2)
6. Plaats de ingrediënten in de schacht. Gebruik
de voedselpers om de ingrediënten verder te
duwen. Druk niet te hard.
LET OP: gebruik hiervoor ALTIJD de voedselpers,
NOOIT uw vingers of andere voorwerpen.
Opmerkingen!
• Steek, om verwondingen of schade aan het
apparaat te voorkomen, nooit een hand of ander
voorwerp in de kom terwijl deze in gebruik is.
Gebruik altijd de voedselpers.
• Indien de ingrediënten te groot zijn om door de
schacht te drukken, snij ze dan eerst in kleinere
stukken.
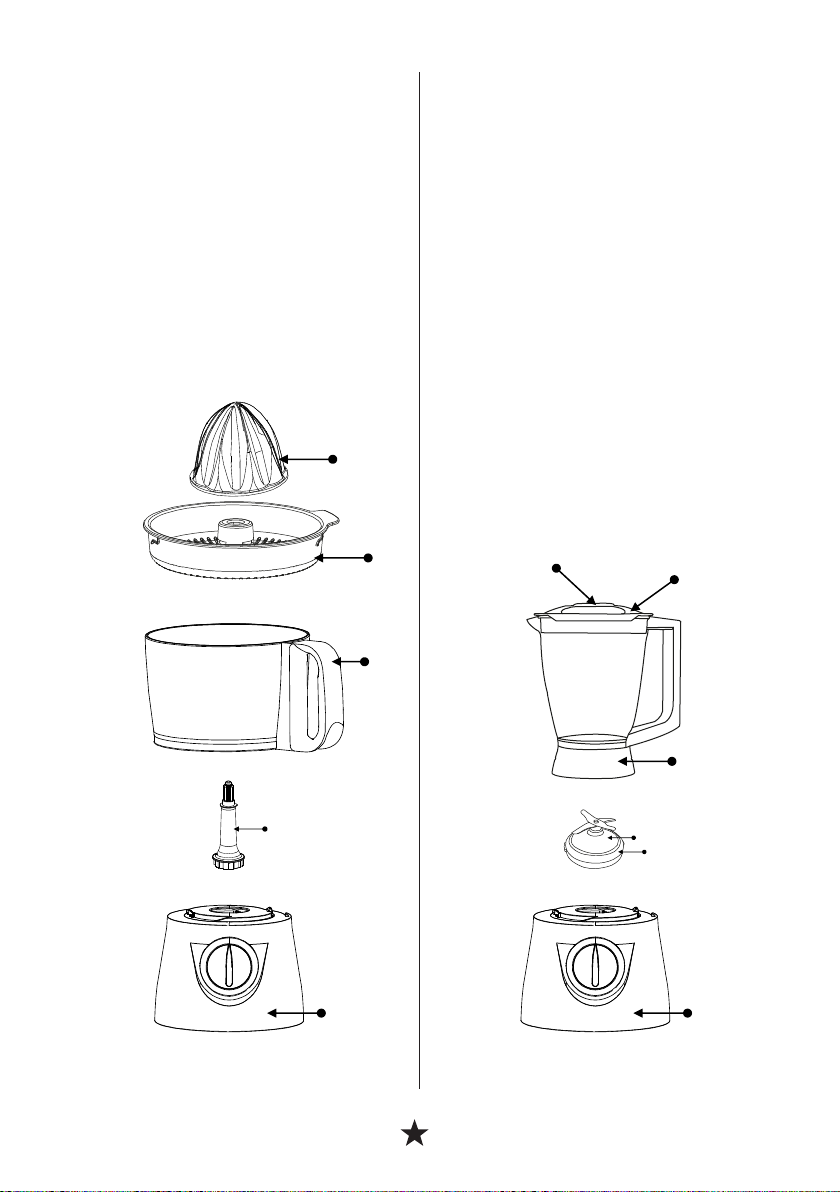
JUICER FUNCTIE
1. Plaats aandrijfas 1 (7) op de basisunit (1).
2. Plaats de kom (3) op de basisunit (1) en draai 30
graden met de klok mee totdat deze vastklikt.
3. Plaats citruspersunit (6) op de kom (3) en draai
30 graden met de klok mee totdat deze vastklikt.
4. Plaats citrusperskegel (5) op de citruspersunit (6)
5. Snijd de citrusvrucht doormidden.
6. Plaats het afgesneden vlak van één helft op de
perskegel.
7. Pers de citrusvrucht met één hand. Gebruik de
andere hand om de schakelaar kort op stand 1 te
zetten. Het sap vloeit automatisch in de kan.
8. Pers de citrusvrucht totdat er nauwelijks meer
sap uit de citrusvrucht komt.
9. Stop met het persen van de citrusvrucht in een
van de volgende situaties:
• Er komt geen sap meer uit de citrusvrucht;
• De kan is gevuld met de gewenste hoeveelheid
sap;
• De kan heeft de maximale capaciteit bereikt.
BLENDER FUNCTIE
1. Plaats blenderkan (2) op de basisunit (1) en draai
30 graden met de klok mee totdat deze vastklikt.
2. Snijd het fruit en/of de groenten in stukken die
goed onderin de karaf passen.
3. Vul de kan met de ingrediënten.
4. Plaats deksel (2a) en afdekdop (2b) op de kan (2).
5. Schakel de blender in op de gewenste stand. In
enkele seconden zullen de producten vermalen
zijn. Hoe langer u de blender ingeschakeld houdt,
des te fijner de producten worden vermalen.
6. Vul de karaf eventueel bij door alleen de vuldop
een kwartslag te draaien en van het deksel af
te nemen. Als de stukken te groot zijn voor de
vulopening, schakel het apparaat dan uit, neem
het deksel af en doe de stukken in de karaf.
Plaats het deksel terug op de karaf voordat u de
blender weer inschakelt.
7. Als u klaar bent met blenden zet het apparaat
dan uit door de schakelaar op stand “0” te zetten
en daarna de stekker uit het stopcontact te halen.
Opmerkingen!
• De blender mixt en pureert. Het ‘mes’ is bewust
bot om ingrediënten kapot te slaan. De blender
snijdt niet. Gebruik daarvoor een van de andere
functies van deze foodprocessor.
• Het mes (2c) + rubber (2d) van de blender is
verwijderbaar. Zie “onderhoud en reinigen voor
instructies.
ONDERHOUD EN REINIGEN
Voorkom dat u zich verwond aan de scherpe messen.
Zorg dat de stekker uit het stopcontact gehaald is.
Spoel de accessoires na gebruik onmiddellijk af om
het schoonmaken te vergemakkelijken.
Het mes van de blender is verwijderbaar voor
schoonmaken door de schroefring onderaan de karaf
los te draaien. Houdt de karaf ondersteboven en
draai dan met de klok mee voor losdraaien en tegen
de klok in voor vast draaien. Het rubber rondom de
houder van het mes is ook te verwijderen.
NL