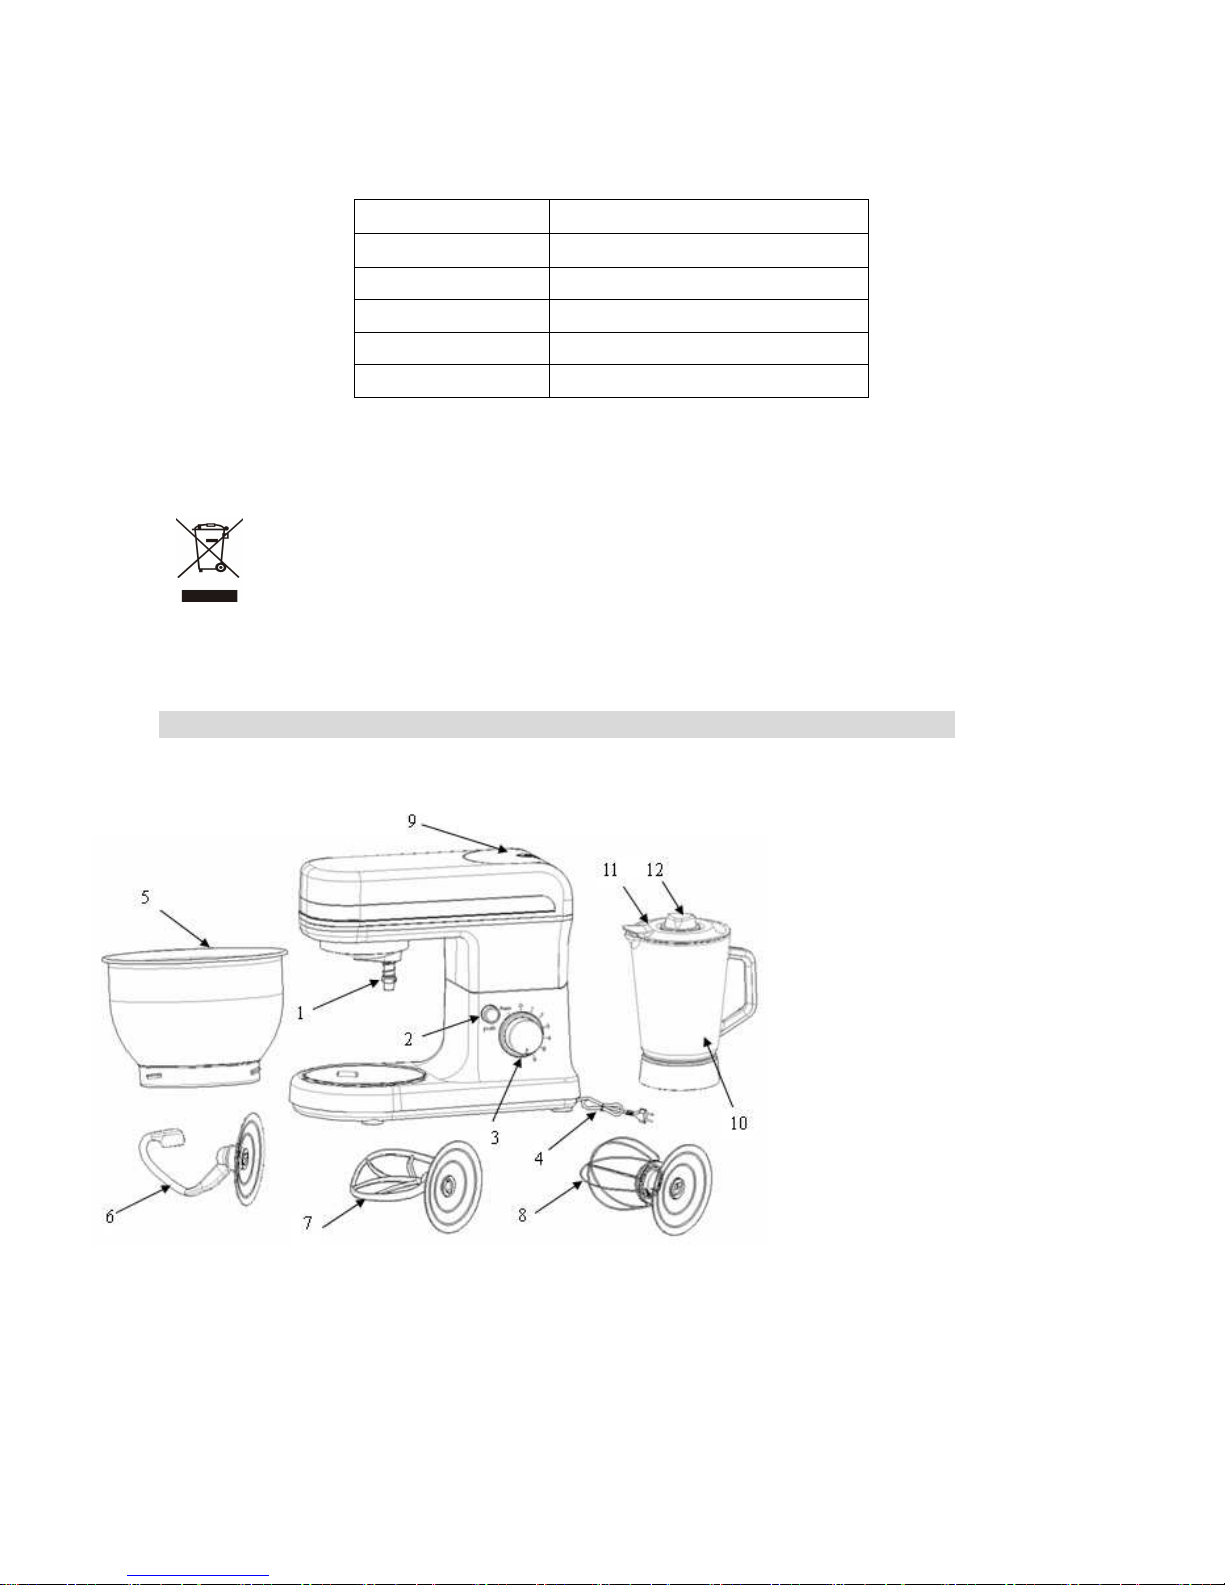
1/ A L’ATTENTION DE L’UTILISATEUR
A. Consign s d sécurité
Lors d branchement
• Avant d’ tiliser cet appareil po r la première fois, lire attentivement ce mode d’emploi et le garder po r
de postérie res cons ltations.
• Cet appareil est destiné niq ement à n sage domestiq e. To te a tre tilisation est considérée
inappropriée et dangere se.
• Cet appareil n’a pas été conç po r son sage par des personnes (enfants y compris) a x capacités
physiq es, sensorielles o mentales réd ites, o sans expérience o connaissance ; à moins de l’ tiliser
so s s rveillance o après avoir été dûment instr ites s r son mode d’emploi par ne personne
responsable de le r séc rité.
• Vérifier q e la tension d secte r correspond bien à celle indiq ée s r la plaq e signalétiq e de l’appareil.
• En cas d’incompatibilité entre la prise de co rant et la fiche de l’appareil o si le câble est endommagé,
il doit être remplacé par le fabricant, son Service Après Vente o des personnes de q alification similaire
afin d'éviter n danger.
• La séc rité électriq e de l’appareil est garantie se lement s’il est raccordé à ne installation de terre
efficace, to t comme le prévoient les normes de séc rité électriq e en vig e r. En cas de do te,
s’adresser à d personnel professionnellement q alifié.
• L’ tilisation d’adaptate rs et/o de rallonges est déconseillée. Si ces éléments s’avéraient indispensables,
tiliser se lement des adaptate rs et des rallonges q i respectent les normes de séc rité en vig e r.
Veiller à ne
pas dépasser la limite de p issance mentionnée s r l’adaptate r.
• Après avoir enlevé l’emballage, vérifier q e l’appareil est en parfait état, en cas de do te, s’adresser a
Service d’Assistance Techniq e le pl s proche.
• Les éléments de l’emballage (sacs en plastiq e, polystyrène, etc.) ne doivent pas être laissés à la portée
des enfants, car ils pe vent représenter n danger.
• Ne pas le laisser cet appareil exposé a x intempéries (pl ie, soleil, givre, etc.)
• Ne pas tiliser l’appareil et ne placer a c ne de ses parties s r des s rfaces cha des o près de celles-ci
(plaq es de c isson à gaz o électriq es o fo rs).
• Éloigner l’appareil de l’ea o de to t a tre liq ide, afin d’éviter to t risq e de décharge électriq e. Ne
pas brancher l’appareil si ce dernier se tro ve s r ne s rface h mide.
• Déposer l’appareil s r ne s rface sèche, lisse et stable.
Ne pas remplir le Blender d’ingrédients de pl s de 80°C
Ne pas remplir le Blender de pl s de 1.5L de liq ide po r éviter les risq es d’éclabo ss re.
Lors de l’ tilisation
• Ne pas to cher l’appareil avec les mains mo illées o h mides.
• Ne jamais laisser l’appareil sans s rveillance à la portée d’enfants o de personnes handicapées.
• Cet appareil n’a pas été conç po r son sage par des personnes (enfants y compris) a x capacités
physiq es, sensorielles o mentales réd ites, o sans expérience o connaissance ; à moins de l’ tiliser
so s s rveillance o après avoir été dûment instr ites s r son mode d’emploi par ne personne
responsable de le r séc rité.
• Ne pas abandonner l’appareil all mé, car il pe t représenter ne so rce de danger.
Po r débrancher la
fiche, ne jamais tirer s r le cordon.
• Vérifiez q e le mote r soit complètement arrêté avant de changer les accessoires.
Ne pas enlever le co vercle alors q e le Blender est en co rs de fonctionnement.
Lors de l’entretien et d nettoyage
• Afin d’éviter n danger, débrancher l’appareil avant de procéder à son nettoyage.
• Afin d’éviter n danger et de détériorer définitivement votre appareil, ne jamais laver le bloc mote r a
lave vaisselle, le plonger dans l’ea o le rincer so s le robinet.
• Ne pas tiliser de prod its abrasifs po r nettoyer l’appareil.