CPAC SteriDENT 300 User manual


1
Table of Contents
Safety Precautions ……………………..…….…………………………….. 2
Operating Instructions ……………………………….…………………………. 3
Sterilizer Setup ………………………………………………………….. 3
Instructions for Operation ………………………………………………. 3
Mechanical Timer ………………………………………………………….. 3
Cycle Start …………………………………….……………………………..…4
Maximum Loading ………………………………………………………….. 4
Material Integrity ……………………………………………………........ 5
Cautions ………………………………………………………….. 5
Instruments validated for use …………………………….…….. 5
Safety notes on Temperature …………………………………... 6
Thermometer & Thermostat …………………………………………….... 6
Pilot Lights ……………………………………………………………………... 6
Accessories ……………………………….…………………………… 6
Chemical Indicator Use ……………………………………………………. 6
Spore Test Strips ………………………………………………………….. 7
Cleaning and Maintenance ….…………………………………………… 7
Power Source and Ratings ……………………………………………….... 7
Simulated Use Testing ………………………………………………. 7
Environmental conditions …………….………………………………… 9
Electrical rating …………………………………………………………..9
Failure Symptoms and Troubleshooting …………………………………… 10
Troubleshooting Quick Reference Guide …………………………………… 12
Product Specifications ………………………………………………………….. 14
Spare Parts List ……………………………………………………………………... 15
Biological Testing protocols ………………………………………………………….. 16
Biological Indicator Testing Checklist ………………………………………………. 22
Statement of Warranty ………………………………………………………….. 23
SAVE THESE INSTRUCTIONS

2
To avoid electrical shock hazard, do not disassemble this appliance unless you are an
authorized service technician. Contact a CPAC authorized service technician when service or
repair work is required. Incorrect reassembly can cause an electric shock hazard.
Unauthorized repair or replacement of parts by non-certified personnel will void of all
warranty guarantees.
WARNING: NEVER ATTEMPT TO PERFORM ANY ELECTRICAL TROUBLESHOOTING
ADJUSTMENT(S) OR SERVICE(S) UNLESS YOU ARE A QUALIFIED ELECTRICIAN, ELECTRONICS
TECHNICIAN OR FACTORY TRAINED SERVICE TECHNICIAN.
The protection provided by the equipment may be impaired if the Sterilizer is used in a
manner not specified in this manual.
IMPORTANT SAFEGUARDS
When using the Steri-Dent Dry Heat Sterilizer, follow these basic safety precautions:
1. Read and understand all instructions.
2. Care must be taken to avoid burns from touching hot parts.
3. Do not operate this appliance with a damaged cord or if appliance has been dropped or
damaged until it has been examined by a qualified service technician.
4. Do not let power cord hang over edge of table or counter or touch hot surfaces.
5. An extension cord should not be used with this unit. The unit should be plugged directly
into a power outlet. Only use a properly grounded fuse/breaker protected outlet (110V, 60
cycles, or a 220/240V, 50 cycles). A separate circuit is recommended.
6. To protect against electrical shock hazard, do not immerse this appliance in water or other
liquids.
7. To avoid electrical shock hazard, do not disassemble this appliance. Call a qualified service
technician when service or repair work is required. Incorrect reassembly can cause electric
shock hazard.
8. Do not lift unit by the handle. Hold securely by the bottom when lifting or moving unit.
SAVE THESE INSTRUCTIONS

3
OPERATING INSTRUCTIONS
STERILIZER SET UP (First time only)
Before using the sterilizer for the FIRST time, the thermostat setting must be checked to
ensure the sterilizer will operate at the proper temperature. For 320°F (160°C), verify the
number “7” on the thermostat dial is lined up with the black marking dot located on the right
side of the sterilizer. Set the timer to “HOLD” position.
After approximately 45 minutes, check the thermometer. It should read between 320°F (160°C)
and 330°F (165°C). If not, adjust the thermostat dial and wait approximately 15 minutes for the
temperature to change. NOTE: The thermostat dial is very sensitive. Decreasing the dial by 1
will drop the temperature approximately 15°F. Continue to adjust the thermostat as needed
until the thermometer reads between 320 Degrees F (160 Degrees C) and 330 Degrees F (165
Degrees C). Temperatures may vary during initial heat-up period.
STERILIZER PROCEDURES
Steri-Dent Dry Heat Sterilizers* are intended for indoor use in hospitals and dental, orthodontic
and health care facilities, veterinary, beauty and body art salons. They come equipped with a
mechanical automatic timer, bi-metal thermostat, and thermometer.
Steri-Dent sterilizers are the result of a design that has been in use for many years by dentists,
hospitals, and the U.S. Armed Forces. This design has been refined and improved over the years
to make it safe and simple to operate, easy to use, and low in cost to operate. It is user friendly
and very reliable, but requires the operator to choose the proper loading, temperature, and
time settings to ensure complete sterilization.
*The Steri-DENT Sterilizer is non-patient care equipment.
INSTRUCTIONS FOR OPERATION
MECHANICAL AUTOMATIC TIMER
The timer serves as the ON/OFF switch for the sterilizer. To activate the timer and turn the
sterilizer on, turn the knob clockwise (right) past the number “10”. The timer can then be set
for the desired time as indicated on the calibrated scale dial. If intending to run additional
cycles during the workday, turn the knob to the “Hold” position when a cycle is complete.
To set the timer for “warm up” or continuous operation, turn the knob counter clockwise (left)
to the “HOLD” position. CAUTION: The sterilizer will remain on and in the warm up condition
until it has been manually turned off or set for a timed sterilization cycle.
WARM UP - The sterilizer should be warmed up in preparation for a sterilization cycle. Before
turning the sterilizer on, visually inspect the interior heating chamber. Close the door and turn
the timer to the “HOLD” position. The unit will warm up and maintain 320°F (160°C) until a
cycle is started. Do not insert a sterilization load until the unit has reached a temperature of
320°F.

4
CYCLE START - Before beginning a sterilization cycle, be sure instruments are clean and free of
debris (for information about which materials can be safely sterilized refer to instruments
validated for use in the sterilizer above). Prepare all instruments for sterilization by rinsing or
using an ultrasonic cleaner, as recommended by the Centers for Disease Control (CDC).
Thoroughly rinse the instruments and pat dry with a paper towel. The CDC recommends
bagging or pouching the instruments prior to sterilizing. Sterilization bags specific to dry
heat sterilization Must be used. Bags and pouches are available from Steri-Dent.
In order to ensure sterility, instruments intended to be stored must be sealed in Steri-DENT nylon
pouches prior to sterilization.
Steri-DENT Part No. 400597B, Dry Heat Sterilization Bags, 2.5”X 1.5”X 10.5”
Steri-DENT Part No. 400636, NYLON SELF SEAL POUCHES 2" X 10"
Steri-DENT Part No. 400651, NYLON SELF SEAL POUCHES 3” X 10”
Steri-DENT Part No. 400637, NYLON SELF SEAL POUCHES 4" X 10"
Steri-DENT Part No. 400638, NYLON SELF SEAL POUCHES 7" X 10.5"
Steri-DENT Part No. 400639, NYLON SELF SEAL POUCHES 9.5" X 13"
Instruments should be placed in a single layer and
distributed evenly on the sterilizer’s trays. Instruments
should not touch each other. Load instruments into
sterilizer and pre-heat to temperature indicated in the
TIME/TEMPERATURE chart. Run the sterilization cycle for
the length of time indicated.
NOTE: Allow time for instruments to reach operating temperature before starting the time
cycle.
TIME/TEMPERATURE CHART
Contents
Preparation
Temperature
Time
Metal instruments,
surgical blades, etc
Thoroughlycleanedand
spread out on trays.
320 Degrees F
160 Degrees C
60minutes
MAXIMUM LOADING
Model 200 Sterilizer –1.3 pounds per tray (includes the weight of the tray)
Model 300 Sterilizer –1.4 pounds per tray (includes the weight of the tray)

5
MATERIALS INTEGRITY
The Steri-DENT sterilizer is designed to operate at 320°F (160°C), but could potentially reach
temperatures up to 392°F (200°C). Tests have been conducted on various surgical and dental
instruments as to compatibility with these temperatures. Generally, medical and dental
stainless and carbon steel hand instruments are safe in the Steri-DENT sterilizer. Caution:
Instruments containing plastic and rubber goods should not be sterilized in dry heat
sterilizers. When in doubt, consult the instrument manufacturer.
CAUTIONS
During operation, the door and outer housing as well as the heating coils, trays and
sterilized instruments will be hot. Caution should be taken when handling hot instruments
and trays. Use tool accessory to change out trays.
The sterilizer is designed for use with metal instruments. While many new plastics, Teflon
and rubber products can be used in a high temperature environment, extreme care should
be used in sterilizing these materials until compatibility has been confirmed by the
instrument manufacturer.
When sterilizing packaged instruments, use only dry heat packaging material suitable for
392°F (200°C) temperatures. All items being sterilized and any associated wraps should be
able to withstand temperatures up to 200°C (392°F).
Instruments that have been wiped with alcohol or other flammable liquids must be allowed
to dry completely before being placed in the sterilizer. Do not allow flammable materials or
liquids within 12 inches (30.5 cm) of the sterilizer.
Use only dry heat pouches supplied by Steri-DENT.
Instruments Validated for Use in Sterilizer
The Model 200 and 300 sterilizers have been validated to sterilize the Sirona Dental Systems,
Cerex Omnicam sleeve and simple metal instruments such as those with hinges, mated
surfaces, and lumens. Examples are cutters, pliers, mirrors, scalers, forceps, brackets, bands,
burrs, amalgam plungers (lumens of 11mm maximum length by 2.5 minimum diameter),
nippers, clippers, tweezers, and other similar devices.
The Model 200 and 300 sterilizers have not been validated to sterilize complex devices such as
those that have power-driven machinery or multiple moving parts. These complex devices
should only be sterilized according to the device manufacturer’s instructions. A list of
instruments compatible for dry heat sterilization can be found on our web site at
www.cpac.com.

6
SAFETY NOTES CONCERNING TEMPERATURE
The temperature in the Steri-DENT sterilizer is controlled by a bi-metal thermostat, which is
calibrated during manufacturing to maintain temperature throughout the sterilizer chamber.
The temperature control is extremely sensitive and calibrated to maintain 320° F (160°C).
After room temperature instruments are placed in the sterilizer, the temperature may drop a
few degrees depending on the size of the load. Leave the timer in the HOLD position and Do
Not begin the sterilization cycle until the thermometer temperature has returned to 320°F
(160°C).
Do not open the door during a sterilization cycle as this will result in possible spore test
failures and incomplete sterilization of instruments.
THERMOMETER & THERMOSTAT
The bi-metal thermostat is used to adjust the temperature of the sterilizer. The glass
thermometer on the front of the unit indicates the sterilizer’s chamber temperature.
PILOT LIGHTS
The sterilizer has two (2) pilot lights. The left light will be on as long as the timer switch is in
the “ON” position indicating the unit has power. The right light is on only while the heating
elements are operating and heating the sterilization chamber. Once the chamber has reached
sterilization temperature, the light will come on intermittently as current is needed to maintain
the chamber temperature.
ACCESSORIES
The Steri-DENT sterilizer comes equipped with two or three instrument trays and a tool for
changing trays. Biological indicator test strips, spore testing kits, and Steri-Dent brand nylon
pouches are available from your distributor or CPAC. Depending on the size of your practice,
you may wish to purchase additional trays.
Chemical Indicator Use
When using a sterilization bag, the chemical indicator listed below may be placed on the
outside or inside the bag along with the instruments to provide an indication the instruments
have gone through a sterilization cycle before use. The chemical indicator should only be used
to prevent the accidental use of a bag of instruments that has not been sterilized. It is not a
means of proving the instruments are being sterilized properly. See section on Biological
Testing for instructions on periodic testing of the effectiveness of the sterilizer.
Dry Heat Chemical Indicator Strips supplied by Steri-DENT are recommended, part no. 400635.

7
Spore Test Strips
The Centers for Disease Control (CDC) recommends the sterilizer be tested weekly. For Dry
Heat Sterilizers, use Bacillus Atrophaeus spore test strips, CPAC part number, 400664.
CLEANING AND MAINTENANCE
The Steri-DENT sterilizer is designed for minimum and easy service. Clean the inside and
outside of the sterilizer with a stainless steel cleaner at least once a month. We recommend
Cleaning Kit #201009. When cleaning the inside of the chamber, spray cleaner on cloth first and
avoid contact with heating elements. Use a wet cloth to wipe away any cleaner residue and
then follow with a dry cloth to wipe dry.
All of the electrical and mechanical components used in the sterilizer’s construction are long
life, heavy-duty parts that require no maintenance. An authorized service representative or
CPAC should be contacted if any of these parts need to be replaced.
Replace the inner door gasket once a year, or sooner if it becomes loose or worn. Order gasket
#201108 for Model 200 or #301108 for Model 300. Replace the thermostat if the temperature
control becomes erratic or every 3 years. Order part #201032 for Model 200 or part #301032
for Model 300.
POWER SOURCE AND RATINGS
Standard units operate on 115 VAC electrical power. Other voltages are available upon request.
Voltage rating is printed on the nameplate located near power cord.
Model 200 Power Rating –500 Watts
Model 300 Power Rating –735 Watts
SIMULATED USE TESTING
A full load of sample metal instruments depicted in Figure 1 were tested in load configurations
depicted in Figures 2 and 3. Performance testing was conducted to validate that the sterilizer
cycle parameters are safe and effective.
Figure 1

8
Figure 2: Test Load Configuration for Model 2100
Figure 3: Test Load Configuration for Model 3100

9
ENVIRONMENTAL CONDITIONS
The Steri-Dent sterilizer is designed for indoor use with the following conditions:
•Temperature Range of 5°C to 40°C (41°F to 104°F)
•Maximum Relative Humidity of 80% up to 31°C (88°F). Decreasing linearly to 50%
at 40°C (104°F).
•Pollution Degree 2 applies in accordance with IE 664.
•Transient Over-voltage Category II applies.
•Supply voltage not to fluctuate more than 10% (+/-12V at 120V, +/-22V at 220V)
•Maximum altitude of 2000 m (6562 ft).
UNIT ELECTRICAL RATINGS
MODEL 200 115 VAC, 50/60 Hz, 10 Amps
MODEL 300 115 VAC, 50/60 Hz, 10 Amps
MODEL 200-220V 230 VAC, 50/60 Hz, 5 Amps
MODEL 300-220V 230 VAC, 50/60 Hz, 5 Amps

10
FAILURES SYMPTOMS and TROUBLESHOOTING
The following symptoms or failures listed in Bold are followed by steps to help trouble shoot
the cause of the symptom or failure. If the information in this technical manual does not help
in correcting or repairing the problem, please contact CPAC Technical Service at 585-382-3223.
Burning/Melting bags/pouches –Verify the following:
1) Temperature reads 320-330°F. If temperature too high, check thermostat and adjust/replace.
2) Instruments are clean, free of all cleaning agents or compounds, and DRY.
3) Bags/pouches are labeled for DRY HEAT USE ONLY to be used in the sterilizer.
4) Bags/pouches are not left in sterilizer for more than 15 minutes after cycle is complete.
Failing spore tests –Verify the following:
1) Instruments are DRY, placed in single tier level, not stacked, and trays not overloaded; see
maximum load parameters in Operating Instructions.
2) Bags/pouches are labeled for DRY HEAT USE ONLY for use in the sterilizer.
3) Bacillus Atrophaeus (BI) spore strip is sealed in a dry heat bag/pouch for testing.
4) Temperature reads 320-330°F before cycle is started and cycle ran for 60 minutes.
5) Was cycle observation data recorded (temperature readings at 1st and 5 minute intervals)
6) Refer to Biological Testing Protocols section for further guidance
Thermometer not reading 320-330°F –Verify the following:
1) Thermostat knob is set to 7. Adjust knob until thermometer reads 320-330°F. If not able to
set proper temperature through knob adjustment (too hot, or too cold), replace thermostat
(Model 200–201042 and Model 300-301032).
2) Is there liquid in the thermometer? Remove thermometer bracket on front of unit and pull
out thermometer. If thermometer is broken and/or liquid has leaked out/missing, replace
thermometer (201024-A).
3) If recently replaced, is thermometer threaded under chamber insulation to allow proper
temperature readings?
4) Refer to Steri-Dent Thermometer/Thermostat Replacement Instructions for assistance.
Unit won’t reach or hold temperature –Verify the following:
1) Unit is plugged in.
2) Fuse in place, thermostat knob set at 7.
3) Thermometer temperature is rising during heating cycle and able to set temperature. If not
able to set proper temperature, replace thermostat (Model 200 –201032 and Model 300 -
301032).
4) Refer to Steri-Dent Thermostat Replacement Instructions for assistance. If thermostat
replacement does not work, replace thermostat circuit switch (210042). Refer to Steri-Dent
Thermostat Replacement Instructions.

11
Timer not timing down –Verify the following:
1) Check that timer dial turns properly. Must turn past 10 minutes for timer to work.
2) Empty sterilizer and turn timer to 120 minute setting. If timer does not reach 0 (zero) in 2
hours, replace timer (201042S).
3) Refer to Steri-Dent Timer Replacement Instructions for assistance.
Pilot lights not lit/functioning –Verify the following:
1) Unit plugged in and timer knob set to HOLD position or starting a cycle.
2) Left light illuminates as long as the timer switch is in the ON position. If not lit when in the
HOLD position or during any sterilization cycle, replace the light.
3) The right light illuminates only while the heating elements are operating and heating the
sterilization chamber. Light should be lit during warmup and to maintain sterilization
temperatures. If not lit replace light.
4) Refer to manufacturer replacement instructions.
No power to unit –Verify the following:
1) Unit plugged in.
2) Pull and check the fuse to see if blown.
3) Check office circuit breakers if tripped or there was a recent power outage.
4) Check unit fuse holder, circuit switch and wire connections (requires removal of back panel
and insulation).
5) Refer to manufacturer replacement instructions.

12
STERI-DENT Model 200/300 Troubleshooting Quick Reference Diagnosis and Repair Chart
STERI-DENT
MODEL 200/300
FAILURE/ERROR CODE
VERIFY
Remedy
Failing spore tests
1) Thermometer reads 320-330°F
before cycle is started.
2) Instruments are placed on
single tier level and not
stacked.
3) Proper spore test strips being
used.
Adjust thermostat to obtain
correct thermometer range.
Replace thermostat. Refer to
Steri-Dent Thermostat
Replacement Instructions for
assistance.
Separate instruments into
single tier.
If not, replace with Bacillus
Atrophaeus spore test strips.
Burning bags/pouches
1) Thermometer reads 320-330°F.
2) Bags/pouches are labeled for
use in a dry heat sterilizer.
3) Bags/pouches are not left in
sterilizer for more than 15 minutes
after cycle is done.
Adjust thermostat to obtain
correct thermometer range.
Replace thermostat.
Use manufacturer
recommended dry heat
bags/pouches.
Remove bags/pouches when
cycle completes.
Thermometer damaged
or liquid missing
1) Check thermometer, remove
bracket on front of unit and pull
out thermometer to check.
If thermometer is broken
and/or liquid has leaked out,
replace thermometer
(201024-A). Refer to Steri-
Dent Thermometer
Replacement Instructions.
Unit won’t reach or hold
temperature (320-330°F)
1) Thermostat knob is set to 7.
2) Thermometer is not damaged.
Adjust knob until
thermometer reads 320-
330°F. If not able to set
proper temperature, replace
thermostat.
Replace thermometer and
check with thermostat
adjustment.

13
3) Thermometer too cold
4) Knob adjusted too high/low
Check thermometer is
threaded under chamber
insulation.
Set knob to 7 and stabilize
temp. If unit won’t hold 320-
330°F, replace thermostat.
Refer to Thermostat
replacement instructions
Unit not heating or No
Power
1) Unit plugged in.
2) Pilot lights on, temperature
rising, thermostat knob at 7.
3) Check fuse is in place and
working.
4) Element tabs not loose, no
broken connections
Plug in unit, set timer, check
thermometer reading, adjust
thermostat knob to 7.
Check thermostat circuit
switch (210042) for damage.
Replace circuit switch.
Replace fuse/fuse holder.
Replace bad element.
Timer not timing down
1) Timer turned past 10 minutes
to test function.
2) Empty sterilizer and turn timer
to 120 minute setting to verify
function.
If timer does not reach 0
(zero) in 2 hours, or function
turned past 10 minutes,
replace timer (201042S).
Refer to Steri-Dent Timer
Replacement Instructions.
Pilot lights not lit
1) Unit plugged in.
2) Left pilot light lit during cycle
operations.
3) Right pilot light lit when unit is
heating.
Plug unit in and turn timer
knob to HOLD position, check
lights, replace bad one. Refer
to Steri-Dent Pilot Light
Replacement instructions.
If not lit during operation
replace left pilot light.
If not lit during heating
operations, replace right pilot
light.

14
SPECIFICATIONS:
Sterilization Time: 60 Minutes
Unit Size (Outside Dimensions):
Model 200 15.5” W x 9.5” D x 10.5” H / 394 x 241 x 267 mm
Model 300 19” W x 11” D x 14.5” H / 483 x 279 x 368 mm
Chamber Size (Inside Dimensions):
Model 200 11.25” W x 7.5” D x 4.75” H / 286 x 190 x 121 mm
Model 300 13.5” W x 8” D x 6.75” H / 343 x 203 x 171 mm
Weight:
Model 200 13 lbs (6 kg)
Model 300 20 lbs (9 kg)
Dimensional Shipping Weight/Dimensions:
Model 200 16 lbs, 20” x 16” x 14”
Model 300 45 lbs, 22” x 18” x 18”
Tray size:
Model 200 (2 trays) 10” W x 6.25” D, 254 mm x 159 mm
Model 300 (3 trays) 11.75” W x 7.25” D, 298 mm x 184 mm
Electrical: 110V-120V, 60 Hz, or 220V-240V, 50 Hz
________________________________ Model 200 - 500 Watts, Model 300 - 750 Watts
Sterilization Temperature: __ _ ___320° Fahrenheit (160° Celcius)
Warranty: Three years (parts and labor)
Models: 200, 300
Approvals: ETL FDA 510(k) K771070
IEC Safety Standard 61010-2-040
UL 61010-1, CAN/CSA C22.2 No. 61010-1
For additional technical advice, service instructions or parts, contact CPAC Equipment, Inc.
Technical Services: (800) 828-6011 or (585) 382-3223

15
STERI-DENT STERILIZER SPARE PARTS LIST
Many of the items listed below require installation by an appropriately trained technician.
Contact CPAC by telephone at (585) 382-3223 for assistance.
Part Number Description
MODEL 200 Part Number
Thermostat, SD 200 201032
Extra Tray for Model 200 –10 x 6 ¼ 201095
Door Gasket Kit, SD 200 201108
Right Side Heating Element 201058
Left Side Heating Element 201059
MODEL 300
Thermostat, SD 300 301032
Extra Tray for Model 300 –12 x 7 ¼ 301095
Door Gasket Kit, SD 300 301108
Side Heating Elements, SD 300 301058
Bottom Heating Element, SD 300 301059
COMMON PARTS –BOTH MODELS
Rubber Foot CX0051
Tray Handle –Both Models CX0047
Fuse, 10A, 250V slow blow ceramic (115V units) CX0076
Fuse, 5A, 250V Ceramic (230V units) PV229
Dry Heat Sterilizer Cleaning Kit 201009
Thermometer Bracket 201021
Thermometer 201024-A
Thermostat Knob 201030
Pilot Light, Red –230V Power Indicator 201038
Pilot Light, White –115V only 201039
Pilot Light, White –230V Heating Indicator 201040
Timer 201042
Door Handle 201073
Needle Tray 201096
Circuit Thermostat 210042
Fuse Holder 302110

16
BIOLOGICAL TESTING
The American Dental Association, United States Air Force, Joint Commission of Accreditation of
Hospitals, and the Centers for Disease Control recommend biological indicator tests to verify
the sterilizer’s performance.
CPAC Equipment, Inc. recommends that a biological indicator and the recommended test load
of 2.6 lbs for model 200 and 4.2 lbs for model 300 be used on a weekly basis or every 25 cycles,
whichever comes first, to test the effectiveness of the sterilizer.
Recommended and Required Equipment
For monitoring dry heat, biological indicators containing Bacillus atrophaeus should be used
along with the recommended test load. Spore test strips, as well as test services are widely
available through universities and commercial services.
Chemical indicators supplied by Steri-DENT are recommended, part. no. 400635
Spore test strips supplied by Steri-DENT are recommended, part no. 400634
The test load should be a full load consisting of simple metal instruments such as those with
hinges, mated surfaces, and lumens. Examples are cutters, pliers, mirrors, scalers, forceps,
brackets, bands, burrs, amalgam plungers (lumens of 11mm maximum length by 2.5
minimum diameter), nippers, clippers, tweezers, and other similar devices. A full load
consists of 1 lb. of instruments per tray (plus weight of the tray)
NOTE: Model 200 tray weighs 0.3 lbs.
Model 300 tray weighs 0.4 lbs.
Self Sealing nylon pouches from Steri-DENT are recommended:
Steri-DENT Part No. 400636, NYLON SELF SEAL POUCHES 2" X 10"
Steri-DENT Part No. 400651, NYLON SELF SEAL POUCHES 3” X 10”
Steri-DENT Part No. 400637, NYLON SELF SEAL POUCHES 4" X 10"
Steri-DENT Part No. 400638, NYLON SELF SEAL POUCHES 7" X 10.5"
Steri-DENT Part No. 400639, NYLON SELF SEAL POUCHES 9.5" X 13"
Introduction
Biological indicators are used in healthcare to validate protocols and operational parameters of
a sterilization process. Sterilizers are operated under standard operational protocols required of
the manufacturer to meet FDA and ANSI/AAMI standards and criteria. For dry heat sterilizers,
time and temperature are the parametric criteria demanded of the sterilizer to provide the
conditions by which sterilization will occur. To effect instrument sterilization under the
prescribed time-temperature sterilization profile, protocols for packaging and loading that are
established through national standards (as well as those sterilizer-specific as mandated by FDA
510(k)’s must be followed.
To assure that both the sterilization unit is functioning properly and that operational protocols
are efficacious, a surrogate challenge microorganism is used that (1) provides a challenge to the
sterilization process; (2) demonstrates that all forms of microorganisms are rendered inactivated
by the process, and (3) provides a quantitative reduction of microbial inactivation. To

17
demonstrate that the thermal process is providing all conditions necessary for sterilization to
occur, biological indicator strips containing 6 Logs of Bacillus atrophaeus spores are used for
periodic process validation. B. atrophaeus spores are rated most thermal-resistant in the
hierarchy of resistance over all other RNA/DNA-containing microbial categories (i.e., viruses,
vegetative bacteria, fungi, parasites, and mycobacterium). Complete inactivation of all spores on
the biological indicator strip indicates (1) all other microbial species will be killed at a 6 Log
reduction or higher and (2) the required 6 Log microbial kill necessary to meet the definition of
sterilization has been achieved.
Biological indicators are used to provide a direct correlation of the sterilizer’s parametric
indicators and packaging/loading protocols with microbiological kill. Their use is not intended for
the everyday monitoring of the sterilizer’s performance, but rather to provide another
monitoring perspective of typical or challenging operating conditions. Local or state public health
departments have jurisdictional oversight for the periodic use of biological indicators, typically
mandating weekly or monthly biological monitoring.
Biological indicators were never intended for routine use. The use of biological indicators as
routine indicators (daily or per load) is impractical for dry heat sterilization technologies. As a
biological, time is required for culturing and assuring all spores are inactivated. Since the
quantitative analysis performed is measured by “growth/no growth”, spores not fatally injured
in the sterilization process are given a week to repair and reproduce. From the time of spore strip
submission to a contracted laboratory, eight days are minimally required to obtain results from
a biological indicator test. (Note: There are no “rapid read” biological indicators currently for dry
heat sterilization as there are for steam and ethylene oxide sterilization.)
In-house culturing is an option from which cultured spore strips can be monitored throughout
the seven-day incubation period for growth. Although a full seven days is required for culturing,
spore strip failures are usually seen within the first 24-48 hours of culturing as indicated by color
change and media turbidity. Although in-house biological monitoring is an option for a more
timely indication of a spore strip failure, this culturing process requires the stringent use of
proper sterile technique when transferring the spore strip to the culture media to avoid the
introduction of an environmental microbial contaminant.
Accordingly, most small clinical and dental practices have preferred the use of a contracted
laboratory for spore strip analysis. The absence of a timely turnaround of spore testing results is of
concern only when positive growth is reported. A significant amount of time has elapsed since the
sterilization cycle was tested and as a result, the cause of the failure may be difficult to trace and
to determine since numerous factors can lead to a spore test failure. These protocols are provided
to assist the practitioner in performing a proper spore test and in the event of a spore test failure,
in determining the cause of a spore test failure through the use of proactive testing documentation.
Following these protocols can provide the documentation required of root-cause analysis of why
the failure may have occurred or minimally, determining those factors that did not lead to the
failure. These protocols are based in part on identified factors that can lead to a spore strip failure
as described in CDC’s Guideline for Disinfection and Sterilization in Healthcare Facilities, 2008. 1

18
Biological Testing Protocols for the Steri-DENT Sterilizer
I. Steri-DENT Sterilizer and Instrument Load Preparation
These test trials will be conducted for the sole purpose of verifying operating performance. All
operating parameters for these tests shall be recorded as detailed below and retained in the
Biological Test Data Manual. Biological Indicator testing is a Risk Management function and as
such, strict adherence to the sterilizer’s operating instructions is essential, including the retrieval
of the biological indicator immediately upon completion of the sterilization cycle.
Prepare challenge load of instruments according to the Operating Manual (page 9), conducting
pre- and post-evaluation as provided in the “Checklist for Weekly/Monthly Biological Indicator
Testing for the Steri-DENT Sterilizer” (page 15-16).
Procedure:
1. Prepare the sterilizer per the warmup instructions.
2. Load the instruments into Steri-DENT self-sealing nylon pouches or other CPAC
pouches recommended for dry heat. If not pouching, layer instruments in the
instrument tray with no instrument overlap.
3. Add a chemical indicator to each pouch, or place chemical indicator strip under an
instrument in each tray to secure it in place.
4. Insert a spore test strip into a pouch and seal pouch. Take extreme care not to
puncture, tear, or rip the outer envelope protecting the biological indicator strip during
insertion into the pouch or by an accompanying instrument.
(a) Inspect the biological indicator envelope before and after the sterilization cycle to
ensure envelope integrity. Failure to detect any defect in the envelope or its sealed
fold may result in entry of an environmental contaminant, which may cause
positive growth.
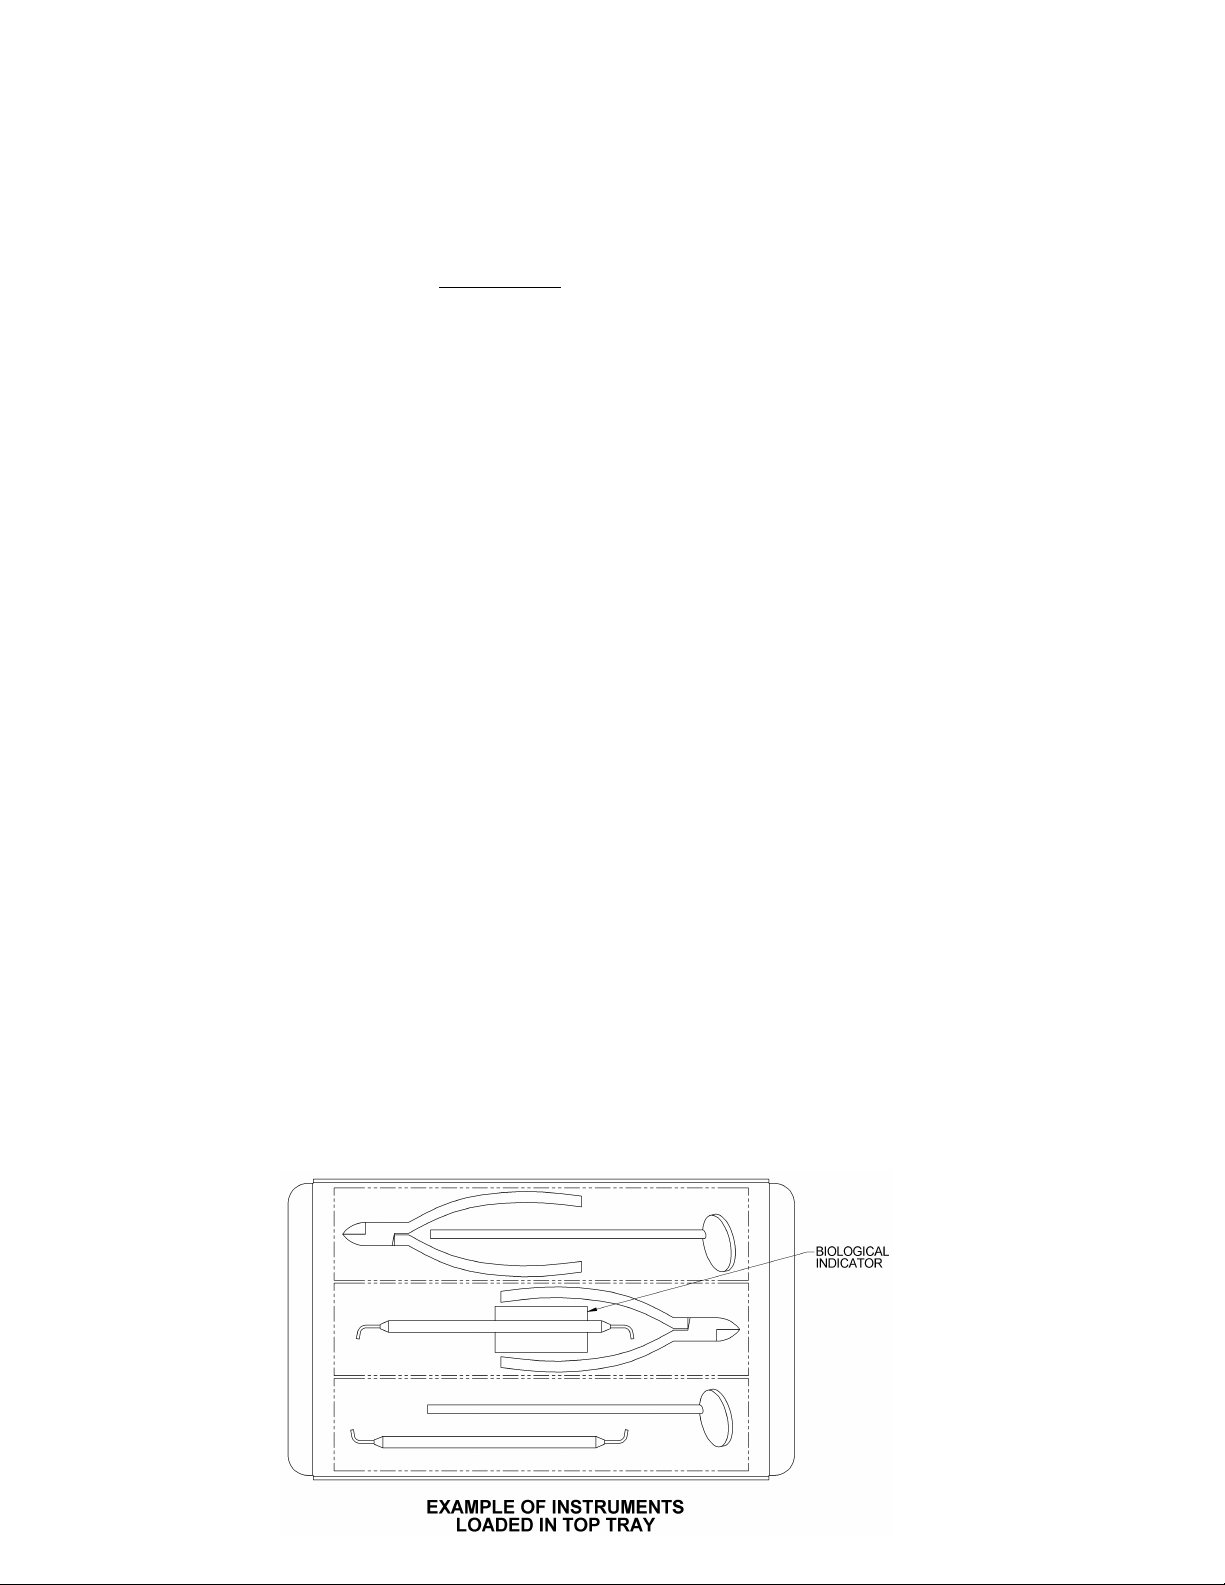
5. Evenly distribute the load throughout the instrument tray assuring that the spore test
strip is located in the center of the upper instrument tray (model 200), or the top
instrument tray (300) and that the pouches or instruments are loaded in a single layer.
6. With the sterilizer at operating temperature (320° F; 160° C) via Step 1, place the
instrument trays into the sterilizer, spore test in appropriate location by model.
7. Allow the sterilizer to return to 320° F, then set the timer for 60 minutes to start the
sterilization cycle.
19
8. Record the parametric operating conditions (date, times, and temperatures) of the test
cycle in five (5) minute intervals throughout the test and place into the Biological Test
Data Manual.
9. When the cycle ends, immediately and carefully remove the spore test strip for
culturing. Evaluate test strip envelope for any undue deviations that could lead to a
break in the integrity of the envelope, specifically punctures, tears, seals along
envelopes perimeter and flap. Verify integrity by documenting in the Biological Test
Data Manual. If the envelope shows signs of seal or flap adhesive separation or loss of
integrity or if the time-temperature parameters deviate from prescribed conditions,
repeat steps 1 through 7.
(a) If mailing the spore test to an off-site test center, place biological indicator
into the mail-back envelope, following directions provided with the spore test kit. This
maintains sterile integrity of the spore test envelope and strip during shipment.
(b) If conducting in-office testing of the spore strip, use sterile techniques when
removing the spore strip from its envelope and transferring the strip to the media tube
for incubation. Follow specified incubation times and temperatures. Note any actions
that might result in cross contamination to the indicator strip.
10. Verify that all chemical indicators changed color. Enter results into the Biological Test
Data Manual.
11. Review the parametric operating conditions data (date, times, and temperatures) from
the test cycle and place into the Biological Test Data Manual. Review this data to assure
the sterilizer was performing properly during this test cycle. Record time and
temperature throughout the sterilization cycle, recorded every 5 minutes.
12. Document any other conditions (including any failure symptoms) or observations that
may influence results and record them in the Biological Test Data Manual.
13. If conditions occurred during the test trial that have the potential to cause spore test
failure, indicate those conditions in the Biological Test Data Manual. Correct those
conditions and repeat the test (Steps 1 through 11).
This manual suits for next models
1
Table of contents
Other CPAC Laboratory Equipment manuals


