Braun Under-Vehicle Lift NUVL855SMXB User manual

Under-Vehicle Lift®
W
ARNING
Read manual
before installing
or servicing lift.
Failure to do so
may result in
serious bodily
injury and/or
property damage.
ual
Man
"Providing Access to the World"
International Corporate Hdqrs: P.O. Box 310 Winamac, IN 46996 USA
1-800-THE LIFT®(574) 946-6153 FAX: (574) 946-4670
®
®
Braun UVL SeriesTM
Braun UVL SeriesTM
NUVL855SMXB
NUVL855SMXB
Public Use Wheelchair Lifts
02
Series 02
Service Manual for:
35098 Rev. A
June 2010
www.braunlift.com®
DOT — Public Use Lift
“DOT — Public Use Lift” verifies that this platform lift meets the
“public use lift” requirements of FMVSS No. 403. This lift may be
installed on all vehicles appropriate for the size and weight of the
lift, but must be installed on buses, school buses, and multi-
purpose passenger vehicles other than motor homes with a gross
vehicle weight rating (GVWR) that exceeds 4,536 kg (10,000 lb).

We at The Braun Corporation wish to express our fullest appreciation
on your new purchase. With you in mind, our skilled craftsmen have designed and
assembled the finest lift available.
This manual provides service-related material. Refer to the FMVSS No. 403
Quick Reference Installation Sheet for installation instructions, operating instructions
and maintenance procedures.
Braun UVL Series™lifts are built for dependability and will provide years of plea-
sure and independence as long as the lift is installed and serviced as specified by a
Braun certified technician, and the lift is operated by an instructed person.
Sincerely,
THE BRAUN CORPORATION
Ralph W. Braun
Chief Executive Officer
Two Braun Serial No./Series No. identification tags (shown below) are posted on the lift.
One I.D. tag is posted on the left platform side plate (outboard end). A second I.D. tag
is located inside of the pump module. Both I.D. tags provide the product identification
information provided on the warranty/registration card. Record the information in the
space provided (or document on a copy). This information must be provided when filing a
warranty claim or ordering parts.
Warranty and Registration Instructions
Immediately upon receiving the lift, examine the
unit for any damage. Notify the carrier at once
with any claims.
Two warranty/registration cards (shown right) are
protected in a clear envelope and attached to the
lift protective shipping wrap. The sales representa-
tive must process one of the cards. The consumer
must fill out the other card and mail it to The
Braun Corporation. The warranty is provided on
the back cover of this manual. The warranty cards
must be processed to activate the warranty.
Congratulations
OWNER'S WARRANTY REGISTRATION
PURCHASED FROM
XXXXXXXXXX XX-XXXXX
DATE INSTALLED
NAME
ADDRESS
CITY
TELEPHONE
TO VALIDATE WARRANTY
REGISTRATION CARDS MUST BE RETURNED TO THE BRAUN CORPORATION.
OWNER
STATE ZIP
Sample Warranty/Registration Card
Serial No.
Model No.
The Braun Corporation
XXXXXXXXXX
XX-XXXXX
XX/XX/XXXX
1-800-THE-LIFT
BRAUNLIFT.COM
TM
MFG DATE
SERIAL NUMBER
TM
DOT Public Use Lift MODEL#
Max. Lifting Capacity - 600Lbs.
Sample Serial No./Series No. Identication Tag
Model No.
Serial No.
Date of Manufacture

Page 1
Contents
Troubleshooting and Maintenance
Lift Terminology ............................................................... 2
Switch and Sensor Locations ......................................... 3
Certication Checklist Diagnostic Procedures ................ 4
Adjustments and Calibration ........................................... 5
LCD Diagnostic Codes ................................................... 6
Floor Level and Inner Roll Stop Adjustments ............ 7-11
Lubrication Diagram ..................................................... 12
Maintenance and Lubrication Schedule .................. 13-15
Troubleshooting Diagnosis Chart ............................ 16-18
Lift Wiring Schematic ..........................................19A, 20A
Contact Removal ........................................................ 19B
Hydraulics
Hydraulics Parts List ................................................... 20B
Hydraulics Diagram ...................................................... 21
Repair Parts
Pump Module
Pump Module Parts List .......................................... 22
Pump Module Diagram .................................23A, 24A
Lift Exploded Views
Complete Lift..................................................23B, 24B
Repair Parts List ..................................................... 25
Housing Detail.......................................................... 26
Carriage Detail......................................................... 27
Platform Detail ......................................................... 28
Warranty
Braun®Limited Warranty .......................................... 29-31

Page 2
W
A
R
N
I
N
G
81823
PushT-handlein fully and
manuallymoveplatform in
andoutto engage platform
lockbeforedriving vehicle.
Failuretolock platform may
resultinunintended platform
deployment.Unintended
platformdeploymentmay
resultinserious bodily injury
and/orpropertydamage.
Donotremove!
NUVL855SMXB-011.ai
DOOR STOW
DOWNUP
Rear
Front
Outboard
(passenger's side)
Inboard
(driver's side)
“Arrows/30°-30°”6-13-90
(of vehicle)
(of vehicle)
Outboard
Right
Left
Inboard
Lift Terminology
Lift Mounting
Brackets (6)
Hydraulic
Cylinders
Lifting
Arms
Rolling
Horizontal Arms
Outer Barrier
Actuator
Outer
Barrier
Platform Cable-activated
Manual Release System
Hand-Held Attendant's
Control Box
Pump
Module
Inner
Roll Stop
Lift Housing
Carriage
Torque
Tube
Platform

Page 3
Switch and Sensor Locations
NUVL855SMXB-02-013.ai
Pressure
Transducer
30426
Outer Barrier
Limit Switch
73950A
Stow Start
Limit Switch
73950A
Floor Level
Limit Switch
73950A
Floor Level
Cam
73712
Stow Start
Cam
73712
W
ARNING
81823
PushT-handlein fully and
manuallymoveplatform in
andoutto engage platform
lockbeforedriving vehicle.
Failuretolock platform may
resultinunintended platform
deployment.Unintended
platformdeploymentmay
resultinserious bodily injury
and/orpropertydamage.
Donotremove!
DOOR STOW
DOWNUP
Lift Out Cam
73775 Full Out Cam
75776CN
Full Out
Limit Switch
73950A
Lift Out
Limit Switch
73950A

Page 4
The following operations and conditions must be functionally veried in order for the lift to be FMVSS
403/404 compliant. If an operation does not function as described or a condition is not met, follow the refer-
enced procedures to correct the problem or contact a Braun Corporation Product Support representative.
• Vehicle movement is prevented unless the lift door is closed, ensuring the lift is stowed.
1. Verify lift stowed signal (pin 7) in the 9 conductor plug on the side of the pump module has a +12 volt
signal.
2. Refer to the interlock installation instructions.
• Lift operation shall be inhibited unless the vehicle is stopped and vehicle movement is prevented.
1. Verify vehicle secure signal (pin 6) in the 9 conductor plug on the side of the pump module has a +12
volt signal.
2. Refer to the interlock installation instructions.
• The platform will not fold/stow when occupied.
- Refer to Platform Sense Calibration.
• The inner roll stop will not raise if occupied.
- Refer to Inner Roll Stop Occupied Sensor Adjustment
• The outer barrier will not raise if occupied.
- Refer to Outer Barrier Occupied Calibration procedure
• Verify platform lighting when lift is deployed and pendant illumination when lift is powered.
1. Replace bulb(s) in the light housing.
2. Check inline fuse on wires going out to lights.
• An audio warning (and visual warning for public lifts) will activate if the threshold area is occupied when
the platform is at least 1" below oor level.
1. Make sure connectors to threshold mat are properly connected.
2. Call Product Support.
• Platform movement is prohibited beyond the position where the inner roll top is fully deployed (up).
- Call Product Support.
• Platform movement shall be interrupted unless the outer barrier is deployed (up).
- Check outer barrier limit switch, wires and connector.
- Diagnostic LCD should display a valve of “1” for OBAR SW when outer barrier is deployed (up).
Certification Checklist Diagnostic Procedures

Page 5
Adjustments and Calibration
Adjustment Procedures
Lift Out Switch: The Lift Out Switch stops inward
travel of the carriage/platform during Stow function
(activated by the housing-mounted Lift Out Cam).
Move cam in to increase inward travel. Move cam
out to decrease inward travel.
Full Out Switch: The Full Out Switch stops out-
ward travel of the carriage/platform during Deploy
(Up/Down) functions (activated by the housing-
mounted Full Out Cam). Move cam in to decrease
outward travel. Move cam out to increase outward
travel. Carriage rollers must be inside housing a
minimum 1/2". The platform will not raise or lower
until this switch is activated.
Floor Level Switch: See page 7 for procedures.
Inner Roll Stop Occupied Sensor: See page 11
for procedures.
Stow Switch: The Stow Switch controls the height
of the carriage/platform before it moves inward dur-
ing the Stow function (activated by the torque tube-
mounted Stow Cam). Rotate the cam in to decrease
platform height. Rotate the cam out to increase plat-
form height. Adjust cam so lifting arms are aligned.
View the platform position in the housing.
Barrier Down Switch: This platform-mounted
switch prohibits the platform from raising unless the
outer barrier is in the full up position. The Up func-
tion is prohibited if the outer barrier detent pin is not
fully engaged also.
Drive Chain Adjustment
In event the drive chain sags 13 mm (1/2") or more,
adjust tension as detailed. Tighten to eliminate vis-
ible sag but do not overtighten.
1. Unlock and pull the manual release cable and
lock in the released position.
2. Manually extend platform carriage 2/3 full out.
3. Remove adjustment bolt (tensioner) access
cover.
4. Use deep well socket (long key sleeve) to loosen
outside jam nut. Tighten inside jam nut to elimi-
nate visible chain sag but do not overtighten.
5. Lock jam nuts together. Unlock and push the
manual cable in fully. Lock release cable. Move
the platform in and out until platform chain re-
lease assembly engages chain.
Carriage Ride Height Adjustment
The carriage horizontal arms move (roll) in and out
of the housing tracks on roller bearings. Follow-
ing installation or extensive lift operation, clearance
between horizontal arms and tracks may diminish.
The eccentric shaft mounting plate allows height
adjustment.
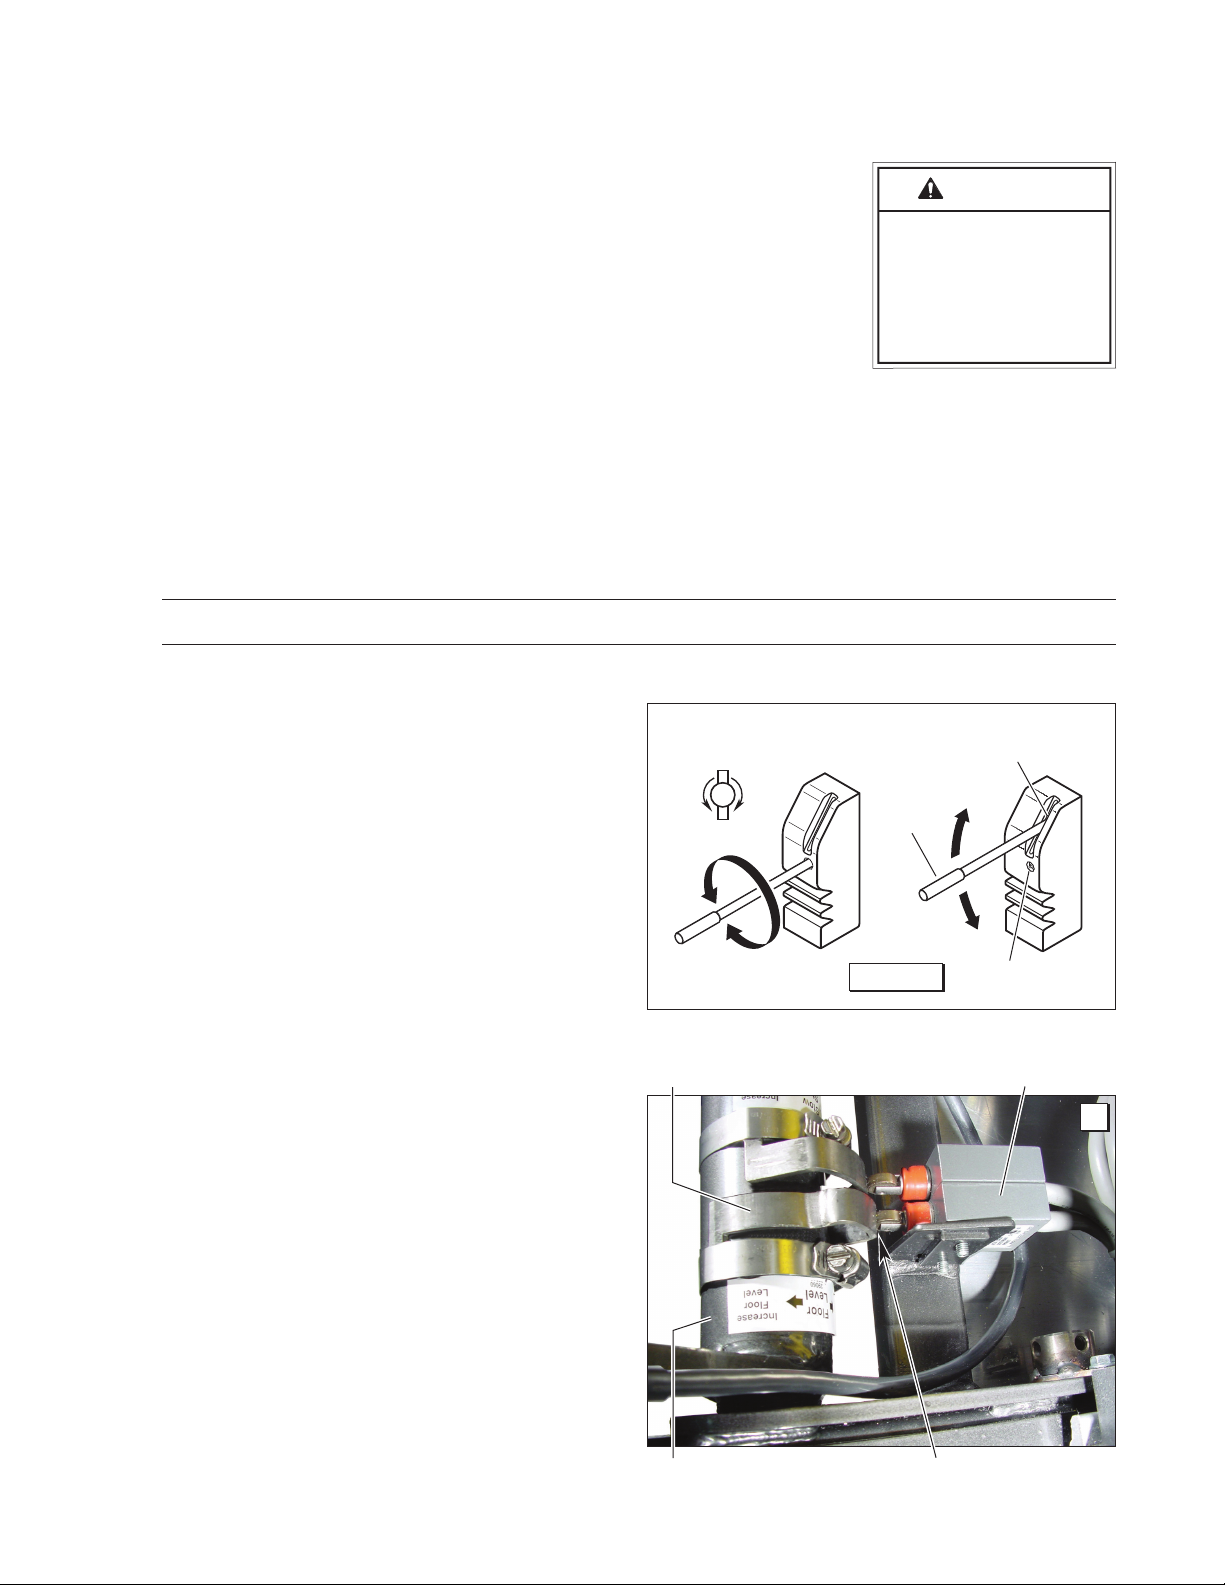
Remove eccentric plate mounting screw. Using
screwdriver or small rod, rotate the shaft clockwise
to increase carriage height. Rotate the shaft coun-
terclockwise to decrease carriage height. Reinstall
mounting screw in nearest retainer hole. Adjust left
and right side eccentric shafts (screw positions may
vary from side to side). Adjust height such that hori-
zontal arms do not contact top or bottom of tracks
(align center).
Calibration Procedures
Platform Sense Calibration
1. Place 20 lbs. in the center of the platform.
2. Press UP button on the hand-held pendant to
raise the platform a minimum of 3" above stow
level.
3. Press and hold 50# CAL button on control board.
While pressing the 50# CAL button, press and
hold the STOW button on the hand-held pendant.
The platform will lower to stow level, raise slightly,
lower to stow level, and begin inward travel.
Release the 50# CAL button when the platform
begins moving inward. The platform sensing is
now calibrated.
4. After calibration, the LCD screen should read “PF
OCCUPIED” when 50 lbs., or more, are present
on the platform. If 50 lbs. does not activate the
“platform occupied” signal readout, recalibrate
with less weight to lower the “occupied” setting or
more weight to increase the “occupied” setting.
Ground Sense Calibration
1. Press hand-held pendant DOWN switch to lower
platform fully to ground level.
2. While continuing to press the pendant DOWN
switch, press and then release the control board
O_BAR/GROUND LVL button.
3. Release the pendant DOWN switch. Ground
level sensing is now calibrated.
4. After calibration, the outboard roll stop should
not unfold (down) until the platform is fully on the
ground.
Outer Barrier Occupied Calibration
1. Press hand-held pendant DOWN switch to lower
platform fully to ground level.
2. Once outer barrier is fully unfolded (ramp posi-
tion), release the pendant DOWN switch.
3. Press and hold the control board O_BAR/
GROUND LVL button. While holding O_BAR/
GROUND LVL button, press hand-held pendant
UP switch to raise the outer barrier. Be sure to
release O_BAR/GROUND LVL button when outer
barrier reaches approximately half full up (verti-
cal) position.
4. After calibration, the LCD screen should read
“OUT-BAR OCCUPIED” whenever there is weight
present on the outer barrier.

Page 6
103 102
103
103
103
103
103
103
103
103
103
103
103
102
243R
103
103
103
103
103
103
102
103
103
103
102
102
102
220
CHA
6C5
220
CHA
6C5
100
VHA
6C5
220
35A
5Q6
3 2 1
3 2 1
3 2 1
V104
V104
V104
C105
V104
V104
102
102
V104
V104
V104
V104
102
102
V104
106 E
330
SOMC1601
8.00M
8.00M
MP916
0.010Ω
.5% R
6H23EM 6H23EM
D7 D8 D5 D6 D3 D4 D2 D1
C20
U8 C4
R15 R14 R8
L_DN B_UP L_OUT
L_UP B_DN L_IN
C3 C2
R4 R2 R1 R6 R7
SW1 SW2
50# CAL O_BAR
GROUND LVL
R9 R10
C11
C10
R42
C1
R32
C21
U3
U2
ZD3
R27
R29
R31
cycle
diag
U5
CLOSECLOSE OPEN
D10
D11
U17
U7
R37
R36
C5
C15
R33
R11
C22
D13
U18
C9
C8
C14
U12
B LIGHT A
Magnetic
Remote
U21
HAND-1 HAND-2
INLK-1
D/S
U/D
J1
J2
R28
D26
D25
D24
D23
R26
R16
R1
U15
C6
U14 C7
R13 R20 R19 R18
U16
R39 R5
K
J
I
H
G
L
A
B
C
D
Lift Devices
4 3 2 1
Door
Operator
RL11 RL10
IN L H
MAT
C16
220
35A
5Q6
U20
R25
C12
D12
VR3
FS1
U19
RL9
R34
C13
FS2 FS8
VR1 VR2
LIGHT
ALARM
PUMP
VALVE
L_IN
L_OUT
B_UP
B_DN
R40
FS7
D9
FS10
FS9
FS5
FS4
FS3
FS6
U9
R3
D19
D18
D21
D20
D16
D17
D15
D14
RL1
RL2
RL3
RL4
NUVL CONTROLLER REV-3.1-1
The Braun Corporation
PWR-IN
1802
1002
R43
R41
U22
102
R38
FS11
OH
IN
GND 12V-B
LIGHT
ALARM
CONTRAST
OB A R S 1
W
LCD Display
All basic functions (UP,
DOWN, STOW and
DOOR) should show a
value of 1 when activated
via a controlled input
(Hand-held Pendant,
Magnetic, Remote Entry
or 3rd Station Controls).
Moving Out
Of Cassette
Moving Up
From Stow
At Floor
Level
Moving Down
From Stow
Ground
Level
Ground Level
OB Out
4STLV SW 1 1
LOUT SW 1
FOUT SW 1 1 1 1 1
FLV SW 1
OBAR SW 1 1 1 1 1 1
*GND LVL 1 1
MAT SW = 1 when mat is activated.
IBAR SW = 1 when inner roll stop is activated.
DO SW = 1 when door is full open or pin 3 and pin 4 are jumpered.
8SBELT SW = 1 when seat (handrail) belt is latched.
STOW
DOWN UP
DOOR
603C Pendant.ai
LCD Diagnostic Codes
To change the LCD display from cycle count to diagnostic
mode, press the “diag” button on the control board (see
illustration at right). When nished, press button again to
return to cycle count mode. When all of the harnesses
are correctly connected to the control board, the values
shown in the chart below will display when the correspond-
ing action is taken. “1” will appear to the right of the switch
or sensor name on the LCD module when activated as
shown. If any other value appears on the LCD screen
during the specic diagnostic procedure, verify that the
correct harness is properly connected to both the control
board and the associated lift harness. Repeat the harness
diagnostic procedure. If an incorrect value is still present
after checking the harness and connections, contact The
Braun Corporation Product Support Department.
Hand-held Pendant
Stowed
diag Button
* (NUVL855RM24 only) 3(BEL ST SW for NUVL855RM24) 7(HRBELT SW for NUVL855RM24)
103 102
103
103
103
103
103
103
103
103
103
103
103
102
243R
103
103
103
103
103
103
102
103
103
103
102
102
102
220
CHA
6C5
220
CHA
6C5
100
VHA
6C5
220
35A
5Q6
3 2 1
3 2 1
3 2 1
V104
V104
V104
C105
V104
V104
102
102
V104
V104
V104
V104
102
102
V104
106 E
330
SOMC1601
8.00M
8.00M
MP916
0.010Ω
.5% R
6H23EM 6H23EM
D7 D8 D5 D6 D3 D4 D2 D1
C20
U8 C4
R15 R14 R8
L_DN B_UP L_OUT
L_UP B_DN L_IN
C3 C2
R4 R2 R1 R6 R7
SW1 SW2
50# CAL O_BAR
GROUND LVL
R9 R10
C11
C10
R42
C1
R32
C21
U3
U2
ZD3
R27
R29
R31
cycle
diag
U5
CLOSECLOSE OPEN
D10
D11
U17
U7
R37
R36
C5
C15
R33
R11
C22
D13
U18
C9
C8
C14
U12
B LIGHT A
Magnetic
Remote
U21
HAND-1 HAND-2
INLK-1
D/S
U/D
J1
J2
R28
D26
D25
D24
D23
R26
R16
R1
U15
C6
U14 C7
R13 R20 R19 R18
U16
R39 R5
K
J
I
H
G
L
A
B
C
D
Lift Devices
4 3 2 1
Door
Operator
RL11 RL10
IN L H
MAT
C16
220
35A
5Q6
U20
R25
C12
D12
VR3
FS1
U19
RL9
R34
C13
FS2 FS8
VR1 VR2
LIGHT
ALARM
PUMP
VALVE
L_IN
L_OUT
B_UP
B_DN
R40
FS7
D9
FS10
FS9
FS5
FS4
FS3
FS6
U9
R3
D19
D18
D21
D20
D16
D17
D15
D14
RL1
RL2
RL3
RL4
NUVL CONTROLLER REV-3.1-1
The Braun Corporation
PWR-IN
1802
1002
R43
R41
U22
102
R38
FS11
OH
IN
GND 12V-B
LIGHT
ALARM
CONTRAST
OB A R S 1
W
NUVL Control Board

Page 7
The Floor Level switch stops upward travel
of the platform during the Up function (ac-
tivated by the torque tube-mounted Floor
Level cam).
1. Position the bottom of the lift platform 1"
above oor level (threshold mat) using
the manual hand pump. See Figure A.
2. Loosen the clamp securing the torque
tube-mounted Floor Level cam. See
Photo A. Rotate the cam until the Floor
Level switch is activated (cam depress-
es switch). Tighten the clamp securing
the cam.
Hydraulic pressure may affect platform
height slightly. Fine tuning adjustment
(tweaking) of the Floor Level switch
(cam) may be required.
3. Using the control pendant, check oor
level position by lowering the platform
to stow level and then pressing the UP
button until the platform raises fully
(stops).
If the inner roll stop rests solidly on
vehicle oor with 7° maximum angle
(relative to the platform), move to page
10 and check the usable platform length
as outlined.
Floor Level Switch
Floor Level Cam
Torque Tube
A
Cam depressing switch.
CAUTION
CAUTION
CAUTION
CAUTION
Do not adjust inner
roll stop linkage rod.
Linkage rod adjust-
ment may result in
lift damage.
Achieving proper oor level posi-
tioning of the platform and inner
roll stop requires a combination
of Floor Level switch adjustment
and inner roll stop cam adjust-
ment. Both are factory set, but
oor level positioning must be
inspected during installation
procedures (will vary per vehicle
application).
Floor Level Requirements:
When the lift is positioned at
oor level (raised fully), the
bottom of the platform must be
above oor level (threshold mat)
and the inner roll stop must rest
solidly on vehicle oor with 7°
maximum angle (relative to the
platform).
Ensure the lift is positioned and
secured as specied on the
Quick Reference Installation
Sheet supplied with the lift.
Adjust the Floor Level switch
rst (detailed below). If the 7°
requirement above is not met,
adjust the inner roll stop cam
as detailed in Cam Adjustment
(adjust cam only if necessary).
Do not adjust the inner roll stop
linkage rod (see Photo H on page
10). The linkage rod should be
adjusted to increase usable plat-
form length only (following all
other procedures).
Figure A
POWER
PACK
31637-005.ai
O
P
E
N
C
L
O
S
E
VALVE
O
P
E
N
C
L
O
S
E
OPEN
VALVE
CLOSE
W
ARNING
81823
Push T-handle in fully and
manually move platform in
and out to engage platform
lock before driving vehicle.
Failure to lock platform may
result in unintended platform
deployment. Unintended
platform deployment may
result in serious bodily injury
and/or property damage.
Donotremove!
OUTER BARRIER
Detent
Pin
PLATFORM
Actuator
Hairpin
Cotter
Manual Hand Pump
Hand Pump
Pump
Handle
Valve
Floor Level and Inner Roll Stop Adjustments
Floor Level Switch Adjustment

Page 8
Floor Level and Inner Roll Stop Adjustments
Stow Level
Platform
below
Stow
Level
B
Stow Level
Floor Level Switch Adjustment
Inner Roll Stop Cam Adjustment
Adjust the Floor Level switch rst (detailed in
previous section). If the above Floor Level
Requirements are not met - adjust the in-
ner roll stop cam as detailed in the following
procedures.
1. Position the lift platform below stow level.
See Photo B. Lowering the platform will
allow access to the cam bolt securement
nut. See Photo D.
2. Remove the 1/4" serrated ange nut se-
curing the lifting arm cam bolt. See Pho-
tos C and D. Do not remove the bolt.
3. Using the control pendant, press the
UP button until the platform raises fully
(stops).
4. Remove the cam securement bolt (lift
inner roll stop to relieve pressure on bolt).
Allow the inner roll stop to rest on the
oor.
4. If the inner roll stop does not rest solidly on ve-
hicle oor or the angle is more than 7°, open
the hand pump valve (turn counterclockwise) to
lower platform slightly (1/4" maximum). Close
valve. See Figure A.
5. Reset the oor level switch cam to this new posi-
tion. See Photo A. Loosen the clamp securing
the torque tube-mounted Floor Level cam. Ro-
tate the torque tube-mounted Floor Level cam
until the Floor Level switch is activated (cam
depresses switch). Tighten the clamp securing
the cam.
6. Using the control pendant, check oor level posi-
tion by lowering the platform to stow level and
then pressing the UP button until the platform
raises fully (stops).
If the inner roll stop rests solidly on vehicle oor
with 7° maximum angle (relative to the platform),
move to page 10 and check the usable platform
length as outlined.
If the inner roll stop does not rest on the vehicle
oor (hovers above oor) - adjust the 9-hole cam
as detailed in the following section.
Floor Level Requirements: When the lift is
positioned at oor level (raised fully), the bot-
tom of the platform must be above oor level
(threshold mat) and the inner roll stop must
rest solidly on vehicle oor with 7° maximum
angle (relative to the platform).

Page 9
1/4" Serrated
Flange Nut
Cam Bolt
Cam Notch (Saddle)
Cam
(9 available holes)
Lifting Arm
(3 available holes)
Rocker
Slider Block
Cam Notch (Saddle)
Engaging
Cam Follower Bearing
C
D
EF
R
o
t
a
t
e
C
a
m
R
o
t
a
t
e
C
a
m
Floor Level and Inner Roll Stop Adjustments
5. Rotate the cam so the cam follower
bearing engages the cam notch
(saddle). See Photos E and F.
6. Reinstall the cam securement bolt
in one of the three lifting arm holes
that aligns best with one of the nine
cam holes. See Photos E and F.
Reposition the cam bolt ange lock
nut. Tighten securely.
7. Use the control pendant to lower
lift platform to stow level and then
raise platform fully to oor level
(stops). Measure angle of inner roll
stop and verify the slope is a maxi-
mum of 7° (relative to platform).
Note: Achieving proper oor level
positioning of the platform and in-
ner roll stop requires a combination
of Floor Level switch adjustment
and inner roll stop cam adjustment.
Adjust as needed to meet Floor
Level Requirements.
Inner Roll Stop Cam Adjustment

Page 10
Inner Roll Stop
Linkage Rod
H
1. Position the lift platform below stow
level.
2. Loosen the jam nuts at each end of
the linkage rod. Adjust rod length as
needed. Minimize adjustment.
3. Carefully check the inner roll stop angle
and operation using the hand pump.
Ensure the linkage rod has not been
over adjusted resulting in pressure on
components (damage will result).
4. Tighten the linkage rod jam nuts.
Do not adjust
the inner roll
stop linkage
rod unless
extra usable
platform length
is needed.
See Photo G.
CAUTION
CAUTION
CAUTION
CAUTION
Improper inner roll
stop linkage rod
adjustment may
result in lift damage.
If the angle of the inner roll stop (when in the
vertical position) restricts the usable platform
length for the wheelchair passenger, adjust-
ment of the linkage rod will change the angle.
Adjust the inner roll stop as detailed in the pre-
vious procedures. Then, adjust the linkage rod
as detailed (only if necessary). If the linkage
rod is over adjusted (too long or too short), it
will exceed the travel of the slider block result-
ing in damage to the cam follower bearing, the
cam and/or other components.
Linkage rod adjustment affects angle
of inner roll stop (vertical position).
31756-001.ai
G
Floor Level and Inner Roll Stop Adjustments
Usable Platform Length
Linkage Rod Adjustment

Page 11
Adjustment Nut
Sensor Activation Bolt
1. If the weight of the empty inner roll stop
is triggering the sensor while it is fold-
ing, tighten the sensor nut 1/8 turn and
cycle the lift several times to verify cor-
rect operation. See Photo I.
2. If the lift is not reacting to weight
(pressure) on the inner roll stop soon
enough, loosen the pressure adjusting
nut 1/8 turn and cycle the lift several
times to verify correct operation.
3. If the inner roll stop occupied alarm
continues to go off even when the inner
roll stop is in the vertical position, turn
the sensor activation bolt clockwise until
alarm is not activated. See Photo J.
The optimum setting for the inner roll stop
occupied sensor adjustment nut is to have
just enough pressure to fold and unfold the
inner roll stop without triggering the inner
roll stop occupied sensor. This provides the
most weight sensitive setting while allowing
the unoccupied inner roll stop to function
correctly.
The inner roll stop sensor activates an au-
dible/visual alarm and stops lift motion if the
inner roll stop is occupied (weight or pres-
sure on roll stop). Do not adjust the inner
roll stop occupied sensor unless lift does
not function properly.
Floor Level and Inner Roll Stop Adjustments
Inner Roll Stop Occupied Sensor Adjustment
I
J

Page 12
See the Maintenance/Lubrication Schedule for recommended applications per number of cycles.
Maintenance and Lubrication
Lubrication Diagram
Specied (recommended) Available Braun
Lubricant Type Lubricant Amount Part No.
LO - Light Oil
LG - Synthetic Grease
DE - Door-Ease
15807
15806
28598
Light Penetrating Oil
(30 Weight or equivalent)
LPS2, General Purpose
Penetrating Oil
16 oz.
Aerosol Can
Stainless Stick
Style (tube)
Door-Ease
Stick (tube) 1.68 oz.
Synthetic Grease
(Multipurpose) Mobiltemp SHC32 12.5 oz.
Tube
Inner
Roll Stop
Hinge Pivot
Points
LO
DOWN
R
O
O
D
UP
W
O
T
S
DEPLOY
W
ARNING
81823
PushT-handleinfullyand
manuallymoveplatform in
andoutto engage platform
lockbeforedrivingvehicle.
Failuretolock platform may
resultinunintended platform
deployment.Unintended
platformdeploymentmay
resultinserious bodilyinjury
and/orpropertydamage.
Donotremove!
Drive Chain and Rollers
LO Drive Chain
Release Latch
SG
Outer Barrier
and
Lower Closure
Pivot Points
LO
Outer
Barrier
Detent
Pin
LO
Eccentric
Shaft and
Carriage
Rollers
(bearings)
LO
Platform
Cable-activated
Manual
Release
System
Torque
Tube
Pivot
Points
LO
Eccentric
Shaft
Rollers
(bearings)
LO
Hydraulic
Cylinder
Pivot
Points
LO
Hydraulic
Cylinder
Pivot
Points
LO
Eccentric
Shaft
Rollers
(bearings)
LO
Inner
Roll Stop
Linkage
Pivot
Points
LO
Torque Tube
Pivot Points
LO
Lifting Arm
Pivot Points
and Rollers
(bearings)
LO
Carriage
Rollers
(bearings)
LO
Carriage
Rollers
(bearings)
LO
Lifting Arm
Pivot Points
and Rollers
(bearings)
LO

Page 13
Maintenance and Lubrication Schedule
Maintenance and
lubrication procedures
must be performed as
specied by an
authorized service
technician. Failure to
do so may result in
serious bodily injury
and/or property
damage.
W
ARNING
Proper maintenance is necessary to ensure safe,
troublefree operation. Inspecting the lift for any wear,
damage or other abnormal conditions should be a part
of the transit agency daily service program. Simple
inspections can detect potential problems.
The maintenance and lubrication procedures speci-
ed in the following schedule must be performed by a
Braun authorized service representative at the sched-
uled intervals according to the number of cycles. NUVL
Series lifts are equipped with a cycle counter (digital
display built into the electronic control board).
NUVL Series lifts are equipped with hardened pins and
self-lubricating bushings to decrease wear, provide
smooth operation and extend the service life of the lift.
When servicing the lift at the recommended intervals,
inspection and lubrication procedures specied in the
previous sections should be repeated. Clean com-
ponents and the surrounding area before applying
lubricants. LPS2 General Purpose Penetrating Oil is
recommended where Light Oil is called out. Use of im-
proper lubricants can attract dirt or other contaminants
which could result in wear or damage to the compo-
nents. Platform components exposed to contaminants
when lowered to the ground may require extra atten-
tion. Lift components requiring grease are lubricated
during assembly procedures. When replacing these
components, be sure to apply grease during installation
procedures. Specied lubricants are available from
The Braun Corporation (part numbers below).
All listed inspection, lubrication and maintenance pro-
cedures should be repeated at 750 cycle intervals fol-
lowing the scheduled 4500 cycles maintenance proce-
dures. These intervals
are a general guideline
for scheduling mainte-
nance procedures and
will vary according to
lift use and conditions.
Lifts exposed to severe
conditions (weather,
environment, contami-
nation, heavy usage,
etc.) may require
inspection and main-
tenance procedures
to be performed more
often than specied.
Maintenance Indicator: The Lift Ready green LED
mounted on top of the pump cover will change color
to yellow after every 750 cycles. The yellow LED will
not affect the functions of the lift, but is a reminder to
complete necessary maintenance and lubrication.
Once the lift has been serviced, press the CYCLE but-
ton (located below LCD display on the control board)
until the Lift Ready LED changes back to green. The
CYCLE button also clears the lift cycle count (since
last service) but not the lifetime cycle count.
Discontinue lift use immediately if maintenance and
lubrication procedures are not properly performed,
or if there is any sign of wear, damage or improper
operation. Contact your sales representative or call
The Braun Corporation. One of our national Product
Support representatives will direct you to an autho-
rized service technician who will inspect your lift.
750
Cycles
Outer barrier and lower closure pivot
points (2)
Outer barrier detent pin pivot points (2)
Inner roll stop hinge pivot points
Inner roll stop linkage pivot points
Lifting arm pivot points and rollers
(bearings)
Inspect outer barrier and lower closure
for proper operation
Inspect outer barrier seal and lower
closure gasket
Inspect outer barrier detent pin hairpin
cotter
Inspect lift for wear, damage or any
abnormal condition
Apply Light Oil - See Lubrication Diagram
Correct or replace damaged parts.
Resecure, replace or correct as needed
Ensure hairpin cotter is present and can be removed
and inserted easily. Resecure, replace or correct as
needed.
Correct as needed.

Page 14
Maintenance and Lubrication Schedule
1500
Cycles
Apply Light Oil - See Lubrication Diagram
Apply Door-Ease - See Lubrication Diagram.
Apply to the surface area around both slots and
wipe off excess.
Apply Light Oil - See Lubrication Diagram
Apply Synthetic Grease - See Lubrication
Diagram
Use compressor and nozzle to remove all debris
from housing. Clean outboard lower pan slot
and apply Antisieze to slot before reinstalling
pan.
Use clean cloth and solvent to clean tracks.
Clean outboard lower pan slot and apply Anti-
sieze to slot before reinstalling pan.
Correct or replace damaged parts and/or relubri-
cate. See Drive Chain Adjustment.
Correct or replace damaged parts and/or relu-
bricate.
Carriage rollers (bearings)
Eccentric shaft rollers (bearings)
Lifting arm slots in rolling horizontal carriage arm
tubes
Hydraulic cylinder pivot points (4 per cylinder)
Drive chain and chain rollers
Drive chain release latch mechanism
Deploy lift, remove inboard and outboard lower
pans and blow out housing. Blow off platform
also.
Deploy lift, remove inboard and outboard lower
pans and clean housing tracks
Check drive chain tensioner, jam nuts and con
necting link for securement and/or misalignment.
Inspect drive chain release latch mechanism for
proper operation, positive securement, wear or
other damage
750
Cycles
Inspect lift for rattles
Check drive chain tension.
Inspect inner roll stop and linkage for:
• Proper operation
• Positive securement
• Wear or damage
• Proper adjustment
Check carriage ride height in housing
Check stow height/lifting arm alignment
Inspect wiring harnesses for securement, wear or
other damage
Check lower pan securement
Torque tube pivot bearings (6 places)
Verify FMVSS 403/404 Certication Checklist
Correct as needed.
Pull out and lock manual release cable. Adjust
chain tension as needed. See Drive Chain
Adjustment.
Resecure, replace or correct as needed. See
Floor Level and Inner Roll stop Adjustment
Instructions.
Adjust as needed. See Carriage Ride Height
Adjustment.
Lifting arms should be horizontal, aligned with
each other and aligned with carriage. Adjust as
needed. See Switch Adjustment (Stow Switch).
Resecure, replace or correct as needed
Resecure, replace damaged parts or correct as
needed.
Apply Light Oil - See Lubrication Diagram
See FMVSS 403/404 Certication Checklist

Page 15
Maintenance and Lubrication Schedule
Inspect platform cable-activated manual release
system (T-handle/cable assembly and carriage
movement)
Inspect limit switches and cams for securement
and proper adjustment
Inspect carriage, lifting arm and eccentric shaft
rollers (bearings) for wear or damage, positive
securement and proper operation
Inspect external snap rings (e-clips):
• Carriage roller bearings (4)
• Lower lifting arm pins (4)
• Eccentric shaft track roller bearing (2)
Inspect lower lifting arm pins for wear or damage,
positive securement and proper adjustment
Inspect eccentric shaft pins, bearing mounting
screw, washers and securement hardware for
wear or damage, positive securement and proper
operation
Inspect torque tube cams for securement, wear or
damage
Inspect housing cam brackets for securement,
wear or damage
Inspect cylinder(s), hoses, ttings and hydraulic
connections for wear, damage or leaks
Inspect power cable
Ensure T-handle release and cable assembly op-
erate properly. Ensure carriage can be manually
extended and retracted freely.
Resecure, replace or adjust as needed. See
Adjustments and Calibration.
Correct, replace damaged parts and/or relubricate.
Resecure, replace or correct as needed.
Resecure, replace damaged parts, lubricate or
correct as needed.
Resecure, replace damaged parts, lubricate or
correct as needed. See Carriage Ride Height
Adjustment.
Resecure, replace or correct as needed.
Tighten, repair or replace if needed.
Resecure, repair or replace if needed.
1500
Cycles
4500
Cycles
Hydraulic Fluid (Pump) - Check level. Note: Fluid
should be changed if there is visible contamina-
tion. Inspect the hydraulic system (cylinder, hoses,
ttings, seals, etc.) for leaks if uid level is low.
Inspect lifting arm bushings and pivot pins for vis-
ible wear or damage
Inspect outer barrier pivot pin mounting bolts (2)
Mounting
Decals and Antiskid
Use Braun 87010R (5606 aviation uid). Do
not mix with Dextron III or other hydraulic uids.
Check uid level with platform lowered fully. Fill
to maximum uid level indicated on reservoir
(specied on decal). Do not overll. If uid level
decal is not present - measure 7/8" from the bot-
tom of ll tube to locate uid level.
Replace if needed.
Tighten or replace if needed
Check to see that the lift is securely anchored to
the vehicle and there are no loose bolts, broken
welds, or stress fractures.
Replace decals if worn, missing or illegible. Re-
place antiskid if worn or missing.
Consecutive
750 Cycle
Intervals
Repeat all previously listed inspection, lubrication
and maintenance procedures at 750 cycle intervals.

Page 16
Troubleshooting Diagnosis Chart
1.00
NO
OPERATION
2.11 Hydraulic valve open
2.12 Pump mounted horizontal
2.13 No oil (low)
1.11 Low Battery
1.12 Bad ground
1.13 Poor plug connections
1.14 Blown fuse
1.15 Circuit Sentry
1.16 Bad circuit breaker
1.17 Defective Interlock
Check vehicle battery
Check for good ground between vehicle chassis
and 3/8” bolt on back of power pack.
Check all plugs for proper contact.
Check fuses on P.C. board.
Manually reset Circuit Sentry (circuit breaker).
Check self reset circuit breaker next to P.C. board.
Check for voltage on gray wire with red stripes in
interlock plug connected to P.C. board.
FUNCTION POSSIBLE CAUSE REMEDY
2.00
PUMP RUNS
BUT WILL
NOT LIFT
PLATFORM
3.11 Up Solenoid
3.12 Bad power and ground
3.00
PUMP DOES
NOT RUN
WITH MAN-
UAL OVER-
RIDE OR
HAND-HELD
PENDANT
Check for power on black wire going from solenoid
to motor.
See 1.00
Troubleshooting and
repair procedures
must be performed
as specied by au-
thorized service per-
sonnel only. Failure
to do so may result
in serious bodily
injury and/or property
damage.
If a problem occurs with your lift,
discontinue operation immediate-
ly! Do not attempt repairs your-
self. Contact your dealer or call
The Braun Corporation. One of
our national service representa-
tives will direct you to an autho-
rized service repairman who will
inspect your lift.
The cause of the problem can
be determined by locating the lift
function and related symptom in
the Troubleshooting Diagnosis
Charts. The specic cause and
remedy can then be determined
by process of elimination. A Wir-
ing Diagram, Electrical Sche-
matic, Hydraulic Diagram and
Hydraulic Schematic are provided
to aid in troubleshooting.
A Repair Parts section with ex-
ploded views and corresponding
parts lists is also provided. Cor-
rect the problem if possible. If the
problem continues, contact The
Braun Corporation.
W
ARNING
Flush valve by operating manual override switches
up and down at same time for 4 to 5 seconds
several times.
Power pack must be mounted vertically.
Use Braun 87010R (5606 aviation uid). Do
not mix with Dextron III or other hydraulic uids.
Check uid level with platform lowered fully. Fill to
maximum uid level indicated on reservoir (speci-
ed on decal). Do not overll. If uid level decal
is not present - measure 7/8" from the bottom of ll
tube to locate uid level.

Page 17
FUNCTION POSSIBLE CAUSE REMEDY
4.11 Outer Barrier switch is not acti-
vated or defective.
4.12 Full Out switch is not activated or
defective
4.13 Hand-held pendant not working
properly
4.00
LIFT WILL
GO UP WITH
OVERRIDE
SWITCH BUT
NOT WITH
HAND-HELD
PENDANT
Check diagnostic LCD for Outer Barrier switch status.
Barrier is down or barrier release pin partially out.
See Outer Barrier Occupied Calibration on page 5.
Replace if necessary.
Check diagnostic LCD for Full Out switch status.
Adjust or replace as necessary.
Check for hand-held pendant illumination and con-
tinuity of the switches. Verify Door Open switch is
functioning correctly.
5.11 Hydraulic down valve bad
5.12 Dirty down valve (clogged)
5.00
LIFT WILL
NOT GO
DOWN WITH
MANUAL
OVERRIDE
OR WITH
HAND-HELD
PENDANT OR
GOES DOWN
SLOWLY
OR DRIFTS
DOWN BY
ITSELF
Check for power on red wire from P.C. Board to
Down solenoid when pushing manual override
button or hand-held pendant button. Replace if
necessary.
Flush valve by operating Up & Down manual
override buttons at same time for 4 to 5 seconds
several times.
Troubleshooting Diagnosis Chart
6.00
LIFT WILL GO
DOWN WITH
OVERRIDE
BUT NOT WITH
HAND-HELD
PENDANT
6.11 Full Out switch out of adjustment
or defective.
6.12 Door Full Close switch out of
adjustment or defective.
Check diagnostic LCD for Full Out switch status.
Adjust or replace switch as necessary.
Check switches for proper operation/adjustment.
Adjust or replace switch as necessary.
8.00
LIFT WILL NOT
GO OUT WITH
OVERRIDE OR
HAND-HELD
PENDANT
8.11 Poor plug connections
8.12 Bad in/out motor
8.13 Bad power and ground
Check harness connections A1, A2, B1 and B2
Check power at motor. Replace motor if necessary.
See 1.00
9.00
LIFT WILL NOT
STOW WITH
HAND-HELD
PENDANT
9.11 Stow switch out of adjustment or
defective.
9.12 Platform is occupied or out of
calibration.
9.13 Restraint Belt latched
Check diagnostic LCD for Stow switch status.
Adjust or replace as necessary.
Remove weight from platform. See Platform
Sense Calibration on page 5.
Unlatch restraint belt before stowing platform.
Check restraint belt receptacle and wiring.
7.00
LIFT WILL NOT
GO OUT WIT
HAND-HELD
PENDANT
7.11 Missing shunt
7.12 Door Open switch out of adjustment
Verify shunt (jumper) is located in the Door Opera-
tor 4-conductor jack (jumper pins 3 & 4) on the
control board when door operators are not used.
Check switch for proper operation/adjustment.
Adjust or replace switch as necessary.

Page 18
FUNCTION POSSIBLE CAUSE REMEDY
11.00
BARRIER
OPERATES WITH
OVERRIDES BUT
WILL NOT GO
UP WITH HAND-
HELD PENDANT
10.11 Faulty Outer Barrier switch
10.12 Barrier occupied
Check diagnostic LCD for outer barrier status.
Adjust or replace as necessary.
Remove weight from barrier. See Outer Barrier
Occupied Calibration on page 5.
12.00
BARRIER
OPERATES WITH
OVERRIDES BUT
WILL NOT GO
DOWN WITH
HAND-HELD
PENDANT
12.11 Faulty pressure transducer
12.12 Stow switch out of adjustment
or defective
12.13 Full Out switch out of adjust-
ment or defective
Check pressure transducer. Adjust or replace as
necessary. See Ground Sense Calibration on
page 5.
Check diagnostic LCD for Stow switch status.
Adjust or replace as necessary.
Check diagnostic LCD for Full Out switch status.
Adjust or replace as needed.
Troubleshooting Diagnosis Chart
13.00
SWITCHES
DO NOT
ACTIVATE
LED(S)
13.11 No power going to switches
13.12 Faulty wiring
13.13 Faulty connections
Check power on connector A1, pins 1 and 2.
Check continuity of wires from switches to con-
nector A2.
Check for proper connections on each switch and
on each connector on the harnesses. Replace
contact if necessary. See diagram on following
page.
14.00
DOORS
DO NOT
OPEN
14.11 Faulty wiring Check for proper wiring to door openers.
15.00
DOORS
DO NOT
CLOSE
15.11 Lift Out switch out of adjustment
or defective
Lift not stowed fully. Adjust Lift Out switch or
replace.
10.00
BARRIER WILL
NOT OPERATE
UP OR DOWN
WITH HAND-
HELD PENDANT
OR OVERRIDES
10.11 Poor plug connections
10.12 Faulty barrier actuator motor
or actuator out of adjustment
10.13 Bad power and ground
Check harness connectors A1 and A2, E1, N1,
N2, E1, F1 and F2.
Check power at motor. Adjust or replace actuator
if necessary.
See 1.00
Table of contents
Other Braun Wheelchair manuals

Braun
Braun Under-Vehicle Lift NUVL604XB User manual

Braun
Braun Under-Vehicle Lift NUVL855C User manual

Braun
Braun Under-Vehicle Lift NUVL855C User manual

Braun
Braun Millennium 06 Series Supplement

Braun
Braun UVL 603A User manual

Braun
Braun Century 2 NCL Series User manual

Braun
Braun Under-Vehicle Lift NUVL855R User manual

Braun
Braun A1 series User manual

Braun
Braun NCL Century 04 Series User manual