manuals.online logo
Brands
  1. Home
  2. •
  3. Brands
  4. •
  5. Breville
  6. •
  7. Toaster
  8. •
  9. Breville Bit More Plus User manual

Breville Bit More Plus User manual

the Bit More™Plus
Instruction Book - BTA435 & BTA440
2
BREVILLE
RECOMMENDS
SAFETY FIRST
At Breville we are very safety
conscious. We design and
manufacture consumer
products with the safety of you,
our valued customer, foremost
in mind. In addition we ask
that you exercise a degree of
care when using any electrical
appliance and adhere to the
following precautions.
IMPORTANT
SAFEGUARDS
READ ALL
INSTRUCTIONS BEFORE
USE AND SAVE FOR
FUTURE REFERENCE
•Remove and safely
discard any packaging
material or promotional
labels before using the
toaster for the first time.
•To eliminate a choking
hazard for young children,
remove and safely discard
the protective cover fitted
to the power plug of this
appliance.
•Do not place the toaster
near the edge of a table,
counter or bench top
during operation.
Ensure the surface is level,
clean and free of water.
•Do not place the toaster
on or near a hot gas or
electric burner, or where
it could touch a heated
oven.
2IMPORTANT SAFEGUARDS
7Components
8Functions
10 Care & Cleaning
Contents
3
•Keep appliance clear
of walls and other heat
sensitive materials such as
cloths and curtains.
•Do not use the toaster on
sink drainboard.
•Always ensure the toaster
is properly assembled
before use. Follow the
instructions provided in
this book.
•Ensure that bread to be
toasted is the correct size
for the toaster and does
not protrude above the
bread slice opening.
Ensure the bread is not
too thick or long that it
will jam or wedge the
bread carriage.
•Never cover the toaster
whilst it is plugged into
the power outlet or while
hot.
•Do not place toast directly
on top of toasting slots
to warm toast as this
may prevent correct air
circulation and damage
the appliance.
•Do not move the toaster
whilst in operation or
when hot.
•Do not touch hot surfaces.
Use side areas for
lifting and carrying the
appliance.
•Do not leave the toaster
unattended when toasting.
•Always turn the power off
at the power outlet and
then remove the power
plug from the power
outlet before attempting
to move the appliance,
when the appliance is not
in use and before cleaning
or storing.
•Do not allow bread
crumbs to accumulate in
the bottom of the toaster.
Failure to clean the crumb
tray regularly may result
in a fire hazard.
•Do not clean with metal
scouring pads.
Pieces can break off the
pad and touch electrical
parts creating an electric
shock hazard.
4
•Keep the appliance clean.
Follow the cleaning
instructions provided in
this book.
•Unwind the power cord
fully before use.
•Do not let the power
cord hang over the edge
of a table counter, touch
hot surfaces or become
knotted.
IMPORTANT
SAFEGUARDS
FOR ALL
ELECTRICAL
APPLIANCES
•This appliance is not
intended for use by
persons (including
children) with reduced
physical, sensory or
mental capabilities,
or lack of experience
and knowledge, unless
they have been given
supervision or instruction
concerning use of the
appliance by a person
responsible for their safety.
•Children should be
supervised to ensure
they do not play with the
appliance.
•It is recommended to
regularly inspect the
appliance. Do not use
the appliance if power
supply power cord, plug
or appliance becomes
damaged in any way.
Return the entire
appliance to the nearest
authorised Breville
Service Centre for
examination and/or repair.
•Any maintenance other
than cleaning should
be performed at an
authorised Breville
Service Centre.
•This appliance is for
household use only.
Do not use this appliance
for anything other than
its intended use. Do not
use in moving vehicles
or boats. Do not use
outdoors.
5
•The installation of
a residual current
device (safety switch)
is recommended to
provide additional safety
protection when using
electrical appliances.
It is advisable that a
safety switch with a rated
residual operating current
not exceeding 30mA be
installed in the electrical
circuit supplying the
appliance. See your
electrician for professional
advice.
•To protect against electric
shock, do not immerse
cord, plug or appliance in
water or any other liquid.
•Always turn the power off
at the power outlet and
then remove the power
plug from the power
outlet before attempting
to move the appliance,
when the appliance is not
in use and before cleaning
or storing.
•The temperature of
accessible surfaces
may be high when the
appliance is operating.
•This appliance is not
intended for use by young
children or infirm persons
without supervision.
•Young children should be
supervised to ensure that
they do not play with the
appliance.
•This appliance can be
used by children aged
from 8 years and above
and persons with reduced
physical, sensory or
mental capabilities or
lack of experience and
knowledge if they have
been given supervision
or instruction concerning
use of the appliance in a
safe way and understand
the hazards involved.
•Children shall not play
with the appliance.
6
•Cleaning and user
maintenance shall not be
made by children unless
they are older than 8 and
supervised.
•Keep the appliance and
its cord out of reach of
children less than 8 years.
•The appliance is not
intended to be operated
by means of an external
timer or separate remote
control system.
•Bread may burn,
therefore this toaster
must not be used near or
below curtains or other
combustible material and
it must be supervised at
all times when in use.
WARNING
Never operate toaster
on its side. Never add
any food substance to
the bread, muffins or
crumpets as this can lead
to electrocution or fire.
This toaster is for toasting
bread, crumpets and
muffins only. Placing other
items in the toaster can
lead to electrocution or fire.
FOR HOUSEHOLD USE ONLY
SAVE THESE INSTRUCTIONS
7
H
H
A
A
F
FE
E
D
D
G
G
I
I
B
B
C
C
BTA435 - 2 Slice
BTA440 - 4 Slice
Components
A. 'A BIT MORE'™ button
B. FROZEN / 'FRUIT BREAD'™ button
C. Cancel button
D. High lift lever
E. Extra wide and long
self-centering slots
F. Brushed stainless steel design
G. Browning control dial
H. Slide out crumb tray
I. Power cord storage
8
Functions
Before first use, remove any packaging material
or promotional labels attached to your toaster.
1. Insert the power plug into a 220-240 volt
power outlet and then turn the power on.
NOTE
When using the toaster for the first time,
we suggest toasting on the maximum
setting without bread. The toaster may emit
a thin smoke or distinct odour on initial use.
This is normal and not detrimental to the
performance of the toaster.
2. For the Bit More™ Plus 2 slide place only
1 slice of bread or crumpet or half an
English muffin or bagel into each of the
toasting slots. Ensure the bread halves are
not too large or thick to fit the slots.
If less than 2 slices are inserted, the usual
browning setting needs to be reduced to
avoid the toast burning.
For the Bit More™ Plus 4 slice place
2 slices of bread or crumpets or 2 halves
of an English muffin or bagel into each of
the toasting slots. Ensure the bread halves
are not too large or thick to fit the slots.
If less than 4 slices are inserted, the usual
browning setting needs to be reduced
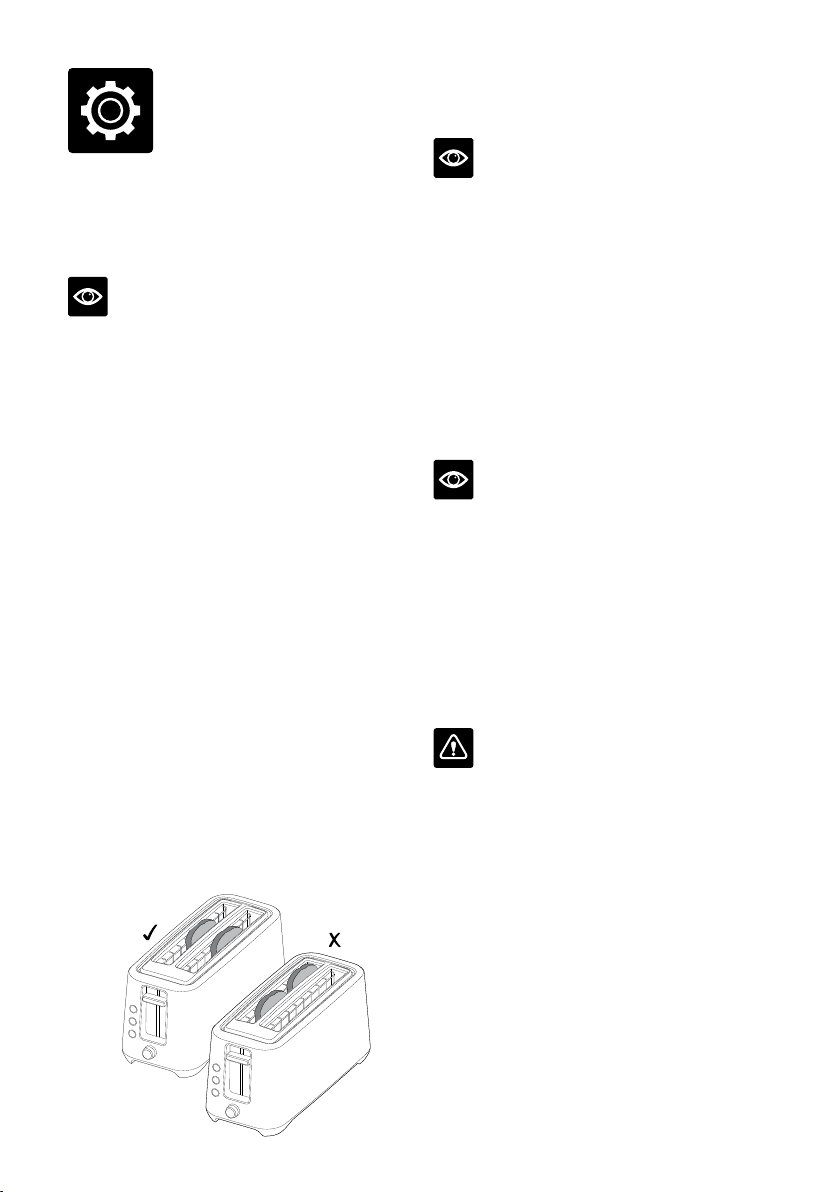
to avoid the toast burning. If toasting 2
slices of bread in the 4 slice toaster, we
recommend placing the bread as per the
illustration below for optimal toasting
results.
3. Select the desired browning setting using
the browning control dial. Colour settings
range from ‘1’ lightest to ‘6’ darkest.
NOTE
When using the toaster for the first time, we
suggest toasting the bread on setting 3 or 4.
Varying types of bread and personal
preference may require a different browning
setting, for example, raisin toast and white
light-textured breads may require a lower
setting, whilst heavier textured rye breads
may require a darker setting.
4. Press the high lift lever down until it
locks into position. The toasting cycle will
automatically commence.
NOTE
If the toaster is not plugged in and switched
on at the power outlet, the high lift lever will
not lock into position.
5. The toaster stops toasting when it has
reached the end of the selected browning
setting. The toast will automatically rise
from the slots. The toasting process can
be stopped at any time by pressing the
CANCEL button.
WARNING
Do not leave unattended when in use as toast
may jam or wedge in the bread carriage.
Never attempt to extract toast, crumpets or
muffins or any other item that has jammed
or wedged in the toaster with a knife or any
other object, as contact with live elements may
not only damage the elements, but can cause
electrocution.
9
‘LIFT & LOOK’™ FEATURE
This feature can be used to check on the
progress of the toasting cycle without
interrupting it. Simply raise the lever to check
on the browning progress of the toast and
lower it down again if you wish to continue to
toast.
HIGH LIFT LEVER
To remove smaller items such as crumpets and
muffins, lift the high lift lever approximately
2cm above the starting position. In the unlikely
event that the bread, crumpet or muffins
become jammed, switch the power off at the
power outlet. Remove the power plug from the
power outlet and then use the high lift lever
to carefully ease the bread out of the toaster,
ensuring that you do not damage the
self-centring slots or the elements.
‘A BIT MORE’™ SETTING
For Extra Toasting & Reheating
Use this feature after the toasting cycle if your
toast requires a bit more toasting or needs
reheating. Once the toast has popped up after
the initial toasting selection has completed,
lower the HIGH LIFT lever back down and
then press the A BIT MORE™ button.
NOTE
The ‘A Bit More’™ setting is to bypass
the normal toasting cycle and toast for
approximately 30 seconds.
FROZEN/FRUIT BREAD SETTING
Toasting Frozen Bread
To toast frozen bread, place the bread into the
toasting slots, select the browning setting you
would normally select if the bread was fresh,
lower the ‘high lift’ lever until it locks into
position and then press the FROZEN/FRUIT
BREAD button once. The button will illuminate
red and cooking time of your selection will be
automatically extended.
To toast fruit bread:
1. Place the fruit loaf into the toasting slots.
2. To start the toasting process, press down
the lever until it locks into place.
3. To select the FRUIT LOAF setting, press the
FROZEN/FRUIT BREAD button twice and
the button will illuminate blue.
4. Select the desired setting by adjusting the
BROWNING CONTROL Dial.
5. The browning settings range from
'1' (lightest) to '6' (darkest).
6. Once the toasting cycle has finished and
the carriage has risen and locked into the
raised position, the toast ready. Remove the
fruit loaf.
NOTE
The ‘A Bit More’™ in Fruit Bread setting is to
toast for approximately 15 seconds.
CANCEL BUTTON
To Stop Toasting
The toasting and defrosting cycles can
be cancelled at any time by pressing the
cancel button. The toaster will turn off and
automatically raise the toast.
10
Care & Cleaning
1. Switch the toaster off at the power outlet
and then remove the power plug from
the power outlet. Allow the toaster to cool
completely before cleaning.
2. To clean any crumbs from the toaster,
remove the crumb tray (located under the
control panel at the front of the toaster) by
pulling it outwards. Empty and replace the
crumb tray before using the toaster again.
Replace the crumb tray by sliding it inwards
until it locks into position.
3. To remove any additional crumbs, turn the
toaster upside down over a bin and shake
crumbs free.
4. Wipe the outside of the toaster with a
slightly dampened soft cloth and then dry it
with a soft dry cloth to dry completely.
NOTE
Do not clean with metal scouring pads. Pieces
can break off the pad and touch electrical parts
creating an electric shock hazard.
STORAGE
Switch toaster off at the power outlet and
remove the power plug from the power outlet.
Allow the toaster to cool completely before
storing. Follow the directions for cleaning and
store in an upright position on a flat surface on
a bench top or in an accessible cupboard.
Do not store anything on top of the toaster.
WARNING
Do not use the toaster without the slide-out
crumb tray in position. Do not allow crumbs to
build up in the crumb tray. Failure to clean the
crumb tray regularly may result in a fire hazard.
11
Notes
Web: www.breville.co.nzWeb: www.breville.com.au
Breville is a registered trademark of Breville Pty. Ltd. A.B.N. 98 000 092 928.
Copyright Breville Pty. Ltd. 2016.
Due to continued product improvement, the products illustrated/photographed
in this brochure may vary slightly from the actual product.
BTA435 / BTA440 D17
Australian Customers
Mail: Locked Bag 2000
Botany NSW 1455
AUSTRALIA
Phone: 1300 139 798
Fax: (02) 9700 1342
Email: Customer Service:
askus@breville.com.au
New Zealand Customers
Mail: Private Bag 94411
Botany Manukau 2163
Auckland NEW ZEALAND
Phone: 0800 273 845
Fax: 0800 288 513
Email: Customer Service:
askus@breville.co.nz
Breville Customer Service Centre

This manual suits for next models

2

Other Breville Toaster manuals

Breville VTT570 User manual

Breville

Breville VTT570 User manual

Breville Colour VTT760 User manual

Breville

Breville Colour VTT760 User manual

Breville Lift & Look Pro User manual

Breville

Breville Lift & Look Pro User manual

Breville VTT550 User manual

Breville

Breville VTT550 User manual

Breville VTT755X User manual

Breville

Breville VTT755X User manual

Breville Toast Select Luxe User manual

Breville

Breville Toast Select Luxe User manual

Breville Selecta VTT953 User manual

Breville

Breville Selecta VTT953 User manual

Breville 'Lift & Look' Touch BTA630XL User manual

Breville

Breville 'Lift & Look' Touch BTA630XL User manual

Breville CT25 User manual

Breville

Breville CT25 User manual

Breville VTT450 User manual

Breville

Breville VTT450 User manual

Breville VST082 User manual

Breville

Breville VST082 User manual

Breville BTA735 User manual

Breville

Breville BTA735 User manual

Breville VTT506X User manual

Breville

Breville VTT506X User manual

Breville ikon CT70 User manual

Breville

Breville ikon CT70 User manual

Breville VTT210 User manual

Breville

Breville VTT210 User manual

Breville BTA340 User manual

Breville

Breville BTA340 User manual

Breville Curve VTT786 User manual

Breville

Breville Curve VTT786 User manual

Breville Lift & Look Pro BTA720 User manual

Breville

Breville Lift & Look Pro BTA720 User manual

Breville Lumina BTO350 User manual

Breville

Breville Lumina BTO350 User manual

Breville VTT715 User manual

Breville

Breville VTT715 User manual

Breville VST057 User manual

Breville

Breville VST057 User manual

Breville VTT284 User manual

Breville

Breville VTT284 User manual

Breville Emporia CT45 User manual

Breville

Breville Emporia CT45 User manual

Breville Ikon CT75XL/A User manual

Breville

Breville Ikon CT75XL/A User manual

Popular Toaster manuals by other brands

Oster TSSTTRJB2R033 user manual

Oster

Oster TSSTTRJB2R033 user manual

Philips HD 4834 quick start guide

Philips

Philips HD 4834 quick start guide

Clatronic TA 3384 instruction manual

Clatronic

Clatronic TA 3384 instruction manual

Scarlett SilverLine SL-1516 instruction manual

Scarlett

Scarlett SilverLine SL-1516 instruction manual

Continental Electric CE23401 user manual

Continental Electric

Continental Electric CE23401 user manual

BETTY CROCKER BC-1618 manual

BETTY CROCKER

BETTY CROCKER BC-1618 manual

WMF Lono 0414090011 operating manual

WMF

WMF Lono 0414090011 operating manual

Cuisinart CPT-140 Series Instruction booklet

Cuisinart

Cuisinart CPT-140 Series Instruction booklet

Wells BT-218 Operation manual

Wells

Wells BT-218 Operation manual

Daewoo sienna SDA2484 user manual

Daewoo

Daewoo sienna SDA2484 user manual

Russell Hobbs STRUCTURE RHT334 Series Instructions & warranty

Russell Hobbs

Russell Hobbs STRUCTURE RHT334 Series Instructions & warranty

Oster 6335 user manual

Oster

Oster 6335 user manual

Morphy Richards Equip TT241001 instructions

Morphy Richards

Morphy Richards Equip TT241001 instructions

Bosch TAT 861 series INFORMATION FOR USE

Bosch

Bosch TAT 861 series INFORMATION FOR USE

Bellini BTT400C manual

Bellini

Bellini BTT400C manual

Aroma ATS-272R instruction manual

Aroma

Aroma ATS-272R instruction manual

Smeg TSF01PGEU manual

Smeg

Smeg TSF01PGEU manual

Back to Basics Paula Deen TEM500PDWH user guide

Back to Basics

Back to Basics Paula Deen TEM500PDWH user guide

manuals.online logo
manuals.online logoBrands
  • About & Mission
  • Contact us
  • Privacy Policy
  • Terms and Conditions

Copyright 2025 Manuals.Online. All Rights Reserved.