BREWISTA Cold Pro Nitro 2 Dual User manual
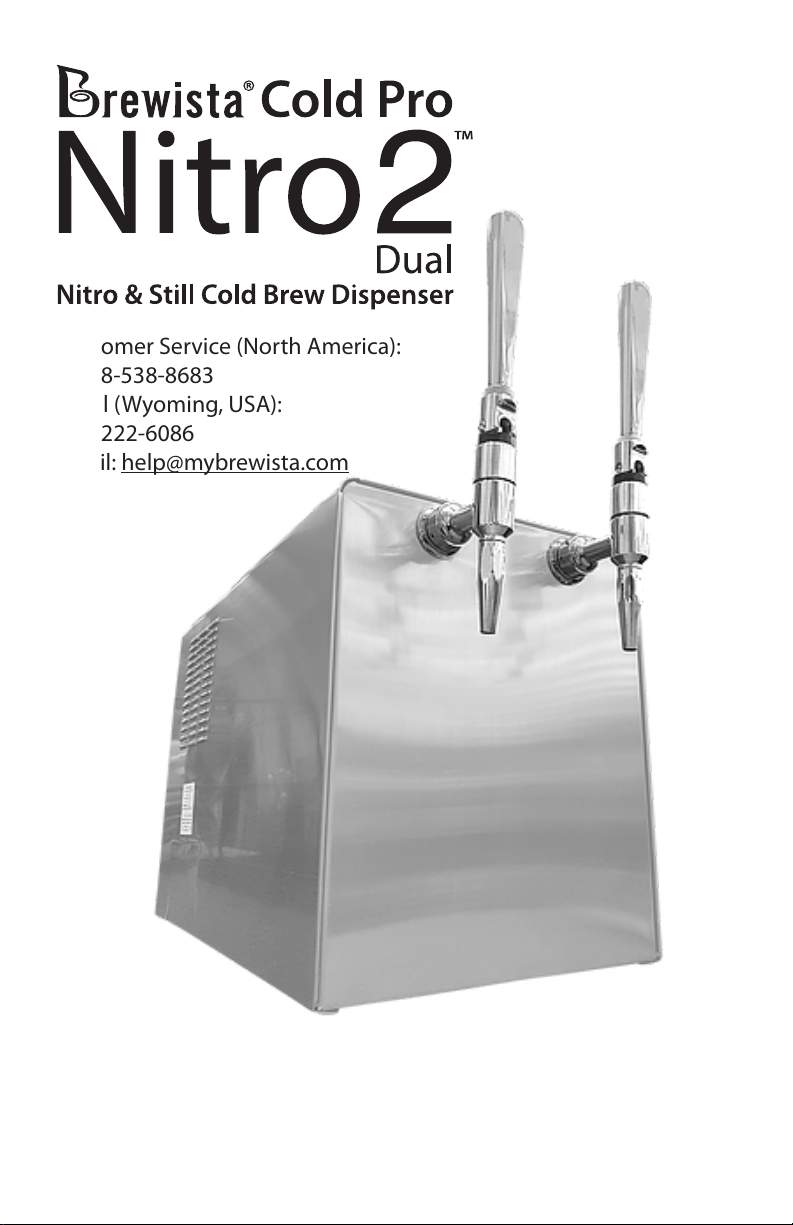
Customer Service (North America):
1-888-538-8683
Local (Wyoming, USA):
307-222-6086
Email: help@mybrewista.com
READ THIS MANUAL PRIOR TO FIRST USE
AND SAVE FOR FUTURE REFERENCE
1-year Limited Warranty
V2PX-NS
2
IMPORTANT SAFEGUARDS
When using electrical appliances, basic safety precautions should always be
followed including the following:
• READ ALL INSTRUCTIONS.
• Place the unit vertically in a level, dry, and clean place.
• Operate dispenser within a temperature range of 45° - 89° F (7 - 32° C).
• To protect against risk of electrical shock, do not put body of the Cold Pro Nitro
2 Dual™ Machine in water or other liquid.
• Never allow water to come into contact with any of the electrical parts of the
Cold Pro Nitro 2 Dual™ machine: There is a danger of creating a short circuit.
• Children should be supervised to ensure that they do not play with the
appliance.
• This appliance is not intended for use by persons (including children) with
reduced physical, sensory or mental capabilities, or lack of experience and
knowledge, unless they have been given supervision or instruction concerning
use of appliance by a person responsible for their safety.
• Always unplug from outlet when not in use, before putting on or removing
parts and before cleaning. To unplug, grasp plug and pull from electrical
outlet. Never pull cord.
• Avoid contacting moving parts. Do not insert objects into rotating parts (fan
or compressor).
• Prevent dirt (dust, bers, etc.) from entering the unit. Operate the Cold Pro
Nitro 2 Dual™ in a dust-free environment.
• Connect only the specied supply voltage.
• Protect the device against moisture, especially by penetrating liquids.
• If the supplied cord is damaged, it must be replaced by the manufacturer, its
service agent, or similarly qualied person in order to avoid a hazard.
• Do not operate any appliance with a damaged cord or plug, or after appliance
has been dropped or damaged in any manner. Return appliance to the nearest
authorized service facility for examination, repair, or adjustment.
• The use of attachments is not recommended as this may cause re, electric
shock, or injury.
• The device is only approved for use with cold liquids and is not suitable for
cooling hot liquids, unltered liquids, chemicals, or similar.
• Do not use outdoors.
• Do not let cord hang over edge of table or counter, or touch hot surfaces.
• Do not attempt to defeat the cover interlock mechanism.
• Be certain all removable doors and compartments are securely locked in place
before operating appliance.
• In case of re, use carbon dioxide (CO2) extinguishers. Do not use water or dry
powder extinguishers.
SAVE THESE INSTRUCTIONS

3
ADDITIONAL SAFEGUARDS
DO NOT OPERATE APPLIANCE IF THE LINE CORD SHOWS ANY DAMAGE OR IF
APPLIANCE WORKS INTERMITTENTLY OR STOPS WORKING ENTIRELY.
EXTENSION CORDS
A short power-supply cord is to be provided to reduce the risk resulting from
becoming entangled in or tripping over a longer cord. Longer detachable power-
supply cords or extension cords are available and may be used if care is exercised
in their use. If a longer detachable power-supply cord or extension cord is used,
1) The marked electrical rating of the cord set or extension cord should be at
least as great as the electrical rating of the appliance, and
2) The extension cord should be a grounding-type 3-wire cord, and
3) The longer cord should be arranged so that it will not drape over the countertop
or tabletop where it can be tripped over, snagged, or pulled on unintentionally
(especially by children).
GROUNDING INSTRUCTIONS
This appliance must be grounded while in use.
CAUTION: To ensure continued protection against risk of electric shock, connect to
properly grounded outlets only.
GROUNDING INSTRUCTIONS
In North American markets the appliance has a plug that looks like Figure A. DO
NOT attempt to insert a power cord into an incompatible outlet. Appliance
damage, electrical system damage or physical harm may result. An adaptor, as
shown in Figure B, should be used for connecting a 3-prong grounding plug to
a 2-wire receptacle. The grounding tab, which extends from the adaptor, must
be connected to a permanent ground such as a properly grounded receptacle as
shown in Figure C, using a metal screw.
Warning: It is best to use this appliance on a dedicated circuit or with all other
appliances o during this appliance’s use. It will not damage electrical systems but
caution should be used to not overload this circuit with other appliances running
at the same time.
Circuit grounding conductor
connected properly
Grounding prong
(A) (B)
Adapter
Grounding means
Adaptor
Cover of grounded
outlet box
Metal mounting
screw
(C)
4
Table of Contents
Cover/Customer Service Information 1
IMPORTANT SAFEGUARDS 2
ADDITIONAL SAFEGUARDS 3
Cold Pro Nitro 2 Dual™ Components 5
Intended Usage 6
Operation Instructions 6
• Assemble your Cold Pro Nitro 2 Dual™ 6
• Connect your Cold Brew Container 6
• Dispensing your Nitro Cold Brew 7
• Adjustable Settings 7
◦Temperature 7
◦Gas Level 8
Higher Cooling Power for High Volume Dispensing 8
Filtration 8
Decomissioning 8
Product Shelf Life 9
Downtimes 9
Cleaning Instructions 9
Maintenance 10
• Remove Dust at Condensator Grid 10
• Changing O-rings and Connectors 10
• Other Maintenance and Repairs 10
Troubleshooting 11
1-year Limited Warranty Information 14
Correct Disposal of this Product 14
Warnings and Technical Data 15
Online User Manual
An electronic version of this manual is available online at the following URL:
https://www.mybrewista.com/nitro-2-dual-manual
5
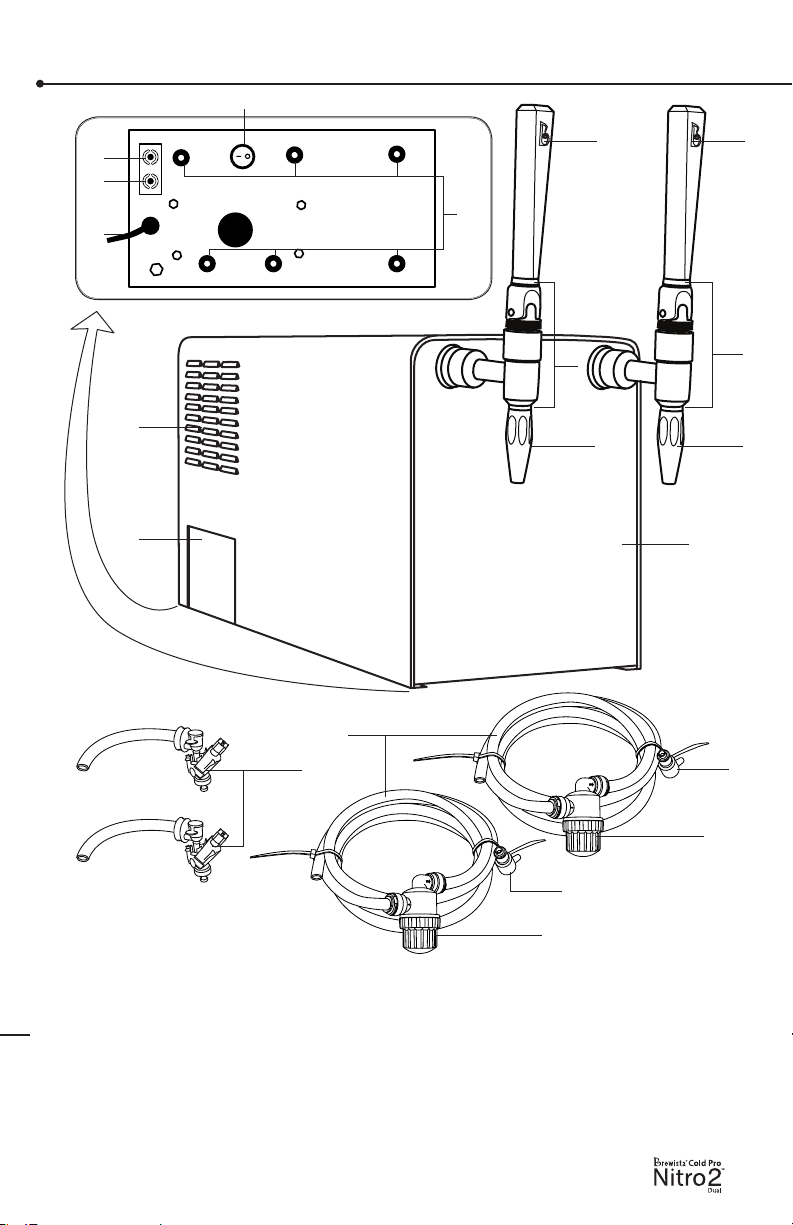
Cold Pro Nitro 2 Dual™ Components
1. Tap Handles
2. Tap Valve Bodies
3. Tap-outlet Spouts
4. Machine Casing
5. Still Cold Brew Inlet
6. Nitro Cold Brew Inlet
7. Power Button
8. Non-slip Feet
9. Power Cord
10. Air Intake Vent
11. Control Panel Cover (protects
Temperature Control and Gas
Level Control)
12. Bag-in-Box Adaptors
13. Intake Line (2.0 m) with Couplers
to connect to dispensers
14. Male Elbow Couplers
15. Intake Filters
15
15
14
14
12
Front
8
5
6
7
Back
11
10
13
11
2
2
33
4
9

6
Intended Usage
The Brewista® Cold Pro Nitro 2 Dual™ Dispenser is a ready-to-use dispenser to tap still and
nitrogenated and cooled beverages in particular cold-brew coee from any pressurized
or non-pressurized container. Such systems are mainly used for professional customers
in cafes, hotels, restaurants, and bars. The nitrogen eect is created through ltered
compressed air which contains 78% nitrogen and chilling it to 36°F (2°C). The device is
only approved for this application and is not suitable for cooling hot liquids, unltered
liquids, chemicals, or similar substances. The Brewista® Cold Pro Nitro 2 Dual™ Dispenser
must only be operated by a trained person. The appliance is not to be used by persons
(including children) with reduced physical, mental, or sensory abilities or with scarce
experience and/or expertise, unless they are supervised by a person responsible for their
safety, or they are instructed by this person on how to properly use the Cold Pro Nitro 2
Dual™ machine.
Operation Instructions
Assemble your Cold Pro Nitro 2 Dual™
1) Place the device in a level, clean, and dry location. Ensure there is enough
space around the machine for proper ventilation — about one inch (2.54 cm)
from the side vents and 4 inches (10 cm) from the top.
2) Let the machine sit upright for 5 hours before rst use so the compressor
works properly.
3) Assemble the tap handles (1) by screwing each on at the top of the dispenser’s
spout component [(2) and (3)].
4) Ensure the power button (7) at the bottom of the machine is switched o. If
the red light inside of the switch is o, then the air compressor is o.
5) Plug in the power cord (9) to a grounded outlet (refer to Additional
Safeguards, page 3).
6) Connect the intake lines (13) to the Cold Pro Nitro 2 Dual™ by pushing the
male elbow coupler (14) into the female couplers [(5) and (6)] at the bottom of
the machine located at the far end of the machine on the bottom.
◦Lift the machine slightly if needed.
◦The female coupler nearest to the side (5) of the machine feeds to the
spout that will dispense chilled still cold brew.
◦The female coupler nearest to the center (6) of the machine feeds to the
spout that will dispense chilled nitro cold brew.
◦To release the coupler attachment, push the metal spring component to
loosen.
7) The pre-lter comes attached upon delivery of the Cold Pro Nitro 2 Dual™
machine. Ensure all tubing is installed rmly at all connections to prevent air
bubbles from entering the tube. Tubing may have loosened during shipment.
◦Note: If a lter adapter is not part of both intake lines, coee grounds
or other particles could block the jet nozzles in the device or impair the
functionality of the membrane pump and make the device unusable.
Connect your Cold Brew Container
• Note: Brewista recommends checking functionality of your system by using
water. This will also help ush out any cleaning solution residue from the
system as well.

7
• Connect the intake line tubing (13) to your cold brew container such as the
Brewista Cold Pro 2™. If your intake line is connected to a keg, be sure the
system can draw air or is fed with inert gas when tapping starts and coee is
dispensed.
For use with the included Bag in Box (BiB) system:
• Connect the BiB Adaptor (12) to your BiB bag of coee or tea. Lift the collet of
your BiB Adaptor and place it on comfortably on the nozzle of the BiB bag.
• Note that the nozzle must be facing the direction of the tube as that will be
the ow of the liquid. Turn the screw at the far side of the BiB Adaptor so that
it pierces the nozzle and is securely in place.
• Connect the BiB adaptor to the Still Cold Brew Inlet (5) or Nitro Cold Brew Inlet
(6) of your Cold Pro Nitro 2 Dual™ using the short length of tubing attached to
it.
◦Use of the provided BiB system included with your Cold Pro Nitro 2
Dual™ is not required. You can use your own BiB bags and adaptors if
you choose. Simply attach your desired BiB adapter to the intake tube
and use a corresponding BiB bag with the appropriate nozzle.
◦If you do not wish to use a BiB system, simply remove the BiB adaptor
from the end of the intake tube.
Dispensing your Nitro Cold Brew
1) Push power button (7) on the bottom of the machine to the“I”(on) position.
2) Place a glass under one of the tap-outlet spouts (3) and pull that spout’s tap
handle (1) forward to about a 90° angle.
3) The unit now pumps the coee from the container and after a short period of
time, cooled and nitrogenated cold brew coee ows out of the tap. You may
need to tap 1-2 glasses until you reach the desired foam level.
4) To stop dispensing, tilt the tap handle (1) upwards to a vertical position.
Adjustable Settings
• Temperature
The target dispense temperature is set at 36°F / 2°C (+/- 2°F or 1°C) by default.
◦The temperature control knob is in the control panel at the side of the
machine.
◦To switch the cooling system o, turn the knob to the OFF position.
Make sure there is an audible clicking sound when turning it o.
◦To achieve the coldest temperature, turn the knob to the MAX position.
8
Higher Cooling Power for High Volume Dispensing
If you need increased cooling power for peak demand situations like high trac events,
use any of the options listed below:
• Pre-cool the coee in the refrigerator before connecting container or BiB system
to the Cold Pro Nitro 2 Dual™.
• Use the Cold Pro Nitro 2 Dual™ dispenser in combination with a refrigerator,
under-counter refrigeration, or a cooling box. In this scenario, the coee remains
cool and does not warm up after connecting to the dispenser.
• Place an additional cooler along the intake line of the dispenser. The coee is
passed through the additional cooler rst on its way to the dispenser.
Filtration
• Ensure that your coee was ltered to a neness of at least 50 μm (microns).
Filtration of 100 μm or more is ideal for use with the Cold Pro Nitro 2 Dual™.
Coarser ltration sizes lead to clogging of the lter in the intake line (13) or of the
tap-outlet spout (3).
• Make sure the intake lter (15) is installed in the intake line to prevent damage to
the interior components of your Cold Pro Nitro 2 Dual™.
• Thick liquids risk slowing down the liquid pump inside the machine.
Decommissioning
• Before putting the dispenser out of service for an extended period of time, we
recommend cleaning the system rst.
• After cleaning, ush the dispenser with clean water.
• Let the dispenser suck air to empty the internal liquid buer of about 25 oz /
750 ml is emptied.
• Disconnect the intake line (13) and unplug the power cord (8).
• Pull tap handle (1) to release internal pressure.
• Protect the dispenser against rain, dust, and temperatures lower than 36° F (2° C)
or higher than 98° F (37° C).
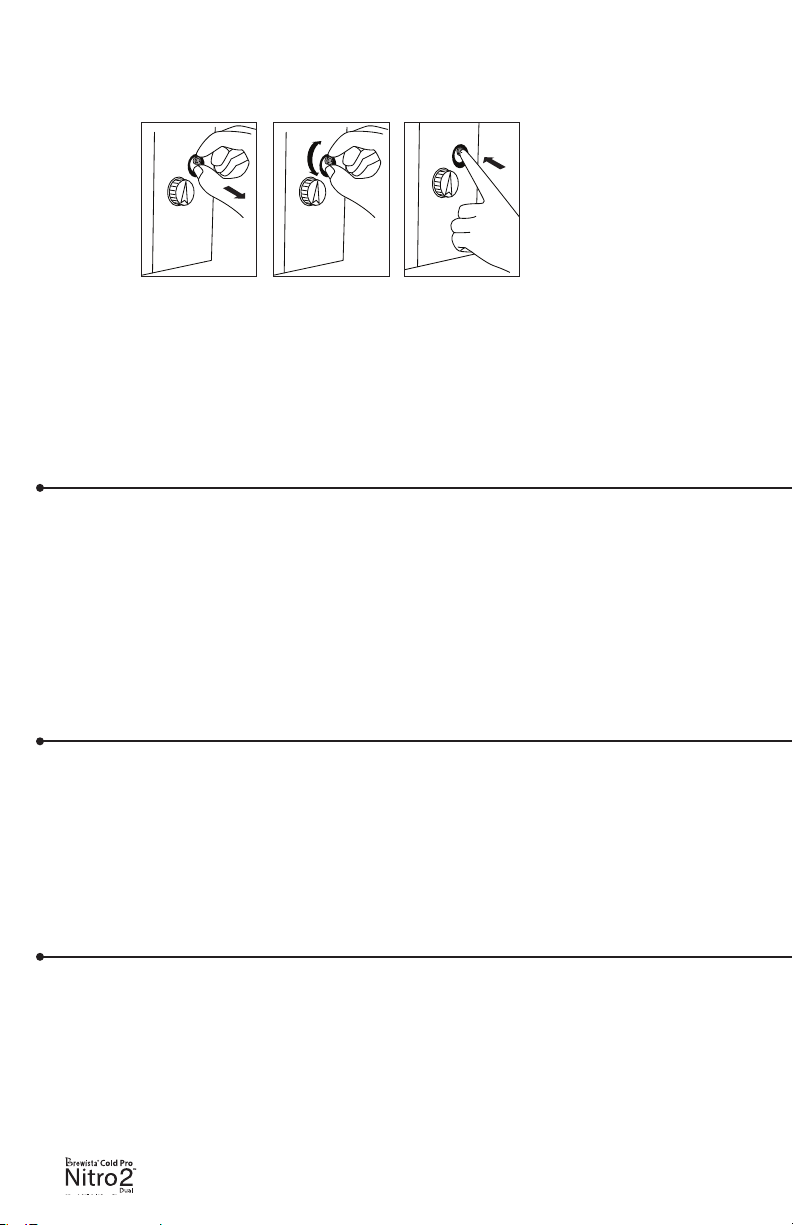
• Gas Level
Locate the nitrogen control knob in the control panel (11) at the side of the
machine.
Pull nitrogen
control knob
outwards gently
until it clicks out
of place.
Turn knob
towards the
minus (-) sign
to decrease
the nitrogen
and towards
the plus (+) to
increase.
Push knob
gently until it
clicks in place.
Note:
◦Keep nitrogen level
between 0 (no
Nitrogen) and 2.
◦The default factory
setting for nitrogen
level is at the
recommended level
of 1.
◦Any setting over 2 risks
putting too many large
bubbles in your Nitro
beverage.
9
Product Shelf Life
The product shelf life after setup/connection depends on several circumstances that are
independent from the dispenser itself. These include:
• Shelf life of product before connection
• Connection spout system (hygienic concept / design)
• Ambient or cooled environment before and after connection
• Tapping frequency
• Cleaning frequency and detergent used for cleaning
Product shelf life and the product quality are the responsibility of the operator of the
dispenser.
Downtimes
• If the dispenser is not used for more than 2 days it should be ushed with fresh
water before dispensing coee again.
• If the dispenser is not used for more than 10 days, a thorough cleaning should be
performed before restarting the coee dispenser.
Cleaning Instructions
Brewista recommends Cold Pro™ Cleaner for cleaning your Cold Pro Nitro 2 Dual™ System.
The Cold Pro Nitro 2™ needs to be cleaned every 24 hours as described in the steps
below. If it has not been used for a long period of time we recommend cleaning it per the
instructions below.
To clean your Cold Pro Nitro 2 Dual™ System:
1) Flush dispenser with water and then with air (emptying the lines) before
unscrewing and dismantling parts.
2) Unscrew spout (3) and rinse it with fresh water. Use a brush if needed to
remove any particles in the strainer. Reassemble tap parts [(1), (2), and (3)].
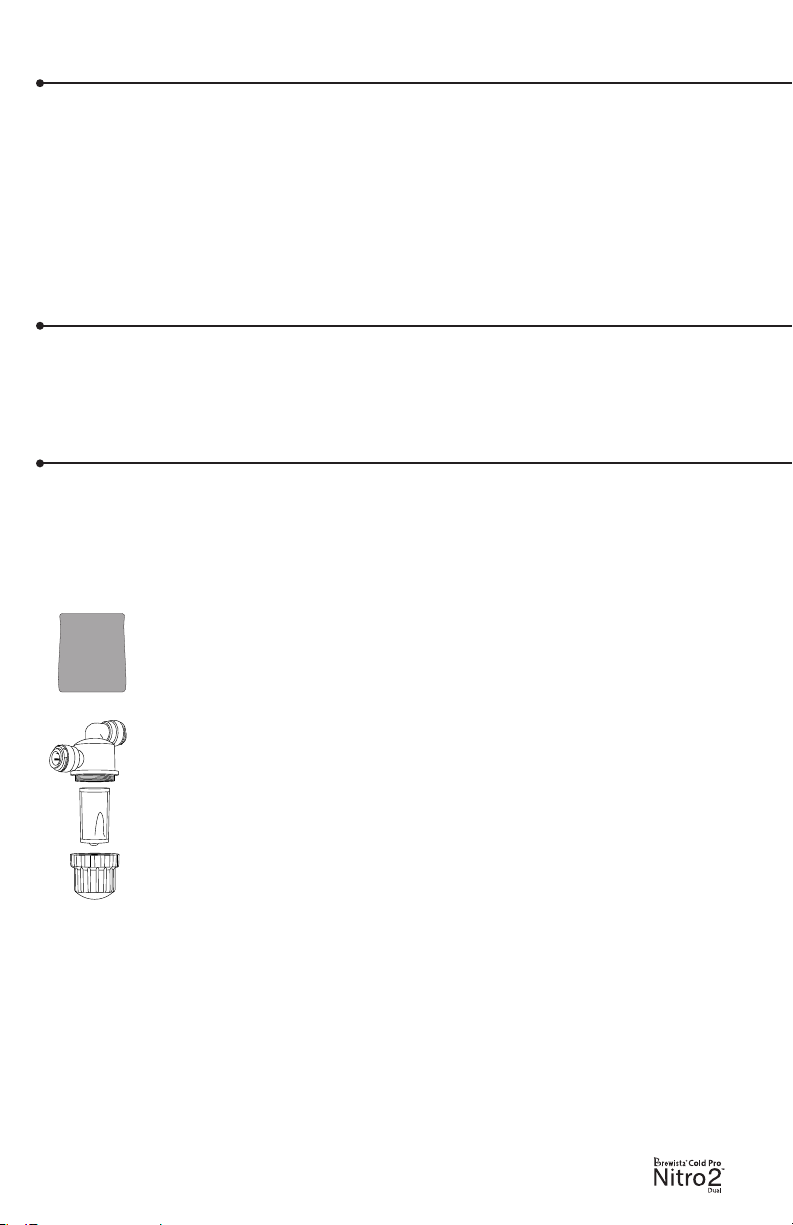
3) Disconnect the intake lter (15) and unscrew it for inspection. Use tools if
necessary as it is tightly screwed. Clean the internal net and then reattach
the cap. Reattach the pre-lter to the intake tube. Replace in the intake line
(13) after cleaning.
4) If used, disconnect your coee container spout system, dismantle, and
clean it as well.
5) Add one teaspoon of Cold Pro™ Cleaner to one liter of water in a container
of your choice. Let the dispenser pull the solution through its lines as it
would with water or coee until the solution leaves the tap. Release tap
handle to stop dispensing the solution.
6) Allow to sit for one hour.
7) Flush the dispenser with water before using it to dispense product.
8) Unscrew the entire tap at its base. Pull out the silicon tube and rinse well
with water. Re-insert the silicon tube and screw the tap back together once
complete. Note that the top part of the silicon tube is perforated and this
should be at the farther end inside the machine.
9) Switch o the air compressor and pull the tap handle (1) again. This
will release any internal pressure. Keep the intake tube (13) connected
throughout.
10) Check the quality of your beverage before serving.
Filter
Adapter
Parts
Cold Pro™
Cleaner
10
Maintenance
The Cold Pro Nitro™ System has very little maintenance requirements.
Remove Dust at the Air Intake Vents (9)
• Blow away any dust particles that settle at the air intake vents on the side of the
dispenser at least every 6 months or as needed. Dust particles on this vent can
reduce the machine’s cooling eciency.
Changing O-rings and Connectors
• If a BiB system is used, O-rings or connectors may need to be changed periodically.
Frequency of changing these parts depends on the specic system being used.
• Brewista recommends checking these connections about once a month to ensure
proper system function.
Other Maintenance and Repairs
• In case of failure, problems, or a suspected fault resulting from a fall, immediately
remove the plug from the power socket and alert a service provider or specialized
technician. Never attempt to operate the Cold Pro Nitro 2 Dual™ if it is faulty.
Please report any fault in the Cold Pro Nitro 2 Dual™ to your service provider. Only
qualied service providers may carry out servicing operations and repairs on
information.

11
Troubleshooting your Cold Pro Nitro 2 Dual™ System
Problem Cause Solution
Not enough or too much
foam
The gas needle valve is not
set up properly.
Follow instructions in the
“Adjusting the Gas Level”
section on page 8. The
needle valve has a default
setup of 1.
A change in the foaming
behavior can also be
a result of a owrate
reduction due to clogging
of the lter adapter (15) or
the spout (3).
Check all lters or strainers
and remove any particles in
it. Unscrew the tap nozzle
(3) and check for particles
lodged in the strainer.
If there is suddenly too
much foam, the dispenser
might be sucking air in via
the product intake line (13).
Ensure that all connections
between the dispenser and
coee container are sealed
well. Sometimes the push-in
connection system causes
air leaks that need to be
removed.
Dispensed coee is not
cold enough
No electrical power or
temperature control is
turned o.
Check the dispenser’s
electrical connection.
If the air compressor is
working then the problem
is not power related. For
maximum cooling, turn the
temperature control to the
MAX position.
When I pour two glasses of
Nitro Cold Brew coee, the
second one is sometimes
slightly less chilled than
the rst one. Why is this
happening?
We recommend pouring
for 45 seconds and then
pausing for 15 sec. before
your 2nd pour. This
allows the coee inside
the fridge to chill to your
desired temperature.
The temperature can be
adjusted on the thermostat
knob on the control
panel. The target pour
temperature is 35.6°F (2°C).
In cases of continuous
pouring, temperature may
rise to 41°F (5°C). If the
cooling capacity of the
device is not strong enough,
you will need to increase
the cooling capacity using
solutions found on page 8.

12
Problem Cause Solution
Dispensed coee is not
cold enough
(Continued)
I have the fridge set at
the coolest possible
temperature but the
beverage is not cold
enough, why is this?
The variance between the
Cold Brew coee in your
container/BiB and at the tap
is 36°F (18°C). This means
if your cold brew coee is
68°F (20°C) then the nitro
coee at the tap will be 36°F
(2°C). For best results, use
cold brew coee that has a
temperature of 68°F (20°C)
or cooler. Do not use frozen
or nearly freezing liquids
with your Cold Pro Nitro 2
Dual™.
The dispenser does not
dispense coee
Filter adapter (15) in the
intake line is clogged.
Check to see if the lter
strainers are clogged and
clean per instructions on
page 9 of this manual if
needed.
Air compressor is turned o
or has no electrical power.
Check the power switch (7)
at the base of the dispenser
to ensure it is turned on and
if the dispenser has power.
Coee is frozen. Unplug the Cold Pro Nitro
2 Dual™ entirely from the
power supply and wait 15
minutes. Repeat until the
machine starts to work
correctly again.
If the gas level to be put
into the coee is set
too high, the gas ow
overpowers the liquid
ow. In this case no coee
comes out of the tap.
Follow instructions in the
“Adjusting the Gas Level”
section on page 8. The
needle valve has a default
setup of 1 mm with a
tolerance of +/- 0.25

13
Problem Cause Solution
The dispenser does
not dispense coee
(Continued)
If the dispenser was used
without a lter adapter
(13) in the intake line (11),
sediment can get into the
pump and damage or block
valve parts. This could lead
to a lack of suction and may
void the warranty.
In such a situation, the
dispenser and the pump
must be ushed with tap
water.
1) Complete step 8 in the
cleaning instructions
of this manual (page 9).
Check to see if there is
a blockage.
2) Test to see if the
dispenser pours.
3) If not, there may be a
bigger blockage in the
liquid pump. You will
need to unscrew the
spout.
4) Remove the BiB
Adaptor and place a
hose at the far end of
the intake tube.
5) Turn power button (7)
on.
6) Pour water into the
intake tube (13) at a
high pressure. Pull
the tap (still without a
nozzle) to ush out any
sediment that is stuck
in the machine.
7) The pressure of the
water will force out any
blockage.
8) Reattach the spout to
the tap.
9) Reattach the BiB
adapter to intake tube
(15).
10) Resume normal
operation.

14
Correct Disposal of this Product
This symbol indicates that this product should not be disposed of
with other household wastes throughout the European Union. To
prevent possible harm to the environment or human health from
uncontrolled waste disposal, recycle it responsibly to promote the
sustainable reuse of material resources. To return your used device,
please use the return and collection systems or contact the retailer
where the product was purchased. They can collect this product for
environmentally safe recycling.
LIMITED WARRANTY
1-Year Limited Warranty from the date of original purchase.
1. This warranty extends only to the original consumer, purchaser, or gift
recipient. Keep the original sales receipt, as proof of purchase is required to
make a warranty claim. The product must be purchased at an authorized
retailer for the warranty to be valid.
2. Defects that occur due to improper connection, improper handling, poor water
quality, or repair attempts by non-authorized persons are not covered by the
warranty. The same applies for failure to comply with the use of consumables
(e.g. cleaning and decalcifying agents) that do not correspond to the original
specications.
3. Routine wear parts (e.g. seals and valves) and fragile parts, like glass, are
excluded from the warranty.
4. Damages which are not under responsibility of the manufacturer are not
covered by the warranty. This is valid, especially for claims arising from
improper use (e.g. operation with wrong type of current or voltage).
5. The guarantee becomes void if repairs are carried out by third parties, who
are not authorized by the manufacturer to do so and/or if spare parts are used
other those from the original equipment manufacturer.
6. Failure to comply with any important safeguards listed in section 1 will void
the limited warranty.
To make a warranty claim, do not return this appliance to the store. Please email
type, and serial numbers on your appliance and have available for the call or
include in your email.

15
WARNING: Never leave the unit unattended while appliance is
running, especially if there are children nearby.
WARNING: Do not immerse the unit in water or any other
liquid. This may cause electric shock or damage
the appliance.
TECHNICAL DATA
For countries with voltage
ranging from 110-127V
Rated voltage: 115 V ~60 Hz
Rated current: 3.2A
Rated power input: 368W
For countries with voltage
ranging from 220-240V
Rated voltage: 220-230 V ~50 Hz
Rated power input: 280W / 1.45-1.52 A

1133 W. 27th Street, Cheyenne, WY 82001, USA | www.mybrewista.com
Toll Free in North America: 888-538-8683 | Local: 307-222-6086
V2PX-NS
Table of contents
Other BREWISTA Dispenser manuals


