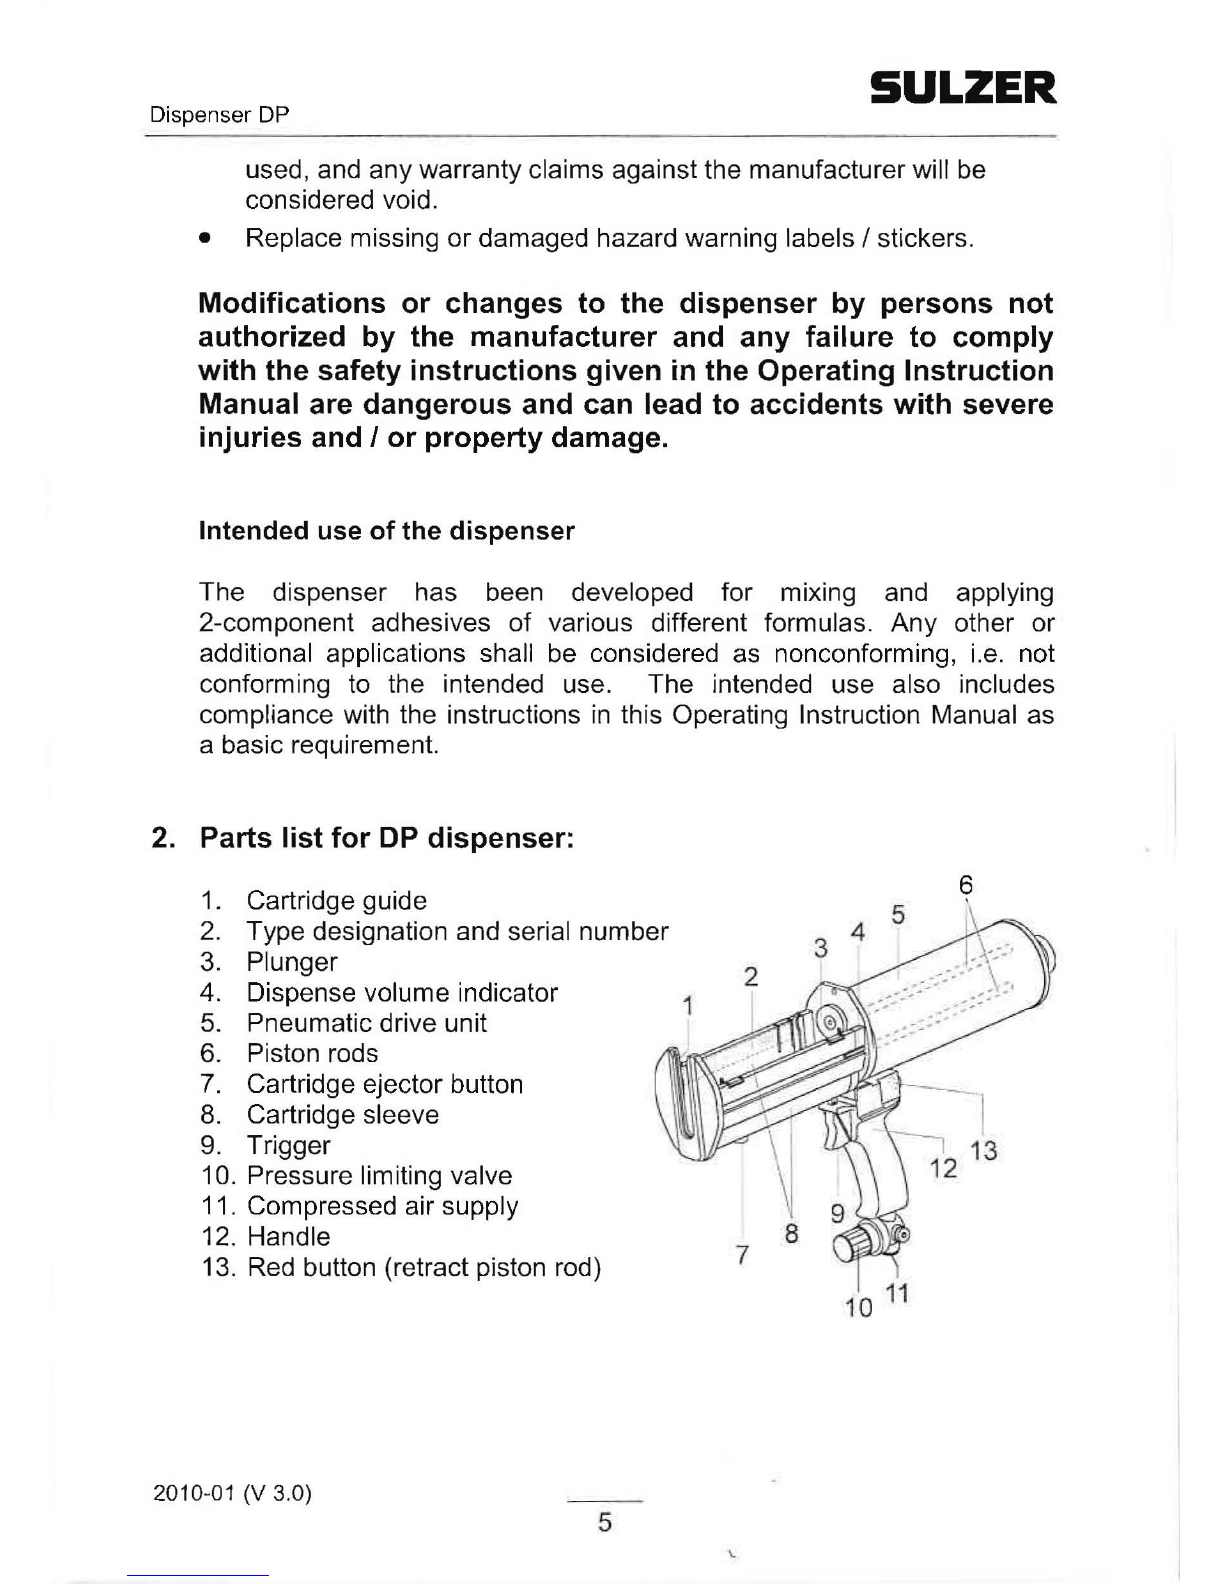
Sulzer DP 400-85 Instruction Manual

SULZ
ER
Operating
lnstruction
Manual
DP 200-70
DP 400-85
DP 400-100
Dispenser
for
2-component
adhesives
Art.
Nr.
007602

SULZER
Dispenser
DP
Contents:
1. Safety instructions
Symbols used
in
the Operating lnstruction Manual and
on
the dispenser
Explanation of the safety concept
lntended use
2.
Parts Iist for
DP
dispenser
3. Preparing the dispenser for use
Package contents
Preparation for use
Operating principle
Preparing the dispenser
4. Operation of the dispenser
Insert cartridge
Connect the dispenser to the compressed air supply
Dispensing the adhesive
Removing the cartridge
5. Troubleshooting
6.
Maintenance and repair
Notices
Information for ordering spare parts
7.
Technical data
8.
Standards applied
Always keep this instruction manual easily accessible
to
users of the
dispenser.
2010-01
(V
3.0) 2
3
3
4
6
7
7
7
8
8
8
9
9
10
10
11
11
12
12
12
13
13

SULZ
ER
Dispenser DP
1.
Safety instructions
•
Read through this dispenser Operating lnstruction Manual
carefully. For safe and reliable operation, it
is
essential for
users to understand and follow all the safety instructions
_ provided
in
the Manual.
Symbols used
in
the Manual and
on
the dispenser
•
•
CE
INFORMATION
lmportant information
on
installation, operation or
maintenance.
DANGER I CAUTION
Risks or hazardous applications that can result
in
severe I fatal injuries or considerable material
damage.
WEAR GLOVES
Failure to do so can result to serious personal
injury
WEAR SAFETY GOGGLES
Failure to do so can result to serious personal
injury
CE
The
DP
dispenser
is
marked with the
CE
symbol
in
compliance with the applicable European
directives.
Do
not use the dispenser until you have read and understood the
operating procedure and the instructions contained
in
this Operating
lnstruction Manual. The dispenser operates under high pressure.
Failure to follow these instructions can Iead to inadvertent
discharge of pressure or breakage
of
the dispenser at high
pressure and may result
in
serious personal injury to the user or
bystanders and/or property damage.
2010-01 (V 3.0) 3

SULZ
ER
Dispenser DP
The following instructions must be read and strictly observed:
•
•
•
•
•
•
•
•
•
•
•
•
•
•
•
()
The user of the dispenser and any persans
.
.
~1.·
. standing in
th
e vicinity mustwear safety
1 goggles and gloves at all times during
operation of the dispenser.
The user should never point the barre! end of the dispenser at
hirnself or
in
the direction of bystanders [animals] or objects during
operation.
Never open the pneumatic drive or attempt to remove.
Handlethe
dispenser properly. Store
in
a cool dry place. Transport
it carefully, with minimal vibration. Do not drop it to the ground or
slam it
on
a bench or other workspace.
Safety devices must not be removed, worked around, bypassed or
deactivated during operation.
Always comply with the warnings and notices
on
the device. Never,
under any circumstances, remove these warnings and notices.
Replace them immediately if they become detached or illegible.
Do not remove, tamper or manipulate pressure limiting valve and
strictly respect pressure Iimits.
Check the dispenser for visible darnage and defects before each
use. The dispenser must only
be
used if it is
in
good working order.
lf you have any doubt about the condition of the dispenser, or if
there are any signs
of
breakage or other damage, immediately stop
using the device and send it for inspection and repair by a site
authorized by the manufacturer.
Keep the dispenser clean at any time. Failure
to
do so may result
in
malfunction of dispenser or bodily injury.
Do not attempt to modify or repair the dispenser. Maintenance and
repairs must
be
carried out exclusively by qualified specialists.
No
such work may be carried out while the dispenser
is
connected to
the compressed air supply.
Always follow safe workplace practices, such as making sure the air
hoses are carefully routed so that neither you nor any other person
can become entangled
in
the hoses or trip over them.
Be cautious connecting and disconnecting air pressure hose.
Always keep this instruction manual easily accessible to users of the
dispenser.
Only authentic Sulzer Mixpac spare parts may be used. Maltunetions
or accidents may result if spare parts of other manufacturers are
2010-01 (V 3.0) 4

SULZER
Dispenser DP
used, and any warranty claims against the manufacturer will be
considered void.
• Replace missing or damaged hazard warning Iabeis I stickers.
Modifications or changes to the dispenser by persons not
authorized by the manufacturer and any failure to comply
with the safety instructions given in the Operating lnstruction
Manual are dangerous and can Iead to accidents with severe
injuries and I or property damage.
lntended use
of
the dispenser
The dispenser has been developed for
m1x1ng
and applying
2-component adhesives of various different formulas. Any other or
additional applications shall be considered as nonconforming, i.
e.
not
conforming to the intended use. The intended use also includes
compliance with the instructions
in
this Operating lnstruction Manual as
a basic requirement.
2.
Parts Iist for
DP
dispenser:
1.
Cartridge guide 6
2. Type designation and serial number
3.
Plunger
4.
Dispense volume indicator 2
5.
Pneumatic drive unit
6.
Piston rods
7.
Cartridge ejector button
8.
Cartridge sleeve
9.
Trigger
10. Pressure limiting valve
11
. Compressed air supply
12.
Handle
13.
Redbutton (retract piston rod) 8
7
201
0-
01
(V 3.0) 5

Dispenser DP
3.
Preparing the dispenser for use:
Package contents
• Dispenser
• Mixer
(not supplied)
Preparation for use
SULZER
• Cartridge sleeve
• Operating lnstruction
Manual
OJJ
Users must read and understand the Operating lnstruction
Manual before first use of the dispenser.
Operating principle
The air pressure is reduced by the
pressure reduction valve
(1
0). The
piston rods (6) are pushed out of the
housing by the pneumatic piston of
the drive unit (5), thereby forcing the
component compounds A and B
through the mixer.
2010-01 (V 3.0) 6
6

SULZ
ER
Dispenser DP
The dispenser operates under high pressure. Failure to
follow the instructions
in
this Manual can Iead to
inadvertent release of pressure, or breakage
of
the
dispenser at high pressure and may result
in
serious
personal injury to the user or bystanders and/or property
damage.
Preparing the dispenser
•
•
•
Remave the protective cap (11) from the pressure
reduction valve (10). 1
lnstall a %" BSP adapter (external thread)
on
the inlet
side of the pressure reduction valve, ready for the
quick-release coupling. ,•
Use a highly flexible pneumatic hose
of
size DN6 with
a quick-release coupling matehing the adapter.
11
Caution: DANGER OF CRUSHING.
Never place your hands or fingers between the plunger
and the cartridge.
The input pressure
of
the compressed air must not exceed
max. 8 bar (max. 120 psi). Requirements for the
compressed air supply (see Technical Data).
Strictly follow the manufacturer's safety instructions for the
2-component adhesive.
2010-01 (V 3.0) 7

SULZER
Dispenser DP
4. Operation
of
the
dispenser
Insert
cartridge
Never
insert
the
cartridge
while
the
dispenser
is
connected
to
the
compressed
air
supply.
Push the cartridge into the cartridge
sleeve as shown in the drawing and
press it down until it clicks into
position. To remove the cartridge
stopper, unscrew the cap nut of the
cartridge.
Fasten the mixer using the cap nut on
the cartridge outlet thread.
lfthe cartridge
is
not
in
the correct position, the trigger (9)
cannot
be
pressed.
Connect
the
dispenser
to
the
compressed
air
supply
Connect the compressed air hose to the compressed air inlet via the
quick-release coupling.
2010-01 (V 3.0) 8

SULZER
Di
spenser DP
Dispensing the adhesive
Press the trigger (9). Dispensing is started,
and the red dispense volume indicator (4)
moves forward. When the trigger (9)
is
released, dispensing stops.
The dispense volume can
be
controlled by means of the
pressure reducing valve
(1
0).
10
a) Pull the pressure reduction valve.
b) Adjust the dispense volume by turning the
adjuster
in
the +
or-
direction.
c) Press the pressure reduction valve to confirm
the set value.
~
~
)
b)
+
4
Do not remove, tamper or manipulate pressure limiting valve and
strictly respect pressure Iimits.
Removing the cartridge
Release the trigger (9) and press the
red
button (13) until the feed plungers have
retracted to the back end-stop. Using the
release button (7), push the cartridge
out
of
the cartridge retainer and
pull it upwards out
of
the unit.
•
2010-01 (V 3.0)
Dispose of the cartridge and mixer
in
conformity with the
manufacturer's specifications.
9

SULZER
Dispenser DP
5. Troubleshooting:
Problem Potential Cause Remedy
Plunger discs cannot Cartridge not fully Check that there
is
enter the cartridge inserted
in
cartridge
no
foreign matter
in
bed the cartridge bed.
Push the cartridge
fully down into the
cartridge bed. Mind
your fingers.
The cartridge cannot The plunger discs are Press the red button
be
removed from the still
in
position inside to fully retract the
dispenser. the cartridge. plunger discs to the
back end-stop.
6.
Maintenance
and
repair:
Notices
•
&
2010-01 (V 3.0)
All
maintenance and repairs must only
be
carried out by
sites authorized by the manufacturer and exclusively by
qualified and suitably trained personnel.
Always disconnect the compressed air supply from the
dispenser during maintenance and repairs.
Never open the pneumatic drive unit. lfthe pneumatic
drive unit
is
or appears to be
in
need of maintenance or
repair, contact a Sulzer Mixpac authorized Service Center.
Keep the dispenser clean at any time. Failure to do so
may result
in
malfunction of dispenser or bodily
injury.
Do not use aggressive cleaning products to clean the
surface of the device.
10

SULZER
Dispenser DP
Information for erdering spare parts:
When ordering spare parts, please provide the following information:
• Serial number
• Dispenser type
• Product description I spare part
7. Technical data:
Operating pressure:
Compressed air supply:
Air requirements:
Pressure adjustment:
Sound Ievei:
Weight:
max. 6 bar (max.
87
psi)
max. 8 bar (max. 120 psi)
ISO 8573-1 2.4.2
lnfinitely variable
83
dBA
DP
200-70
DP
400-85
DP 400-100
1.6 kg
2.2
kg
2.4
kg
8. Codes and standards applied:
8.1
Codes:
2006/42/EC: Machinery Directive
8.2 Standards:
EN
ISO 8573-1:2000 Compressed air quality
Glasses
Original manual written
in
German
2010-01 (V 3.0)
11
This manual suits for next models
2
Table of contents
Other Sulzer Dispenser manuals
Popular Dispenser manuals by other brands

Dispense-Rite
Dispense-Rite SLR-2 Series INSTALLATION & BAFFLE SELECTION INSTRUCTIONS

Wagner Ewar
Wagner Ewar WP1300 Series Manual instructions for use

TAKE-A-LABEL
TAKE-A-LABEL TAL-750HD-18 operating instructions

UnicornHygienics
UnicornHygienics Multivend Technical reference manual

ASI
ASI EZ FILL Troubleshooting and maintenance guide

Rocket Pack
Rocket Pack DPD200 Operation and instructions