BrightSign HD120 User manual

BRIGHTSIGN QUICK START GUIDE
HD120, HD220, HD1020, XD230, XD1030, XD1230
BrightSign, LLC. 16795 Lark Ave., Suite 200 Los Gatos, CA 95032 | 408-852-9263 | www.brightsign.biz

TABLE OF CONTENTS
What’s in the box? 1
What is BrightSign? 2
Benefits 2
Capabilities 2
Models 3
Getting Started 4
Connecting a display 5
Using an HDMI cable 5
Connecting speakers 6
Setting up BrightSign Players 7
Creating presentations 10
Creating a Full-Screen Presentation 10
Creating a Multiple Zone Presentation 13
Creating an Interactive Presentation 17
Publishing Presentations 23
Next steps 26

1
What’s in the box?
BrightSign Player Power Adapter
Rubber feet Cable Mount International prongs
SD slot cover Cable tie
Tip: Use the cable mount and ties to keep the cables securely attached to your BrightSign player.
Note: An SD card is not included in the package, but it is required for the player to function.
.

2
What is BrightSign?
A BrightSign player is a standalone digital sign and kiosk controller. Because BrightSign players are non-PC devices with
no moving parts, they are durable, reliable, and energy-efficient. They are designed specifically for digital signs, making
them an ideal solution for information kiosks, retail displays, video walls, museum exhibits, and more.
Benefits
•Everything included: the hardware, the software, and the networking
•Astonishing full-HD quality
•Reliable solid-state platform designed specifically for digital signage
•Support for interactive displays with buttons, touch screens, and more
•Multi-zone screen layouts and synchronization of multiple displays
•Versatile networking options allowing remote control of presentations
Capabilities
You can use a BrightSign player to do any combination of the following:
•Play content from a Secure Digital card (SD, SDHC, SDXC) or USB Flash drive.
Note: You must format your SD storage using FAT32
•Display content on a high-definition monitor or TV.
for the player to receive network updates and generate logs.
You should only format the storage using NTFS if you need to play media files that are 4GB or larger in size.
•Play looping video, images, and music in HD.
•Divide the display into separate content windows called zones to play back video and images simultaneously.
•Display HTML5 content (available on the XD230, XD1030, and XD1230 only).
•Play live HD video, including HDCP-secured content, using an ATSC/ClearQAM tuner (available on the XD1230
only).

3
•Schedule content to play at specific times (hour, day, month, and year).
•Create looping displays.
•Display RSS feeds and other network information.
•Run interactive presentations that playback content based on inputs from buttons, touch screens, mice, network
devices, and more.
•Synchronize video playback across multiple BrightSign players.
•Update software and content remotely using the BrightSign Network.
Models
To compare BrightSign models and see all the features available for your digital signage, see the BrightSign Product
Comparison Matrix.

4
Getting Started
1. Download the QuickStart.zip file from the following URL: www.brightsign.biz/quickstart.
2. Unzip the file to a location on your PC.
3. Double-click the Setup.exe file and follow the on-screen instructions to install the BrightAuthor software.
Locating the BrightAuthor install file

5
Connecting a display
Using an HDMI cable
Note: The connectors on BrightSign players vary by model. Your BrightSign player may have different connectors from
those displayed above.

6
Connecting speakers
If your presentations include audio, you can route the audio through an HDMI display connected to your BrightSign player,
or you can connect powered speakers to your BrightSign player.

7
Setting up BrightSign Players
Before you can create and publish presentations, you must first set up your BrightSign player(s). To set up a player, you
need to create setup files in BrightAuthor and add those files to a storage device (SD card or USB flash drive). Afterward,
insert the storage (usually an SD card) into the BrightSign player. Remember that if you are using an SD card, it must be
formatted using FAT32
for the player to receive network updates and generate logs.
You can set up your BrightSign players for standalone use, add them to a Local Network, add them to the BrightSign
Network, or set them up for Simple File Networking. Adding players to a network allows you to remotely manage and
update your BrightSign players and presentations. Alternatively, using a BrightSign player as a standalone device requires
inserting an updated storage device into the player each time you want to update content.
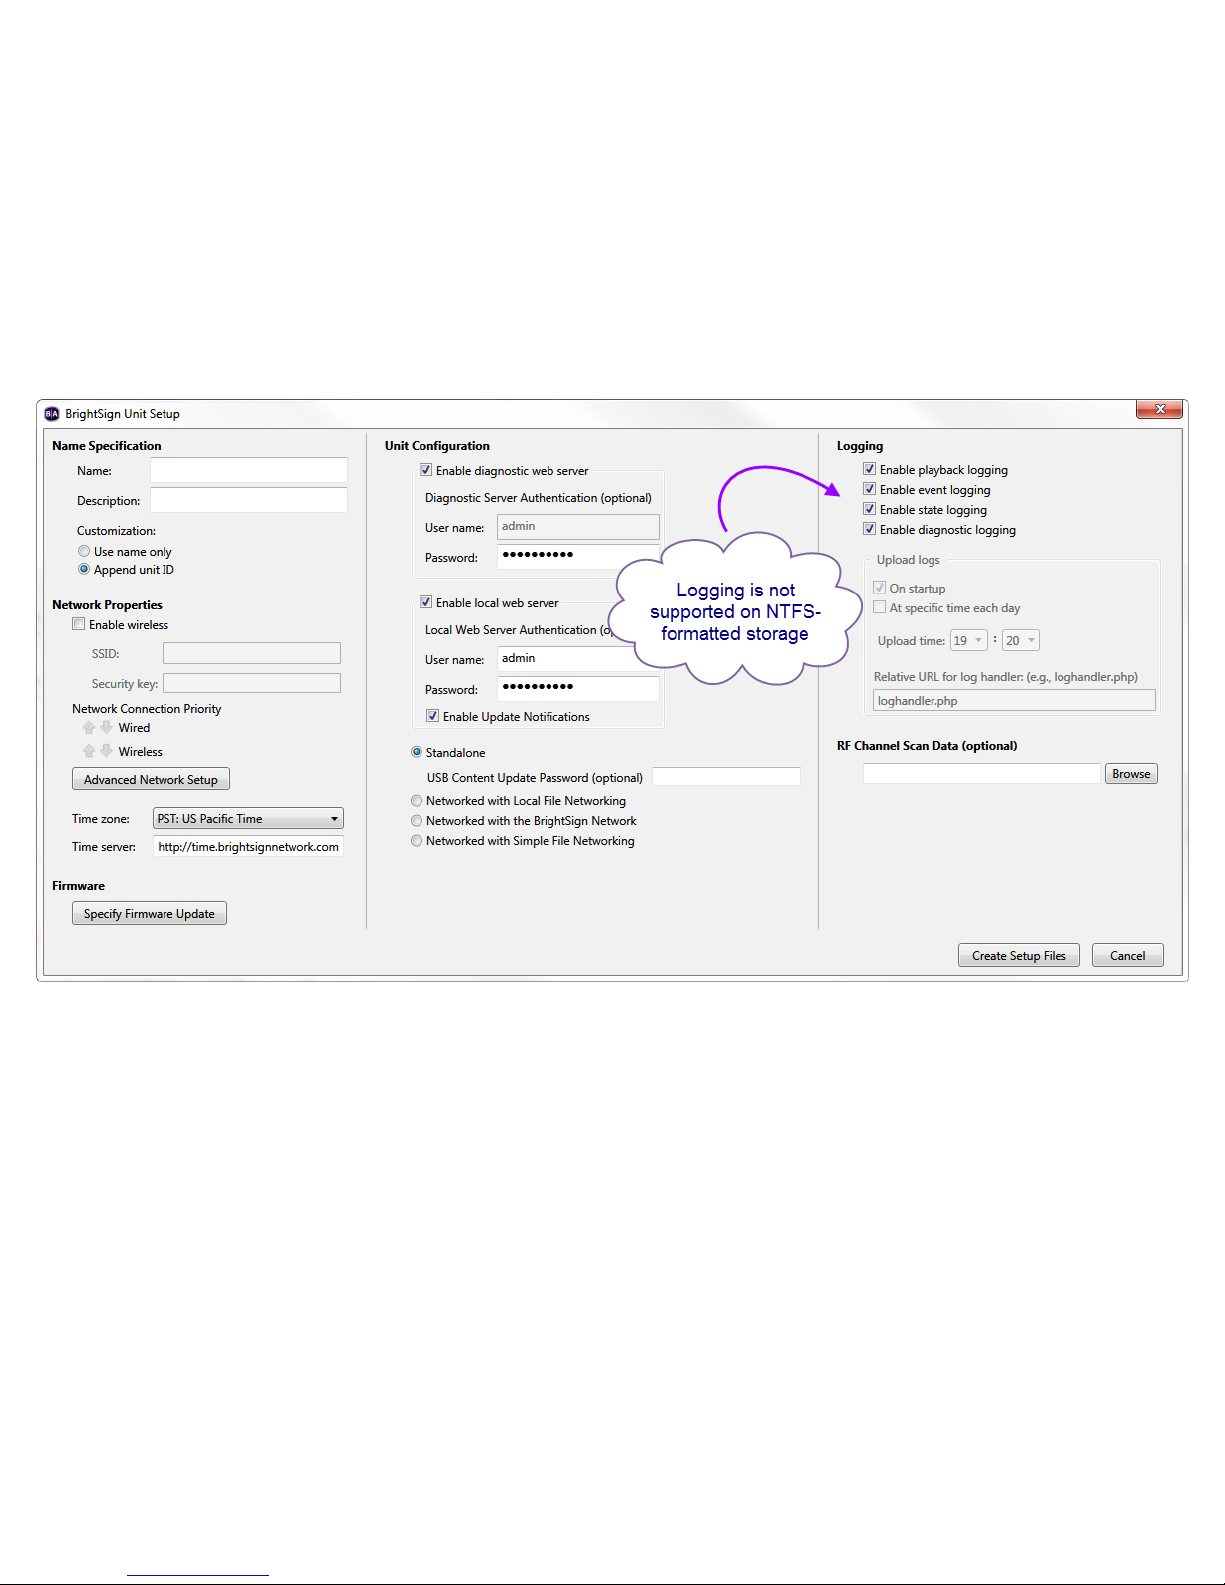
Complete the following steps to set up your BrightSign player. For a detailed description of all items in the BrightSign Unit
Setup window, including optional settings, refer to the BrightAuthor User Guide.
1. On the menu bar, click Tools > Setup BrightSign unit.
2. Under Name Specification, enter a name and description for the unit.
3. Under Network Properties, choose whether you would like to Enable wireless (only some models have wireless
capability; please see the BrightSign Product Comparison Matrix for more details). Choose your preferred Network
Connection Priority.
4. (Optional)Click Advanced Network Setup if you would like to manually configure the player’s IP address. This
window contains other content download options depending on the Unit Configuration option you choose.
5. Under Firmware, indicate whether you want to update the firmware and to which version. BrightAuthor requires a
minimum firmware version to correctly publish presentations to a BrightSign player. The following are the minimum
firmware versions you need for certain units:
•HD120, HD220, HD1020, AU320: Requires firmware version 4.6.46 or later.
•XD230, XD1030, XD1230: Requires firmware version 4.6.46 or later

8
6. Under Unit Configuration, choose one of the four setup options,and then complete these steps:
•Standalone: Under Unit Configuration, enabling the Diagnostic Web Server and Local Web Server is
optional.
•Local File Networking: Under Unit Configuration,enabling the Diagnostic Web Server and Local Web
Server is optional.
Using BrightAuthor to set up a player for standalone use

9
•BrightSign Network: Assign the unit to a group. The player will receive presentations assigned to this
group. Set a Network Connection Frequency and an Update Health Frequency.
•Simple File Networking: In the URL for web folder text field, set the location from which the unit will
download presentations. Set a Network Connection Frequency.
7. Under Logging, set your logging preferences.
8. Click Create Setup Files.
9. Select an SD card or USB flash drive (HD1020, XD1030, XD1230 only) to store the setup files. Click OK.
Note: You must format your SD storage using FAT32
10.Turn off your BrightSign player by unplugging the power adapter. Insert the SD card or Flash drive into the unit.
for the player to receive network updates and generate logs.
You should only format the storage using NTFS if you need to play media files that are 4GB or larger in size.
11.Turn on the BrightSign player by reconnecting the power adapter.
The SD card or USB flash drive must remain connected to the BrightSign player or it will not receive scheduled
presentations from the network. The BrightSign player has no internal storage and therefore cannot receive content
without a storage device connected.

10
Creating presentations
This guide describes how to create three types of presentations: a full-screen presentation, multi-zone presentation, and
interactive presentation. The presentations built in this section are the same as the “FullScreen_HDMI_1080p60.bpf”,
“Zones_HDMI_1080p60.bpf”, “Interactive_HDMI_1080p60.bpf” presentation files that are included in the Quick Start Kit.
You can use these presentation files as a guide to see how each presentation is built when it is complete.
Creating a Full-Screen Presentation
In a full-screen presentation, a single image or video will occupy the entire screen. When you need to create
presentations with more than one image or video, you can use playlists to play multiple files in a loop. This section shows
you how to create a playlist using BrightAuthor and the sample files provided in the Quick Start kit.
1. Create a new BrightAuthor project:
a. Double-click the BrightAuthor icon on your desktop.
b. Click File > New Presentation.
Tip: If you don’t see New Presentation under File, make sure
you have the Edit, Publish, or Manage tab selected in the
upper-left side of the screen.
c. In the Save As field, enter a name for the presentation.
d. In the Where field, enter the folder where you want to store
the presentation. Click Browse to navigate to the desired
folder.
e. Select your BrightSign Model, Connector type, and Screen
resolution.
f. Click Create.
2. Select the Full Screen template.
3. Click Choose.
4. Under Media Library, click Browse and select the Content folder
within the Quick Start Kit folder.
Creating a new full-screen project

11
5. Drag one or more files to the playlist area.
6. Set the order in which files play by dragging them to the playlist area in the desired order. You can change the
order of files already in the playlist by clicking a file and dragging it to a new position.
7. Right-click a file and click Edit:
a. For image files: Specify how long each file displays in the presentation and the type of transition that will
occur when the image file times out.
b. For video files: Specify the volume (between 0-100) of the video.
8. On the Menu bar, click File > Save… to save your presentation.
For details on publishing the saved presentation to your player, see Publishing Presentations.
Locating the Content folder in the Quick Start Kit

12
Playlist of the “FullScreen_HDMI_1080p60.bpf” presentation file provided in the Quick Start Kit

13
Creating a Multiple Zone Presentation
Using zones, you can divide your signage screen into windows and play different types of content simultaneously in each
window, which can include video, audio, images, ticker feeds (RSS or text), or date and time. You can also control
transitions between media files, background color, background image, font, text color, text alignment, and text orientation.
Below are a few examples of BrightSign zone templates:
2-Zone 3-Zone 5-Zone
To create a presentation with multiple zones using the sample content, complete the following steps:
1. Create a new BrightAuthor project:
a. Double-click the BrightAuthor icon on your desktop.
b. Click File > New Presentation.
Tip: If you don’t see New Presentation under File, make sure you have the Edit, Publish, or Manage tab
selected in the upper-left side of the screen.
c. In the Save As field, enter a name for the presentation.
d. In the Where field, enter the folder where you want to store the presentation. Click Browse to navigate to
the desired folder.
e. Select your BrightSign Model, Connector type, and Screen resolution.
Note: This example presentation uses a screen resolution of 1920x1080x60p.
f. Click Create.
2. In the Template window, select the Full screen template and click Choose. In the following steps, we will modify
the zone layout to make it a two-zone vertical presentation with a Video or Images zone and an Images zone .

14
•Video or Images: You can add videos, images, or audio files in this type of zone. If using an HD player, you
can only have one video-enabled zone on screen at a time. If using an XD player, you can have up to two.
•Images: You can add images to this type of zone. Also, you can add as many image zones as you like to a
presentation.
3. Resize the existing zone:
a. Navigate to the Layout screen under the Edit tab.
Resizing the Video or Images zone

15
b. Select and drag one side of the Video Or Images zone to make the zone thinner. Alternatively, you can
specify the exact height and width of each zone using the Wand Hfields on the left.
Tip: For best results, match the width and height of your zone to the width and height of your video/image files.
The content used in the sample multi-zone presentation is 1536x1080 pixels in size.
4. Add a new zone:
a. Click Add Zone in the Zone section on the left.
b. Select an Images zone and specify a name for the zone.
c. Click OK to add the zone to the layout.
Adding and reshaping the Images zone

16
5. Position and resize the new Images zone:
a. Place the Images zone to the right of the Video or Images zone by either dragging it or entering the Xand Y
coordinates into the Position field.
b. Resize the zone by clicking and dragging the corners or by entering the exact width and height into the
Position field. The content used in the Images zone of the sample multi-zone presentation is 384x1080
pixels in size.
6. Add appropriately sized video and image content to the Playlist of each zone.
7. On the Menu bar, click File > Save... to store your presentation.
For details on publishing the saved presentation, see Publishing Presentations.

17
Creating an Interactive Presentation
The HD120, HD220, and HD1020—as well as all XD series of BrightSign players—support various types of interactivity.
For a complete list of features and details for each BrightSign model, see the BrightSign Product Comparison Matrix.
This section of the guide will teach you how to create an interactive presentation with a USB touch screen attached to
your BrightSign player (see this FAQ to learn more about the brands of touch screens we support). Even if you do not
have a USB touch screen connected to your BrightSign player, this example can teach you the basics of interactive
presentations before you attempt more complex projects. Demos for various types of interactive presentations (included
Linked Zones, Touch Screen, and Button Board) can be download from our website.
To create an interactive touch-screen presentation with the sample content, follow these steps:
1. Create a new BrightAuthor project:
a. Double-click the BrightAuthor icon on your desktop.
b. Click File > New Presentation.
Tip: If you don’t see New Presentation under File, make sure you have the Edit, Publish, or Manage tab
selected in the upper-left side of the screen.
c. In the Save As field, enter a name for the presentation.
d. In the Where field, enter the folder where you want to store the presentation. Click Browse to navigate to
the desired folder.
e. Select your BrightSign Model, Connector type, and Screen resolution.
Note: This example presentation uses a screen resolution of 1920x1080x60p.
f. Click Create.
2. In the Template window, select the Full screen template and click Choose.
3. Make your presentation interactive:
a. Navigate to the Playlist window in the Edit tab.
b. Select the Interactive option in the Playlist type field on the right.
4. Make the Quick Start Kit content folder your media library:

18
a. Select the files tab in the Media Library section to the left.
b. Click the Browse button and locate the …\Quick Start Kit\Content folder.
c. Select the content folder and click OK. You should now see the sample image and video files in the Media
Library.
5. Drag the “MainScreen.jpg” file into the interactive playlist area. Adding this file to the presentation first will make it
the Home State (i.e. the media item or state that interactive presentation will always begin with). The Home State
will always be designated with the icon.
6. Add the following files to the interactive playlist area and arrange them approximately as shown below:
“Products1.jpg”, “Products2.jpg”, “Features1.jpg”, “Features2.jpg”, “Showcase.jpg”, “MenuBoard2.jpg”, and
“LiveHDTV2.jpg”.
Adding image files to the Interactive Playlist area
Other manuals for HD120
1
This manual suits for next models
5
Table of contents
Other BrightSign Media Player manuals

BrightSign
BrightSign HD222 User manual

BrightSign
BrightSign XT243 User manual

BrightSign
BrightSign XD230 User manual

BrightSign
BrightSign 4K Series User manual

BrightSign
BrightSign HD2000 User manual

BrightSign
BrightSign XD1230 Specification sheet

BrightSign
BrightSign HD120 User manual

BrightSign
BrightSign HD110 User manual

BrightSign
BrightSign HD110 Owner's manual