Brink Renovent Sky 200 User manual

Renovent Sky 200 (Plus)
WWW.BRINKAIRFORLIFE.NL 614485-C
INSTALLATION INSTRUCTIONS (English)


This appliance can be used by children aged from 8 years and above and persons with reduced physical, sensory
or mental capabilities or lack of experience and knowledge if they have been given supervision or instruction
concerning use of the appliance in a safe way and understand the hazards involved.
Children shall not play with the appliance.
Cleaning and user maintenance shall not be made by children without supervision.
STORE NEAR THE APPLIANCE
Renovent Sky 200 (Plus)
GB

page
1
1.1
1.2
Delivery.....................................................................................................................................................................
Scope of delivery.......................................................................................................................................................
Accessories Renovent Sky 200.................................................................................................................................
1
1
2
2 Application............................................................................................................................................................... 4
3
3.1
3.2
3.3
3.4
Version......................................................................................................................................................................
Technical information.................................................................................................................................................
Connections and dimensions ....................................................................................................................................
Fan graph..................................................................................................................................................................
Exploded view appliance...........................................................................................................................................
5
5
6
6
7
4
4.1
4.2
4.3
4.4
Operation..................................................................................................................................................................
Description.................................................................................................................................................................
Bypass conditions......................................................................................................................................................
Frost protection..........................................................................................................................................................
Renovent Sky Plus version........................................................................................................................................
8
8
8
8
8
5
5.1
5.2
5.2.1
5.2.2
5.3
5.4
5.4.1
5.4.2
Installation................................................................................................................................................................
Installation general ....................................................................................................................................................
Placing the appliance ................................................................................................................................................
Placing the appliance for ceiling mounting................................................................................................................
Placing the appliance for wall mounting....................................................................................................................
Connecting the condensate discharge......................................................................................................................
Electric connections...................................................................................................................................................
Connection of the power plug....................................................................................................................................
“Brink Air control” connection.....................................................................................................................................
9
9
9
10
11
12
15
15
15
6
6.1
6.2
6.3
6.4
6.4.1
6.4.2
6.4.3
Display .....................................................................................................................................................................
Switching the appliance on and off............................................................................................................................
General explanation “Brink Air control”......................................................................................................................
View on Display.........................................................................................................................................................
Main menu.................................................................................................................................................................
Device information menu...........................................................................................................................................
Basic settings menu ..................................................................................................................................................
Installer menu............................................................................................................................................................
16
16
16
17
18
19
20
21
7
7.1
7.2
Fault..........................................................................................................................................................................
Trouble shooting........................................................................................................................................................
Display codes............................................................................................................................................................
22
22
23
8
8.4
8.2
Maintenance.............................................................................................................................................................
User maintenance .....................................................................................................................................................
Maintenance Installer ................................................................................................................................................
24
24
26
9
9.1 Elektric diagram.......................................................................................................................................................
Wiring diagram .......................................................................................................................................................... 30
30
10
10.1
10.2
10.3
10.4
10.5
10.6
10.7
10.8
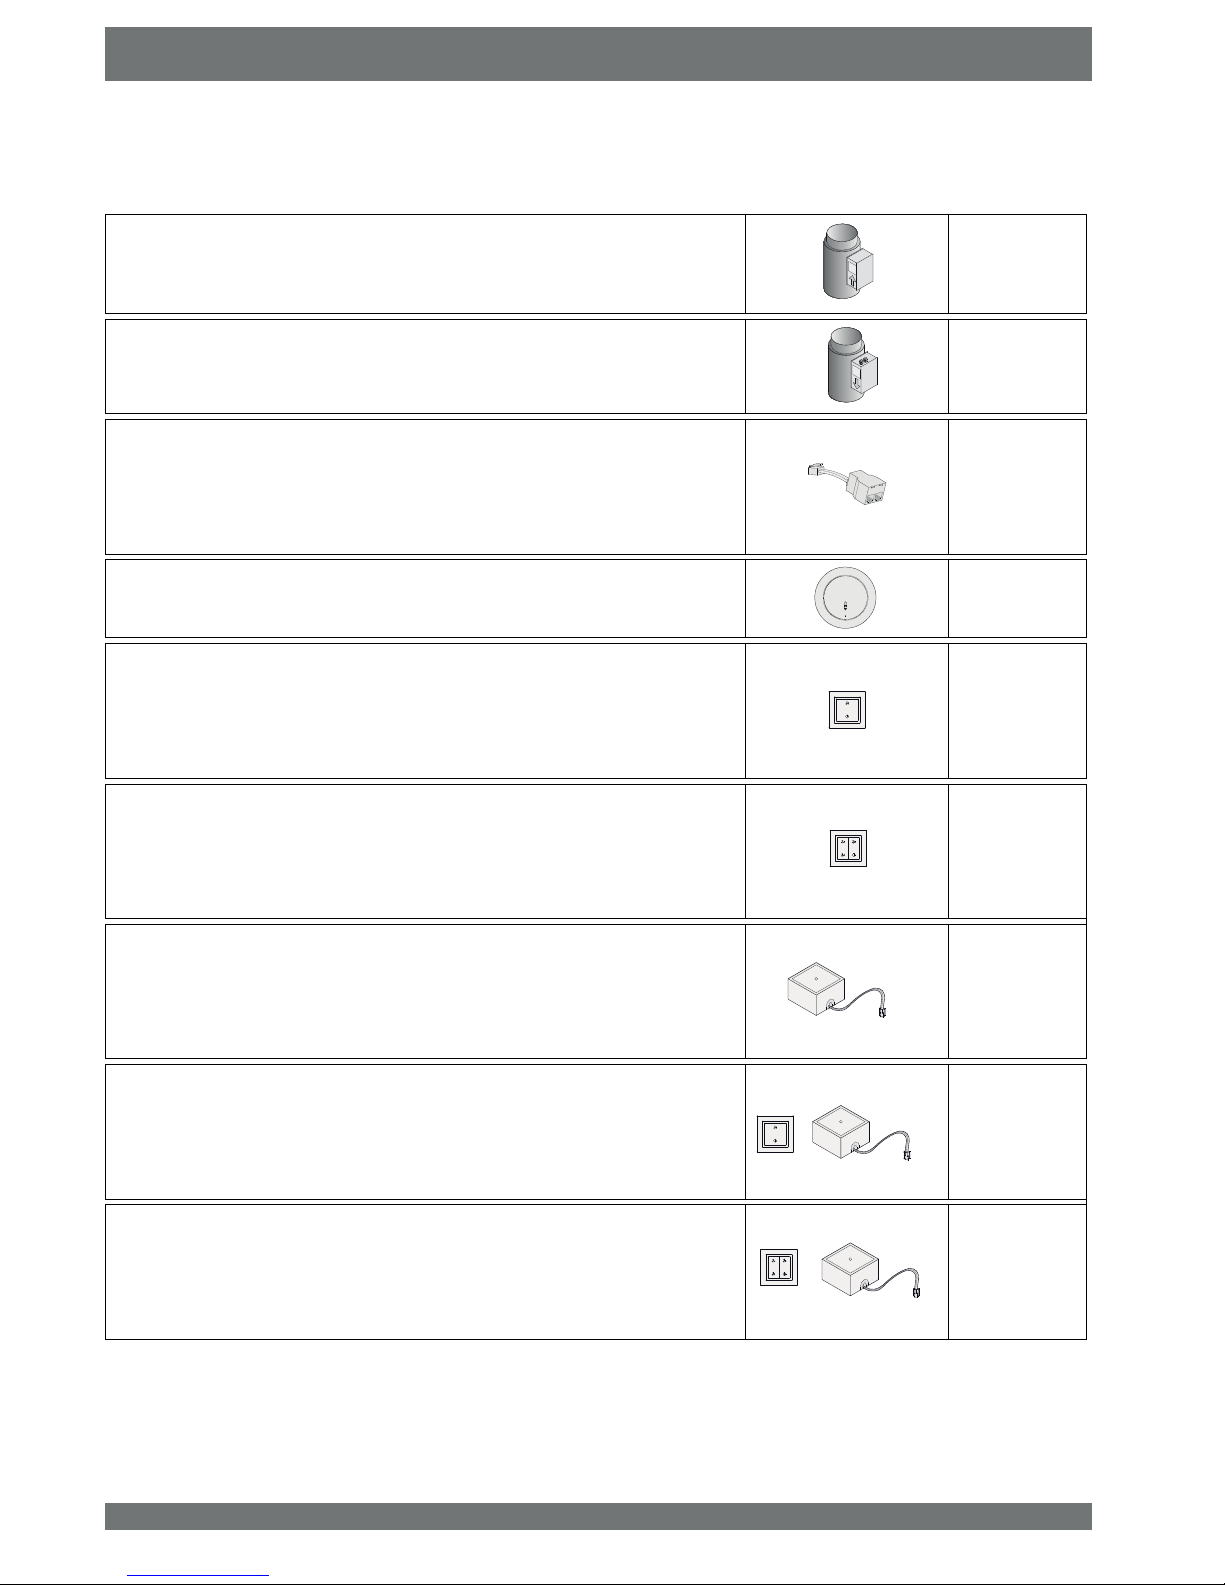
Electric connections accessories..........................................................................................................................
Connections connectors............................................................................................................................................
Wireless remote control.............................................................................................................................................
Coupling several appliances......................................................................................................................................
Connection RH (humidity)-sensor .............................................................................................................................
Connection postheater or extra preheater.................................................................................................................
Connection geo heat exchanger................................................................................................................................
Connecting external switch contact...........................................................................................................................
Connection to 0-10 V input........................................................................................................................................
31
31
31
32
32
33
34
35
35
11
11.1
11.2
Service......................................................................................................................................................................
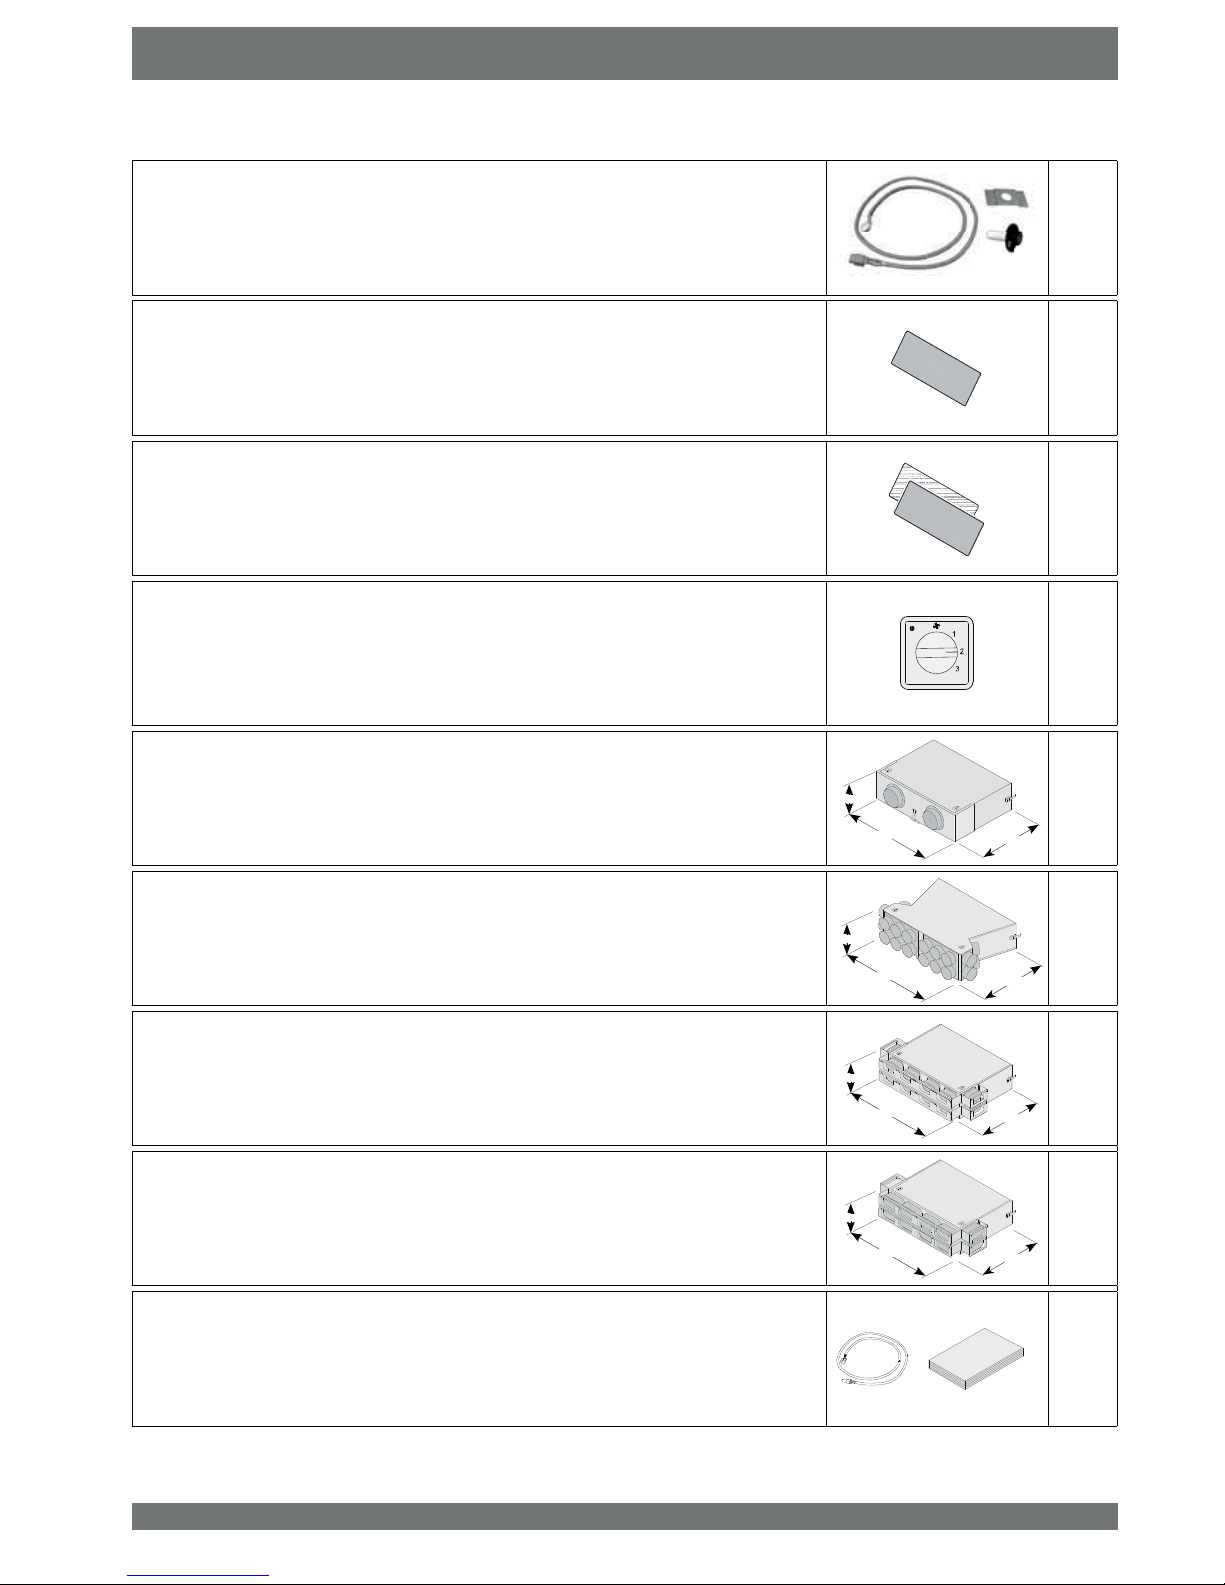
Exploded view ...........................................................................................................................................................
Service articles..........................................................................................................................................................
36
36
36
12 Setting values.......................................................................................................................................................... 38
13 Declaration of conformity...........................................................................................................................................
ErP values................................................................................................................................................................. 40
42
Renovent Sky 200 Rev. C
Table of contents

1.1 Scope of delivery
Before starting installation of the heat recovery unit, check that it has been supplied complete and undamaged.
The scope of delivery of the heat recovery unit Renovent Sky 200 includes the following components:
1: Heat recovery appliance
2: Wall mounting bracket kit; - 2x suspension strips
3: Duct connecting kit; - 4x collars Ø160 mm
4: Documentation set; - 1x installation instructions
5: Connecting kit; 0RXQWLQJPDWHULDOFROODUVLQFOXGLQJ¿[DWLRQVFUHZVDQGDcondensate discharge
connection with 3/4” mail thread
- Connectors : 2-pole screw connector (eBus) and 9-pole screw connector
(only for Plus version)
6: “Brink Air control” with operating manual
Renovent Sky 200 Rev. C 1
Chapter 1 Delivery
1
3
5
4
2
6

Electric postheater 310730
Electric (extra) preheater 310740
Splitter RJ12 510472
CO2sensor eBus surface-mounted 532126
Transmitter wireless remote control 2 positions (with. battery) 532170
Transmitter wireless remote control 4 positions (with. battery) 532171
Receiver wireless remote control (for battery version) 532172
Kit wireless remote control 2 positions (1 transmitter & 1 receiver) 532173
Kit wireless remote control 4 positions (1 transmitter & 1 receiver) 532174
2 Renovent Sky 200 Rev. C
1.2 Accessories Renovent Sky 200
Chapter 1 Delivery

RH (humidity)-sensor 310657
)LOWHUNLW[)¿OWHU 533001
Filter kit 1x G4 & 1x F7 533002
ZD\VZLWFKZLWK¿OWHULQGLFDWLRQÀXVKPRXQWHGPRGXODUFRQQHFWLRQ 540262
Silencer box Ø125 mm (2x)
482 mm
660 mm
200 mm
423010
Silencer- / air distribution box Ø75 mm (20x)
482 mm
660 mm
200 mm 423011
Silencer- / air distribution box 100 x 50 mm (12x)
482 mm
660 mm
200 mm 423012
Silencer- / air distribution box 130 x 60 mm (12x)
482 mm
660 mm
200 mm 423013
Servicetool 531961
Renovent Sky 200 Rev. C 3
Chapter 1 Delivery

4 Renovent Sky 200 Rev. C
The Brink Renovent Sky 200 is a ventilation unit with heat
recovery with a maximum ventilation capacity of 200 m
3
/h and
low-energy fans.
Features Renovent Sky:
VWHSOHVVO\ DGMXVWDEOH DLU ÀRZ UDWHV WKURXJK D ³%ULQN $LU
control” (supplied with appliance).
¿OWHULQGLFDWLRQRQWKH³%ULQN$LUFRQWURO´PXOWLSOHVZLWFK
D FRPSOHWHO\ QHZ LQWHOOLJHQW IURVW SURWHFWLRQ V\VWHP
which ensures that also at low outdoor temperatures
the appliance’s performance remains optimal and that, if
necessary, it activates the standard preheater.
ORZVRXQGOHYHO
FRPHVDVVWDQGDUGZLWKDXWRPDWLFE\SDVVYDOYH
FRQVWDQWÀRZFRQWURO
ORZHQHUJ\FRQVXPSWLRQ
KLJKHI¿FLHQF\
Renovent Sky 200 is available in two types:
³5HQRYHQW6N\´
³5HQRYHQW6N\3OXV´
Compared to the Renovent Sky 200, the Renovent Sky 200
Plus has a more extensive control board which increases the
connection options.
These installation instruction describe both the standard
Renovent Sky 200 and the Renovent Sky 200 Plus.
With the aid of the supplied mounting brackets, the Renovent
Sky 200 (Plus) can be mounted either on the wall or on the
ceiling. For the correct position of the connection ducts and
dimensions see §3.2.
When ordering an appliance always state the correct type;
subsequent conversion to a different version is highly labour-
intensive.
The Renovent Sky 200 comes ready to plug in with a 230 V
mains plug.
The appliance comes as standard with a “BrinkAir control”, but
connection of a simple 4-way switch is possible as well.
,IDZD\VZLWFKLVLQVWDOOHGLQVWHDGRID³%ULQN$LUFRQWURO´
the settings of the appliance can only be changed with a
laptop!
Connecting a combination of “Brink Air control” and multiple
switch is another option.
Chapter 2 Application

Renovent Sky 200 Rev. C 5
3.1 Technical information
Renovent Sky 200
Supply voltage [V/Hz] 230/50
Protection degree IP30
Dimensions (w x d x h) [mm] 1000 x 660 x 198
Duct diameter [mm] Ø160
External diameter condensate discharge [“] 3/4
Weight [kg] 24,5
Filter class G4
Fan setting (factory setting) - “Brink Air con-
trol” Max.
- 4-way switch 123
Ventilation capacity [m
3
/h] 50 100 125 150 200
Permissible resistance ducts system [Pa] 3 - 13 13 - 50 20 - 78 28 - 113 50 - 200
Rated power (excl. preheater) [W] 12 - 13 20 - 27 30 - 41 44 - 61 84 - 114
Rated current (excl. preheater) [A] 0,13 - 0,15 0,20 - 0,27 0,28 - 0,39 0,40 - 0,54 0,74 - 0,98
Rated power (incl. preheater) [A] 2,7
&RVij 0,38 0,43 - 0,44 0,46 0,48 - 0,49 0,49 - 0,51
Chapter 3 Version

3.2 Connections and dimensions
1
To dwelling
2
To atmosphere
3
From dwelling
4
From atmosphere
5
Electric connections
6
Connection condensate discharge
3.3 Fan graph
6 Renovent Sky 200 Rev. C
0
50
100
150
200
25 50 75 100 125 150 175 200 225
= [W]
x
12
9 11
14
10
7
7
6
19
17
21
15
28
25
30
22
39
35
42
31
52
47
57
42
>3D@
[m3K@
Note: The value stated in
the circle is the capacity
per fan (in Watt)
Chapter 3 Version
165
102
198
198
102
1000
d
f
g
h
c
e
165
330
165 165
660
40
102
168
102

3.4 Exploded view appliance
Renovent Sky 200 Rev. C 7
1 ([WUDFWDLU¿OWHU
2 Indoor temperature sensor
3 Bypass
4 Condensate bin
5 Extract fan
6Locking screw front panel
(mounted in front panel)
7 Connector X14
8 Control board
9 Connector X4
10 Condensate discharge
11 6XSSO\DLU¿OWHU
12 Preheater
13 Outdoor temperature sensor
14 Heat exchanger
15 Supply fan
16 Modular connector multiple switch
17 Service connector
18 Sleeve low voltage cable
19 Sleeve cable 230 V. postheater or extra preheater
20 Mains cable 230 V.
21 9-pole connector (only for Plus version)
22 Connector eBus
23 Fall Protection front panel
Chapter 3 Version
2
5
10
12
15
1
3
4
11 6
8
7
14
16
17
18
19
20
21
9
22
13
23

4.1 Description
4.3 Frost protection
5HQRYHQW6N\3OXVYHUVLRQ
The appliance comes plug and play and operates fully
automatically. The extracted indoor air heats up the fresh,
clean outdoor air. That saves energy and fresh air is sent to the
required rooms.
The control system has four ventilation modes.
7KH DLU ÀRZ UDWH FDQ EH DGMXVWHG SHU YHQWLODWLRQ PRGH 7KH
FRQVWDQWYROXPHFRQWUROV\VWHPHQVXUHVWKDWWKHDLUÀRZUDWH
of the supply and extract fans is realised independent of the
duct pressure.
The standard bypass valve makes it possible to supply fresh
outside air that is not heated by the heat exchanger. Particularly
during summer nights it is desirable to supply cooler outside
air. Then the hot air in the dwelling is replaced by cooler outside
air in so far as possible.
The bypass valve opens and closes automatically when a
QXPEHURIFRQGLWLRQVDUHVDWLV¿HGUHIHUWRWKHWDEOHEHORZIRU
bypass conditions).
7KH RSHUDWLRQ RI WKH E\SDVV YDOYH FDQ EH DGMXVWHG LQ VWHS
number 5, step number 6 and step number 7 in the settings
menu (see chapter 12).
%\SDVV
valve
open
- The outdoor temperature is higher than 7°C and
- the outdoor temperature is lower than the indoor temperature in the dwelling and
- the temperature in the dwelling is higher than the temperature set at step no. 5 in the settings menu
(set a standard at 22°C).
%\SDVV
valve
closed
- The outdoor temperature is lower than 7°C or
- the outdoor temperature is higher than de indoor temperature in the dwelling or
- the temperature from the dwelling is lower than the temperature set at step no. 5 in the settings menu minus the
set temperature by the hysteresis (step no. 6), this temperature is factory 20 °C (22,0 °C minus 2,0 °C).
To prevent freezing of the heat exchanger at extremely low
outdoor temperatures, the Renovent Sky features intelligent
frost control. Temperature sensors measure the temperatures
across the heat exchanger and, if necessary, the preheater is
switched on. That guarantees a proper ventilation balance,
also at very low outdoor temperatures. If, with switched on
preheater(s), the exchanger temperature still starts to drop
below zero, stepless unbalance is created in the appliance.
The Renovent Sky is also available as Plus version. This
version is equipped with a different control board with 2
additional connectors (X14 & X15) with more connection
options for various applications.
Only the Plus is equipped with a 9-pole connector (connected
to X15 on control board) that is accessible from the outside of
the appliance.
If a postheater or extra preheater is connected to connector
X14 (accessible after opening the front panel ) the installer
mustfeedthe connected230Volt cabletooutside theappliance
through a strain reliever. For this strain reliever (not supplied
with the appliance) a plug must be removed from the position
where this strain relieve must be placed.
See §9 for more information on the connection possibilities of
connectors X14 and X15.
8 Renovent Sky 200 Rev. C
%\SDVVFRQGLWLRQV
Chapter 4 Operation
9-pole
connector
Hole for gland to be mounted by installer (for sleeve
cable postheater/ extra preheater).

5.1 Installation general
Installation must take place under:
4XDOLW\UHTXLUHPHQWVYHQWLODWLRQV\VWHPVGZHOOLQJV
4XDOLW\UHTXLUHPHQWVEDODQFHGYHQWLODWLRQLQGZHOOLQJV
7KH UHJXODWLRQV IRU YHQWLODWLRQ RI GZHOOLQJV DQG UHVLGHQWLDO
buildings.
7KHVDIHW\UHJXODWLRQVIRUORZYROWDJHLQVWDOODWLRQV
7KH UHJXODWLRQV IRU FRQQHFWLRQ WR LQWHULRU VHZHUV LQ GZHOO-
ings and residential buildings.
$Q\DGGLWLRQDOUHJXODWLRQVRIWKHORFDOXWLOLWLHV
7KHLQVWDOODWLRQLQVWUXFWLRQVIRUWKH5HQRYHQW6N\
In addition to the above design and installation requirements
and recommendations, the national building and ventilation
regulations must be complied with.
Renovent Sky 200 Rev. C 9
Chapter 5 Installation
3ODFLQJWKHDSSOLDQFH
The Renovent Sky 200 can directly be mounted to the wall or
ceiling using the mounting brackets supplied for that purpose.
%HFDXVHRIWKHDSSOLDQFH¶VZHLJKWPRXQWLQJWKH
appliance must always be done by two people!
The Renovent Sky can directly be mounted to the wall/ ceiling
using the suspension brackets supplied for that purpose. For a
vibration-free result the appliance must be mounted to a solid
wall with a minimum mass of 200 kg/m
2
. A gypsum block or
PHWDOVWXGZDOOGRHVQRWVXI¿FH$GGLWLRQDOPHDVXUHVVXFKDV
double panelling or extra studs are required in that case. In ad-
dition, the following aspects must be taken into account.
7KHDSSOLDQFHPXVWEHSODFHGOHYHO
8
99
8
88
9
99
The installation room must be such that a good conden-
sate discharge with air trap and pitch for condensate can
be made.
:H UHFRPPHQG QRW WR LQVWDOO WKH KHDW UHFRYHU\ XQLW LQ
spaces with an average high RH (for instance bathroom).
That will prevent condensation on the outside of the heat
recovery unit.
Make sure that under no condition the condensate
discharge is installed at a pitch towards the appli-
ance!
The appliance is only suitable for ceiling or wall
PRXQWLQJ1HYHUPRXQWWKHDSSOLDQFHÀDWRQWKH
ÀRRU EHFDXVH RI WKH SRVLWLRQ RI WKH FRQGHQVDWH
discharge bin!
The heat recovery unit must be installed in an insulated,
frost-free room to prevent, among other things, freezing of
the condensate discharge
:KHQPRXQWLQJÀH[LEOHGXFWVEHDULQPLQGWKDWLWPXVWEH
possible to replace them in due course.
0DNHVXUHWKHUHLVVXI¿FLHQWIUHHVSDFHDWWKHDSSOLDQFHWR
DOORZFOHDQLQJRIWKH¿OWHUVDQGPDLQWDLQLQJWKHDSSOLDQFH
It must be possible to swing the door open.
$YRLG WKH XVH RI SHWUROHXPEDVHG DGKHVLYHV LQ DLU SODQW
systems.
'ZHOOLQJV ZLWK FRQVWUXFWLRQ PRLVWXUH PXVW EH YHQWLODWHG
QDWXUDOO\GXULQJDFHUWDLQSHULRG
Ceiling mounting:
At least 70 cm at the underside of the appliance and a free
headroom of 1.8 m; if 70 cm free space is not available,
for instance when mounting on top of a suspended ceiling,
WKHUHPXVWEHVXI¿FLHQW URRPWRSDUWO\ RSHQDQGUHPRYH
the front panel.
The front panel can be detached after removing a lock
screw at the hinge! (§ 3.4 / nr. 6)
0DNH VXUH WKH ¿OWHUV FDQ DOZD\V IUHHO\ EH UHPRYHG VR
WKHUHLVQRIUDPHRURWKHUREVWDFOHDWWKHOHYHORIWKH¿OWHUV
Wall mounting :
Make sure there is a free space of at least 70 cm at the
front of the appliance and a free headroom of 1.8 m.
0DNHVXUHWKHUHLVDWOHDVWFPIUHHVSDFHDWWKHDSSOL-
ance side where the electric connections are located, so
connectors and sleeves remain accessible.
Air ducts:
7KHDLUGXFWVPXVWEHPRXQWHGDLUWLJKW
7KHDLUGXFWVWRDQGIURPWKHGZHOOLQJPXVWEH¿WWHGZLWKD
PXIÀHU
0RXQWLQJRIDLUGXFWVWRWKHURRIGHFNPXVWEHDYRLGHGLQ
order to prevent sound transmission.
,WLVUHFRPPHQGHGWRUHVWULFWWKHH[WHUQDOGXFWSUHVVXUHLQ
WKHGHVLJQWR3DDWWKHGHVLJQÀRZUDWHLQRUGHUOLPLW
the total sound level. In all events the practical external
duct pressure must be limited to 150 Pa
7KHDLUYHORFLW\PXVWEHOLPLWHGWRPVLQWKHPDLQGXFWV
and 3,5 m/s in the branches.

10 Renovent Sky 200 Rev. C
3ODFLQJWKHDSSOLDQFHIRUFHLOLQJPRXQWLQJ
Chapter 5 Installation
min.
100mm
min.
50mm
min.
25mm
Condensate discharge
1
Appliance disconnecting from mounting
bracket
o
p
n
Click!
n
o
3
2
4
6
5
4x
670 mm
1005 mm
505 mm
min.
25mm

Renovent Sky 200 Rev. C 11
3ODFLQJWKHDSSOLDQFHIRUZDOOPRXQWLQJ
Chapter 5 Installation
670 mm
505 mm
min.
25mm min.
25mm
min.
100mm
min.
50mm
o
p
n
1
2
Click!
4
5
Appliance disconnecting from mounting
bracket
6
Condensate discharge
4x
n
o
1005 mm
3

12 Renovent Sky 200 Rev. C
7KH 5HQRYHQW 6N\ PXVW DOZD\V EH ¿WWHG ZLWK D FRQGHQVDWH
discharge.
The condensate must be discharged through a drainpipe
The condensate discharge connection with 3/4” mail thread
(supplied with the appliance) must be screwed into the
appliance’s condensate bin by the installer.
Important:
Always install a detachable coupler in the
condensate discharge line as closely as possible
WR WKH DSSOLDQFH RWKHUZLVH WKH FRQGHQVDWH ELQ
cannot be removed from the appliance for service
purposes!
The condensate discharge line can be mounted to it, preferably
glued, if necessary using a square bend. The installer can
glue the condensate discharge to the appliance in the desired
position. The drain must discharge under the water level in the
U-trap. Use a condensate discharge line with a diameter of 32
mm.
3DUWLFXODUO\IRUFHLOLQJPRXQWLQJPDNHVXUHWKHFRQGHQVDWH
discharge is below the level of the condensate bin in the
Renovent Sky!
Before connecting the condensate discharge to the appliance,
pour water into the U-trap to create an air trap.
Detachable coupler
0D[1P
3/4” Detachable coupler
5.3 Connecting the condensate discharge
Chapter 5 Installation

Renovent Sky 200 Rev. C 13
Chapter 5 Installation
%
A
A
²
²
²
²
²
²
X
A
²
²
12
34
A t60 mm
%tA

14 Renovent Sky 200 Rev. C
Chapter 5 Installation
A
%
A
²
²
²
²
²
²
X
A
²
²
1
2
3
4
A t60 mm
%tA

Renovent Sky 200 Rev. C 15
5.4 Electric connections
5.4.1 Connecting the power plug
The appliance comes ready to plug in with a 230 V mains plug
Make allowance for the 375 W preheater; if in addition also
a postheater or extra preheater is installed, the rated pow-
er increases to 1375 W.
The appliance can be connected to an easily accessible, earthed wall socket with the plug that is mounted to the appliance. The
electric installation must comply with the requirements of your power company.
Warning
The fans and control board carry a high voltage. Al-
ways take the voltage from the appliance by pulling
the power plug when working on the appliance.
³%ULQN$LUFRQWURO´FRQQHFWLRQ
The “BrinkAir control” that comes as standard with the appliance must be connected to the eBus connector. This (detachable) 2-pole
eBus connector is mounted on the outside of the appliance (see also §10.1).
nr.1 nr.2 Cables to be connected by installer
(wire diameter at least 0,34 mm2)
Chapter 5 Installation

16 Renovent Sky 200 Rev. C
10.54
HRU-Ventilation
23/11/15
08:00 17:00
-
6.1 Switching the appliance on and off
*HQHUDOH[SODQDWLRQ%ULQN$LUFRQWURO
Warning
:KHQZRUNLQJRQWKHDSSOLDQFHDOZD\VWDNHWKHYROWDJHIURPWKHDSSOLDQFHE\¿UVWVZLWFKLQJLWRIIWKURXJKVRIWZDUHDQG
subsequently pulling the power plug.
Chapter 6 Display
230V / 50 Hz
> ± 25 sec
S1.01.01
10.54
HRU-Ventilation
23/11/15
08:00 17:00
-
c
Setting knob Pressing the ‘Right-hand setting knob’takes you to the
Main Menu of the Sky appliance (§6.4).
d
Return key Press the Return key ( ) to close any selected
menu.
e
Setting &
activating timer
programme
Use this key ( ) to select a type of timer programme;
WKHVHWWLPHVDQGWKHFRQQHFWHGDLUÀRZUDWHV
f
Manual
control key
After pressing the manual control key ( ) the timer
control can be overruled. At the position of the current
time block, the display shows the message ’manual’.
The appliance will remain running in this manual
mode until it is cancelled by pressing the ’Return’ key
().
g
Bypassing
the timer
programme
Pressing the key ( ) take you to a temporary main
VFUHHQWKHQWKHDLUÀRZGXULQJRQHWLPHF\FOHFDQ
PDQXDOO\EHPRGL¿HGXVLQJWKHULJKWKDQGVHWWLQJ
knob.
2
3
The “Brink Air control” display shows what the operating mode
of the appliance is. Settings in the “Brink Air control” software
of the Renovent Sky 200 can be called up and changed with
the aid of the operating keys. Ex factory the “Brink Air Control”
is set for the English language. In the setting menu “Brink Air
Control”, §6.4.2, you can choose a language.
4
5
1
This manual suits for next models
1
Table of contents