Brinkmann COOK'N CAJUN User manual

PIG ROASTER
ASADOR DE CERDO
OWNER’S MANUAL / MANUAL DEL PROPIETARIO
WARNING/ADVERTENCIA
HAZARDOUS EXPLOSION MAY RESULT IF THESE WARNINGS AND INSTRUCTIONS ARE IGNORED. READ AND
FOLLOW ALL WARNINGS AND INSTRUCTIONS IN THIS MANUAL TO AVOID PERSONAL INJURY, INCLUDING
DEATH OR PROPERTY DAMAGE.
SE PUEDE PRODUCIR UNA EXPLOSIÓN PELIGROSA SI SE HACE CASO OMISO A ESTAS ADVERTENCIAS E
INSTRUCCIONES. LEA Y SIGA TODAS LAS ADVERTENCIAS E INSTRUCCIONES EN ESTE MANUAL PARA
EVITAR LESIONES PERSONALES, INCLUSO LA MUERTE, O LOS DAÑOS MATERIALES.
ASSEMBLY AND OPERATING INSTRUCTIONS
INSTRUCCIONES DE ARMADO Y OPERACIÓN
SAVE THIS MANUAL FOR FUTURE REFERENCE
GUARDE ESTE MANUAL PARA REFERENCIA FUTURA
NOTICE TO INSTALLER:
LEAVE THESE INSTRUCTIONS WITH THE
GRILL OWNER FOR FUTURE REFERENCE.
AVISO PARA EL INSTALADOR:
ENTREGUE ESTAS INSTRUCCIONES AL
PROPIETARIO DE LA PARRILLA PARA
REFERENCIA FUTURA.

1
General Warnings . . . . . . . . . . . . . . . . . . . . . . . . . . . . . . . . . . . . . . . . . . 2-3
Pig Roaster Operating Instructions . . . . . . . . . . . . . . . . . . . . . . . . . . . . . 4-6
After Use Safety/Proper Care & Maintenance . . . . . . . . . . . . . . . . . . . . . . 7
Pig Roaster Assembly Instructions . . . . . . . . . . . . . . . . . . . . . . . . . . . . 8-13
Roaster Cooking Tips . . . . . . . . . . . . . . . . . . . . . . . . . . . . . . . . . . . . . . . . 14
Warranty. . . . . . . . . . . . . . . . . . . . . . . . . . . . . . . . . . . . . . . . . . . Back Cover
TABLE OF CONTENTS
DANGER: Indicates an imminently hazardous situation which, if not avoided, will result in death or serious injury.
WARNING: Be alert to the possibility of serious bodily injury if the instructions are not followed. Be sure to read and
carefully follow all of the messages.
CAUTION: Indicates a potentially hazardous situation which, if not avoided, may result in minor or moderate injury.
FOR COVERS, ACCESSORIES AND OTHER PRODUCTS, PLEASE VISIT US ONLINE AT:
CALIFORNIA PROPOSITION 65 WARNING
This product contains chemicals that are known to the State of California to cause cancer, and
birth defects or other reproductive harm. Wash hands after handling. When used, this product
emits fuel combustion chemicals that are known to the State of California to cause cancer, and
birth defects or other reproductive harm. Follow all instructions in this manual and use only in well
ventilated, outdoor area.

WARNING
• Only use this pig roaster on a hard, level, non-combustible, stable surface (concrete, ground, etc.)
capable of supporting the weight of the pig roaster. Never use on wooden or other surfaces that
could burn.
• Proper clearance of 10 feet (3.1 m) between the pig roaster and combustible material (bushes, trees,
wooden decks, fences, buildings, etc.) or construction should be maintained at all times when pig
roaster is in use. DO NOT place pig roaster under a roof overhang or other enclosed area.
• For outdoor use only. DO NOT operate pig roaster indoors or in an enclosed area. Do not use on
balconies.
• Keep children and pets away from hot pig roaster. DO NOT allow children to use or play near this
pig roaster. Close supervision is necessary when pig roaster is in use.
• Never add charcoal lighting fluid to hot or even warm coals as flashback may occur causing severe
burns.
• We recommend the use of a Charcoal Chimney Starter to avoid the dangers associated with
charcoal lighting fluid. If you choose to use charcoal lighting fluid, only use lighting fluid approved
for lighting charcoal. Carefully read instructions on the charcoal lighting fluid and charcoal prior to
use.
• Never leave coals and ashes on pig roaster unattended. Before pig roaster can be left unattended,
remaining coals and ashes must be removed from pig roaster. Use caution to protect yourself and
property. Carefully place remaining coals and ashes in a non-combustible metal container and
saturate completely with water. Allow coals and water to remain in metal container 24 hours prior to
disposing.
• Extinguished coals and ashes should be placed a safe distance from all structures and combustible
materials.
• With a garden hose, completely wet the surface beneath and around the pig roaster to extinguish
any ashes, coals or embers which may have fallen during the cooking or cleaning process.
• DO NOT store lighter fluid or other flammable liquids, material or charcoal that has been pre-treated
with lighter fluid around the pig roaster.
• DO NOT use gasoline, kerosene or alcohol for lighting charcoal. Use of any of these or similar
products could cause an explosion possibly leading to severe bodily injury.
• DO NOT leave pig roaster unattended when in use.
• DO NOT store or use pig roaster near gasoline or other flammable liquids, gases or where
flammable vapors may be present.
• DO NOT use while under the influence of drugs and alcohol.
Pig roaster is hot when in use. To avoid personal injury and property damage:
• DO NOT attempt to move the pig roaster.
• Wear protective gloves or oven mitts.
• DO NOT touch any hot pig roaster surfaces.
• DO NOT wear loose clothing or allow hair to come in contact with pig roaster.
GENERAL WARNINGS
2

WARNING
• When adding charcoal, keep hands, face and body a safe distance from hot ashes and flame
flare-ups.
• DO NOT allow charcoal to rest on the edge of pig roaster.
• Use caution when assembling and operating your pig roaster to avoid scrapes or cuts from sharp
edges of metal parts.
• In windy weather, place pig roaster in an outdoor area that is protected from the wind.
• After each use, clean the pig roaster thoroughly and apply a light coat of vegetable oil to interior to
prevent rusting. Cover the pig roaster to protect it from excessive rusting.
• For household use only. DO NOT use this pig roaster for other than its intended purpose.
• Use caution when lifting or moving pig roaster to prevent strains and back injuries.
• We advise that a fire extinguisher be on hand. Refer to your local authority to determine proper size
and type of fire extinguisher.
• Accessory attachments not manufactured by The Brinkmann Corporation for this particular product
are not recommended and may lead to personal injury or property damage.
• Store the pig roaster out of reach of children and in a dry location when not in use.
• DO NOT attempt to service the pig roaster other than normal maintenance as explained in “After-Use
Safety” and “Proper Care & Maintenance” on page 7 of this manual.
• Properly dispose of all packaging material.
USE CAUTION AND COMMON SENSE WHEN OPERATING YOUR PIG ROASTER.
FAILURE TO ADHERE TO SAFETY WARNINGS AND GUIDELINES IN THIS MANUAL COULD RESULT
IN BODILY INJURY OR PROPERTY DAMAGE.
SAVE THIS MANUAL FOR FUTURE REFERENCE.
3

4
PIG ROASTER OPERATING INSTRUCTIONS
PLACE THE PIG ROASTER OUTDOORS ON A HARD, LEVEL, NON-COMBUSTIBLE SURFACE AWAY
FROM ROOF OVERHANG OR ANY COMBUSTIBLE MATERIAL. NEVER USE ON WOODEN OR OTHER
SURFACES THAT COULD BURN. PLACE THE PIG ROASTER AWAY FROM OPEN WINDOWS OR DOORS TO
PREVENT SMOKE FROM ENTERING YOUR HOUSE. IN WINDY WEATHER, PLACE THE PIG ROASTER IN AN
OUTDOOR AREA THAT IS PROTECTED FROM THE WIND.
READ ALL SAFETY WARNINGS AND INSTRUCTIONS CAREFULLY
BEFORE OPERATING YOUR PIG ROASTER.
1. The Brinkmann Pig Roaster will roast a pig up to 75 lbs.
Place the pig between the two cooking grates as shown.
Do not score or poke holes into the skin.
2. Use the four S-hooks provided to hold the pig between
the two cooking grates. Make sure the handles are facing
away from the pig.
3. Place the dripping tray inside the Pig Roaster cart.
4. Place the pig inside the Pig Roaster cart, skin side down.
This may require the help of a second person.
ROASTING A WHOLE PIG:
Handle
Handle
S-Hook S-Hook

5. Set the ash pan on top of the cart, directly above the pig.
6. Place the charcoal grate directly above the ash pan.
If using charcoal chimney starter, follow all manufacturer’s
warnings and instructions regarding the use of their product.
Start with 13 - 15 lbs. (5.9 kg. - 6.8 kg.) of charcoal. This should
be enough charcoal for the first
hour of cooking.
7. Carefully light charcoal chimney starter and allow to burn
until covered with a light ash (approximately 20 minutes).
When charcoal is burning strong, carefully place hot coals
evenly over the charcoal grate.
If using lighter fluid, follow all manufacturer’s warnings and
instructions regarding the use of their product. Start with
13 - 15 lbs. (5.9 kg. - 6.8 kg.) of charcoal. This should
be enough charcoal for the first hour of cooking.
8. Saturate charcoal with lighting fluid. Wait 2 to 3 minutes
to allow lighting fluid to soak into charcoal. Store charcoal
lighting fluid safely away from the Pig Roaster.
9. Stand back and carefully light charcoal and allow to burn
until covered with a light ash (approximately 20 minutes).
When charcoal is burning strong, carefully place hot coals
evenly over charcoal grate.
5
IIFFUUSSIINNGGCCHHAARRCCOOAALLCCHHIIMMNNEEYYSSTTAARRTTEERR,,
PPRROOCCEEEEDDTTOOSSTTEEPP1111

If using pre-treated charcoal, follow all manufacturer’s warnings
and instructions regarding the use of their product. Start with
13 - 15 lbs. (5.9 kg. - 6.8 kg.) of charcoal. This should be
enough charcoal for the first hour of cooking.
Note: You can only use pre-treated charcoal in the first round
of charcoal.
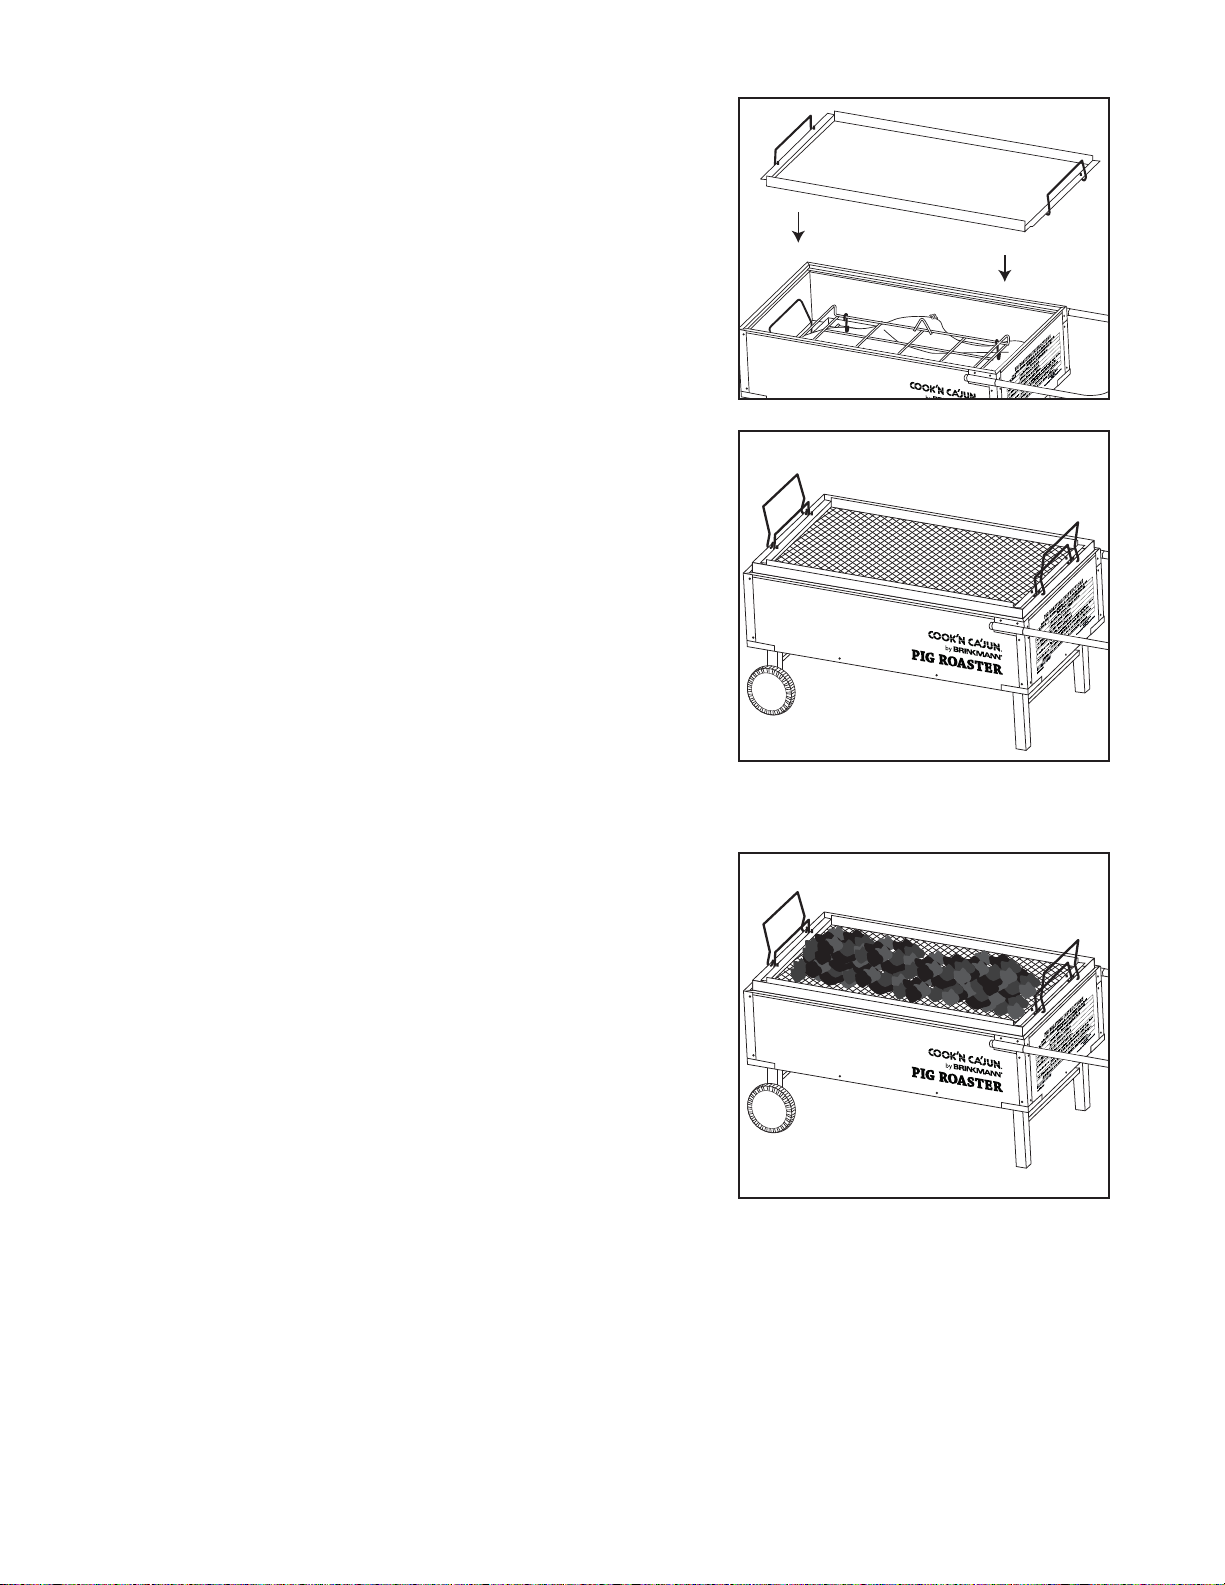
10. Stand back and carefully light charcoal and allow to burn until
covered with a light ash (approximately 20 minutes). When
charcoal is burning strong, carefully place hot coals evenly
over charcoal grate.
11. Once the charcoal is lit and spread evenly over the charcoal
grate, the cooking time starts now. After one hour, add
8 - 9 lbs. (3.6 kg. - 4.1 kg.) of charcoal. Keep the lid closed,
peeking into the roaster will allow heat to escape and
increase cooking time. Monitor the temperature gauge.
The Pig Roaster temperature should remain between
300 - 350 ºF (150 - 175 ºC).
12. After additional one hour, add 8 - 9 lbs. (3.6 kg. - 4.1 kg.)
of charcoal. Keep the lid closed, peeking into the roaster will
allow heat to escape and increase the cooking time.
13. After additional half hour, add 10 - 11 lbs. (4.5 kg. - 5.0 kg.)
of charcoal. Keep the lid closed, peeking into the roaster will
allow heat to escape and increase cooking time.
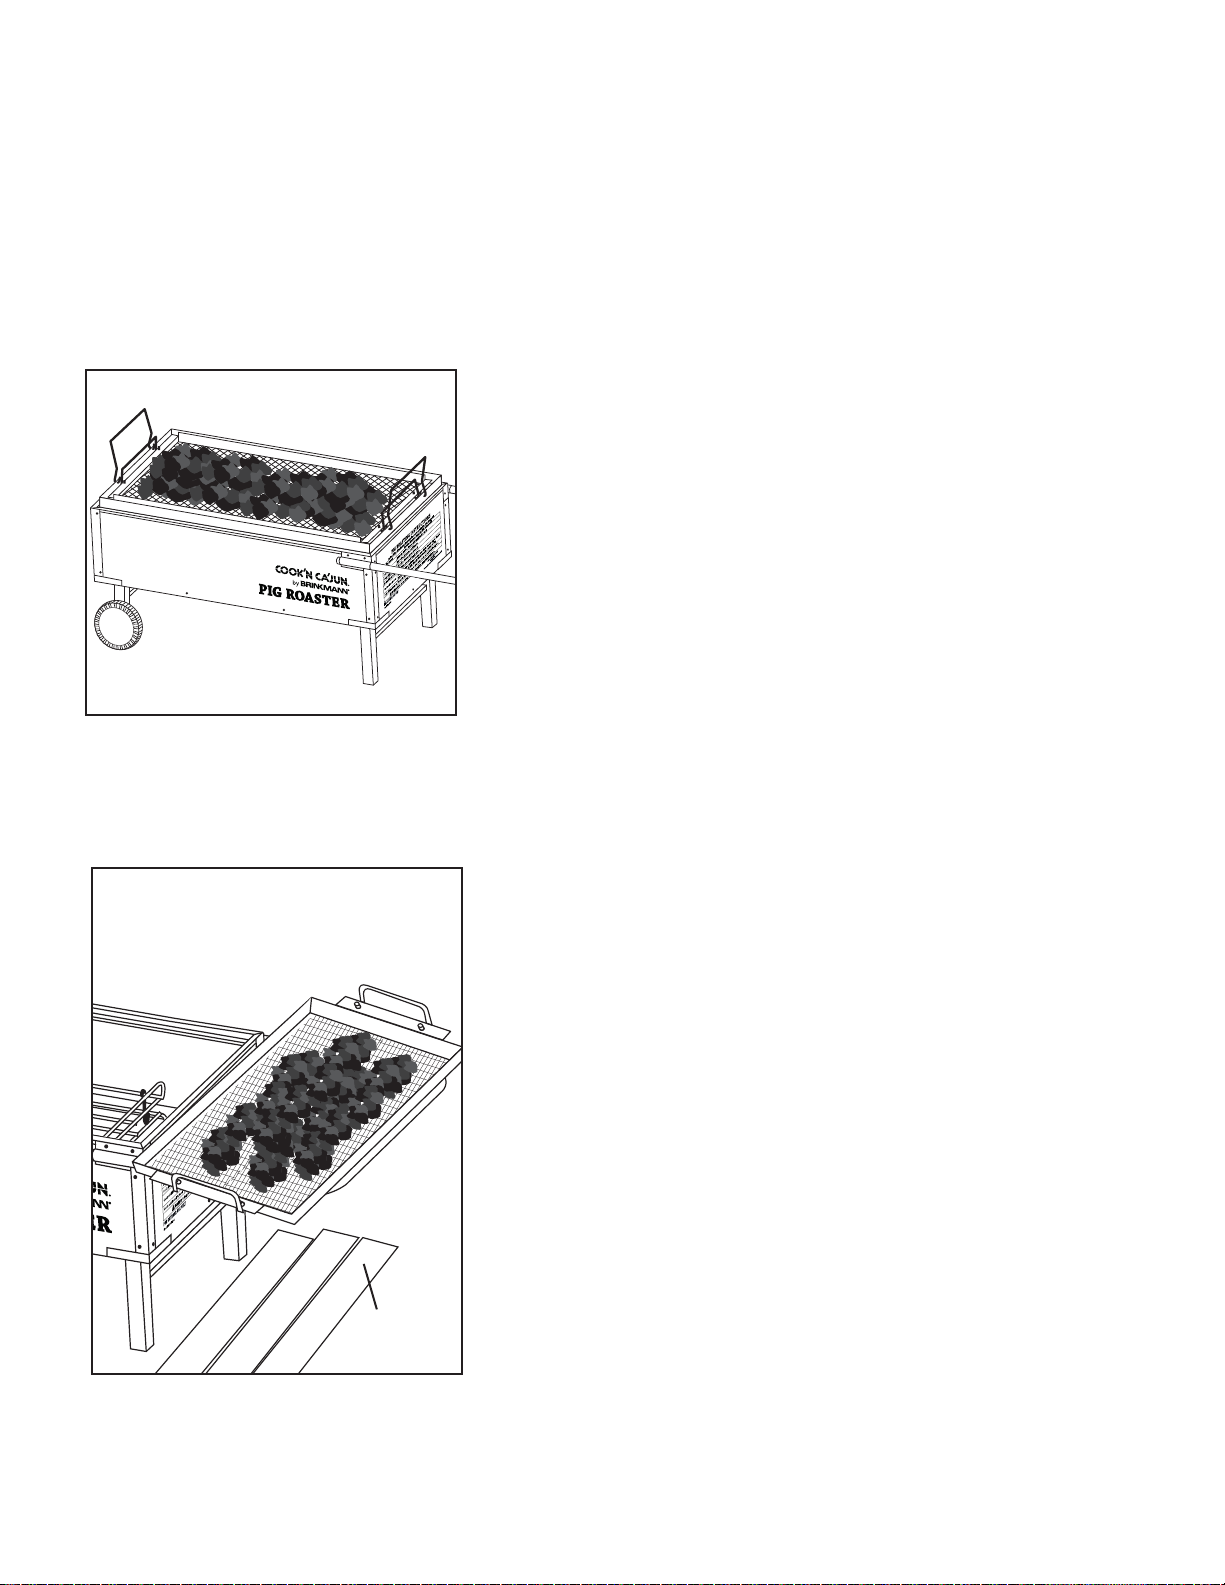
14. Spread several layers of aluminum foil on the surface
beneath the handle of the pig roaster. Foil should completely
cover the area under the charcoal grate (see diagram).
This will catch any falling ash from the cooking grate so that
the ash can be properly disposed of and will also prevent
discoloration to your patio, etc. After the 3 hours are up, sift
the ashes into ash pan by lifting and shaking the charcoal
grate. Place the charcoal grate with hot coals on the Pig
Roaster handle over the foil.
15. Properly dispose of ashes in ash pan. Carefully place ash in
non-combustible metal container and saturate with water
(including the ground around metal container) to completely
extinguish hot coals. Do not replace ash pan.
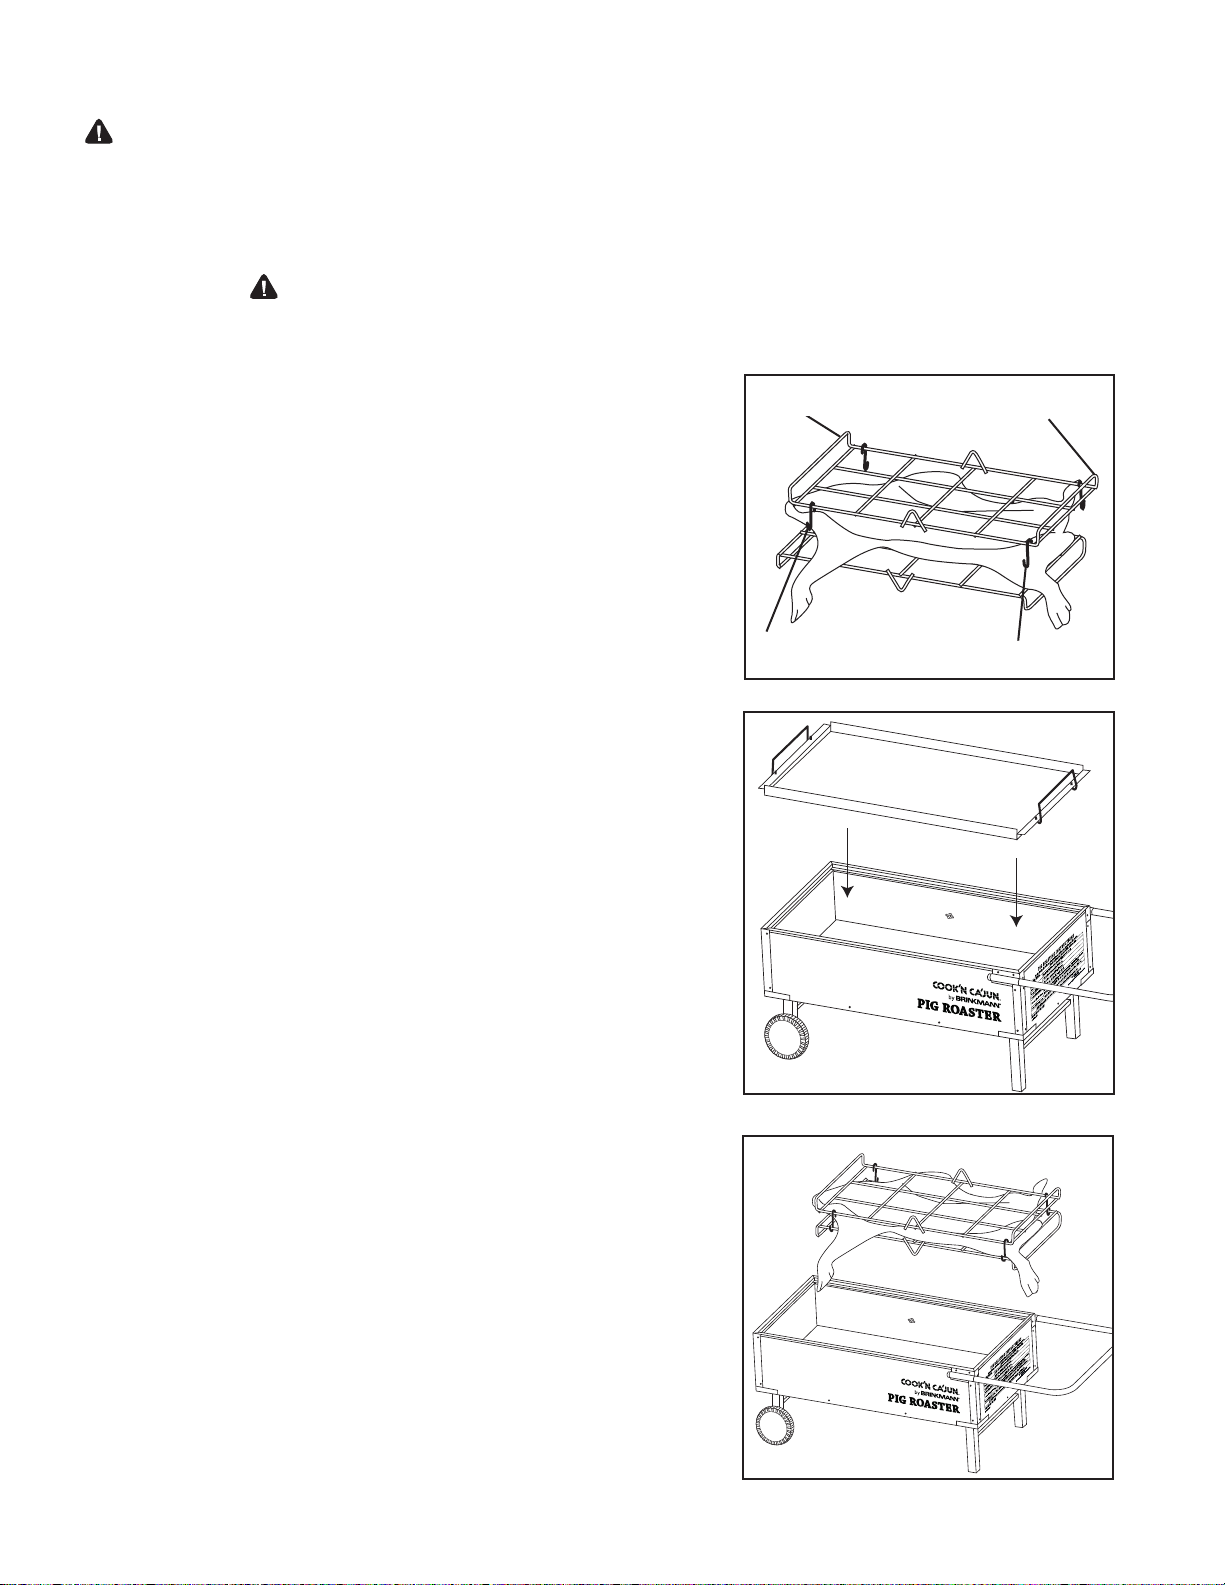
16. With the help of a second person, flip the pig/cooking grates
over so that the skin side is up. This is easily done by
grabbing the top cooking grate handle on one end, lift and
slide as you pull upward. Have the second person grab the
bottom handle on the opposite side of the cooking grate. Flip
and lay pig/cooking grates back down into Pig Roaster cart.
The pig and grates will be hot so be sure to wear oven mitts.
17. Score the skin using a knife to help remove the fat from
the skin.
18. Cover the roaster cart again with the ash pan and charcoal
grate, do not add any more charcoal. After 30 minutes, check
periodically until the skin is crispy to your liking.
6
IIFFUUSSIINNGGCCHHAARRCCOOAALLLLIIGGHHTTEERRFFLLUUIIDD,,
PPRROOCCEEEEDDTTOOSSTTEEPP1111
Foil

• Always allow pig roaster and all components to cool completely before handling.
• Never leave coals and ashes on pig roaster unattended. Make sure coals and ashes are completely
extinguished before removing.
• Before pig roaster can be left unattended, remaining coals and ashes must be removed from pig roaster.
Use caution to protect yourself and property. Place remaining coals and ashes in a noncombustible metal
container and completely saturate with water. Allow coals and water to remain in metal container 24 hours
prior to disposing.
• Extinguished coals and ashes should be placed a safe distance from all structures and combustible
materials.
• With a garden hose, completely wet surface beneath and around the grill to extinguish any ashes, coals
or embers which may have fallen during the cooking or cleaning process.
• Cover and store pig roaster in a protected area away from children and pets.
AFTER-USE SAFETY
WARNING
• To protect your pig roaster from excessive rust, the unit must be covered at all times when not in use.
• Wash cooking grates and charcoal grates with hot, soapy water, rinse well and dry. Lightly coat grates
with vegetable oil or vegetable oil spray.
• Clean inside and outside of pig roaster by wiping off with a damp cloth. Apply a light coat of vegetable
oil or vegetable oil spray to the interior surface to prevent rusting.
• If rust appears on the exterior metal surfaces of your pig roaster, clean and buff the affected area
with steel wool or fine grit emery cloth. Touch-up exterior metal surfaces with a good quality
high-temperature resistant paint.
PROPER CARE & MAINTENANCE
7

8
1 Charcoal Grate
1 Ash Pan
1 Dripping Tray
2 Side Panels
1 Bottom Panel Assembly
2 Cooking Grates
PARTS LIST:
PIG ROASTER
ASSEMBLY INSTRUCTIONS
READ ALL SAFETY WARNINGS & ASSEMBLY INSTRUCTIONS CAREFULLY
BEFORE ASSEMBLING OR OPERATING YOUR PIG ROASTER.
WE RECOMMEND TWO PEOPLE WORK TOGETHER WHEN ASSEMBLING THIS UNIT.
The following tools are required to assemble this Brinkmann Pig Roaster:
• Phillips Head Screwdriver
• Adjustable Wrench
1
2
3
2 Front and Back Panels
1 Handle
2 Wheel Hub Caps
2 Wheels
2 Wheel Axle Bolts
1 Temperature Gauge
1
4
5
7
8
9
10
11
6
2
3
4
5
7
6
8
910 11
FOR COVERS, ACCESSORIES AND OTHER PRODUCTS, PLEASE VISIT US ONLINE AT:
Inspect contents of the box to ensure all parts are included and undamaged.
12
12

ASSEMBLY STEPS
Choose a good, cleared assembly area
and get a friend to help you put your
pig roaster together. Lay cardboard
down to protect the pig roaster finish
and assembly area.
Step 1
With the help of a friend, turn the
bottom panel upside down with legs
facing up
Step 2
Attach the legs to the bottom panel
using four M6 X 12 mm bolts.
Note: With the help of a friend, turn
the firebox assembled over.
Try to minimize the stress to
the legs.
9

10
Step 3
To install the wheels, insert wheel
axle bolts through wheels, right rear
and front cart legs as illustrated.
Secure with axle nuts.
Step 4
Insert side panel into corner brackets
on bottom panel as illustrated. Hold
into place while performing Step 5.
Note: Confirm handle brackets
are on the opposite side of
wheels.
Step 5
Secure side panels by using four
M6 X 22 mm bolts.
Corner Brackets

11
Step 6
Slide front and back panels into
brackets on the side panels as
illustrated.
Step 7
Attach front and back panels
using two M6 X 22 bolts and ten
M6 X 12 mm bolts.
Step 8
To attach handle onto roaster cart,
depress push pin on handle. Insert
handle into the holders until the push
pins lock into place.
M6 X 22 Bolt
M6 X 22 Bolt

Step 9
Place dripping tray on bottom of
roaster cart.
Step 10
Hook cooking grates together using
‘S’ hooks, place cooking grates
directly above dripping tray.
Step 11
Attach temperature gauge through
the hole in the side panel. Secure
with wing nut.
Step 12
Place ash pan on top of roaster cart.
Rest charcoal grate on lid.
Cooking Grates
Dripping Tray
Charcoal Grate
Ash Pan
12

Pig Roaster (Assembled)
13

ROASTER COOKING TIPS
CLEANLINESS
• Always wash hands thoroughly with soap and hot water prior to handling food and after handling raw
meat, uncooked poultry or seafood.
• When using a platter to carry raw meat, uncooked poultry or seafood to the roaster, make sure to wash
the platter thoroughly with soap and hot water before placing cooked foods back on the platter or use
different platters for raw and cooked foods.
• Never use the same utensils when handling raw meat, uncooked poultry or seafood unless you wash the
utensils thoroughly with soap and hot water.
• Never re-use marinade from raw meat or uncooked poultry on foods that have been cooked and are
ready to be served.
COOKING TO PROPER TEMPERATURE
• Use a meat thermometer to be sure food has reached a safe internal temperature.
• The US Department of Agriculture recommends the minimum temperature be reached for the
following food items:
Chops . . . . . . . . . . . . . . . . . . . . .145 degrees F (62.8° C)
Ground Meat . . . . . . . . . . . . . . .160 degrees F (71° C)
Pork . . . . . . . . . . . . . . . . . . . . . . .160 degrees F (71° C)
Poultry . . . . . . . . . . . . . . . . . . . . .180 degrees F (82° C)
Roasts . . . . . . . . . . . . . . . . . . . . .145 degrees F (62.8° C)
Seafood . . . . . . . . . . . . . . . . . . . .140 degrees F (60° C)
Vegetables . . . . . . . . . . . . . . . . .145 degrees F (62.8° C)
HELPFUL HINTS
• If you pre-cook meat or poultry, do so immediately before roasting.
• Never defrost meat at room temperature or on a countertop.
• Refrigerate leftovers within 2 hours of taking food off the roaster.
• For additional information, please phone the USDA’s toll free Meat & Poultry Hotline at 800-535-4555.
14

15
Advertencias Generales . . . . . . . . . . . . . . . . . . . . . . . . . . . . . . . . . . . 16-17
Instrucciones de Operación del Asador de Cerdo. . . . . . . . . . . . . . . . 18-20
Seguridad Posterior al Uso/Cuidado y Mantenimiento. . . . . . . . . . . . . . . 21
Instrucciones de Asamblea del Asador de Cerdo . . . . . . . . . . . . . . . . 22-27
Recomendaciones Útiles para Asar . . . . . . . . . . . . . . . . . . . . . . . . . . . . . 28
Información de la Garantía . . . . . . . . . . . . . . . . . . . . . . . . Cubierta Trasera
ÍNDICE
PELIGRO: Indica una situación peligrosa inminente la cual, si no se evita, producirá lesiones graves o aún la
muerte.
ADVERTENCIA: Manténgase alerta a la posibilidad de lesiones corporales graves si no se siguen las
instrucciones. Asegúrese de leer y seguir cuidadosamente todos los mensajes.
PRECAUCIÓN: Indica una situación posiblemente peligrosa la cual, si no se evita, puede producir lesiones
menores o moderadas.
PARA CUBIERTAS, ACCESORIOS Y OTROS PRODUCTOS,
FAVOR DE VISITARNOS POR LA RED MUNDIAL EN:
CALIFORNIA PROPOSICIÓN 65 ADVERTENCIA
Este producto contiene químicos, incluyendo el plomo en el estaño en ciertas partes de sus
componentes, conocido en el estado de California porque producen cáncer y defectos de
nacimiento u otros daños reproductivos. Lávese las manos después de manejarlo. Cuando se usa,
este producto emite químicos de combustión de combustible que son conocidos en el estado de
California porque producen cáncer y defectos de nacimiento u otros daños reproductivos. Siga
todas las instrucciones en este manual y úselo solamente en un área bien ventilada en exteriores.

16
ADVERTENCIA
ADVERTENCIAS GENERALES
• Utilice estae asador de cerdo únicamente sobre una superficie estable dura, nivelada, no
combustible (concreto, piso, etc.) capaz de aguantar el peso del ahumador. Nunca lo utilice sobre
superficies de madera o de otro tipo que podrían quemarse.
• Tiene que haber un espacio de 10 pies (3.1m) entre el asador de cerdo y materiales combustibles
(arbustos, árboles, terrazas de madera, cercas, edificios, etc.) o una construcción en todo momento
en que la parrilla está en uso. No coloque el asador de cerdo debajo del voladizo de un techo u otro
lugar cerrado.
• Para uso externo únicamente. No debe operarse este asador de cerdo en interiores o en una zona
cerrada. No utilice en balcones.
• Mantenga a los niños y las mascotas alejados del asador de cerdo caliente. NO permita que los
niños usen o jueguen cerca del asador de cerdo. Supervisión cercana es necesaria cuando el
asador de cerdo este en uso.
• Nunca añada líquido encendedor de carbón a los trozos de carbón calientes porque puede ocurrir
un retroceso de la llama que causaría quemaduras graves.
• Le recomendamos usar una chimenea de encendido de carbón para evitar los riesgos asociados
con el uso de liquidos inflamables para encender el carbón. Si decide usar un liquido inflamable,
use solamente un liquido especialmente para encender carbón. Antes de encender el carbón, lea
cuidadosamente las instrucciones incluidas con el carbón y el liquido inflamable.
• Nunca deje trozos de carbón y ceniza sin atender. Antes de dejar el asador de cerdo desatendido,
saque los trozos de carbón sobrantes y la ceniza del asador de cerdo. Tenga precaución para
cuidar su persona y propiedad. Con cuidado, meta los trozos de carbón sobrantes y la ceniza en un
recipiente metálico no combustible y llénelo totalmente de agua. Deje los trozos de carbón en el
recipiente metálico por 24 horas antes de tirarlos a la basura.
• Ponga los trozos de carbón y la ceniza que ya extinguió a buena distancia de toda estructura y
material combustible.
• Con la manguera de su jardín, moje completamente el área debajo y alrededor de su asador de
cerdo para extinguir toda ceniza, trozo de carbón o rescoldo que pudiesen haberse caído durante
el cocimiento o la limpieza.
• No almacene líquido encendedor ni otros líquidos o materiales o carbón previamente tratado con
líquido encendedor alrededor de su asador de cerdo.
• No utilice gasolina, queroseno o alcohol para encender el carbón de leña. El empleo de uno de
estos productos o uno similar podría causar una explosión con posibles lesiones graves a la
persona.
• No deje el asador de cerdo desatendido durante el uso.
• No almacene o utilice el asador de cerdo cerca de gasolina u otros líquidos inflamables, gases o
donde se encuentren vapores inflamables.
• NO use la parrilla bajo la influencia de alcohol o drogas.
El asador de cerdo está muy caliente al usarse. Para evitar quemaduras:
• NO intente mover el asador de cerdo.
• Póngase guantes protectores o guantes gruesos para el horno.
• NO toque ninguna superficie caliente de el asador de cerdo.
• NO se ponga ropa suelta y cuídese de que su pelo no toque el asador de cerdo.

ADVERTENCIA
• Al agregar el carbón de leña, mantenga las manos, la cara y el cuerpo una distancia segura de las
cenizas calientes y de las llamaradas de la llama.
• No permita que el carbón de leña se reclinen sobre las orillas de el asador de cerdo.
• Tenga precaución al ensamblar y operar su asador de cerdo para no rasguñarse o cortarse en los
bordes filosos o partes metálicas.
• Cuando haya mucho viento, ponga su asador de cerdo en una zona externa protegida del viento.
• Tras cada uso, limpie su asador de cerdo muy bien a aplíquele a su interior una capa ligera de aceite
vegetal para evitar la oxidación. Cubra el asador de cerdo para que no se oxide demasiado.
• Sólo para uso doméstico. No use este asador de cerdo para otros usos que no sean los indicados.
• Tenga cuidado al levantar o mover el asador de cerdo para evitar torcer y lesionar su espalda.
• Recomendamos tener un extintor contra incendios a la mano. Contacte a las autoridades de su
localidad para averiguar el debido tamaño y tipo del extintor.
• No se recomiendan aditamentos para accesorios de este producto en particular no fabricados por
The Brinkmann Corporation ya que pueden causar lesiones personales o daños a la propiedad.
• Cuando no utilice su asador de cerdo, almacénela en un lugar seco y lejos del alcance de los niño.
• No intente darle a su asador de cerdo mantenimiento que vaya más allá del normal, como se explica
“Seguridad después del uso” y “Debido cuidado y mantenimientoe” en la pagina 7 de este manual.
• Deseche debidamente todo material de empaque.
TENGA PRECAUCIÓN Y USE SU SENTIDO COMÚN AL OPERAR SU AHUMADO
LA PERSONA QUE NO SIGA LAS DIRECTRICES Y ADVERTENCIAS DE SEGURIDAD DE ESTE MANUAL
PODRÍA LESIONARSE GRAVEMENTE O SUFIR DAÑOS A LA PROPIEDAD.
GUARDE ESTE MANUAL PARA CONSULTARLO EN EL FUTURO.
17

18
INSTRUCCIONES DE OPERACIÓN PARA EL ASADOR DE CERDO
COLOQUE EL ASADOR DE CERDO EN EL EXTERIOR, SOBRE UNA SUPERFICIE DURA,
NIVELADA Y NO COMBUSTIBLE, LEJOS DEL VOLADIZO DE UN TECHO O DE CUALQUIER MATERIAL
COMBUSTIBLE. NUNCA PONGA SOBRE SUPERFICIES DE MADERA O DE OTRO TIPO QUE PUDIESEN
QUEMARSE. ALEJE EL ASADOR DE CERDO DE PUERTAS O VENTANAS ABIERTAS PARA QUE EL HUMO NO
ENTRE A LA CASA. CUANDO HAGA VIENTO, COLOQUE EL ASADOR DE CERDO EN UN LUGAR EXTERNO
PROTEGIDO DEL VIENTO.
LEA DETENIDAMENTE TODAS LAS ADVERTENCIAS E INSTRUCCIONES DE SEGURIDAD
ANTES DE UTILIZAR SU ASADOR DE CERDO.
1. El asador de cerdo de Brinkmann asará un cerdo hasta
75 libras. Coloque el cerdo entre las dos rejillas de cocinar
como se muestra. No corte ni haga agujeros en la piel.
2. Utilice los cuatro ganchos-S proporcionados para sostener
el cerdo en medio las dos rejillas de cocinar. Cerciórese
de que las manijas esten volteadas lejos del cerdo.
3. Ubique la bandeja de goteo dentro del carro del Asador
de Cerdo.
4. Coloque el cerdo dentro del carro del asador, lado de
la piel abajo. Esto puede requerir la ayuda de una
segunda persona.
ASANDO UN CERDO ENTERO:
Manija
Manija
Gancho-S Gancho-S

5. Fije la cacerola de la ceniza encima del carro,
directamente sobre el cerdo.
6. Coloque la rejilla del carbón de leña directamente sobre
la cacerola de la ceniza.
Si usa un Encendedor para Chimenea a Carbón, siga todas
las advertencias e instrucciones del fabricante para el uso de
su producto. Comience con 5.9 kg. - 6.8 kg. (13 - 15 libras) de
carbón. Éste debe ser suficiente carbón de leña para la primera
hora de cocinar.
7. Con cuidado encienda el encendedor para chimenea a
carbón, dejando que arda hasta que se cubra ligeramente
con una capa de ceniza (aprox. 20 minutos). Cuando el
carbón de leña está quemando fuerte, cuidadosamente
coloque los carbones calientes parejos sobre rejilla del
carbón de leña.
Si usa líquido para encendedores, siga las advertencias e
instrucciones del fabricante relacionadas con el uso de su
producto. Comience con 5.9 kg. - 6.8 kg. (13 - 15 libras) de
carbón. Éste debe ser suficiente carbón de leña para la primera
hora de cocinar.
8. Sature el carbón con fluido de encendido. Con la tapa
abierta, espere 2 a 3 minutos para permitir que el carbón
absorba el fluido. Guarde el fluido de encendido de carbón
lejos de el asador de cerdo.
9. Aléjese y con cuidado encienda el carbón y deje que arda
hasta que se cubra ligeramente con una capa de ceniza
(aprox. 20 minutos). Cuando el carbón de leña está
quemando fuerte, cuidadosamente coloque los carbones
calientes parejos sobre rejilla del carbón de leña.
19
SSIIEESSTTÁÁUUSSAANNDDOOUUNNEENNCCEENNDDEEDDOORRPPAARRAACCHHIIMMEENNEEAAAA
CCAARRBBÓÓNN,,CCOONNTTIINNÚÚEECCOONNEELLPPAASSOO1111
Table of contents
Languages:
Other Brinkmann Kitchen Appliance manuals

Brinkmann
Brinkmann ROTISSERIE User manual

Brinkmann
Brinkmann 812-9180-S User manual

Brinkmann
Brinkmann ProSeries User manual

Brinkmann
Brinkmann 815-3500 User manual

Brinkmann
Brinkmann Boiling Pot User manual

Brinkmann
Brinkmann 4 Burner Gas Grill User manual

Brinkmann
Brinkmann ProSeriesTM User manual

Brinkmann
Brinkmann 2-Gallon Pan & Basket Set User manual

Brinkmann
Brinkmann PROSERIES 140-4400-R_INSTR User manual