BRINKS DCU-500 User manual

TABLE OF CONTENTS
HOW TO AVOID FALSE ALARMS............................................................ 1
THE BRINK’S HOME SECURITY SYSTEM
Equipment in the Standard Systems....................................................... 2
Optional Equipment................................................................................. 3
Description of the Keypad........................................................................ 5
OPERATING THE BRINK’S SYSTEM
Normal Operating Mode.......................................................................... 6
Turning the System ON........................................................................... 6
Not Ready Status.................................................................................... 7
Turning the System OFF.......................................................................... 7
Turning System OFF and Canceling a Sounding Alarm.......................... 8
Turning System OFF After an Alarm in Your Absence............................. 8
What to do in an Actual Emergency......................................................... 9
Turning System ON with Motion Detectors Off........................................ 9
Turning System ON with Delay Doors Instant.......................................... 9
Turning System ON with Motion Off and Doors Instant........................... 9
Using the Keypad’s Emergency Buttons................................................ 10
USING SYSTEM OPTIONS
Bypass.................................................................................................. 11
Door Chime........................................................................................... 11
Adding Auxiliary Codes......................................................................... 12
Deleting Auxiliary Codes....................................................................... 12
Viewing Alarm Memory.......................................................................... 12
TESTING THE BRINK’S SYSTEM
Transmission and Siren Test.................................................................. 13
Testing the Door and Window Sensors.................................................. 13
Testing the Motion Detector................................................................... 14
Testing the Smoke Detector (Optional Feature).................................... 14
TROUBLE MESSAGES
No AC Power Indication........................................................................ 15
Low Battery Indication........................................................................... 15
Trouble on Fire Zone Indication............................................................. 16
Communication Problem Indication....................................................... 16
CLEANING THE SMOKE DETECTOR (Optional Feature)................... 17
EMERGENCY EVACUATION PLANS................................................... 18
QUESTIONS AND ANSWERS.............................................................. 20

1
How to Avoid False Alarms
Avoiding false alarms is critical to better monitoring service and preventing
false alarm fines from your local municipality. Below are tips to help you
receive better alarm response.
• Select the seven day training period on your Emergency Information
Schedule.
• Select the “standard” procedure for intrusion alarms on the Emergency
Information Schedule.
• Make sure everyone in your house knows how to use the alarm system.
They should all know a valid three-digit code and the codeword. Notify
Brink’s if you are going to sell or rent your home, so we can assist the
new residents.
• Cancel all accidental alarms by entering your three-digit code, then press
CANCEL. (You can also cancel accidental alarms in reverse order by
first pressing CANCEL then entering your three-digit code.) See page 10
for more details.
• Test the system each week and promptly notify Brink’s Customer Service
of any problems at 1-800-445-0872. Customer Service is available 24
hours a day, seven days a week.
• If you experience any unexplained false alarms, immediately contact
Brink’s Customer Service.
• If you are going to fumigate your home or do any other work, which will
create a large amount of dust, completely cover all motion detectors and
smoke/heat detectors. (Don’t forget to uncover the smoke detectors and
motion detectors when you are finished.) Excessive smoke from cooking
or the fireplace can also cause a false fire alarm.
• If you know the motion detector is the cause of your false alarms, you
may turn the system on with the motion detector off.To do this, follow the
steps described on page 11 of this manual. Promptly notify Brink’s
Customer Service for further assistance.
• If you get an indoor pet after the alarm system is installed, you should
contactBrink’sCustomerService.Aservice callmayneedtobe scheduled
to adjust the motion detector.
• The motion detector can detect movement of balloons, plants, curtains
and other decorations. Be sure air currents do not cause movement of
these items in the area covered by a motion detector.

1. One Master Control Panel - This device
processes information sent to it by all the other
components of the system. When an alarm is
tripped, the master control panel interprets the
signal and sends a message to the Brink’s
Monitoring Center. This message is sent over
telephonelines.Thispanel also contains abackup
battery incaseyour homeloses power.Youshould
not open the cover to the master control panel
unless instructed to do so by a Brink’s
representative.
2. One Keypad -This keypad is used to turn the
systemon andoffandtouse othersystem options.
It also includes three emergency panic buttons -
police, fire, and medical (See note on page 7.),
which can be used if emergency assistance is
needed.Whenpressed, thepoliceand fire buttons
will cause the siren to sound. When the medical
button is pressed, the keypad beeps, but the siren
does not sound. In all cases, an alarm signal is
senttothe Brink’s Monitoring Center.(Fire buttons
are not available in commercial installations.)
3. Two Door/Window Sensors - These sensors
are placed in or on the frame and body of each
door or window to be protected. If the protected
door or window is opened while the system is on,
an alarm will trip, and an alarm signal will be sent
to the Brink’s Monitoring Center.
4. One Motion Detector - This device is used to
detect motion on the inside of your house. If
someone enters the area covered by the motion
detector while the system is on, an alarm will trip,
and an alarm signal will be sent to the Brink’s
Monitoring Center.
The Brink’s Home Security Standard System
2

5. One Siren - This device sounds a warning
when the alarm system is tripped. The siren is
designedtobe located inside the house to frighten
intruders. It may also sound when using other
special features.
6. OnePowerTransformer-Thisdeviceconnects
the alarm system to the electricity in your home.It
isplugged into aregular (110VAC)electrical outlet.
7. One RJ-Block & Dialer Cable Connection -
This device connects the alarm system to the
phone line in your home.The phone line is used to
send alarm signals to the Brink’s Monitoring
Center.
8. One“Protected byBrink’sHome Security”yard
sign - This high visibility sign warns potential
intruders thatthepremisesisprotected byaBrink’s
security system.
9. Window Stickers - You will be provided with
several “Protected by Brink’s Home Security”
windowstickers.These stickersalsowarn potential
intruders thatthepremisesisprotected byaBrink’s
security system.
Optional Equipment
You may purchase additional keypads, door and/
or window sensors, motion detectors, and sirens
to meet your desired security needs.The following
optional equipment is also available:
1. Smoke/HeatDetector-This deviceisdesigned
to detect smoke and dangerously high heat.
(Not available in commercial installations)
2. HeatSensor -This devicedetects dangerously
high heat. It is designed to be located in attics and
garages or near furnaces.
(Not available in commercial installations.)
3


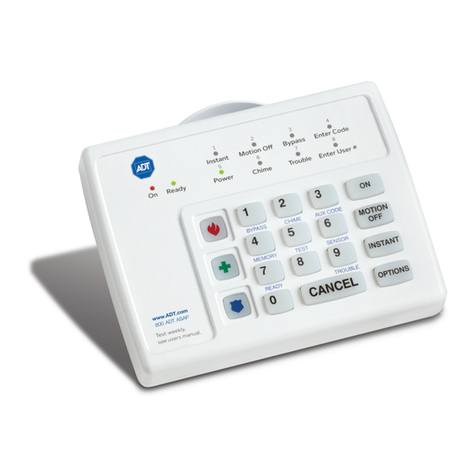
DESCRIPTION OF THE KEYPAD
DCU-500 Keypad
1. ON Light 7. Emergency Panic Buttons
2. Instant Light Fire
3. Motion Off Light Medical
4. System Ready Light Police
5. Power Light 8. Cancel Alarm Button
6.Trouble Light 9. Motion Detector Off Button
10. ON Button
5

Operating the Brink’s System
NORMAL OPERATION MODE
When the system is turned on, all interior and exterior intrusion sensors
are turned on; allowing time to enter and exit designated doors.
Designated Entry/Exit Doors
Designated entry/exit doors should be only those doors you use most
frequently to enter and exit your home.
Upon entering a designated entry/exit door, the system will sound a tone
from the keypad as a reminder to turn the system OFF. A standard delay
period of 40 seconds allows time to enter a valid user code. If you do not
turn the system off during this delay period, the siren will sound and an
alarm signal will be sent to the Brink’s Monitoring Center. If this happens,
enter your user code, then press CANCEL to silence the siren and cancel
the alarm signal.
When turning the system ON, the system allows a standard delay period of
80 seconds to exit and close a designated door. If you exit and securely
close your door within this delay period, the system will not sound the siren
or send an alarm signal to the Brink’s Monitoring Center. When ON, the
system is ready to detect intrusion in all protected areas.
Turning the System ON
1. Before turning the system ON, close all doors and windows and verify
that the green ready light is on. (If NOT see page 9.)
2. Press ON.
3. The red ON light located on the upper left side of the keypad will begin
to flash, showing the system is ON and the delay period to exit has
begun.
4. Exit promptly (If the red ON light becomes steady, the standard 80-
second delay period has expired.If you open a door now, the alarm will
trip.Turn the system off with your user code and start over.)
6

NOT READY STATUS
1. If the green ready light is not on and you press ON, the pad will sound
multiple tones to alert you that the system cannot be turned on.
2. Push and hold the “7” key for 3 seconds.The keypad lights will light up
exceptthe zoneorzones thatare notsecured.Thensecure theidentified
door, window, or area.
1 = Zone 1 3 = Zone 3 5 = Zone 5
2 = Zone 2 4 = Zone 4 6 = Zone 6
3. Check to see if the green ready light is on.If the green ready light is on,
proceed to turn the system on.
4. If thegreen readylight isstilloff,pressandhold the“1”keyfor3seconds.
5. Enter the zone number that showed not ready in step 2 by pressing the
corresponding number on the keypad. (This procedure “bypasses” the
identified zone.)
6. The green ready light will flash on and off repeatedly while a zone is
bypassed.When the system is turned on then off, all bypassed zones
are restored automatically.
7. You may proceed to turn the system on with the trouble zone bypassed.
CAUTION: THE ZONE YOU BYPASSED WITH THIS PROCEDURE
WILL NOT BE PROTECTED. Please call Brink’s Customer Service at
1-800-445-0872 for assistance.Customer Service is available 24 hours
a day, 7 days a week.
TURNING THE SYSTEM OFF
1. Enter by one of the designated doors. When you open the door, the
system will sound a tone to remind you to turn the system off.
2. Turn the system off by entering your user code. Each key will sound a
short beep when pressed.
3. The red ON light will go out when the system is turned OFF.You must
enter the proper code within the standard 40 second delay period to
prevent sounding an alarm.
7

TURNING SYSTEM OFF AND CANCELING A SOUNDING ALARM
1. Entera validusercode immediatelyfollowedbyCANCELto notify
the Brinks Monitoring Center that the signal is a false alarm.(The
cancel command can also be done in reverse order by pressing
CANCEL then a valid user code.)
2. The keypad will sound a one-second beep to confirm that the
cancellation was successful. You will NOT receive a call from
Brink’s.
NOTE: If you want the Brink’s Monitoring Center to call you
after an alarm has tripped, do not press the CANCEL button.
Simply turn the system off using a valid user code and wait for
the Brink’s Monitoring Center to call. DO NOT CALL BRINK’S.
Calling Brink’s may tie up your phone line, resulting in Brink’s
notifying an emergency agency, which could result in a false
alarmfine.Bepreparedto giveyourcodewordwhentheBrink’s
operator calls. (You select the code word at the time of your
installation, and it is written on your Emergency Information
Schedule.)
TURNING SYSTEM OFF AFTER AN ALARM IN YOUR ABSENCE
1. If an alarm has occurred in your absence the red ON light will be
flashing.
2. Enter a valid user code to turn the system OFF. The keypad will
beep.The zone that sent the alarm will flash for 2 seconds after
the code is entered.
3. Refer to “Viewing Alarm Memory” to review alarms.
4. If you do not know what caused the alarm, call Brink’s Customer
Service at 1-800-445-0872. Customer Service is available 24
hours a day, seven days a week.
8

WHAT TO DO IN AN ACTUAL EMERGENCY
Do
not turn the system off.
1. Do not use the telephone, unless you are calling 911 to report
the emergency; you will not be able to use your telephone until
the system has finished sending the alarm signal to the Brink’s
Monitoring Center.
2. When the Brink’s monitoring operator calls to verify the alarm,
explain the emergency. If you do not answer the phone, Brink’s
will contact the appropriate emergency agency, unless you have
given other instructions.
TURNING SYSTEM ON WITH MOTION DETECTOR OFF
1. To turn thesystemON withouttheMOTIONDETECTORS,press
ON, then MOTION OFF.
2. The motion off light will be on and the red ON light will start
flashing.
TURNING SYSTEM ON WITH DELAY DOORS INSTANT
1. To turn the system ON and make all the doors INSTANT, press
ON, then push and hold the ON button for 3 seconds.
2. The instant light and the red ON light will be lighted.
CAUTION: This feature should only be used whenYOU WILL NOT
BE LEAVING YOUR HOME, BECAUSE YOUR DOORS WILL NOT
HAVE A DELAY PERIOD. If you open any door, the alarm will trip,
and the siren will sound instantly.
TURNING SYSTEM ON WITH MOTION OFF AND DOORS INSTANT
This feature allows you to turn the system on without the motion
detectorand removethedelaytimefrom designated entry/exitdoors.
1. You may combine the above features by pressing ON, MOTION
OFF, then push the ON button and hold it for 3 seconds.
2. The INSTANT, MOTION OFF and the red ON lights will be lit,
confirming the system is ON.
3. You may now move freely within your home without tripping the
alarm. 9

USING THE KEYPAD’S EMERGENCY BUTTONS:
1.If you are home when a police, medical or fire emergency
arises you may press the appropriate button on the keypad.
The system does not have to be on to use these features.
2. The fire button is designated by the following symbol , the
medical button is designated by , and the police button is
designated by . (Certain emergency buttons are not
available to commercial customers or in some areas.)
3. If the fire or police buttons are pushed, the system’s siren will
sound. If the medical button is pushed, the keypad will beep
but the siren will not sound.
4. Afterreceiving a signalfrom theemergency button,theBrink’s
HomeSecurity operatorwill callyourhometo verify the alarm.
Ifyouwaitforthe operatorto call,youwill havethe opportunity
to explain your emergency. If you leave or do not answer the
return call, or if your phone is busy Brink’s will contact the
emergency agency designated by the signal you sent. If you
have accidentally pressed an emergency button, follow the
procedures described in this manual.
911 SERVICE: If your community provides 911 Service and
you are able to reach a phone, Brink’s recommends that you
call the 911 operator before using emergency buttons on the
keypad. This normally gives you the fastest access to the
emergency agency. After calling 911 you may use the
emergency buttons to report to Brink’s Home Security.
10

USING SYSTEM OPTIONS
Thesystem hasfiveoptions:BYPASS,DOORCHIME, AUXILIARY CODES,
ALARM MEMORY, and TEST.
You may select any option by pressing and holding for 3 seconds the
button that corresponds with the option you want.
1 = Bypass 3 = Auxiliary Code 5 = Test Communications
2 = Door Chime 4 = Memory 6 = Test Sensor
If you select a feature in error, you may cancel the selection by pressing
CANCEL.
BYPASS
This option allows you to bypass a trouble zone or a specific zone of your
choice.When bypassed, the system ignores the specified zone.
1. Press and hold the “1” key for 3 seconds. All the keypad’s lights
will go off.
2. Enter the zone number. The zone light will go on when you enter
the number.
3. The system can then be turned on by pressing ON. The BYPASS
option can also be used with the Door Chime option described
below. The green ready light will flash on and off until the system is
turned off.
NOTE: The BYPASS feature is automatically canceled when the
system is turned off with a valid user code.
DOOR CHIME
Thisfeatureisused when the system is offtoletyou knowwhen a protected
door or window has been opened. When a door or window is opened, you
are alerted by a beep from the keypad.
1. Press and hold the “2” key for 3 seconds.
2. The keypad will beep.
3. Press CANCEL to turn off this feature, or it will automatically be
canceled when the system is turned on.
11

ADDING AUXILIARY CODES
This feature allows you to add up to six extra codes to turn the system on
and off. You can use auxiliary codes when you want to allow someone
access to your home, but you do not want to give them your master code.
For example, auxiliary codes can be given to houseguests, housekeepers,
housesitters, etc.
1. Press and hold the “3” key for 3 seconds.
2. Enter the user master code.
3. Press 1-6 (You have six “slots”in which to program auxiliary codes.)
4. Select 1 as the user identification for the first auxiliary code you
choose. (The next auxiliary code user identification would be 2,
and so on, up to a maximum of six auxiliary codes.)
5. Enter any user code of your choice.
6. The keypad will beep to confirm the system accepted the new
code.You may test the code by turning the system on and off
with the new auxiliary code.
DELETING AUXILIARY CODES
1. Press and hold the “3” key for 3 seconds.
2. Enter the user master code.
3 Enter the user identification number (1-6) for the auxiliary code
you wish to delete.
4. DO NOT ENTER THE AUXILIARY CODE; instead,press
CANCEL to delete the code.
5. You will receive a confirmation beep from the keypad.
6. You may verify that the code was deleted by turning the system
on and trying to turn it off with the code you deleted. If it was
deleted, it will not turn the system off.
VIEWING ALARM MEMORY
1. Press and hold the “4” key for 3 seconds.
2. The zone number of any alarms in memory will light up for 5
seconds then reset.
12

TESTING THE BRINK’S SYSTEM
TRANSMISSION AND SIREN TEST
NOTICE: Your Protective Service Agreement requires that you test the
system each week.
1. Press and hold the “5” key for 3 seconds.
2. A test signal will be sent to the Brink’s Monitoring Center.
3. When the test signal is successfully received at the Brink’s Monitoring
Center, the keypad will beep, and the siren will sound a short blast.
(If the test signal is not successfully received at the Brink’s Monitoring
Center, the trouble light will be on. Call Brink’s Customer Service at
1-800-445-0872. Customer Service is available 24 hours a day, sevsn
days a week.)
NOTE:You will not receive a call from the Brink’s Monitoring center when
you use this feature.
TESTING THE DOOR AND WINDOW SENSORS
You can test the door and window sensors without sending alarm signals to
the Brink’s Monitoring Center.
1. Close all protected doors and windows.
2. Check the green ready light to see if on.
(ifyoucannotgettheREADY indication, call Brink’sCustomerService.)
3. Press and hold the “2” key for 3 seconds.
4. The keypad will beep.
5 Open and close each protected door and window one at a time.The
keypad will give a short tone to indicate that sensor is working. (Make
a note of each sensor that does not cause the keypad to give the tone
and call Brink’s Customer Service.)
6. When all doors and windows have been tested, press CANCEL to
exit the door chime mode.
NOTE: Door chime is automatically canceled when the system is
turned on.
13

TESTING THE MOTION DETECTOR
You can test the motion detector without sending alarm signals to
the Brink’s Monitoring Center.
1. Make sure there is no movement in the area protected by
motion detector.
2. Press and hold the “6” key for 3 seconds.
3. All zone lights will flash rapidly.
4. Walk through the protected area. If your motion is detected, the
siren will give a short blast.(If your motion was not detected, call
Brink’s Customer Service. A service call may need to be
scheduled to adjust the motion detector.)
5. Whenyouarefinished testingthemotiondetector,exitthe sensor
test mode by pressing CANCEL.
NOTE: If the CANCEL key is not pressed, the SENSOR TEST is
automatically canceled in five minutes.
TESTING THE SMOKE DETECTOR (Optional Feature)
The smoke detector can be tested without sending alarm signals to
the Brink’s Monitoring Center. Call Brink’s Customer Service at
1-800-445-0872 for assistance in testing the smoke detector.
CAUTION:Do not attemptto testthe smoke detectorwith canned
smoke, heat, or flame.These methods may damage the smoke
detector.
14

Trouble Messages
NO AC POWER INDICATION
1. The power light will flash.
2. The system is currently working on the back up battery because the
electrical source to the system has been interrupted.
3. If you have a power outage, the system will work on back up battery for
four to six hours.When power is restored, the system will automatically
switch back to the electrical source.The battery will recharge within 24
hours.
4. If you have power to your home, check the transformer to verify it is still
plugged into the electrical source.
(See page 3 item 6 for description of transformer.)
5. If the transformer is plugged in, check your electrical breaker box to
confirm that all the breakers are in the ON position. If you have fuses,
check the fuse panel to see if any have blown.
6. If the breakers are all in the ON position, unplug the transformer. (May
require removing the retainer screw from the outlet cover.) Plug in a
small appliance to determine if the electrical outlet is working properly.
7. If the outlet is not working, call your electrician to repair it. You may
power the system from a working outlet by plugging the transformer
into an extension cord that is plugged into the working outlet. When
the faulty outlet is repaired, plug the transformer back into the outlet.
8. If the outlet is working, call Brink’s Customer Service a1-800-445-0872
for assistance. Customer Service is available 24 hours a day, seven
days a week.
LOW BATTERY INDICATION
1. The TROUBLE light will be flashing. Press and hold the “9” key for 3
seconds.The zone 1 light will be on.
2. The keypad will beep every fifteen seconds.
3. Press CANCEL to silence the beep for 24 hours.
4. If the power has been off in your home, but is now restored,you do not
need to do anything.The battery will recharge within 24 hours.
a. If the trouble message appears again after 24 hours, the battery is
not recharging properly.
b. Call Brink’s Customer Service at 1–800-445-0872 for assistance.
15

TROUBLE ON FIRE ZONE INDICATION
1.If youaccidentallytrip thesmoke/heatdetectorcancelthe alarmbyentering
a valid user code immediately followed by CANCEL.
2.Youmust clearallsmoke,dust,steam etc.fromthe smokedetector. Failure
to do so will cause the alarm to trip again.
3.Thesystemwillautomaticallytry toreset whena validusercode isentered.
If it fails to reset, the alarm will sound again
NOTE: This trouble condition only affects the smoke/heat detector.
All other devices will work normally.
COMMUNICATION PROBLEM INDICATION
IMPORTANT NOTICE: Converting your phone to a DSL (Digital Subscriber Line) service or other
high speed data line could affect the ability of the Brink’s Home Security system to transmit alarm
signals. If you have switched to DSL or other high speed line service, you should immediately test
the Brink’s system’s transmission capability by following the directions in this manual. If the
transmission is not successful, call Brink’s Customer Care at 1-800-445-0872. It may be necessary
for Brink’s to install a filter provided by your DSL company in connection with Brink’s control panel.
Note that although installation of the filter will generally allow communication, due to the nature of
DSL service the Brink’s system will not be able to communicate if your telephone is in use or
otherwise off the hook.
1.The TROUBLE light will be on. Press and hold the “9” key for 3 seconds
the zone 2 light will be on. This indicates the system was unable to
communicate a signal over the telephone line to the Brink’s Monitoring
Center.
2.The keypad will beep every fifteen seconds.
3.Press CANCEL to stop the beeping for 24 hours.
4.Take the following action to determine if the problem is being caused by
the alarm system or the telephone Service:
a. Check your telephone for dial tone.
b. If there is no dial tone:
1) Unplug the dialer cable from the RJ-Block.(See page 5, item 7 for
description of dialer cable and RJ-Block.) This disconnects the
Brink’s alarm system from your telephone line.The RJ-Block is
located on the side of the panel or inside of the panel.
2) If there is now a dial tone, call Brink’s Customer Service at 1-800-
445-0872 for assistance.Customer service is available 24 hours a
dayseven days a week.
3) If the telephone is still not working properly, the problem is not the
alarm system. PLUG THE DIALER CABLE BACK INTO THE RJ-
BLOCK. Notify your local telephone company for service. Until
the telephone service is restored, no alarm signal can be sent
to Brink’s Monitoring Center, but the system will still work
within your home. It is very important to resolve this problem
quickly to ensure your home continues to be monitored.
16

Cleaning the Smoke Detector
(Optional Feature)
If you had a smoke/heat detector installed, you will need to clean it
every three months. It may also be necessary to clean it after it has
been tripped by smoke or dust.To clean the smoke detector,vacuum
the smoke detector vents using a crevice attachment without
removing the cover. Should this cleaning process trip a smoke/heat
detector alarm, perform the following steps:
1. The siren will sound. Cancel the alarm by entering a valid
user code immediately followed by the CANCEL button.
2. The keypad may start beeping and the TROUBLE light will be
on. Finish vacuuming the smoke detector.
3. When you have finished vacuuming the smoke detector, check
the keypad to see if it is still beeping and the TROUBLE light is
on, wait 5 minutes for the system to reset.
4. The beeping can be silenced for 24 hours by pressing the
CANCEL key.
5. If after 30 minutes the detector fails to reset, the TROUBLE
light will be on and the keypad will beep. Call Brink’s Customer
Service at 1-800-445-0872 for assistance. Customer Service is
available 24 hours a day, 7 days a week.
NOTE: Every twoyearsyoushouldcontact Brink’sCustomerService
toscheduleservice ofthe smoke detectors.Amore thorough cleaning
and testing of the smoke/heat detector can be done at this time. (If
you have purchased an extended service plan, there is no charge
for this service call.)
17

Emergency Evacuation Plans
An emergency evacuation plan should be established for an actual fire
alarm condition. For example, the following steps are recommended by
the National Fire Protection Association and can be used as a guide for
establishing this plan for homes or commercial buildings.
1. Drawup a floorplanof yourpremises.Show windows,doors,stairs,
and rooftops that can be used for escape. Indicate each room’s
escape routes. Determine two means of escape from each room.
One will be the door leading to the normal exit from the premises.
The other may be a window that opens easily. An escape ladder
may have to be located near the window if there is a long drop to
the ground below.
2. Set a meeting place outdoors for a headcount of all occupants.
Practice escape procedures.For increased home safety, sleep with
the bedroom door closed. It will increase your escape time. If you
suspect fire, test the door. If it feels hot, the hall is already too hot
to enter.If you think it is safe, brace your shoulder against the door
and open it cautiously. Be ready to slam the door if smoke or heat
rush in. Practice escaping to the outdoors and meeting at an
assigned spot. Call the fire department from a neighbor’s phone.
18

NOTE: After having the alarm system installed,please contact
your local fire and police departments to find out if an
alarm permit is required.
Early warning fire detection is best achieved by fire detection
equipment installed in all rooms and areas of the household as
follows: a smoke detector installed in each separate sleeping area
(vicinity of, but outside of the bedrooms), and heat and smoke
detectorsinlivingrooms,diningrooms,bedrooms,kitchens,hallways,
attics,furnace rooms, closets,utility,and storagerooms,basements,
and attached garages. This equipment should be installed in
accordance with the National Fire Protection Association’s Standard 72.
For additional information write:
National Fire Protection Association
1 Battery March Park
Quincy, Massachusetts 02269
California residents may also write:
California State Fire Marshal
7171 Bowing Drive, Suite 600
Sacramento, California 95823
19
This manual suits for next models
1
Table of contents
Other BRINKS Security System manuals