logo
Brands
  1. Home
  2. •
  3. Brands
  4. •
  5. Brinno
  6. •
  7. Accessories
  8. •
  9. Brinno TimeLapse ATM100 User manual

Brinno TimeLapse ATM100 User manual

Popular Accessories manuals by other brands

Hillco 2810 Operator's manual

Hillco

Hillco 2810 Operator's manual

Siemens QSA2700D Basic documentation

Siemens

Siemens QSA2700D Basic documentation

Contours ZY024 manual

Contours

Contours ZY024 manual

Saivod VS621 manual

Saivod

Saivod VS621 manual

SCE ENVIRO-THERM SCE-TE170B24VSS user manual

SCE

SCE ENVIRO-THERM SCE-TE170B24VSS user manual

Z-Wave HSD-200Z user manual

Z-Wave

Z-Wave HSD-200Z user manual

turck FMX-IM-2UPLI63FX quick start guide

turck

turck FMX-IM-2UPLI63FX quick start guide

Decagon Devices 10HS manual

Decagon Devices

Decagon Devices 10HS manual

UPPAbaby Cup Holder user manual

UPPAbaby

UPPAbaby Cup Holder user manual

Elko SmartSensor Leakage Wireless manual

Elko

Elko SmartSensor Leakage Wireless manual

Grizzly H8371 instructions

Grizzly

Grizzly H8371 instructions

Panasonic HG-T Series user manual

Panasonic

Panasonic HG-T Series user manual

IFM Electronic Efector 250 Series Brief instructions

IFM Electronic

IFM Electronic Efector 250 Series Brief instructions

Virtuox VirtuCLEAN 2.0 user manual

Virtuox

Virtuox VirtuCLEAN 2.0 user manual

DigiDesign 888/24 I/O installation guide

DigiDesign

DigiDesign 888/24 I/O installation guide

PROZIS QUAY user manual

PROZIS

PROZIS QUAY user manual

patagonia PSI Vest user manual

patagonia

patagonia PSI Vest user manual

SFC Energy EFOY GO! manual

SFC Energy

SFC Energy EFOY GO! manual

https://manuals.online logo
https://manuals.online logoBrands
  • About & Mission
  • Contact us
  • Privacy Policy
  • Terms and Conditions

Copyright 2025 Manuals.Online. All Rights Reserved.

User Manual
ATM100
Motion Sensor
www.brinno.com
Package Contents
1. ATM100 Motion Sensor x1
2. Magnetic holder x1
3. Metal Lens ring x2 4. User manual
Specication
Dimension
Weight
Waterproof
Detect Distance
Detect Angle
56(W)x34(L)x23(D) mm
10 g
IP54
4m
90˚
Use
r M
a
n
ual
ATM
1
00
www
.b
rinn
o.
c
om
Parts of ATM100
1. Magnetic Holder 2. Motion Sensor
3. Plug
1
2
3
Installation on TLC200
1.
Clean the Time Lapse
Camera (TLC200) lens
and lens ring, then
place the metal lens
ring included on the
camera lens ring.
2. Attach your
Motion sensor
magnetic holder
to the Time Lapse
Camera (TLC200)
lens ring, and
insert the plug
into Time Lapse
Camera (TLC200)
Extension port.
e
3. Turn on the Time Lapse Camera (TLC200)
and the screen will display Motion mode.
Motion mode screen
4. Press OK, go to the preview screen.
Preview screen
READY
5. Press OK again for one second, until the
LCD panel turns o, and the Time Lapse
Camera (TLC200) is recording images.
Preview screen
READY
LCD turn o
Recording...
Hold
OK button
1 Sec.
During the recording period, the LCD panel will turn o
to save power.
When the SD card memory is full, the Time Lapse Camera
(TLC200) will STOP RECORDING. Please remember to replace
the SD card to continue recording.
Green LED light: indicates
image capture in process.
When the Green LED light ashes, the Motion
Sensor (ATM100) is activated and the Time Lapse
Camera (TLC200) is capturing photos.
Red LED light: Memory is
full or Battery is empty.
All manuals and user guides at all-guides.com
all-guides.com
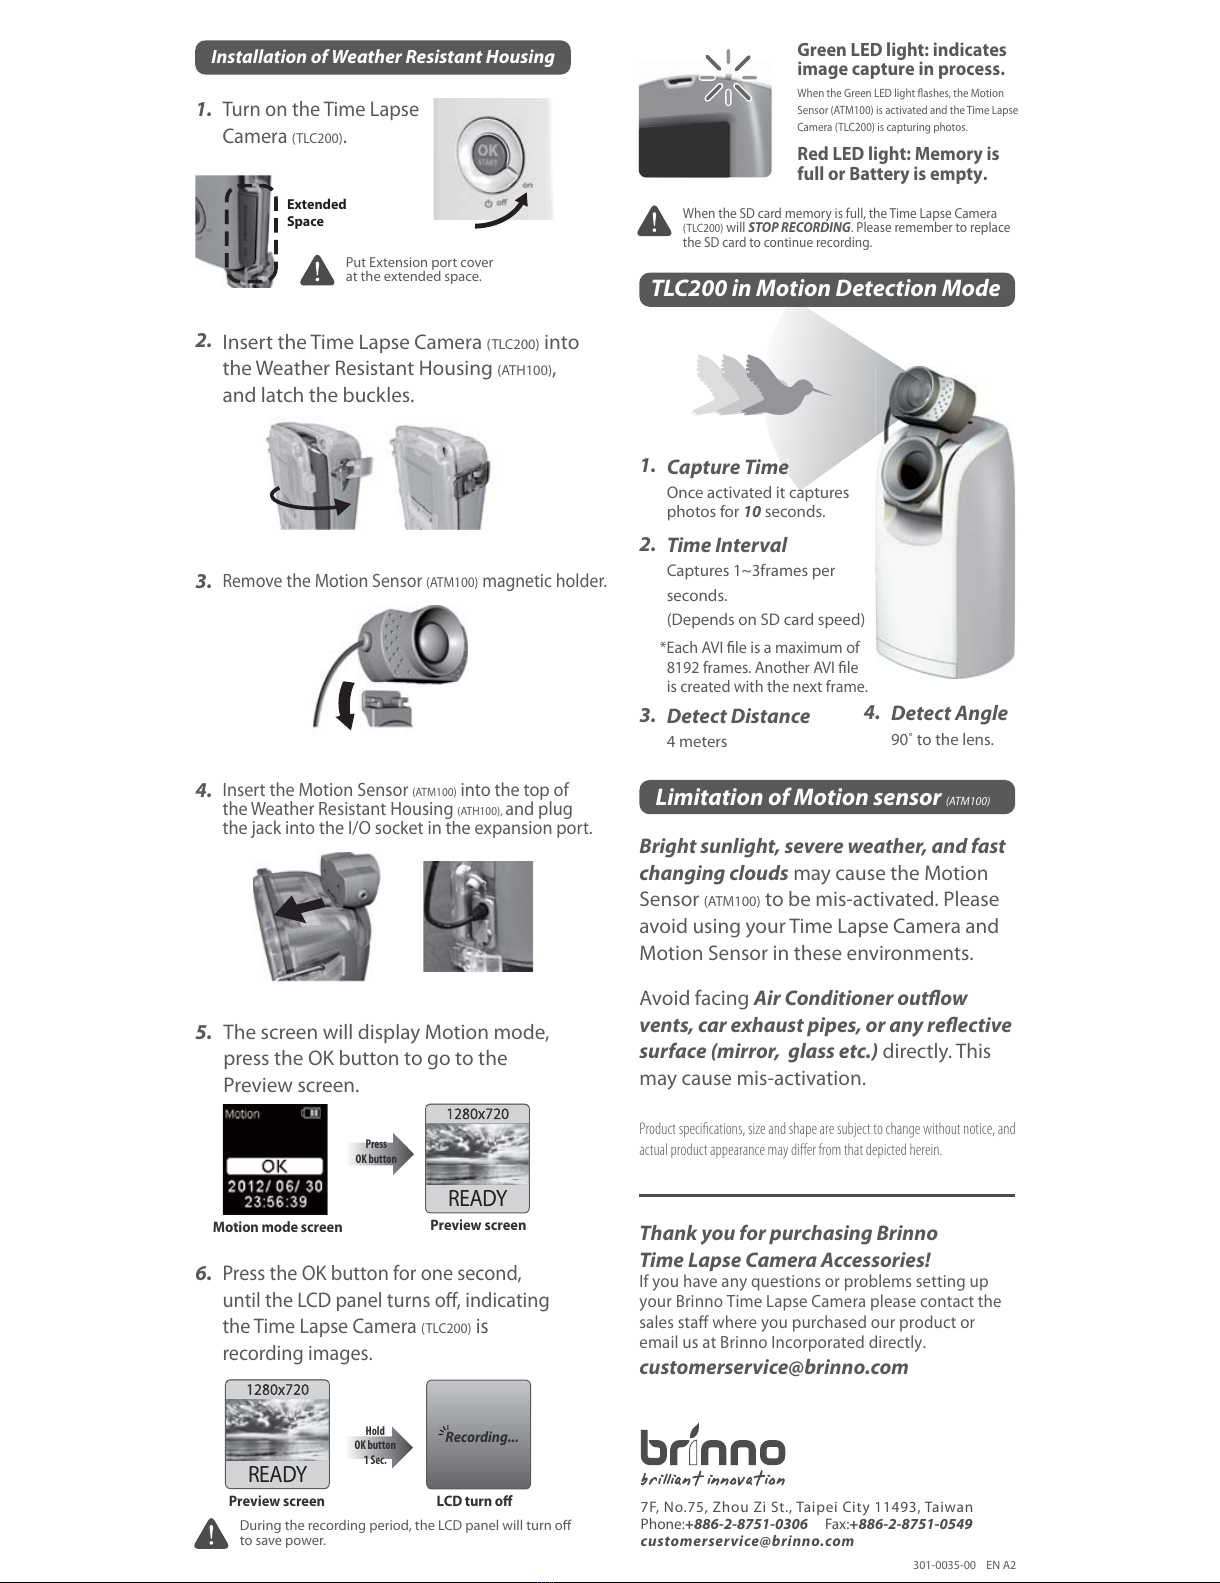
Put Extension port cover
at the extended space.
Extended
Space
1.
Turn on the Time Lapse
Camera (TLC200).
Insert the Time Lapse Camera (TLC200) into
the Weather Resistant Housing (ATH100),
and latch the buckles.
2.
4.
Insert the Motion Sensor (ATM100) into the top of
the Weather Resistant Housing (ATH100)
,
and plug
the jack into the I/O socket in the expansion port.
3.
Remove the Motion Sensor (ATM100) magnetic holder.
M
otion Sensor
(
ATM
100)
i
n
r
Resistant Housing
(
A
T
ot
he
I/O
so
cke
ti
nt
he
During the recording period, the LCD panel will turn o
to save power.
6.
Press the OK button for one second,
until the LCD panel turns o, indicating
the Time Lapse Camera (TLC200) is
recording images.
Preview screen
READY
LCD turn o
Recording...
Hold
OK button
1 Sec.
5. The screen will display Motion mode,
press the OK button to go to the
Preview screen.
Motion mode screen Preview screen
READY
Press
OK button
Installation of Weather Resistant Housing
Bright sunlight, severe weather, and fast
changing clouds may cause the Motion
Sensor (ATM100) to be mis-activated. Please
avoid using your Time Lapse Camera and
Motion Sensor in these environments.
Avoid facing Air Conditioner outow
vents, car exhaust pipes, or any reective
surface (mirror, glass etc.) directly. This
may cause mis-activation.
Limitation of Motion sensor
(ATM100)
TLC200 in Motion Detection Mode
Capture Time
Once activated it captures
photos for 10 seconds.
1.
Detect Distance
4 meters
3. Detect Angle
90˚ to the lens.
4.
Time Interval
Captures 1~3frames per
seconds.
(Depends on SD card speed)
2.
*Each AVI le is a maximum of
8192 frames. Another AVI le
is created with the next frame.
e
ap
7F, No.75, Zhou Zi St., Taipei City 11493, Taiwan
Phone:+886-2-8751-0306 Fax:+886-2-8751-0549
customerservice@brinno.com
Thank you for purchasing Brinno
Time Lapse Camera Accessories!
If you have any questions or problems setting up
your Brinno Time Lapse Camera please contact the
sales sta where you purchased our product or
email us at Brinno Incorporated directly.
customerservice@brinno.com
301-0035-00 EN A2
Product specifications, size and shape are subject to change without notice, and
actual product appearance may differ from that depicted herein.
When the SD card memory is full, the Time Lapse Camera
(TLC200) will STOP RECORDING. Please remember to replace
the SD card to continue recording.
Green LED light: indicates
image capture in process.
When the Green LED light ashes, the Motion
Sensor (ATM100) is activated and the Time Lapse
Camera (TLC200) is capturing photos.
Red LED light: Memory is
full or Battery is empty.
All manuals and user guides at all-guides.com