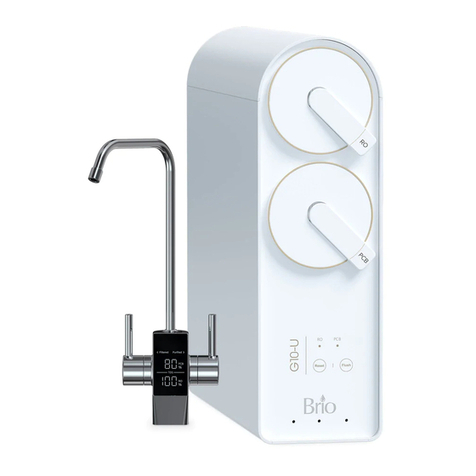
BRIO AQUUS TROE600COL User guide

AQUUS
Tankless 1.5:1 RO Filtration
System with Smart Faucet
Setup Manual
Model No.: TROE600COL

2
Table of Contents
Safety Information . . . . . . . . . . . . . . . . . . . . . . . . . . . . . . . . . . . . . . . . . . . . . . . . . . . . . . . . . . . . . . . . . . . 3
Intended Use........................................................................4
Product Features ....................................................................4
Indicator Panel Description . . . . . . . . . . . . . . . . . . . . . . . . . . . . . . . . . . . . . . . . . . . . . . . . . . . . . . . . . . . . . 5
Product Dimensions . . . . . . . . . . . . . . . . . . . . . . . . . . . . . . . . . . . . . . . . . . . . . . . . . . . . . . . . . . . . . . . . . . . 5
Materials Needed ....................................................................5
Specifications .......................................................................5
Package Contents . . . . . . . . . . . . . . . . . . . . . . . . . . . . . . . . . . . . . . . . . . . . . . . . . . . . . . . . . . . . . . . . . . .6
Installation ..........................................................................7
Installation Overview . . . . . . . . . . . . . . . . . . . . . . . . . . . . . . . . . . . . . . . . . . . . . . . . . . . . . . . . . . . . . . . . . . 7
Connect to the Cold Water Supply. . . . . . . . . . . . . . . . . . . . . . . . . . . . . . . . . . . . . . . . . . . . . . . . . . . . . . . 7
Make the Reverse Osmosis Waste Connections . . . . . . . . . . . . . . . . . . . . . . . . . . . . . . . . . . . . . . . . . . . 9
Install the Faucet . . . . . . . . . . . . . . . . . . . . . . . . . . . . . . . . . . . . . . . . . . . . . . . . . . . . . . . . . . . . . . . . . . . . . 10
Complete the Installation . . . . . . . . . . . . . . . . . . . . . . . . . . . . . . . . . . . . . . . . . . . . . . . . . . . . . . . . . . . . . . . 11
Operation.......................................................................... 11
Start Up the Filtration System . . . . . . . . . . . . . . . . . . . . . . . . . . . . . . . . . . . . . . . . . . . . . . . . . . . . . . . . . . . 11
Start Water Purification. . . . . . . . . . . . . . . . . . . . . . . . . . . . . . . . . . . . . . . . . . . . . . . . . . . . . . . . . . . . . . . . . 11
Shut Down ...........................................................................11
Care and Maintenance. . . . . . . . . . . . . . . . . . . . . . . . . . . . . . . . . . . . . . . . . . . . . . . . . . . . . . . . . . . . . . . 12
Filter Replacement Schedule . . . . . . . . . . . . . . . . . . . . . . . . . . . . . . . . . . . . . . . . . . . . . . . . . . . . . . . . . . 12
Replacing the Filter . . . . . . . . . . . . . . . . . . . . . . . . . . . . . . . . . . . . . . . . . . . . . . . . . . . . . . . . . . . . . . . . . . . 12
Flushing the Filters . . . . . . . . . . . . . . . . . . . . . . . . . . . . . . . . . . . . . . . . . . . . . . . . . . . . . . . . . . . . . . . . . . . 12
Troubleshooting ....................................................................13
Warranty...........................................................................14

3
Safety Information
WARNING: To reduce risk of injury and property damage, you must read this entire guide before assembling,
installing, and operating the filtration system.
•If the power cable is damaged, do not use. Contact Customer Service for a replacement.
•Avoid storing in an area exposed to intense sunlight as this can cause damage to components.
•Do not store in or expose the device to temperatures lower than 32°F (0°C). The ideal temperature range is
39 - 100°F (4 - 38°C).
•The device must be installed or relocated by a professional technician due to the risk of electric shock and
product damage.
•The best working pressure for this device ranges from 14.5 to 58 PSI. Install a pressure increasing or
decreasing device if the water pressure is lower or higher than this level.
•For use with municipal tap water only. Not for use with well or underground water.
•Do not place magnetic devices near the device as damage could occur.
•Do not place heavy objects on the device.
•Do not allow children near the device without adult supervision.
•To unplug the unit, grasp the power cord by the plug and pull directly from socket. Do not plug in or unplug
with wet hands.
•Do not place combustible substances near the device. Keep away from heat sources and open flames.
•Install this device near a floor drain.
•If the device is not going to be used for a long period of time, shut o power and close the shut-o valve.
When restoring the water supply, first open all faucets to drain any remaining sediment, then open the shut-
o valve.

4
Intended Use
This appliance system is intended to be used in household and similar applications such as:
• Sta kitchen areas in shops, oces, and other working environments
• Farm houses
• Hotels, motels, and other bed-and-breakfast-type environments
• Residential-type environments
• Catering and similar non-retail applications.
This appliance is not intended for use by persons (including children) with reduced physical, sensory, or mental
capabilities, or lack of experience and knowledge, unless they are given supervision or instruction concerning
the use of appliance by a person responsible for their safety.
Product Features
2
1
3
8
9
7
4
5
6
7
Part Description Part Description
1 Reverse osmosis filter compartment 6 Filtered water connection
2 PCB filter compartment 7 Inlet water connection
3 Display panel 8 Filtered water handle
4 Waste water connection 9 RO filtered water handle
5 RO filtered water connection

5
Indicator Panel Description
10. Filter indicator lights – When blinking, indicate it is time to
change filters (RO or PCB).
11. Reset button – Press to reset the system after changing filters.
12. Flush button – Press to flush newly installed filters.
Product Dimensions
Height Width Depth
16.6 in. (42.1 cm) 5.2 in. (13.2 cm) 18.2 in. (46.1 cm)
Materials Needed
Phillips-Head
Screwdriver
Adjustable Wrench Power Drill 1/4" Drill Bit (for
Drain Saddle)
1" Drill Bit
(for Faucet Hole)
Specifications
Gallons per day 600
Purified flow rate 1.5 L/min
Recovery rate 1.5:1
Filtration system PCB and RO
RO PCB
Reset Flush
10
11 14
13
12

6
Package Contents
A
D
E
J
L
K
B
C
G
F
H
I
Part Description Quantity Part Description Quantity
A RO filtration unit 1 G Plumbers tape 1
B Smart faucet 1 H Drain saddle 1
C Power adapter 1 I RO waste water tube 1
D Feed water adapter 1 J Shut-o valve tube 1
E RO filter 1 K Faucet tubing 2
F PCB filter 1 L 1/4 in. Quick connector 2

7
Installation
1. Installation Overview
H
I
G
JK
K
A
B
2. Connect to the Cold Water Supply
CAUTION: DO NOT CONNECT THIS WATER LINE TO A HOT WATER SUPPLY LINE. The water supply to the
unit MUST be from the COLD WATER LINE. Using HOT WATER will severely damage your filters.
A. Turn o and then disconnect the current cold
water supply line.
B. Connect the feed water adapter (D) to the cold
water supply line.
C. Connect the cold water supply line on top of
the feed water adapter (D).
NOTE: An extra adapter nut is included on top
of the feed water adapter (D) to attach to
a 3/8 in. or 1/2 in. feed plumbing line.
D

8
D. Insert the shut-o valve with tube (J) straight
into the quick connector piece of the feed
water adapter (D).
E. Tighten the nut on the feed water adapter.
D
J
F. Gently tug on the tube (J) to ensure a secure
connection with the feed water adapter (D).
D
J

9
3. Make the Reverse Osmosis Waste Connections
The “RO” filter assembly requires a drain line connection to
be installed, which removes rejected water to the sewer. The
drain saddle connects the drain line from the dispenser to
your drain pipe. The drain saddle is designed to fit around a
standard 1.5 in. OD (outer diameter) drain pipe.
Always install the drain saddle BEFORE the P-trap (15).
Ensure the drain saddle is in place on a vertical or
horizontal section of the pipe.
To avoid clogging the drain line with debris, do not
install the drain saddle on a section of piping that is
located after the drain pipe meets a garbage disposal
or dishwasher drain.
To make the Reverse Osmosis (RO) drain connections:
A. Determine the location for your drain saddle (H) and
then make a mark on the drain pipe for the opening
(16).
B. Use your drill and a 1/4 in. drill bit to create a hole at
the mark, ensuring you only drill through one side of
the drain pipe.
C. Find the half of the drain saddle (H) with the hole in
the center, remove the backing from the foam gasket,
align the gasket with the hole on the drain saddle (H),
and stick the adhesive side of the gasket to the drain
saddle (H).
D. Position both halves of the drain saddle (H) on the
drain pipe with the saddle’s opening aligned over the
drilled hole, and insert your drill bit through the saddle
(H) and drilled hole to ensure proper alignment.
E. Secure both ends of the drain saddle (H) together
using the bolts and nuts, but do not overtighten.
F. Connect the RO waste water tube (I) to the drain
saddle (H).
15
I
H
16

10
4. Install the Faucet
A. Ensure that you have a mounting hole in your sink or countertop for this faucet. If you do not, create a
mounting hole no less than 1.0 - 1.2 in. (2.54 - 3.0 cm),
B. Remove the washer (17) and lock nut (18) from the faucet. Ensure that you leave the O-ring (19) on the
faucet(B).
C. Attach one 1/4 in. quick connector (L) to the long stem outlet (filtered water) and other 1/4 in. quick
connector to the short stem outlet (RO filtered water).
B
19
17
18
L
L
D. Insert the faucet into the mounting hole and secure in place underneath the sink with washer (17) and lock
nut (18).
E. From underneath the sink, insert each faucet tube (K) 0.6 in. (1.5 cm) into each of the 1/4 in. quick
connectors (L).
L
17
18
K
K
L

11
5. Complete the Installation
A. Connect the shut-o valve tube (J) to the inlet water
connection(1).
B. Connect the RO water tube (K) to the RO water connection (2).
C. Connect the filtered water tube (K) to the filtered water
connection (3).
D. Connect the RO waste water tube (I) to the waste water
connection(4).
E. Ensure all connections are secure before proceeding.
Operation
Start Up the Filtration System
1. Ensure all water connections are completed as described in the Installation section.
2. Turn the cold water supply on. Open the shut-o valve on tube (J). Connect the power supply to the
filtration system and then to an outlet. The filter indicator panel turns on.
NOTE: When the system is first turned on it goes into automatic flushing state, which lasts approximately 90
seconds.
3. Open the RO lever on the smart faucet and allow RO water to run for 5-6 minutes, or until water runs clear.
Do not drink this water. While system is flushing, make sure there are no leaks in the joints, fittings, valves
and tubing connections.
Start Water Purification
Open the faucet and the water filtration system starts to produce water.
NOTE: If the faucet runs water for a long time (for 2 hours), the filtration unit enters overtime protection
mode. The display screen flashes, and the system is no longer able to produce water. Unplug the
filtration unit, then plug it in again to clear the protection mode.
Shut Down
1. Close the shut-o valve on the tube (J).
2. Unplug the power supply.
7
2
1
3
4
J
IK

12
Care and Maintenance
• Keep this device in a cool, dry place away from direct sunshine.
• Use a clean, soft cloth to remove dust build-up. Do not use soap, detergent, or harsh abrasives.
• If the filtration system is not going to be used for an extended period of time, close the shut-o valve on
tube (J) and unplug the unit.
• Never lay the unit on its side or back. It should always be operated and stored in an upright position.
• If the cold water inlet temperature drops to 32 °F (0 °C), there is a risk the tubes could crack and damaging
leaking could occur. To prevent this, turn o the shut-o valve on the tube (J), then open the handles of the
smart faucet and drain any remaining water out of the filtration system.
Filter Replacement Schedule
Filter Type Replacement Schedule Function
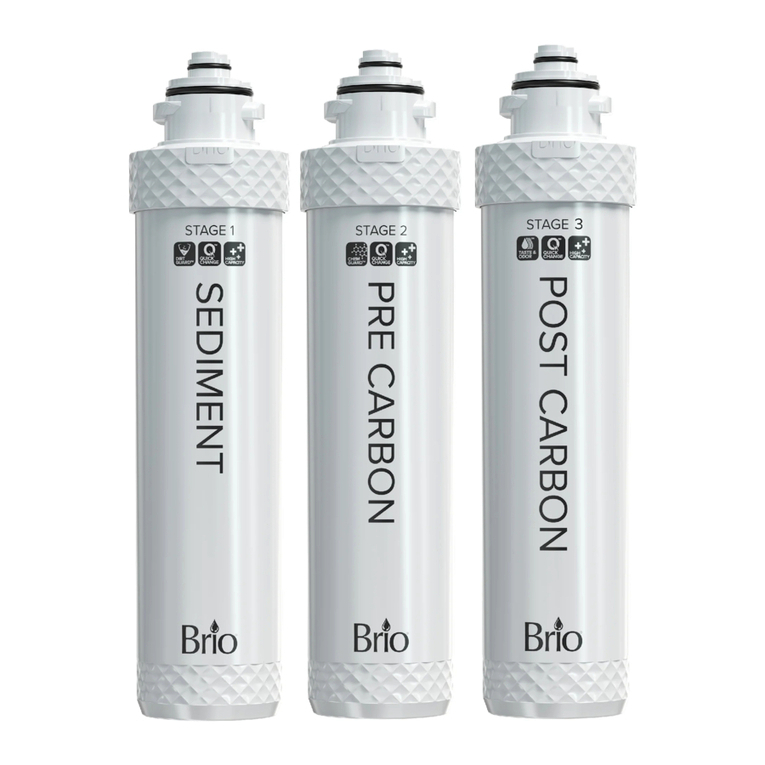
PCB Composite
Filter (PAC and
Carbon)
12 months Removes mud, sand, rust, suspended materials, residual
chlorine, and abnormal flavor from water.
RO Filter 24 months Removes up to 99% of contaminants including arsenic,
lead, fluoride, heavy metals, and more.
Replacing the Filter
When one or both of your filter indicator lights begin to flash, or the smart faucet’s filter life indicator displays 0,
the filter(s) needs to be replaced. To change filter:
1. Unplug unit from power source, then disconnect from
water supply. Carefully pry o front filter compartment
cover.
2. Grasp handle of expired filter and rotate counterclockwise
to unlock filter from compartment. Remove expired filter.
3. Insert new filter, rotating clockwise to lock it into place.
Snap filter cover back onto unit.
4. Restore water connection, then plug unit back into power
source. Press and hold Reset button until the filter indicator
light stops flashing (approximately 3 seconds). Proceed to
“Flushing the Filters” section.
Flushing the Filters
Always flush new filters before using. Open the faucets. Press the Flush button once. The flushing process takes
approximately 60 seconds. To stop the flushing process at any time, press the Flush button again.
NOTE: The Flush button does not work when the device is in an automatic flushing state.

13
Troubleshooting
Problem Probable Cause Solution
The filters are generating a
light noise during operation.
The filters will generate a light
noise during operation.
This is normal.
The water output volume has
dropped.
• The filter is jammed.
• The filter needs to be replaced.
• The shut-o valve is not in the
ON position.
• The ambient temperature is
low.
• Flush or replace the filter.
• Replace the filter.
• Check the shut-o valve and the
faucet to ensure they are in the ON
position.
• When the ambient temperature is
low, it is normal for the RO-filtered
water flow to drop. Increase ambient
temperature.
The water quality is low. • A filter needs to be replaced.
• The filtration system has not
been used in more than 3 days.
• The quality of the source water
is low.
• Replace one or both filters.
• Turn the faucets on and flush for 3-5
minutes.
• Confirm the water source is
municipal tap water.
There is a water leak. A component is damaged. Immediately turn o the power and
water, and contact customer service for
assistance.
There is no water output after
replacing a filter.
There is an air jam. When replacing a filter, first unplug the
unit. Then shut o the water supply.
Replace the filter. Turn the water supply
back on, then plug the unit back in.

14
Warranty
Brio (“Vendor”) warrants to the original purchaser of the Brio Water Filtration System (the “Product”), and to
no other person, that if the Product is assembled and operated in accordance with the printed instructions
accompanying it, then for a period of one (1) year from the date of purchase, all parts in the Product shall be free
from defects in material and workmanship. This Limited Warranty shall be limited to repair or replacement of
parts, which prove defective under normal use and service and which Vendor shall determine in its reasonable
discretion upon examination to be defective. To take advantage of this Limited Warranty, please follow these
steps:
1. Please retain your sales slip or invoice, as Vendor may require reasonable proof of your date of purchase.
2. Contact Vendor’s Customer Service Department using the contact information listed below.
3. Return parts to Vendor, per Vendor’s instructions, at your cost and expense.
4. Upon receipt by Vendor, Vendor shall advise you in writing whether a defect covered by this Limited Warranty
exists in any returned part and whether your claim has been approved or denied.
5. Upon Vendor’s approval of your claim, Vendor will replace such defective part without charge to you.
WHAT THIS LIMITED WARRANTY DOES NOT COVER: This Limited Warranty does not cover any failures
or operating diculties of the Product due to accident, abuse, misuse, alteration, misapplication, improper
installation or improper maintenance or service by you or any third party, or failure to perform normal and routine
maintenance on the Product, as set out in the User’s Manual. In addition, this Limited Warranty does not cover
damages to the finish, such as scratches, dents, discoloration or rust after purchase.
This Limited Warranty is the only express warranty given on the Product and is in lieu of all other express
warranties. Vendor disclaims all warranties for products that are purchased from seller other than authorized
retailers or distributors. THIS LIMITED WARRANTY RESTRICTS THE DURATION OF ANY AND ALL IMPLIED
WARRANTIES, INCLUDING WITHOUT LIMITATION, THE IMPLIED WARRANTY OF MERCHANTABILITY AND
FITNESS FOR A PARTICULAR PURPOSE TO THE ONE (1) YEAR TERM OF THIS LIMITED WARRANTY. UPON THE
EXPIRATION OF THE ONE (1) YEAR TERM OF THIS LIMITED WARRANTY, VENDOR DISCLAIMS ANY AND ALL
IMPLIED WARRANTIES, INCLUDING WITHOUT LIMITATION THE IMPLIED WARRANTIES OF MERCHANTABILITY
AND FITNESS FOR A PARTICULAR PURPOSE, THE PRODUCT BEING THUS SOLD AS-IS, WITH ALL FAULTS.
FURTHER, VENDOR SHALL HAVE NO LIABILITY WHATSOEVER TO PURCHASER OR ANY THIRD PARTY
FOR ANY SPECIAL, INDIRECT, PUNITIVE, INCIDENTAL, OR CONSEQUENTIAL DAMAGES. OTHER THAN THIS
LIMITED WARRANTY, THERE ARE NO WARRANTIES WHICH EXTEND BEYOND THE DESCRIPTION ON THE
FACE HEREOF. Vendor assumes no responsibility for any defects caused by third parties. This Limited Warranty
gives you specific legal rights, and you may have other rights which vary from state to state. State law may also
override statements in this Limited Warranty regarding the restriction on the duration of implied warranties.
Some jurisdictions do not allow exclusion or limitation of special, incidental or consequential damages, or
limitations on how long awarranty lasts, so the above exclusion and limitations may not apply to you.

©2021 Brio Water Technology, Inc.
Contact Us
Call: +1 844-257-4103
Table of contents
Other BRIO Water Filtration System manuals
Popular Water Filtration System manuals by other brands

SpectraPure
SpectraPure MaxPure MPDI RO/DI System Installation and operating manual

intatec
intatec Hiper II V1 HIU USER GUIDE AND MAINTENANCE

Zodiac
Zodiac CS Series Instructions for installation and use

Antunes
Antunes 9700913 installation instructions

Jandy
Jandy SFSM60 Installation and operation manual

WMF
WMF 9000F user manual

Fandis
Fandis GF Series Mounting instructions

Culligan
Culligan Iron-Cleer Installation and operation instructions with parts list

Octave
Octave Filter 3-P owner's manual

Monarch Water
Monarch Water MA12CH install guide

Kenmore
Kenmore 625.34440 owner's manual

better waters
better waters XL7000 installation instructions