Brita Tap User manual

BRITA Tap
Instructions for use | Mode d‘emploi
Manual de instrucciones | Instruções de utilização
Gebrauchsanleitung | Istruzioni per l‘uso
Instrukcja obsługi | Gebruiksaanwijzing
1014662-002_GA_BRITA_Tap_CE.indb 1 04.04.16 11:27

2
Index
Installation Video
I. Congratulations Page 3
II. Quality from the very start Page 4
III. Important notes Page 15
IV. BRITA, quality and satisfaction guaranteed Page 16
I. Nous vous félicitons Page 17
II. La qualité dès l’installation Page 18
III. Important Page 29
IV. BRITA, qualité et satisfaction garanties Page 30
I. Felicidades Página 31
II. Calidad desde el principio Página 32
III. Notas importantes Página 43
IV. BRITA calidad y satisfacción garantizadas Página 44
I. Parabéns Página 45
II. Qualidade a partir do primeiro momento Página 46
III. Notas Importantes Página 57
IV. BRITA, qualidade e satisfação garantidas Página 58
I. Herzlichen Glückwunsch Seite 59
II. Für Qualität von Anfang an Seite 60
III. Wichtige Hinweise Seite 71
IV. Der BRITA Service Seite 72
I. Congratulazioni Pagina 73
II. Istruzioni d’uso Pagina 74
III. Note importanti Pagina 85
IV. BRITA al vostro servizio per una
completa soddisfazione Pagina 86
I. Gratulujemy Strona 89
II. Jakość od samego początku Strona 90
III. Ważne informacje Strona 101
IV. Pełna satysfakcja dzięki produktom BRITA Strona 102
I. Gefeliciteerd Pagina 103
II. Kwaliteit vanaf het allereerste begin Pagina 104
III. Belangrijke opmerkingen Pagina 115
IV. BRITA’s service Pagina 116
ENGLISH
FRANÇAIS
ESPAÑOL
PORTUGUÊS
ITALIANO
DEUTSCH
POLSKI
NEDERLANDS
1014662-002_GA_BRITA_Tap_CE.indb 2 04.04.16 11:27

ENGLISH 3
Your BRITA Tap, is the key to cleaner, clearer
great tasting filtered water
Next to hot and cold unfiltered water,
your BRITA system offers many advantages
• Great tasting filtered water at your fingertips
• Filtered water is ideal for bringing out the full potential of your
food and tastes great for everyday drinking
• Water is a fundamental part of food preparation and can
influence the results of your cooking at home. The BRITA Tap
is easy to install replacing your existing tap and can make a
wonderful difference to your cooking.
• Stylish European design will complement any kitchen
• It is economical, convenient and easy to use
• Allows for filtered and unfiltered water
The P1000 Cartridge: BRITA's advanced filtration
technology in a compact and long lasting cartridge.
The P 1000 has a constant filtration performance for limescale
reduction thanks to its multilevel BRITA filtration system.
The professional filter head allows three filtration settings for
medium hard, hard and very hard water.
The P 1000 filter cartridge
• reduces limescale and substances, e.g. chlorine, that affect
taste and odour.
• reduces lead and copper in tap water that can result from
certain types of household installation.
Lifetime of the P 1000 filter cartridge
The lifetime of the P 1000 cartridge is dependant on your individ-
ual volume usage and your water conditions. For optimum BRITA
filtration performance, we recommend a minimum exchange of
your cartridge every 12 months. Exchange will be prompted by
your BRITA Tap Cartridge Status Indicator, shown by the colour
of the LED.
For more information regarding the BRITA Tap Cartridge Status
Indicator, see chapter 3.
I. Congratulations on your new BRITA® Tap System
You are assured of BRITA quality and our commitment to our
customers.
BRITA Tap
P 1000
filter cartridge
1014662-002_GA_BRITA_Tap_CE.indb 3 04.04.16 11:27

4ENGLISH
II. Quality from the very start
1 Terms of warranty
The BRITA Tap system is subject to the statutory guarantee of
2 years. A guarantee claim may be asserted only if all instructions
in this handbook are followed and observed.
2 Contents of the BRITATap Water Filter Kit
To ensure you get the best result from your BRITA Tap Water Filter
Kit, please follow these instructions carefully.
Your BRITA Tap Water Filter Kit includes the following
(see fig. 1):
1. Filter head with three settings including a convenient locking
handle
2. Flexible wall mount
3. P 1000 water filter cartridge
4. BRITA Tap (design may differ from image shown)
5. BRITA Tap Cartridge Status Indicator
6. Battery (CR2032)
7. Hose (1) length = 800 mm, 3/8" nut on one side and M8 connec-
tor on the other side, 2 Hoses (2+3), length = 450 mm, 3/8" nut
on one side and M8 connectors on the other side
8. Hose (4), length = 800 mm and 3/8" nut on both sides
9. 2 Adapters 1/2" female thread to 3/8" male thread (Only in UK)
10. Usage Instructions
11. Carbonate hardness testing strip
12. T-piece
13. Gaskets
Recommended tools for installation: a pipe wrench, an Allen key
(4 mm), a wrench and a screwdriver.
For wall mounting the cartridge (optional), you need: two screws
(e.g. 5 mm thread diameter) and, if required, two wall plugs suitable
for your type of wall.
1. 2.
3. 4.
5.
6.
7.
8.
10.
(fig. 1)
9.
11.
12. 13.
1014662-002_GA_BRITA_Tap_CE.indb 4 04.04.16 11:27

ENGLISH 5
3 BRITA Tap – easy installation
Before starting, please check that you have all the components
listed above (see fig. 1) as well as the recommended tools.
There are 7 steps to the installation.
!
Prior to installation, read the "Technical Data" (chapter 7)
and the "Important Notes" (chapter 9). The system cannot
be installed with a low pressure boiler as this might lead to
water damages. After storage and transport below 0°C,
the product must be stored in the open original packaging
for at least 24 hours at the stated ambient temperatures
(chapter 7) for operation.
3.1 Step 1: Selecting the carbonate hardness
setting (A/B/C) on the filter head
The filter head offers three settings for medium hard water (A),
hard water (B) and very hard water (C). Please follow the instruc-
tions below to adjust to the right setting for your local water.
First carry out a carbonate hardness test using the supplied testing
strip. The strip can be found in the outer wrapping of these Usage
Instructions.
Using the testing strip:
• Immerse all reaction zones of the test strip in a glass of your
regular tap water (15 - 30 °C) for 1 second (not in running water!).
(fig. 2).
• Shake off excess liquid from the strip and after 1 min check how
many reaction zones changed their colour on the test strip.
Depending on the number of reaction zones that changed their
colour, we recommend setting your filter head as follows:
Setting A B C
number of reaction
zones that changed
their colour
capacity P1000 up to 1200 L up to 600 L up to 400 L
P3000 up to 3400L up to 1700 L up to 1100 L
German Carbonate
Hardness [°dH] up to 10 10 to 17 above 17 dH
English Carbonate
Hardness [°eH] up to 13 13 to 21 above 21
French Carbonate
Hardness [°fH] up to 18 18 to 30 above 30
Milligram per
Litre CaCO3
[mg/L CaCO3]
178 178 to 303 above 303
(fig. 2)
(fig. 3)
Now you can change the setting for the hardness of your water.
The filter head is set to "B" by default. To change the setting, use
an Allen key (4 mm). Turn in the direction of the arrow until the
"C" symbol appears in the window. Turn against the direction of
the arrow until the "A" symbol appears in the window (fig. 3). The
filter head contains a flow regulator already installed. It guarantees
smooth water flow from your BRITA Tap even at higher water
pressures.
1014662-002_GA_BRITA_Tap_CE.indb 5 04.04.16 11:27

6ENGLISH
3.2 Step 2: Starting the BRITA Tap Cartridge
Status Indicator
The BRITA Tap Cartridge Status Indicator reminds you through
three different coloured flashing lights when to exchange the filter
cartridge.
A Commissioning:
Insert the enclosed battery (1x CR2032) into the appropriate
compartment of the BRITA Tap Cartridge Status Indicator. Mind
the print on the battery for correct implementation (fig. 4). All LEDs
should flash shortly. Close the compartment. Keep the Reset But-
ton pushed down for three seconds until a small green light flashes
three times at the top.
(fig. 4)
B Initial programming of the BRITA Tap Cartridge
Status Indicator:
Depending on the setting you chose for the filter head (step 1),
you will programm the BRITA Tap Cartridge Status Indicator as
follows (see fig. 5):
a Push the button on the right side (HARDNESS) to choose the
water hardness. If you push the button once, two yellow LEDs
will flash (default hardness setting: B). Then push the button until
your correct water hardness setting appears:
To choose the water hardness setting C, push the button until
one yellow LED flashes.
To choose the water hardness setting B, push the button until
two yellow LEDs flash.
To choose the water hardness setting A, push the button until
three yellow LEDs flash (see table below).
b Push the button on the left side (CARTRIDGE) to set the car-
tridge you are using. If you push the button once, two yellow
LEDs will flash (default cartridge setting: P1000). Then push the
button until the correct setting for filter cartridge appears:
If you are using the filter cartridge A 1000, push the button, until
one yellow LED flashes.
If you are using the filter cartridge P 1000, push the button, until
two yellow LEDs flash.
If you are using the filter cartridge P 3000, push the button, until
three yellow LEDs flash (see table below).
c To change a setting, simply push the button until the right
number of lights are flashing.
d Insert the BRITA Tap Cartridge Status Indicator into the BRITA
tap's lever (see fig. 4).
(fig. 5)
1. Cartridge Button
2. Hardness Button
3. Reset Button
1 LED 2 LEDs 3 LEDs
water hardness setting (HARDNESS) CBA
cartridge setting (CARTRIDGE) A 1000 P 1000 P 3000
C How the BRITA Tap Cartridge Status Indicator works
To ensure optimal performance, you should change the filter car-
tridge on a regular basis. The BRITA Tap Cartridge Status Indicator
in the BRITA lever tells you when to change the filter cartridge.
D Signals
The three lights in the BRITA lever are only activated in the filtering
position. They indicate:
- Green light: The BRITA filter is working at optimum performance.
1014662-002_GA_BRITA_Tap_CE.indb 6 04.04.16 11:27

ENGLISH 7
- Yellow light: 90 % of the filter capacity has been used. Remember
to buy a new replacement filter cartridge.
- Red light: The filter cartridge needs to be changed.
E Reprogramming the BRITA Tap Cartridge Status
Indicator
If the maximum volume is reached or the cartridge has been used
for 12 months, the BRITA Tap Cartridge Status Indicator’s LED will
start flashing red (only if BRITA lever is in the filtering position).
In this case the filter cartridge should be replaced (chapter 4). Once
the cartridge has been replaced the BRITA Tap Cartridge Status
Indicator has to be reset. For this purpose push the reset button
(fig. 5) of the Cartridge Status Indicator for three seconds until it
starts flashing green (for this step, you do not need to remove the
BRITA Tap Cartridge Status Indicator from the BRITA lever).
After replacing of the empty battery the commissioning should be
followed in accordance with section 3.2.
Technical data:
• Battery: 1x CR2032 (removable)
• lifetime of battery: app. 2 years
!Do not immerse Cartridge Status Indicator in water
3.3 Step 3: Installing the BRITA Tap
To install the BRITA Tap, firstly ensure you have all the components
required.
!Please, make sure that there is enough room and access
under the sink to allow for the installation of the filter head
and cartridge, and to connect the two supplied hoses.
WD 3020
1. BRITA Tap with 3 hoses
2. BRITA Tap Cartridge Status Indicator
3. O-Ring
4. Shank
5. Joint (Is only necessary for installa-
tion of the dispenser if you directly
mount it onto your sink. If you
mount it onto your countertop-plate,
you do not necessarily need this
part. It helps stabilizing the tap at
your sink)
6. Flat Gasket
7. Flange
8. Hex nut
WD 3030/WD 3040 and WD 3050
(fig. 7)
1.
2.
3.
4.
5.
6.
7.
8.
1. BRITA Tap (design may differ) with
3 hoses
2. BRITA Tap Cartridge Status Indicator
3. Base
4. Shank
5. Joint (Is only necessary for installa-
tion of the dispenser if you directly
mount it onto your sink. If you
mount it onto your countertop-plate,
you do not necessarily need this
part. It helps stabilizing the tap at
your sink)
6. Flat Gasket
7. Flange
8. Hex nut
7.
8.
1.
2.
3.
4.
5.
6.
(fig. 6)
1014662-002_GA_BRITA_Tap_CE.indb 7 04.04.16 11:27

8ENGLISH
A First of all, unmount your existing kitchen tap.
a) Turn off the cold and hot water supplies
b) Please make sure you release any pressure by opening all
levers.
!No water should run through the existing kitchen tap.
c) Unscrew the existing hoses from the cold and hot water
supply.
!We recommend placing a suitable container under the water
supply as there will be water left in the hoses which will run
down when you unscrew them.
d) Unscrew your kitchen tap – there is no standard mounting but
in general a pipe wrench will help you to unmount it.
e) Pull out both your kitchen tap and the hoses.
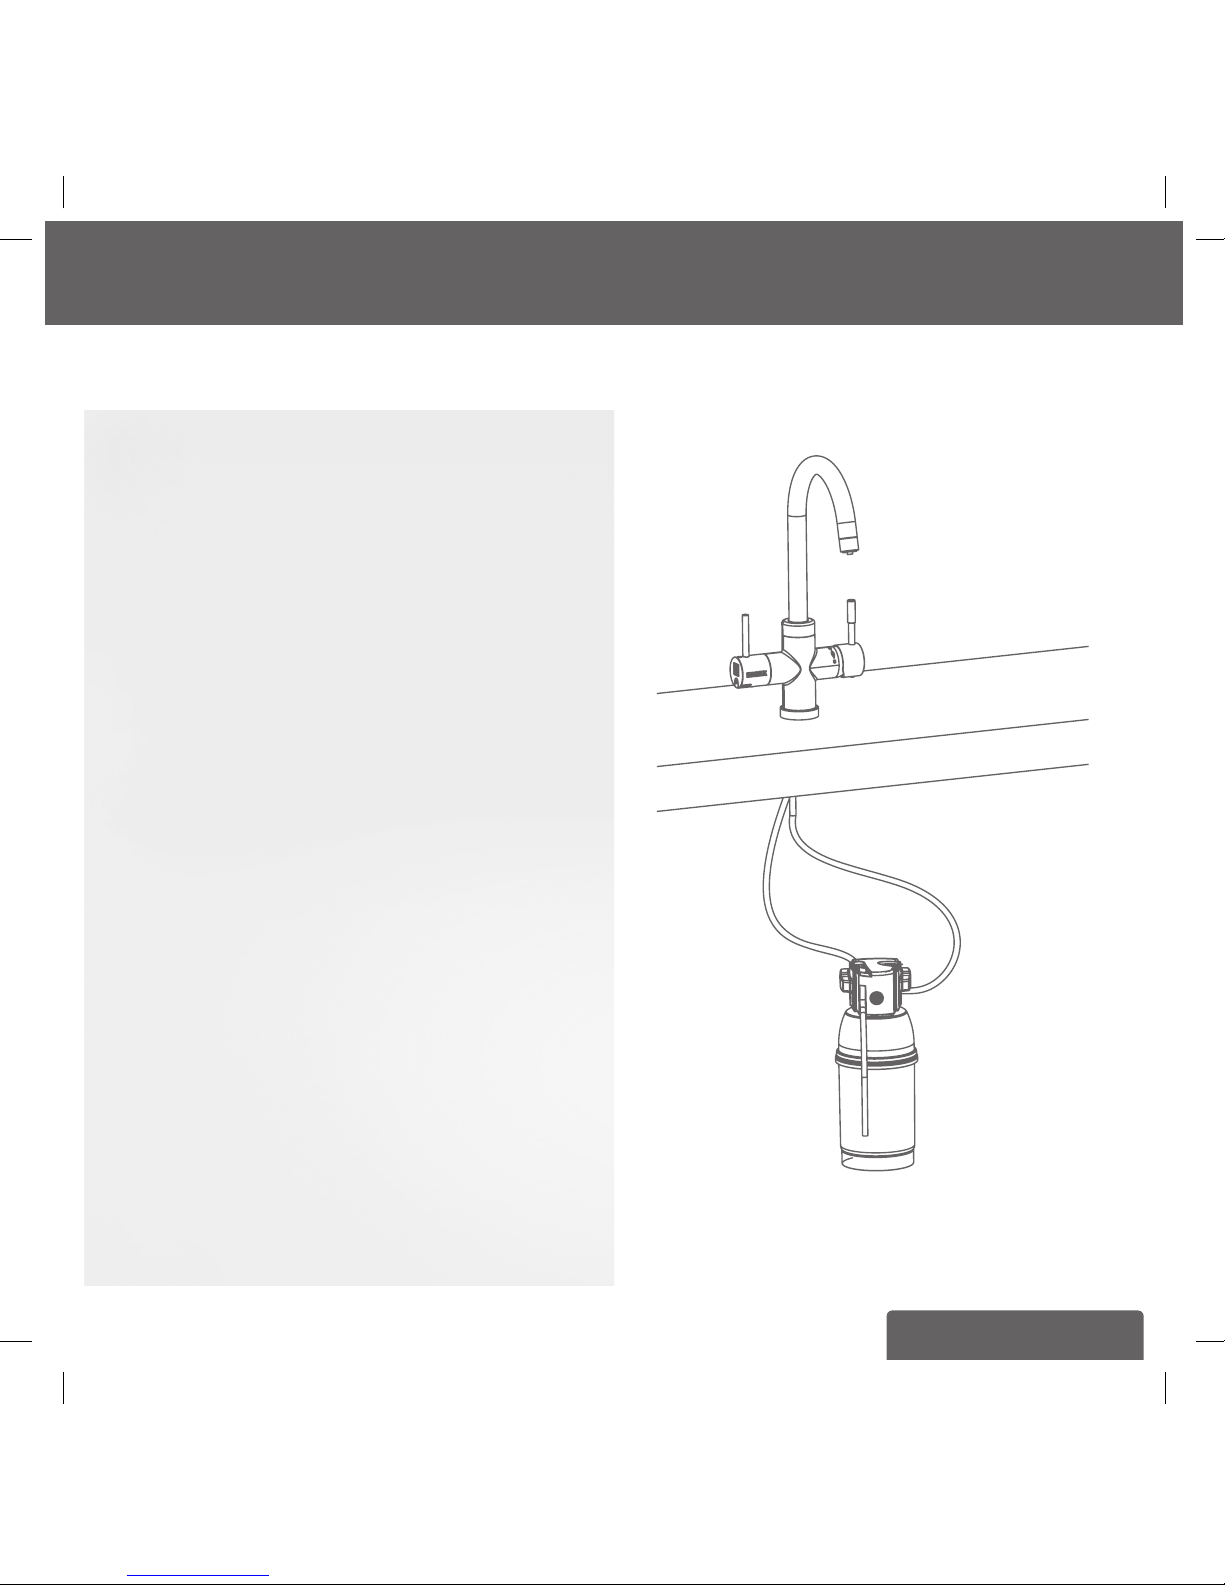
B You’re now ready to install the BRITA Tap.
First of all, screw the shank (4) into the Brita Tap (1).
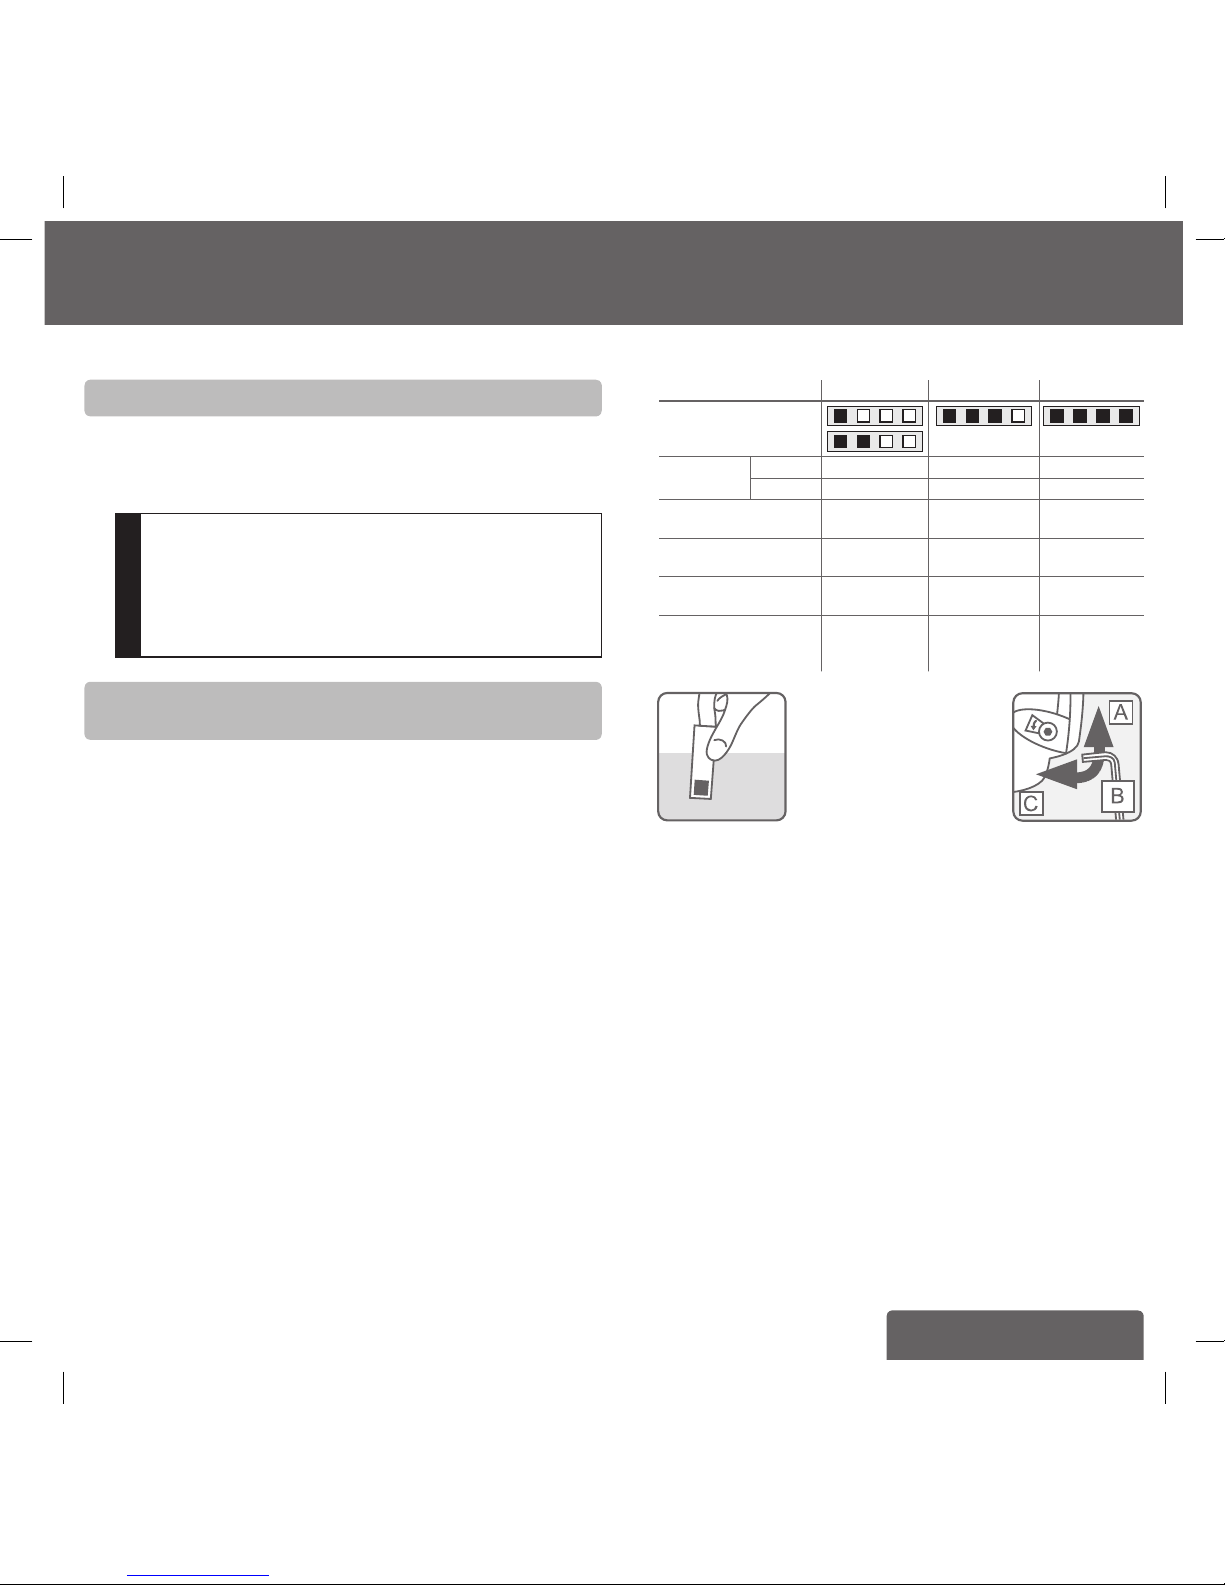
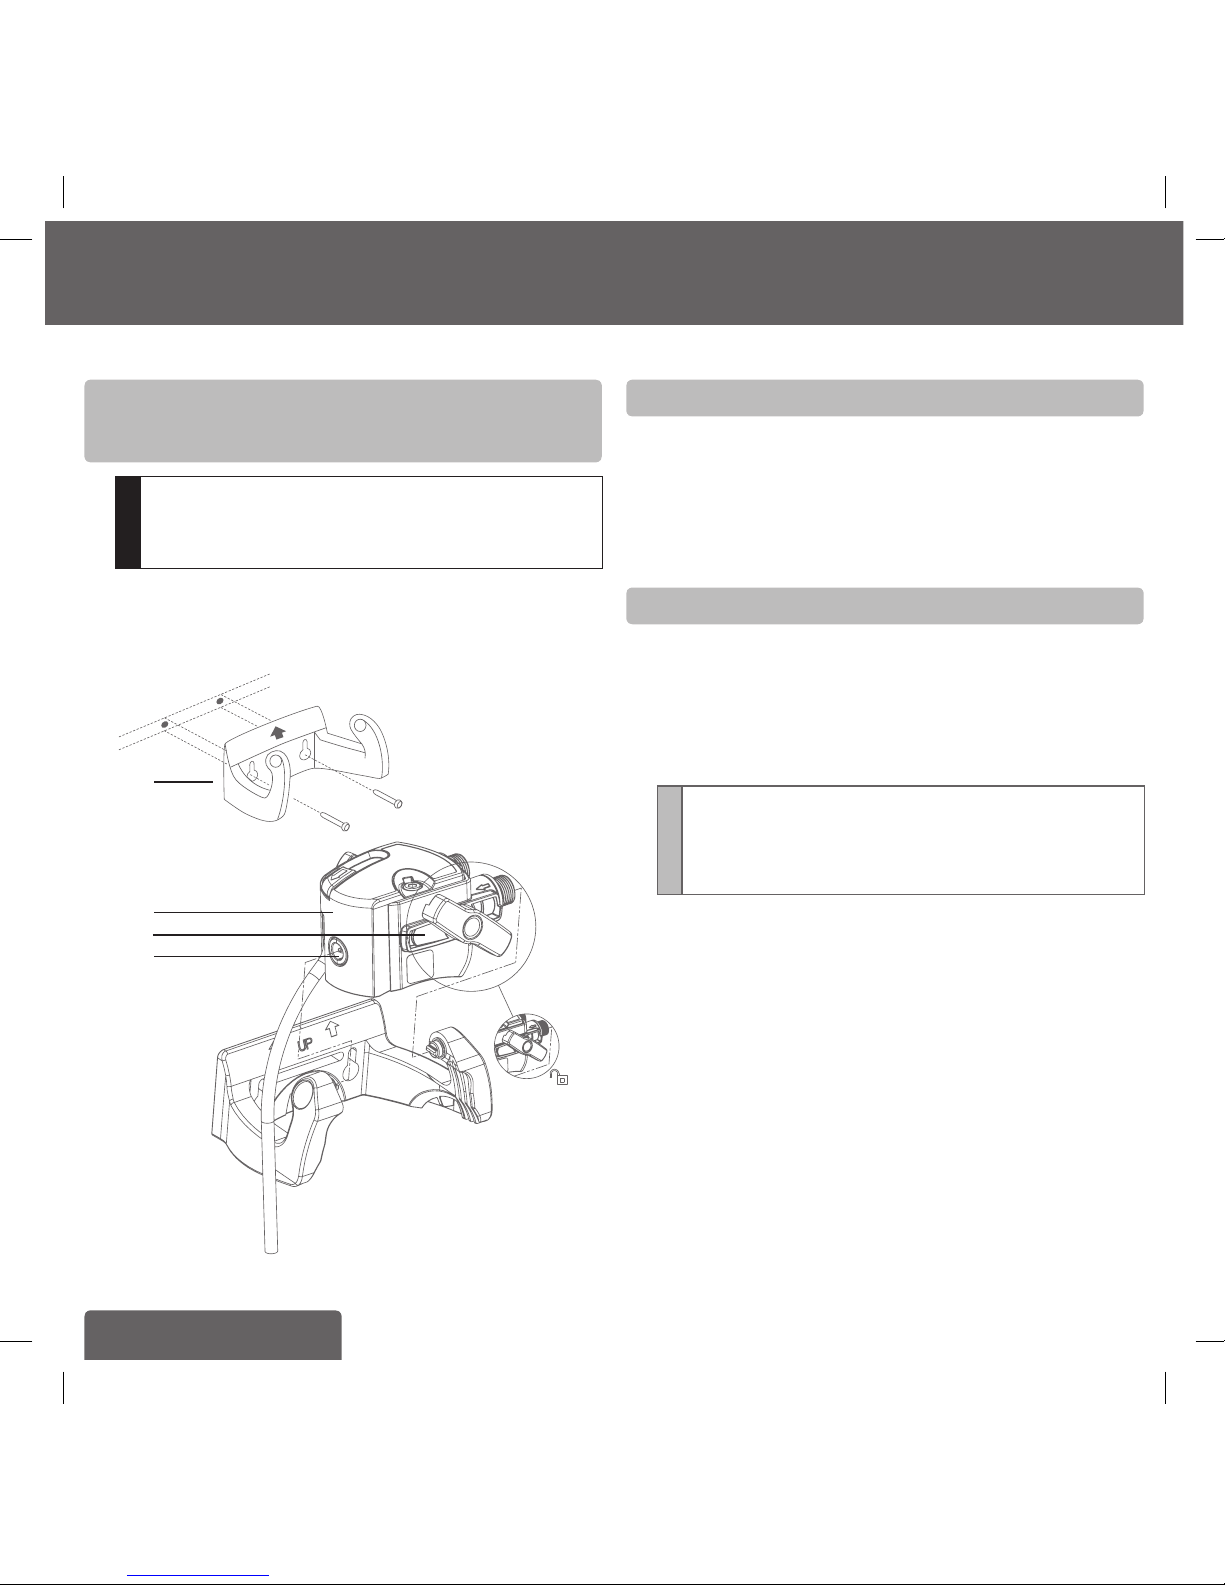
Screw the hoses into the dispenser (see fig. 8).
Screw the M8 connector of the hose with the blue stripe into the
hole C .
Screw the M8 connector of the hose with the red stripe into the
hole H.
Screw the M8 connector of the 800 mm hose into the hole B.
(fig. 8)
WD 3020/ WD 3030/ WD 3040 and WD 3050
C
B H
!Ensure the connections are screwed tight, but avoid over
tightening!
Then put the base or O-Ring (3) over the hole and fix the BRITA Tap
(1) in place using the supplied joint (5), the flat gasket (6), flange (7)
and the hex nut (8).
3.4 Step 4: Attaching the hoses
!We recommend that you arrange all the parts you need in
front of you before you begin.
For wall mounting (optional), you will need: two screws (e.g. 5 mm
thread diameter) and, if required, two wall plugs suitable for your
type of wall.
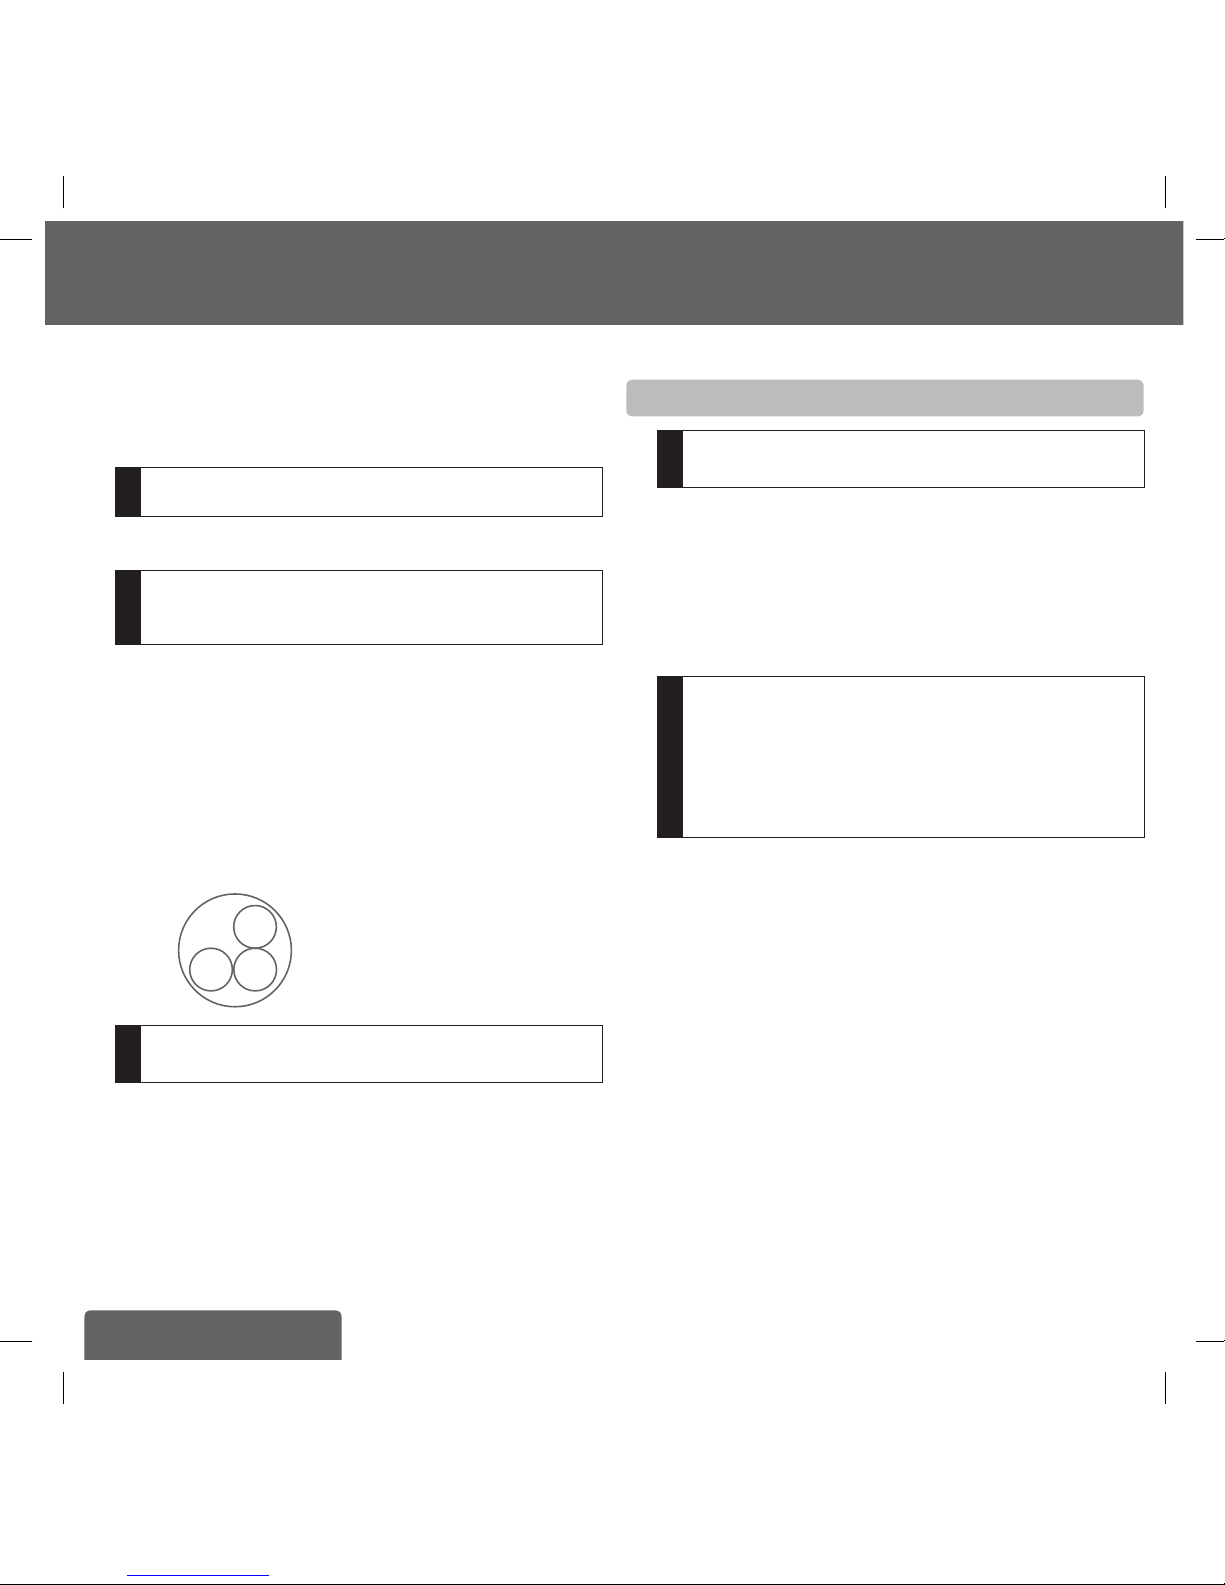
Please follow the diagram below (see fig. 9) and perform the steps
in the right order.
A Connect supplied T-piece on your cold water supply
a) Insert one 3/8" gasket into the female nut of the supplied
T-piece.
b) Connect this end of the T-piece to your cold water supply.
!
If you do have an additional free 3/8" cold water supply for
the BRITA Tap in your kitchen, you do not need to install the
supplied T-piece!
If your cold water supply does not fit the 3/8" connector of
the T-piece, use the supplied adapter if required. Please
insert the 1/2" gasket into the female nut of the adapter first.
Your Water Filter Kit comes with two 1/2" adapters. Please
go to your nearest supplier for adapters in other sizes.
B Connect the hose with the blue stripe to one side of the T-piece.
C Take the hose with two 3/8" connectors. Insert the 3/8" gaskets
into the respective female threads of the two hose ends.
Connect one end with the free side of the T-Piece.
D Now connect the other end to the filter head inlet. This is
labelled “IN” (inlet) and marked with an arrow. Make sure that
the gaskets are seated correctly!
E Connect the 800 mm hose which is connected with the
dispenser with the outlet of the filter head labelled with an
"OUT" arrow. Make sure that also here the gaskets are seated
correctly!
F Connect the hose with the red stripe with your hot water supply.
If your hot water supply does not fit the 3/8" connector, use the
supplied adapter if required. Please insert the 1/2" gasket into
the female nut of the adapter first.
G Make sure all connections are tightened properly. Avoid over
tightening.
1014662-002_GA_BRITA_Tap_CE.indb 8 04.04.16 11:27

ENGLISH 9
(fig. 9)
Hot water
supply
Cold water
supply
!
The max. tightening torque for the G3/8" connections may
not exceed 14 Nm! Only hose connections with gaskets
(13) may be used – hoses with conical screw connections
damage the connections of the filter head and invalidate any
warranty claims!
3.5 Step 5: Inserting the filter cartridge (see fig. 10)
A Remove protective strap (1).
B Insert the filter cartridge (4) vertically into the filter head (5).
C Turn the locking handle (3) until you feel it engages.
(fig. 10)
A.
B.
3.
2.
1.
4.
5.
!The filter cartridge can only be inserted when the locking
handle is open.
Make sure that the filter cartridge is positioned correctly.
1014662-002_GA_BRITA_Tap_CE.indb 9 04.04.16 11:27

10 ENGLISH
3.6 Step 6 (optional): Space-saving wall mount
to install the cartridge under the sink
(see fig. 11)
!During assembly, note the installation dimensions, bending
radii of the hoses and dimensions of the accessories. The
system can be operated vertically and horizontally. When
using the wall mount, install vertically only!
A Attach the wall mount in place using the two matching screws
and use two wall plugs, if necessary, depending on the type of
wall.
B Engage the filter head (2) in the wall mount (1). Please use the
fixation holes (4).
1.
2.
3.
4.
(fig. 11)
3.7 Step 7: Commissioning
Before use, make sure that you have followed all the steps
correctly and all the parts are fitted. Place a suitable container
under the cartridge to catch any leakages.
A Turn on the cold and hot water supplies and check the system
carefully for any leaks.
B Open the BRITA Tap and allow water to run until the filtered
water runs clear and without any bubbles (at least 2 litres).
4 Replacing the filter cartridge
If the maximum volume is reached or the cartridge has been used
for 12 months from commissioning, the BRITA Tap Cartidge Status
Indicator will flash red to remind you that the cartridge needs to be
replaced.
Read Important Notes (chapter 9) prior to exchange. After storage
and transport below 0°C, the product must be stored in the open
original packaging for at least 24 hours at the stated ambient tem-
peratures (chapter 7) for operation.
NOTE
The filter cartridge can be pivoted by 90° in the wall mount
for easy removal. When the locking handle is open, the
water supply to the cartridge is interrupted and by-passing
with direct water flow from the water inlet to the outlet is
possible.
Replacing the P 1000 (see fig. 10):
A Open the locking handle (3).
B Place a suitable container under the flush hose to catch the rinse
water. Open the flush valve (2) and release pressure from the
system. Close the flush valve (2) again.
C Remove the exhausted filter cartridge (4) from the filter head (5)
– please be aware, the cartridge is firmly embedded so you can
give it a firm pull without worrying about breaking it.
D Insert the new filter cartridge (see chapter 3.5).
E Close the locking handle (3).
F Reset the BRITA Tap Cartridge Status Indicator (chapter 5).
G Open the BRITA branded lever on your BRITA Tap and rinse
through until the filtered water runs clear and without any
bubbles (at least 2 litres).
Replacing the P 3000 refill cartridge is exactly the same as
replacing the P 1000. The P 3000 lasts up to 3400 liters with the
A-setting, up to 1700 liters with the B-setting and up 1100 liters
with the C-setting. Please take this into consideration while reset-
ting your BRITA Tap Cartridge Status Indicator.
1014662-002_GA_BRITA_Tap_CE.indb 10 04.04.16 11:27

ENGLISH 11
5 Activating the BRITA Tap Cartridge Status
Indicator
A Push the Reset Button (see fig. 5) of the BRITA Tap Cartridge Sta-
tus Indicator for three seconds until the LED-light flashes green.
B The timer starts automatically.
6 Maintenance
Regularly check the filter system for leaks. Regularly check the
hoses for kinks. Kinked hoses must be replaced.
!Prior to exchanging the filter system, read the Technical
Data (chapter 7) and Important Notes (chapter 9).
Regularly clean the outside of the filter system with a soft, damp
cloth.
!Do not use any abrasive chemicals, cleaning solutions or
astringent cleaning agents.
7 Technical data of the P 1000 and P 3000 cartridge
Operating pressure 2 bar to max. 8.6 bar
Water intake temperature 4°C to 30°C
Ambient tem-
perature for
operation 4°C to 40°C
storage/transport –20°C to 50°C
Capacity up to carbonate hard-
ness 10 °dH at setting “A”
P1000 1200 L
P3000 3400 L
Capacity from carbonate hard-
ness 10 to 17 °dH at setting
“B”
P1000 600 L
P3000 1700 L
Capacity from carbonate hard-
ness 17 to 24 °dH at setting
“C”
P1000 400 L
P3000 1100 L
Pressure loss by nominal service flow 0.25 bar
Weight (dry/wet) P1000 1.0 kg/1.6 kg
P3000 1.8 kg/2.8 kg
Dimensions
(Width/Depth/
Height)
Filter
system
(filter head
with filter
cartridge)
P1000 119 mm/108 mm/265 mm
P3000 117 mm/104 mm/417 mm
Filter
cartridge
P1000 108 mm/108 mm/259 mm
P3000 104 mm /104 mm/410 mm
Installed
dimensions
(vertical
installation
with wall
mounting
bracket)
P1000 137 mm/130 mm/265 mm
P3000 137 mm/128 mm/417 mm
Operating position Horizontal and vertical
Water inlet connection G3/8"
Water outlet connection G3/8"
Technical data of the BRITA Tap
Operating pressure 0.5 bar to max. 10 bar
cold water connection 4°C to 30°C
warm water connection max. 70°C
flow rate ≥ 9 L/min
acoustics rating Group II/-
Weight Dimensions (Width/
Depth/Height) Aerator
WD 3020 2,07 kg 17,3 cm x 28,4 cm x
29,4 cm M24x1
WD 3030 2,12 kg 17,2 cm x 20,5 cm x
36,3 cm M22x1
WD 3040 2,16 kg 17,2 cm x 23,7 cm x
34,8 cm M22x1
WD 3050 2,12 kg 17,2 cm x 20,5 cm x
36,2 cm M22x1
1014662-002_GA_BRITA_Tap_CE.indb 11 04.04.16 11:27

12 ENGLISH
For models WD 3030 and WD 3040 only
These models have an aerator with two integrated outlets. The
Inner one is for BRITA filtered water, the outer area for hot and cold
water. As with every tap aerator, there can be limescale build-up in
the outer area. Therefore it is recommended to clean the aerator
on a regular basis. For cleaning: Unscrew the cap on the end of the
dispensers neck. The aerator is connected to a silicon hose. Detach
it carefully and clean the aerator (e.g. with vinegar). After cleaning
connect the long, thin part on the back of the aerator carefully with
the silicon hose. Place the cap over the aerator and screw it tight.
Make sure that the gasket in the cap is seated correctly. When
installed correctly there should not be any leaks whilst running hot,
cold or BRITA filtered water.
If you want to replace the aerator with a new one, you can order
it from BRITA. You can find the contact details for your BRITA
customer service team next to your country code on the back of this
booklet.
(fig. 12)
8 Troubleshooting
A No water flow
Cause: Water intake closed.
Troubleshooting: Open the water intake at the upstream shut-off
valve or by closing the locking handle (3) on the
filter head (5). Check hoses for kinks.
B No or low water flow in spite of open water intake
Cause: Mains pressure too low.
Troubleshooting: Check mains pressure. If the fault continues,
check the filter system and filter cartridge and
replace if necessary. Check hoses for kinks.
Cause: Filter head not mounted in direction of water
flow / hoses wrongly connected.
Troubleshooting: Dismantle filter head and hoses and install in
direction of water flow (chapter 3.4).
C Leak
Cause: Screwed connections not fitted correctly.
Troubleshooting: Check mains pressure. Check all screwed
connections and mount as described in
chapter 3.4.
D No LED indication by usage
Cause: Battery is not inserted in a correct way or is
used up.
Troubleshooting: Check if battery is inserted properly.
If necessary, replace the battery.
1014662-002_GA_BRITA_Tap_CE.indb 12 04.04.16 11:27

ENGLISH 13
Spare Part Name
Article No. Spare Part Name
1004715 Gasket On Line 3/8" 2 mm CE + AU
1004713 Gasket On Line 1/2" 2 mm CE + AU
1004699 Hose On Line 3/8" IT - 3/8" IT CE
1015771 filterhead G3/8 3-way LED CE spare part
1004690 Adapter 1/2" IT - 3/8" ET
1005821 T-piece 3/8"
1015771
1004715
1004699
1005821
1004690
1004713
(fig. 13)
WD 3020
1012554
1013529
1012562
1012557
1012556
1016311
1015754
1016282
(fig. 14)
Article No. Spare Part Name
1012554 Aerator Set WD 3020 CE
1012556 Spare Part Mixer Cartridge
1012557 Hose Set WD 3020 CE
1012562 Spare part Hose DN6 800 mm HF M8x1 -
G3-8HN ASM
1013529 Assembly Set WD3050
1015754 BRITA Tap Cartridge Status Indicator spare
part
1016311 Valve LED ASM spare part
1016282 Cover mixer tap WD3020-3040 spare part
1014662-002_GA_BRITA_Tap_CE.indb 13 04.04.16 11:27

14 ENGLISH
WD 3030/
WD 3040/
WD 3050
Article No. Spare Part Name
1012550 Aerator Set WD 3030 CE
1014609 Aerator Set WD 3050
1012556 Spare Part Mixer Cartridge
1012552 Base Ring Set WD 3030/3040
1014608 Base Ring Set WD 3050
1012557 Hose Set WD 3020 CE
1013529 Assembly Set WD 3050
1012562 Spare part Hose DN6 800 mm HF M8x1 -
G3-8HN ASM
1015754 BRITA Tap Cartridge Status Indicator spare part
1016311 Valve LED ASM spare part
1016282 Cover mixer tap WD3020-3040 spare part
1012557
1012562
1013529
1012552
1016311
1012556
1012550
1015754
brushed 1014609
brushed 1014608
1016282
(fig. 15)
1014662-002_GA_BRITA_Tap_CE.indb 14 04.04.16 11:27

ENGLISH 15
9 Important notes
Protect the P 1000 water filter cartridge from direct sunlight and
mechanical damage. Do not assemble near sources of heat and
open flames. A stop valve must be installed before the filter
system intake hose. The BRITA Tap System is only suitable for
domestic use.
Only water of drinking water quality may be used as intake water
for the BRITA water filter system. The BRITA water filter cartridge
is only suitable for cold water use within the supply water tem-
perature stated in chapter 7. No microbiologically impaired water
or water of unknown quality may be used without appropriate
disinfection.
The system cannot be installed with a low pressure boiler.
Irrespective of the water used, you should use stainless steel
utensils or kettles with stainless steel heating elements. This is of
particular importance to people who are sensitive to nickel.
In the event: filter first, and then boil
If there are official instructions to boil tap water, the filter sys-
tem must be decommissioned. When the requirement to boil
water comes to an end, the filter cartridge must be replaced
and the connections cleaned.
Ultimate hygiene
• For hygiene reasons, the filter material of the cartridge is sub-
jected to a special treatment with silver. A small quantity of silver,
which is harmless to health, may be released into the water.
This is in compliance with the World Health Organisation (WHO)
recommendations for drinking water.
• It is generally recommended to boil tap water for certain groups
of people (e.g. people with weak immune systems, babies). This
also applies to filtered water.
• Note for people with kidney disease or dialysis patients: The filter-
ing process can cause a small rise in the levels of potassium.
• The water filtrate is classified in Category 2 according to EN 1717.
Optimum use
• BRITA recommends that the filter system is not left unused for
a long period. If the BRITA Tap is not used for several days (2–3
days), we recommend that the filter system be flushed with the
flushing volume X indicated in the table below. After stagnation
periods of over 4 weeks, the filter should be flushed with flushing
volume Y. Please also note the maximum usage period of the fil-
ter cartridge is 12 months, irrespective of the actual volume used.
Similar to the conventional taps, before using you should let water
rinse through for a short period so you can enjoy your BRITA
filtered water.
Flushing volume X after 2–3 days stagnation Flushing volume
P 1000 2 Litres
P 3000 3 Litres
Flushing volume Y after 4 weeks stagnation Flushing volume
P 1000 20 Litres
P 3000 30 Litres
• The filter kit must not be opened or dismantled during operation.
The filter cartridge must not be opened. The filter kit is designed for
a service life of 10 years (counted from the date of installation).
BRITA filtered water is designed for human consumption. Use it
within 1–2 days.
Sensitive to potassium?
The filtering process can cause a small rise in the levels of potas-
sium. However, one litre of BRITA filtered water contains less
potassium than an apple, for example. If you have kidney disease
and/or have to observe a special potassium diet, we recommend
that you consult your doctor before using the water filter.
Natural traces
As with every natural product, the P 1000 parts can be subject
to natural fluctuations. This can lead to a slight abrasion of small
carbon particles into your filtered water, noticeable as black bits.
These particles have no negative health effects. If ingested, they
will not harm the human body. In case you observe carbon parti-
cles, BRITA recommends flushing out the P 1000 filter cartridge
until the black bits disappear.
III. Important notes
1014662-002_GA_BRITA_Tap_CE.indb 15 04.04.16 11:27

16 ENGLISH
Correct disposal of the BRITA Tap Cartridge
Status Indicator
Every BRITA Tap Cartridge Status Indicator has
a useful life of approx. 5 years. At the end of the
useful life of the Status Indicator, remember that
it must be disposed of according to the applicable
regulations and statutory requirements.
Exclusion of liability
BRITA shall not be held liable for any damage, including subsequent
damage, arising from the incorrect use of the product.
100 % satisfaction: the BRITA guarantee
We are confi dent that this BRITA product will
meet your demands in terms of quality and
performance. If this product does not meet your
expectations, we will accept its return within
30 days of the date of purchase and reimburse
the purchase price. Just send the product with
your proof of purchase (receipt) and the grounds
for your dissatisfaction, your phone number and
bank details to the customer service address for
your country (on the back of this booklet).
M
o
n
e
y
B
a
c
k
G
u
a
r
a
n
t
e
e
3
0
D
a
y
s
BRITA recycling: for our environment
To work together in taking responsibility for our
environment, you can return your P 1000 fi lter
cartridges to a number of BRITA dealers.
More about BRITA: For details on recycling,
please see www.brita.net.
The BRITA service hotline cares
Do you have any questions about your BRITA product?
Or on the subject of water fi ltration? Give us a call!
You can fi nd the contact details for your BRITA customer service
team next to your country code on the back of this booklet.
The best side of water: www.brita.net
Are you looking for your nearest BRITA retailer? Do you want more
detailed information about BRITA products? Or about the BRITA
company?
Want to make the most of one of BRITA’s service offers? Up-to-date
information, consumer tips, seasonal competitions, delicious coffee
and tea recipes can be found around the clock at www.brita.net
Registering your product online
Register your product and get benefi ts at www.register.brita.net
IV. BRITA®, quality and satisfaction guaranteed
Registering your product online
Register your product and get benefi ts at www.register.brita.net
1014662-002_GA_BRITA_Tap_CE.indb 16 04.04.16 11:27

FRANÇAIS 17
Le Robinet BRITA fournit une eau filtrée plus
claire au goût agréable.
Outre la distribution d'eau froide et chaude non filtrée,
le système BRITA offre de nombreux avantages
• Une eau au goût agréable d'un simple gesten
• L'eau filtrée révèle la saveur de vos aliments et offre une eau
au goût agréable pour votre consommation quotidienne
• L'eau est un élément essentiel de la cuisine qui influence le
goût de vos préparations culinaires. Simple à installer, le robinet
BRITA vient remplacer votre mitigeur de cuisine et peut vous
aider à révéler la saveur de vos plats.
• Un design européen et élégant qui s'adapte à toutes les
cuisines
• Utilisation simple, pratique et économique
• Eau filtrée ou eau non filtrée
La cartouche P1000, compacte et de longue durée,
incarne la technologie de filtration avancée de BRITA.
Grâce au système de filtration à plusieurs niveaux BRITA, la
cartouche P 1000 filtre l'eau en permanence pour réduire sa
teneur en tartre. La tête filtrante professionnelle permet trois
réglages : eau moyennement dure, eau dure et eau très dure.
La cartouche filtrante P 1000
• réduit la teneur en tartre et certaines substances, comme le
chlore, qui altèrent le goût et l'odeur de l'eau.
• réduit la teneur en plomb ou en cuivre de l'eau du robinet
présente dans certains types d'installations domestiques ;
Durée d'utilisation de la cartouche filtrante P 1000
La durée d'utilisation de la cartouche filtrante P 1000 dépend de
votre consommation d'eau personnelle et de la qualité de votre
eau locale. Pour des performances de filtration BRITA optimales,
nous vous recommandons de changer la cartouche au moins
une fois tous les 12 mois. L'indicateur lumineux de changement
de cartouche BRITA vous rappelle quand remplacer la cartouche
suivant la couleur de la LED.
Pour plus d'informations sur l'indicateur lumineux de changement
de cartouche BRITA, reportez-vous au chapitre 3.
I. Nous vous félicitons pour l'achat de votre nouveau Robinet BRITA®
Vous bénéficiez à présent de la qualité BRITA, de notre engagement
envers nos clients et de notre garantie.
Robinet BRITA
P 1000
cartouche filtrante
1014662-002_GA_BRITA_Tap_CE.indb 17 04.04.16 11:27

18 FRANÇAIS
II. La qualité dès l'installation
1 Dispositions relatives à la garantie
Le Robinet BRITA est assorti d'une garantie légale de 2 ans. Un
recours en garantie ne pourra être invoqué au cours de cette
période que si toutes les instructions du présent manuel ont été
lues et respectées.
2 Contenu du kit d'installation du robinet BRITA
Pour obtenir les meilleurs résultats possibles, lisez attentivement les
instructions ci-après du kit d'installation du robinet BRITA.
Votre kit d'installation du robinet BRITA comprend les
éléments suivants (voir fig. 1) :
1. Tête de filtre à 3 réglages avec poignée de verrouillage pratique
2. Fixation murale pratique
3. Cartouche filtrante P 1000
4. Robinet BRITA (votre Robinet BRITA peut ne pas correspondre
tout à fait à celui de l'illustration)
5. Indicateur lumineux de changement de cartouche BRITA
6. Pile (CR2032)
7. Tuyau (1), longueur = 800 mm, écrous-raccords 3/8" d'un côté
et connecteur M8 de l'autre, 2 tuyaux 2 (2+3), longueur =
450 mm, écrous-raccords 3/8" d'un côté et connecteur M8 de
l'autre
8. Tuyau (4), longueur = 800 mm et écrous 3/8" des deux côtés
9. 2 adaptateurs filetage intérieur 1/2" - filetage extérieur 3/8" (Pour
Royaume-Uni seulement)
10. Mode d'emploi
11. Bandelette pour test de dureté de l'eau
12. Pièce de raccord en T
13. Joints
Outillage recommandé pour l'installation : une clé à molette, une
clé Allen (4 mm), clé anglaise et tournevis.
Pour le montage mural (facultatif), vous avez besoin de deux vis
(p. ex., 5 mm de diamètre) et, si nécessaire, de deux chevilles
adaptées à votre type de mur.
1. 2.
3. 4.
5.
6.
7.
8.
10.
(fig. 1)
9.
11.
12. 13.
1014662-002_GA_BRITA_Tap_CE.indb 18 04.04.16 11:27

FRANÇAIS 19
3 Robinet BRITA : installation facile
Avant d'installer le système, vérifiez que vous avez bien toutes
les pièces mentionnées ci-dessus (voir fig. 1) et tous les outils
recommandés.
L'installation comporte 7 étapes.
!
Lisez attentivement les caractéristiques techniques (cha-
pitre 7) ainsi que les instructions importantes (chapitre 9)
avant l'installation. Le système ne peut pas
être installé avec un chauffe-eau à basse pression en raison
des risques de dégâts des eaux. Après un stockage et un
transport en dessous de 0 °C, le produit doit être stocké
dans son emballage d'origine ouvert pendant au moins
24 heures avant d'être mis en service à la température
ambiante du lieu d'installation (chapitre 7).
3.1 Etape 1 : sélection de la dureté carbonate
(A/B/C) sur la tête de filtre
La tête de filtre permet trois réglages : eau moyennement dure (A),
eau dure (B) et eau très dure (C). Pour ajuster le réglage en fonction
de la qualité de votre eau locale, suivez les instructions ci-dessous.
Effectuez d'abord un test de la dureté carbonate en utilisant la
bandelette fournie. La bandelette est jointe à l'emballage des
présentes instructions.
Utilisation de la bandelette :
• Plongez la zone réactive de la bandelette de test dans un verre
d'eau du robinet fraîche (de 15 à 30 °C) pendant 1 seconde (pas
sous l'eau du robinet !). (fig. 2).
• Agitez la bandelette pour éliminer le liquide en trop et après
1 minute vérifiez le nombre de zones réactives dont la couleur sur
la bandelette de test a changé.
Selon le nombre de zones réactives dont la couleur a changé, nous
vous recommandons de régler la tête de filtre comme suit :
Réglage A B C
Nombre de zones
réactives dont la
couleur a changé
Capacité P1000 jusqu'à
1200 L jusqu'à 600 L jusqu'à
400 L
P3000 jusqu'à
3400L jusqu'à
1700 L jusqu'à
1100 L
Dureté carbonate
allemande [°dH] jusqu'à 10 10 à 17 plus de
17 dH
Dureté carbonate
anglaise [°eH] jusqu'à 13 13 à 21 plus de 21
Dureté carbonate
française [°fH] jusqu'à 18 18 à 30 plus de 30
Milligrammes par
litre CaCO3 [mg/L
CaO3]
178 178à 303 plus de 303
(fig. 2)
(fig. 3)
Vous pouvez à présent adapter le réglage de la dureté de votre eau.
Le réglage par défaut de la tête de filtre est « B ». Pour changer
le réglage, utilisez une clé Allen (4 mm). Tournez-la dans le sens de
la flèche jusqu'à l'apparition du symbole « C » dans la fenêtre.
Tournez-la dans le sens opposé à la flèche jusqu'à l'apparition du
symbole « A » dans la fenêtre (fig. 3). La tête de filtre est équipée
d'un régulateur de débit. Il garantit un débit optimal de l'eau distri-
buée par votre robinet BRITA même lorsque la pression est élevée.
1014662-002_GA_BRITA_Tap_CE.indb 19 04.04.16 11:27

20 FRANÇAIS
3.2 Etape 2 : démarrage de l'indicateur lumineux
de changement de cartouche BRITA
L'indicateur lumineux de changement de cartouche BRITA vous
indique automatiquement au moyen de trois voyants lumineux
quand remplacer la cartouche filtrante.
A Mise en service :
Insérez la pile fournie (1x CR2032) dans le compartiment de l'indi-
cateur lumineux de changement de cartouche BRITA. Vérifiez les
instructions sur la pile pour veiller à une bonne installation (fig. 4).
Toutes les LED doivent clignoter brièvement. Fermez le comparti-
ment. Maintenez le bouton Reset enfoncé pendant trois secondes
jusqu'à l'affichage d'un petit voyant vert au centre, en haut.
(fig. 4)
B Première programmation de l'indicateur lumineux de
changement de cartouche BRITA :
Selon le réglage que vous avez choisi (étape 1), vous allez pro-
grammer l'indicateur lumineux de changement de cartouche
BRITA comme suit (voir fig. 5) :
a Appuyez sur le bouton à droite (DURETÉ) pour choisir la dureté
de l'eau. si vous appuyez sur le bouton une fois, deux LED
jaunes clignoteront (réglage de dureté B par défaut). Puis
appuyez sur le bouton autant de fois que nécessaire pour
qu'apparaisse le réglage de dureté désiré:
Pour choisir le réglage C de dureté de l'eau, appuyez sur le bou-
ton jusqu'à ce qu'un indicateur LED jaune clignote.
Pour choisir le réglage B de dureté de l'eau, appuyez sur le bouton
jusqu'à ce que deux indicateurs LED jaunes clignotent.
Pour choisir le réglage A de dureté de l'eau, appuyez sur le bou-
ton jusqu'à ce que trois indicateurs LED jaunes clignotent.
b Appuyez sur le bouton à gauche (CARTOUCHE) pour choisir la
cartouche que vous utilisez, si vous appuyez sur le bouton une
fois, deux LED jaunes clignoteront (réglage de cartouche P 1000
par défaut). Puis appuyez sur le bouton autant de fois que néces-
saire pour qu'apparaisse le réglage de la cartouche désiré:
Si vous utilisez la cartouche filtrante A 1000, appuyez sur le
bouton jusqu'à ce qu'un indicateur LED jaune clignote.
Si vous utilisez la cartouche filtrante P 1000, appuyez sur le
bouton jusqu'à ce que deux indicateurs LED jaunes clignotent.
Si vous utilisez la cartouche filtrante P 3000, appuyez trois
fois sur le bouton jusqu'à ce que trois indicateurs LED jaunes
clignotent (voir tableau ci-dessous).
c Pour changer un réglage, il suffit d'appuyer sur le bouton jusqu'à
ce que le nombre correct d'indicateurs clignotent.
d Insérez l'indicateur lumineux de changement de cartouche
BRITA dans le levier du robinet BRITA (voir fig. 4).
(fig. 5)
1. Cartridge Button
2. Hardness Button
3. Reset Button
1 LED 2 LEDs 3 LEDs
Réglage de dureté de l'eau (DURETÉ) CBA
Cartouche (CARTOUCHE) A 1000 P 1000 P 3000
C Fonctionnement de l'indicateur lumineux de
changement de cartouche BRITA
Pour obtenir les meilleures performances possibles, il est recom-
mandé de remplacer régulièrement la cartouche filtrante. L'indica-
teur lumineux de changement de cartouche dans le levier BRITA
vous indique quand changer la cartouche filtrante.
1014662-002_GA_BRITA_Tap_CE.indb 20 04.04.16 11:27
Other manuals for Tap
1
This manual suits for next models
1
Table of contents
Languages:
Other Brita Water Dispenser manuals

Brita
Brita Purity C Series User manual

Brita
Brita PURITY 450 Steam Guide

Brita
Brita Wave BPA-Free Water Pitcher User manual

Brita
Brita Elemaris XL User manual

Brita
Brita Platinum Performance Series User manual

Brita
Brita P 1000 User manual

Brita
Brita Hydration Station 2500.CT User manual

Brita
Brita PURITY 450 Quell ST Guide

Brita
Brita PURITY 450 Quell ST Guide

Brita
Brita Elemaris User manual