Britex Dado DDR2-HFBF User manual

MELBOURNE
Britex Place Mirra Crt
Bundoora VIC 3083
t(03) 9466 9000
e[email protected]om.au
SYDNEY
16 Northumberland Drv
Taren Point NSW 2229
t(02) 9531 2100
ensw@britex.com.au
PERTH
Unit 1/8 Principal Link
Malaga WA 6090
t(08) 9249 5464
ewa@britex.com.au
BRISBANE
19 Manilla St
East Brisbane QLD 4169
t(07) 3363 2400
e[email protected]om.au
ADELAIDE
The Britex Group
SA State Office
t1300 764 744
e[email protected]om.au
Installation
Guide
150 150
330
774
72
28
518
60
485 Recommended
Noggin Height
470
700 as per AS1428.2
640 ±5 Recommended waste inlet height
789 ±5 Recommended waste height
1275 Recommended Noggin Height
15
1/2"
Solenoid
Inlet
Piezo
activation
button
Optional Chiller Unit
CWU-INT
485H x 335L x 185W
1/4" John Guest
Fittings
Should not be
installed more than
8m away
Timber
bonded
splashback
Angle
mounting
strip
Ø40mm
Waste
Designed to
suit Caroma
102115 or
Hepvo, not
supplied
Drain Trap to be
supplied by
customer
1000
20
60
850
210 620
172
50
75
36 186
188
338
60
92
36
17
722 Recommended Cutout
966 Recommended Cutout
Removable
bottom panel
Dome head
fixing screws
Services Access Services Access
Removable
bottom panel
255
338
255
258
R180
R180
Scale: 1:12
Scale: 1:7
Tick for
optional chiller
DDR2-HFBF - Double Round with Inwall bottle filler -
Approval
A3
SHEET 1 OF 1
SCALE:1:8
TITLE:
DO NOT SCALE DRAWING
DATE
UNLESS OTHERWISE SPECIFIED:
DIMENSIONS ARE IN MILLIMETERS
APPV'D
CHK'D
DRAWN
REVISION
Britex Metal Products Co. Pty Ltd.
ACN: 004 309 737
2 Mirra Ct, Bundoora Victoria 3083
P: 03 9466 9000 F: 03 9466 9044
britex.com.au [email protected]
Drawing:
DS
12/09/23
A
SD-6290.1
DDR2-HFBF | DDR2-R-HFBF
Dado Round Double Drinking
Fountain with Hands Free
Bottle Filler
DDR2-HFBF & DDR2-R-HFBF Installation Guide | QID 3.9 | Rev 2 | 25 Oct 2023

Australia’s Finest Stainless | britex.com.au
About
Preparation and Completion Notes
The BRITEX Stainless Steel Dado Round Drinking Fountain with Hands-Free Bottle Filler
is a stylish, versatile fixture supplied with an accessible drinking station. This unit comes
complete with front piezo timed flow lead-safe bubblers, a hygienic hands-free lead-safe
bottle filler, splashback panel, waste outlets, mounting bracket and concealed access.
Manufactured from commercial grade 304 stainless steel. Refrigerated models are
supplied with a separate remote chiller unit for installation within wall cavity.
Contractors please note: Ideally, stainless steel drinking fountain should be installed after all
other building activities that could cause contamination to the surface of the stainless steel
have been completed.
These activities include:
Using proprietary building mortar removers containing hydrochloric acid. Welding, cutting and
grinding that may ‘spray’ carbon steel and iron particles onto the stainless-steel surface.
1. Remove drinking fountain from box packaging and inspect for any damage before beginning
installation process.
2. Confirm all requested details are correct.
3. If the drinking fountain is damaged in transit or if any details are not as requested, do not
install it. Notify Britex immediately within 24 hours of receipting the product.
4. Bottle filler sensor assembly requires a standard GPO.
2
DDR2-HFBF & DDR2-R-HFBF Installation Guide | QID 3.9 | Rev 2 | 25 Oct 2023
IMPORTANT
ALL SERVICE TO BE PERFORMED BY AN AUTHORISED SERVICE PERSON
Installation of this unit must be in accordance with AS/NZS 3500.1, AS/NZS 3500.2, the PCA
and the local regulatory requirements. Water and/or electrical supply conditions must comply to
national or state requirements and standards. Failure to comply shall void the product warranty
and may affect the performance of the product. For further support and after-sales care, please
contact Britex.
WARNING
WHEN INSTALLATION IS COMPLETE, ENSURE THESE INSTRUCTIONS REMAIN INSIDE
THE PLASTIC BAG PROVIDED WITH THE UNIT FOR FUTURE REFERENCE

Australia’s Finest Stainless | britex.com.au 3
DDR2-HFBF & DDR2-R-HFBF Installation Guide | QID 3.9 | Rev 2 | 25 Oct 2023
DDR2-HFBF Installation Drawing
150 150
330
774
72
28
518
60
485 Recommended
Noggin Height
470
700 as per AS1428.2
640 ±5 Recommended waste inlet height
789 ±5 Recommended waste height
1275 Recommended Noggin Height
15
1/2"
Solenoid
Inlet
Piezo
activation
button
Optional Chiller Unit
CWU-INT
485H x 335L x 185W
1/4" John Guest
Fittings
Should not be
installed more than
8m away
Timber
bonded
splashback
Angle
mounting
strip
Ø40mm
Waste
Designed to
suit Caroma
102115 or
Hepvo, not
supplied
Drain Trap to be
supplied by
customer
1000
20
60
850
210 620
172
50
75
36 186
188
338
60
92
36
17
722 Recommended Cutout
966 Recommended Cutout
Removable
bottom panel
Dome head
fixing screws
Services Access Services Access
Removable
bottom panel
255
338
255
258
R180
R180
Scale: 1:12
Scale: 1:7
Tick for
optional chiller
DDR2-HFBF - Double Round with Inwall bottle filler -
Approval
A3
SHEET 1 OF 1
SCALE:1:8
TITLE:
DO NOT SCALE DRAWING
DATE
UNLESS OTHERWISE SPECIFIED:
DIMENSIONS ARE IN MILLIMETERS
APPV'D
CHK'D
DRAWN
REVISION
Britex Metal Products Co. Pty Ltd.
ACN: 004 309 737
2 Mirra Ct, Bundoora Victoria 3083
P: 03 9466 9000 F: 03 9466 9044
britex.com.au [email protected]
Drawing:
DS
12/09/23
A
SD-6290.1
150 150
330
774
Scale: 1:7
Scale: 1:10
72
28
518
60
485 Recommended
Noggin Height
470
700 as per AS1428.2
640 ±5 Caroma 102115
789 ±5 Caroma 102115
1275 Recommended Noggin Height
15
1/2"
Solenoid
Inlet
Piezo
activation
button
Optional Chiller Unit
CWU-INT
485H x 335L x 185W
1/4" John Guest
Fittings
Should not be
installed more than
8m away
Timber
bonded
splashback
Angle
mounting
strip
Ø40mm
Waste
Designed to
suit Caroma
102115 or
Hepvo, not
supplied
Drain Trap to be
supplied by
customer
1000
20
60
850
210 620
172
51
75
36 186
188
338
60
Removable
bottom panel
Dome head
fixing screws
Services Access Services Access
Removable
bottom panel
Place unit on wall and mark the top,
ensuring top of basin is between 695-700
as per AS1428.2
Mark location for bottom fixing strip and fix
to wall.
Place unit on the top of fixing strip while
holding the bottom of the unit away from
the bottom fixing angle.
Push the bottom of the unit over the
bottom fixing strip and insert the bottom
fixing screws.
DDR2-HFBF - Double Round with Inwall bottle filler -
Installation
A3
SHEET 1 OF 1
SCALE:1:8
TITLE:
DO NOT SCALE DRAWING
DATE
UNLESS OTHERWISE SPECIFIED:
DIMENSIONS ARE IN MILLIMETERS
APPV'D
CHK'D
DRAWN
REVISION
Britex Metal Products Co. Pty Ltd.
ACN: 004 309 737
2 Mirra Ct, Bundoora Victoria 3083
P: 03 9466 9000 F: 03 9466 9044
britex.com.au [email protected]
Drawing:
DS
12/09/23
A
SD-6289.1

Australia’s Finest Stainless | britex.com.au
Installation Instructions
1. Place unit on wall and mark the top to ensure you have the drinking fountain at the
correct height for AS 1428.2, the assessable basin needs to be between 695-700 mm from
the floor to comply.
2. One you have marked the joggle strip location, measure where the bottom strip needs to
be on the wall, then fix both to the wall.
3. Place unit on the top of the joggle strip while holding the bottom of the unit away from
the bottom fixing angle. Ensure you have at least two people assisting in this task.
4. Push the bottom of the unit over the bottom fixing strip and insert the bottom fixing
screws.
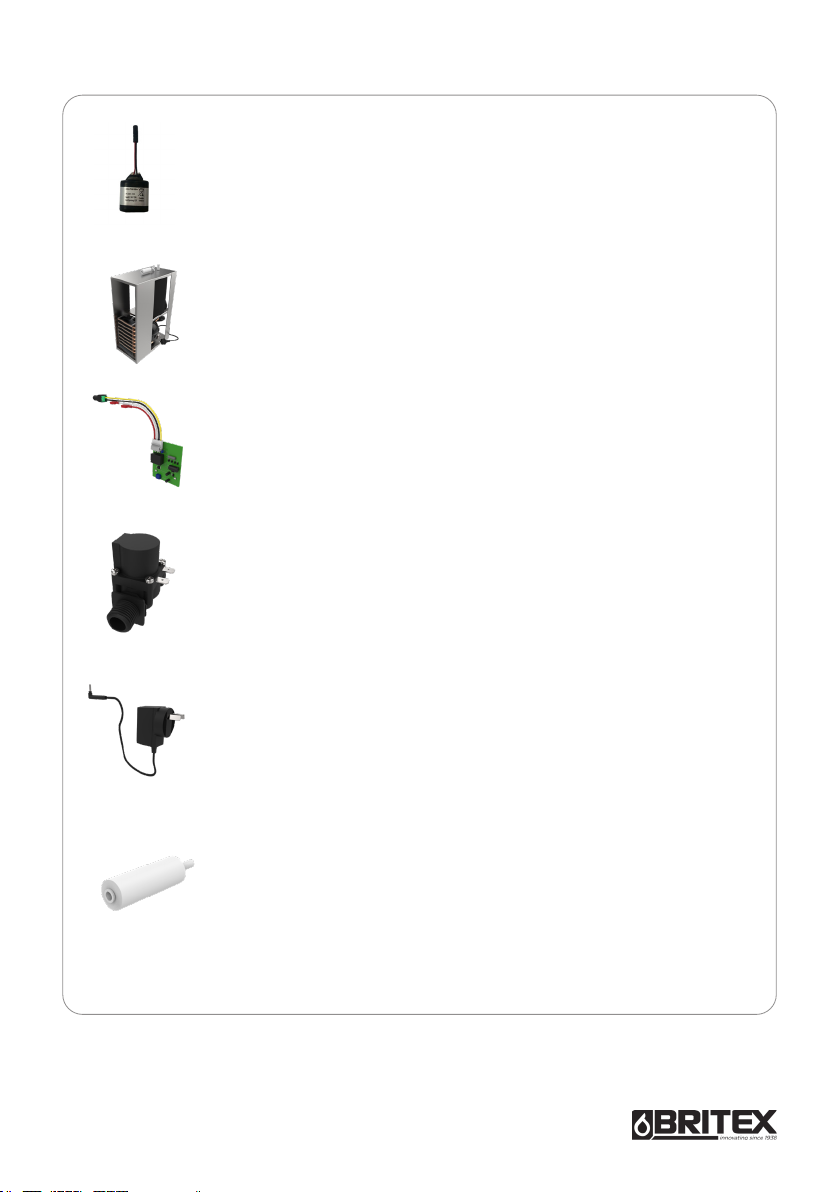
5. Remove the inspection plates on the two basins and plumb up the wastes for all three
units. Connect the basins and bottle filler to the mains pressure, according to the correct
Plumbing Code or Standard.
6. Plug in transformer of sensor into the GPO to set up.
7. Once everything is connected, then you need to ensure all the fittings are watertight and
the bottle filler and drinking fountain are working to the desired degree.
Note: GPO required for bottle filler and refridgerated version. Drinking Fountain is battery
operated
If you have ordered a refrigeration model, then below is the other steps that need to be
carried out.
1. 1. Place the refrigeration unit in the cavity, ensure there is a 10-amp standard power
outlet.
2. This unit to be installed in a cavity not less than 700mm wide. A vent should be installed
adjacent to the fan aperture. The remote unit must have 25mm at front and back of the
unit, the unit can be installed flush against either side wall of the cabinet.
3. Unit is ‘remotely’ located whether that’s in a cupboard space with adequate ventilation
or in a janitorial/services room ideally adjacent to the fountain.
4
PLEASE NOTE:
This unit is preset and locked to flow for 7 seconds and cannot be adjusted.
PLEASE READ: This unit has an automatic 24 hour purge setting (hygiene rinse) to
remove any stagnant water. This will reduce the amount of metals that may leach into the
water from the plumbing system, and assist in minimising the growth of bacteria such as
Legionella. This function is activated at the time the unit is first live (switched on). The unit
will then automatically flush at this time if the unit has been inactive for 24 hours.
PLEASE READ: If this unit is preplumbed with your product please note that it has been
tested and to flow for 7 seconds and will be installed with a blue ring.
PLEASE READ: Ensure all supply lines are flushed thoroughly to remove debris prior to the
installation. Strainers are recommended if debris is an ongoing problem.
DDR2-HFBF & DDR2-R-HFBF Installation Guide | QID 3.9 | Rev 2 | 25 Oct 2023

Australia’s Finest Stainless | britex.com.au 5
Technical Parameters
Inlet Connection 1/2” BSP Male along with other parts as
stipulated in the drawing
Recommended Inlet Pressure 350 kPa
Maximum Inlet Pressure 500 kPa
Water Supply Temperature
Limitations 4-15°C
Electrical Standard GPO
Specifications for Piezo Button
Inlet G 1/2"BSP -
Female
Outlet G 1/2”BSP - Male
Working Pressure (kPa) min 50
max 500
Working Temperature Range (°C) min 5°C - max 60°C
Headwork Solenoid Valve
How to Activate the Piezo Button and Bottle Filler
Drinking Fountain
• Press the button once to activate.
• The water will flow for the set duration of 7 seconds and
turn off automatically.
• Alternatively press the button at any time to turn off.
Bottle Filler
• Place botte on inwall bottle place holder
• Bottle must be place inline with senor eye
• Operation will start and run for 20 seconds
DDR2-HFBF & DDR2-R-HFBF Installation Guide | QID 3.9 | Rev 2 | 25 Oct 2023

Australia’s Finest Stainless | britex.com.au
DDR2-HFBF Assembly Diagram
6
60
700
640
490
430
60
1
2
4
3
5
9
10
11
12
13
14
15
16
17
18
19
20
21
22
23
24
25
26
7
27
8
28
29
1 x 50-07-0054 Back Plate DDR2 (HFBF)
1 x HFBF Bottle Filler
2 x Solenoid Bracket
2 x 74-03-0018 Elbow Brass Flared x MI
2 x 74-08-0045 Bubbler
2 x 74-11-0003 Waste 40 x 70mm S/S Top # PW4070SS
2 x 74-08-0105 Piezo Button and solenoid
1 x 50-07-0088 DDR Disabled Basin
1 x 50-07-0055 DDR Basin
1 x 74-02-0012 Tube Black 10mm LLDPE # PE-1007-10M-E
1 x 74-02-0013 Adapter Straight Male 1/2" BSP x 10mm Tube
1 x 74-05-0034 Solenoid
1 x 74-02-0036 Stem Elbow 10mm Tube M&F John Guest #PM221010E
1 x 74-02-0010 Adapter Female 1/2" BSP x 10mm Tube
1 x 74-05-0037 BRITEX 256 Aerator Adaptor M22MI x AER x 15mm BSP
1 x 74-02-0012 Tube Black 10mm LLDPE # PE-1007-100M E
1 x 74-05-0038 Cascade Insert with housing female M22x1
1 x 74-02-0010 Adapter Female 1/2" BSP x 10mm Tube
1 x 74-05-0035 Bracket
1 x 74-02-0013 Adapter straight Male 1/2" BSP x 10mm Tube
1 x 74-05-0039 Mounting bracket for HFBF Outlet
1 x Mounting joggle for backplate
1 x 74-03-0052 Fernco Coupling (Plumb quick) # 1056-40/32MA
1 x 74-05-0031 TB35 12-volt sensor
1 x 2.1mm DC socket with screw terminals and wiring loom
1 x 74-05-0033 Adapter Mains 12V DC400MA
1 x Angle mounting bracket
3 x 96-02-0021 M5 x 20 Button head allen screw
2 x 74-09-EZIH450 Hose connector 450mm
6
21
1
2
3
4
5
7
8
9
10
11
12
13
14
15
16
17
18
19
20
22
23
24
25
26
27
28
29
DDR2-HFBF -
Double Round with Inwall bottle filler - Assembly
A3
SHEET 1 OF 1
SCALE:1:8
TITLE:
DO NOT SCALE DRAWING
DATE
UNLESS OTHERWISE SPECIFIED:
DIMENSIONS ARE IN MILLIMETERS
APPV'D
CHK'D
DRAWN
REVISION
Britex Metal Products Co. Pty Ltd.
ACN: 004 309 737
2 Mirra Ct, Bundoora Victoria 3083
P: 03 9466 9000 F: 03 9466 9044
britex.com.au [email protected]
Drawing:
DS
07/09/23
A
SD-6287.1
Sign
Date
Approval For Manufacture
1. 1 x 50-07-0054 Back Plate DDR2 (HFBF)
2. 1 x HFBF Bottle Filler
3. 2 x Solenoid Bracket
4. 2 x 74-03-0018 Elbow Brass Flared x MI
5. 2 x 74-08-0045 Bubbler
6. 2 x 74-11-0003 Waste 40 x 70mm S/S Top # PW4070SS
7. 2 x 74-08-0105 Piezo Button and solenoid
8. 1 x 50-07-0088 DDR Disabled Basin
9. 1 x 50-07-0055 DDR Basin
10. 1 x 74-02-0012 Tube Black 10mm LLDPE # PE-1007-10M-E
11. 1 x 74-02-0013 Adapter Straight Male 1/2” BSP x 10mm Tube
12. 1 x 74-05-0034 Solenoid
13. 1 x 74-02-0036 Stem Elbow 10mm Tube M&F John Guest #PM221010E
DDR2-HFBF & DDR2-R-HFBF Installation Guide | QID 3.9 | Rev 2 | 25 Oct 2023

Australia’s Finest Stainless | britex.com.au 7
14 .1 x 74-02-0010 Adapter Female 1/2” BSP x 10mm Tube
15. 1 x 74-05-0037 BRITEX 256 Aerator Adaptor M22MI x AER x 15mm BSP
16. 1 x 74-02-0012 Tube Black 10mm LLDPE # PE-1007-100M E
17. 1 x 74-05-0038 Cascade Insert with housing female M22x1
18. 1 x 74-02-0010 Adapter Female 1/2” BSP x 10mm Tube
19. 1 x 74-05-0035 Bracket
20. 1 x 74-02-0013 Adapter straight Male 1/2” BSP x 10mm Tube
21. 1 x 74-05-0039 Mounting bracket for HFBF Outlet
22. 1 x Mounting joggle for backplate
23. 1 x 74-03-0052 Fernco Coupling (Plumb quick) # 1056-40/32MA
24. 1 x 74-05-0031 TB35 12-volt sensor
25. 1 x 2.1mm DC socket with screw terminals and wiring loom
26. 1 x 74-05-0033 Adapter Mains 12V DC400MA
27. 1 x Angle mounting bracket
28. 3 x 96-02-0021 M5 x 20 Button head allen screw
29. 2 x 74-09-EZIH450 Hose connector 450mm
DDR2-HFBF & DDR2-R-HFBF Installation Guide | QID 3.9 | Rev 2 | 25 Oct 2023

Australia’s Finest Stainless | britex.com.au
8
Troubleshooting for Piezo Button (74-08-0105)
PROBLEM CAUSES ACTION
Inconsistent flow Blocked flow regulator screw Remove flow regulator screw
and clean
Water is not flowing from
tap
Water is turned off Turn on water
Blocked flow regulator screw Remove flow regulator screw
and clean
Rate of flow inadequate The flow regulator screw may
not be adjusted correctly
Remove blanking screw and
adjust flow regulating screw as
described above
Troubleshooting for DDR2
PROBLEM CAUSES ACTION
Water Not Cold Loss of gas or failed fan Contact manufacturer
Power supply to Chiller unit No Power Supply Turn on water
Inconsistent flow Blocked flow regulator screw Remove flow regulator screw
and clean
Water is not flowing from
tap
Water is turned off Turn on water
Blocked flow regulator screw Remove regulator screw and
clean
Rate of flow inadequate The flow regulator screw may
not be adjusted correctly
Remove blanking screw and
adjust flow regulating screw as
described above
Troubleshooting Drinking Fountain
Water pressure issue if it is too low, then the unit will not produce the desired amount of
flow into the drinking bottle.
Ensure the unit is working to the desired degree, the outlet should be free from debris.
If water is leaking from the unit establish where it is coming from. If it is on any of the inlet
or outlet connections, tighten these as required.
DDR2-HFBF & DDR2-R-HFBF Installation Guide | QID 3.9 | Rev 2 | 25 Oct 2023

Australia’s Finest Stainless | britex.com.au 9
Spare Parts
CWU-INT
- This unit MUST be installed in a Vertical Orientation
- This unit MUST be installed with a Pressure Relief Valve (supplied)
- This unit MUST be installed with Ventilation
PRV
Pressure Relief Valve for CWU-INT
74-08-0106
Battery Pack 6V DC with 6mm Dia. 2 Pin Plug (suits electronic button
and Solenoid unit)
(For Drinking Fountain)
The control module which is 74-05-0031 TB35-2-12-volt Sensor
together with 74-05-0040 2.1mm DC Socket with screw terminals.
(For Bottle Filler)
The Solenoid value 74-05-0034 Solenoid Valve 12V DC ½” BSP WMK
Approved. (For Bottle Filler)
The power supply which is 74-05-0033 Adapter Mains SMPS 12V
DC400MA SLIM 7DC Plug. (For Bottle Filler)
DDR2-HFBF & DDR2-R-HFBF Installation Guide | QID 3.9 | Rev 2 | 25 Oct 2023

Australia’s Finest Stainless | britex.com.au
Care and Maintenance
Stainless steel products should be kept clean at all times. The secret to stainless steel’s
ability to maintain a high-quality finish and promises of a long-life expectancy is the
invisible chromium-oxide film that sits on the surface and protects the steel beneath. To
maintain this film, it is essential that the surface remains clean and in constant contact
with oxygen. If this film is penetrated (either by abrasion or chemically) and dirt, liquid,
grime contaminants embed themselves in these micro chasms for an extended period,
the chromium oxide film will not be able to regenerate and the steel below will eventually
become damaged and discoloured.
What we recommend for general cleaning and maintenance:
Cleaning Materials:
• A soft cloth
• A soft-bristled brush
• A natural or artificial sponge
Cleaning Solutions:
• Hand washing soap / soft water solution
• Mild soap / soft water solution
White vinegar / soft water solution
It is recommended that general cleaning of stainless-steel surfaces be carried out weekly, or
as soon as a build-up of surface media has been observed. To clean, simply wash stainless
steel surfaces with, warm, diluted, mild soapy water using a cloth or soft bristled brush. Once
all dirt, oil and grime is removed, rinse thoroughly with clean water and wipe dry.
10
DDR2-HFBF & DDR2-R-HFBF Installation Guide | QID 3.9 | Rev 2 | 25 Oct 2023

Australia’s Finest Stainless | britex.com.au
Warranty
The BRITEX product is backed by our manufacturer’s warranty available for download
from our website at www.britex.com.au. We expressly warrant that the product is free from
operational defects in workmanship and materials for the warranty period indicated on the
schedule in the manufacturer’s warranty. During the warranty period, BRITEX will repair or
replace any defective products manufactured by BRITEX at no charge, provided that the
terms of the manufacturer’s warranty are followed.
This warranty is the only warranty given by BRITEX, and we expressly disclaim all other
warranties, including but not limited to implied warranties of merchantability and fitness
for a particular purpose. This warranty represents the sole and exclusive remedy for breach
of warranty, and BRITEX shall not be liable for any incidental, special, or consequential
damages, including lost profits, labor charges, delays, vandalism, negligence, fouling
caused by foreign material, damage from adverse water conditions, chemical, electrical or
any other circumstances beyond BRITEX’s control.
This warranty shall be void if the product is abused, misused, improperly installed,
maintained, or altered. By purchasing our product, you agree to these terms and
conditions. We appreciate your business and look forward to providing you with high-
quality products and services.
11
DDR2-HFBF & DDR2-R-HFBF Installation Guide | QID 3.9 | Rev 2 | 25 Oct 2023

MELBOURNE
Britex Place Mirra Crt
Bundoora VIC 3083
t(03) 9466 9000
e[email protected]om.au
SYDNEY
16 Northumberland Drv
Taren Point NSW 2229
t(02) 9531 2100
ensw@britex.com.au
PERTH
Unit 1/8 Principal Link
Malaga WA 6090
t(08) 9249 5464
ewa@britex.com.au
BRISBANE
19 Manilla St
East Brisbane QLD 4169
t(07) 3363 2400
e[email protected]om.au
ADELAIDE
The Britex Group
SA State Office
t1300 764 744
e[email protected]om.au
DDR2-HFBF & DDR2-R-HFBF Installation Guide | QID 3.9 | Rev 2 | 25 Oct 2023
This manual suits for next models
1
Table of contents
Other Britex Outdoor Fountain manuals

Britex
Britex DDR1-D User manual

Britex
Britex Dado Square Drinking Fountain Compact User manual

Britex
Britex DPDF User manual

Britex
Britex Dado DDS1-D User manual

Britex
Britex DSR User manual

Britex
Britex DIWR User manual

Britex
Britex DDR1-S User manual

Britex
Britex TP6 User manual

Britex
Britex Dado DDS2 User manual

Britex
Britex DVR User manual
Popular Outdoor Fountain manuals by other brands

Campania International
Campania International YARDART Austin FT-206 Assembly instructions

LuxenHome
LuxenHome WHF848 instruction manual

CLIMAQUA
CLIMAQUA PLATO instructions

BENITO
BENITO Acces UM542 Assembly instructions

Jeco
Jeco FCL148 quick start guide

Campania International
Campania International Del Rey Fountain quick start guide