manuals.online logo
Brands
  1. Home
  2. •
  3. Brands
  4. •
  5. bROK
  6. •
  7. Jack
  8. •
  9. bROK 32908 User manual

bROK 32908 User manual

Serious injury or death may result from the use of this
product. Exercise extreme caution when using these Jacks.
•User must ensure product is installed according to these
instructions. Purchaser, owner or user must not alter or
modify the product.
Serious injury or death may result to operator or bystanders.
•If this product has a pivot tube mount, make certain the
pivot tube pin is fully inserted through both sides of the
pivot tube and the pivot tube mounts.
•If this product is a swivel jack, Ensure the plunger pin is
locked into a hole on the mounting bracket before
operating the jack.
•If this product has a snap ring, ensure the snap ring
groove is cleared of any and all debris before and after
attachment of the snap ring. Ensure snap ring is fully
seated into the snap ring groove.
•Do not weld “Bolt-On” brackets or straps to the tongue.
•If this product has a drop foot or drop leg, Never attempt
to adjust a drop foot or drop leg when it is under load.
Always remove drop foot or drop leg from product before
towing trailer to maximize ground clearance.
•If this product is a rack jack, never raise the ger housing
above the inner tube.
•Always replace any and all bent broken or worn parts on
this product before using this product.
•These jacks are not designed to be used on a round tube
tongue.
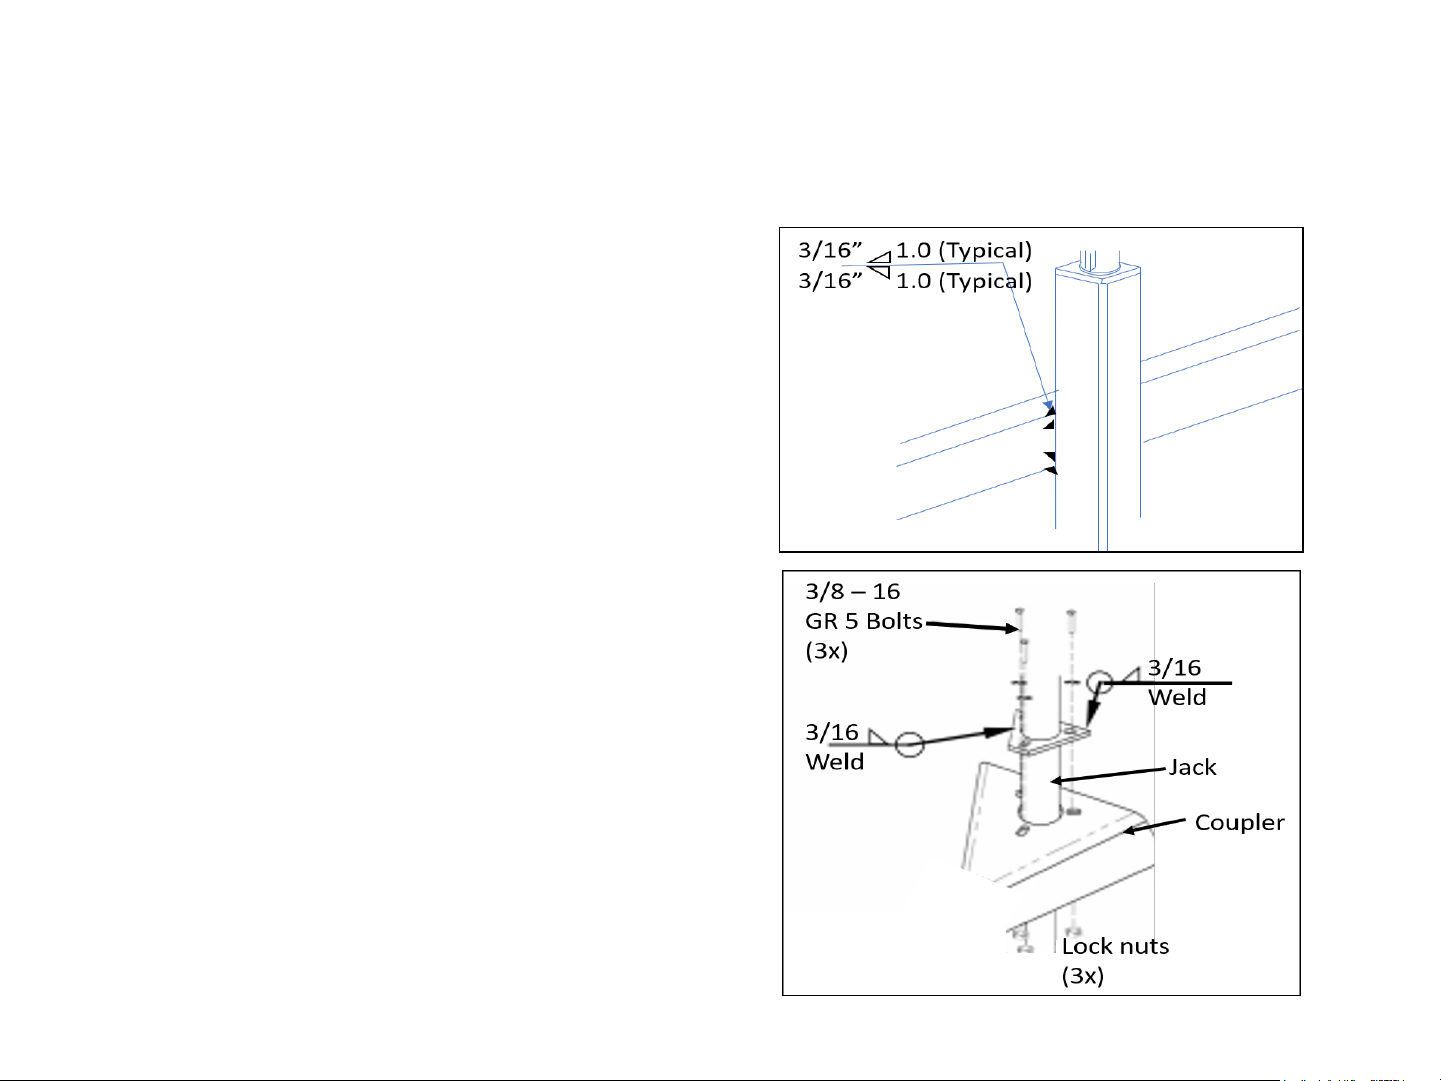
•All welding must be performed by a certified AWS welder
Serious Injury or death may result to operators and bystanders.
•Never position any part of the body under any portion of this
product or the load being applied to at any time.
•Always fully rotate and secure the jack in a fully retracted
manner to ensure complete clearance form the road or road
obstacles before traveling.
•When using this product to bear the weight of the load
always ensure wheels are fully chocked and trailer and load
are prevented from moving or rolling.
•This is not a transport device. Minimize any movement of the
trailer or load while this product is engaged with the ground.
•Do not allow children to play on the jack or the load that it is
applied to.
•Do not exceed jack capacity. Jack capacity is limited to the
lesser of the foot plate, caster or jack capacity.
•Never exceed the maximum rated capacity of the jack. Jack
capacity is located on the jack’s decals or stampings.
•Do not allow excessive side loading of the jack. The jack is
designed for vertical loading only.
•Lower jack to lowest position before manually moving trailer.
•Always replace bent broken or worn parts before using this
this product.
The attachment or use of this product is critical and beyond
the control of bROK Products LLC. bROK Products is not
responsible for the use or attachment or installation. bROK
Products neither guarantees nor will it be liable for any
damage resulting from the attachment, use or misuse of the
this product or assembled product. The liability of this product
is limited to its purchased price if it is proved to be the result
of poor workmanship or defective material.
Trailer Jacks:
32908, 32909, 32923, 32924,
32925, 32932 , 15936 Rev A
1
Assembly Instructions
Before mounting your product, confirm there will be no interference with the towing vehicle, ground, tongue, or any
other accessories while stationary or in motion. Check for sufficient clearance to avoid interference in all positions
including handle rotation, handle swing and swivel positions if applicable. Check for sufficient clearance after
installation is completed.
Bolt-On Mounting Bracket Instructions
If using a bolt on jack, assure the correct mounting hole
pattern for your tongue size. The gap between the tongue
and the mounting bolts is not to exceed .06 inches.
1) Place the jack against the tongue and position the
mounting brackets/straps on the opposite side of the
tongue as illustrated. Align the holes in the straps with
the holes in the bracket.
2) Insert four bolts through the bracket and the straps.
The top two bolts can rest on the tongue. The bottom
bolts should be less than .07 inches below the tongue.
3) Secure the bolts with locknuts. Torque nuts to 25 ft
LBS
4) Check to ensure clearance of handle, coupler and
trailer jack handle. Reposition if needed.
Snap Ring/Bolt Through Instructions:
To attach a snap ring style jack:
-Place the jack over the mount and place the snap ring in the
groove. Ensure the snap ring is seated completely and firmly
in the snap ring groove.
To attach a bolt through jack:
-Place the jack bracket into the recessed opening in the
mount. Place a small end of a bushing into the bracket on
the jack and on to the bolt. Tighten locknut until there is
little movement of the bushing.
-Note: Bolt should not be installed between the trailer
tongue and the mount. The jack’s bracket will be held by
the bushing between the mount and the locknut.
2
Assembly Instructions
Before mounting your product, confirm there will be no interference with the towing vehicle, ground,
tongue, or any other accessories while stationary or in motion. Check for sufficient clearance to avoid
interference in all positions including handle rotation, handle swing and swivel positions if applicable.
Check for sufficient clearance after installation is completed.
Direct Mount:
The same welding instructions apply to a weld on
mounts unless otherwise specified.
1) All welding must be performed by an AWS certified
welder
2) Place the jack at the desired location. Weld 1” in 2
locations on both sides of the jack as shown using a
3/16” fillet weld.
A-Frame Jack Assembly:
1) All welding must be performed by an AWS certified
welder
2) If the A-Frame is separate from the jack, align the
jack (and foot if included) with the jack and coupler
as desired before welding. Use a 3/16” fillet weld
as shown.
3) Bolt the jack “A” plate to the coupler. Use three
3/8”-16 Grade 5 bolts. Torque nuts to 15-20 ft LBS.
4) If needed, weld a support plate to the bottom of
the trailer frame. Use a 3/36” filet weld all around.
5) If your jack is a plain mount type, it may be
mounted directly to/using a couple with a 3/16”
fillet weld all around. Align the foot (with the jack
and coupler ) as desired before welding.
3
To attach wheel assembly:
1) Ensure you have the
shoulder bolt, Caster wheel
and nut.
2) Set the wheel into the
caster body and place the bolt
through the caster body and
wheel.
3) Secure bolt with the nut
provided.
Heavy Duty Caster:
1) Jack capacity limited to
lesser of jack or caster.
2) Use 4 3/8” bolts, washers,
and locknuts as shown.
To attach a handle assembly:
1) Insert the long bolt through
handle.
2) Align flat on bolt with flat in
crank arm hole.
3) Tighten locknut to secure
crank arm to the handle.
bROK Products LLC 2840 Gilchrist RD –14B Akron OH 44305
4
Top-wind handle assembly:
1) Place the washer between
handle and screw step at top
of jack.
2) Assemble the bolt through
the handle and the screw step.
3) Attach locknut to bolt and
tighten securely.
Shoulder Bolt
Rev A

This manual suits for next models

6

Popular Jack manuals by other brands

BGS technic 2883 instruction manual

BGS technic

BGS technic 2883 instruction manual

U-Line H-1545 manual

U-Line

U-Line H-1545 manual

CLAS OH 0273 manual

CLAS

CLAS OH 0273 manual

Norco 72450A Setup, operating, maintenance instructions

Norco

Norco 72450A Setup, operating, maintenance instructions

BIG RED JACKS T82002 owner's manual

BIG RED JACKS

BIG RED JACKS T82002 owner's manual

Clarke Strong-Arm CTJ1500QULP Operating & maintenance instructions

Clarke

Clarke Strong-Arm CTJ1500QULP Operating & maintenance instructions

USAG 1955 A Original instructions

USAG

USAG 1955 A Original instructions

RODCRAFT RH216 Operator's manual

RODCRAFT

RODCRAFT RH216 Operator's manual

Sunex HD 6606 owner's manual

Sunex HD

Sunex HD 6606 owner's manual

K Tool International KTI-63500A owner's manual

K Tool International

K Tool International KTI-63500A owner's manual

Clarke STRONG-ARM VPJ300 Operating & maintenance instructions

Clarke

Clarke STRONG-ARM VPJ300 Operating & maintenance instructions

Enerpac JH Premium instruction sheet

Enerpac

Enerpac JH Premium instruction sheet

USAG 2510 C Original instructions

USAG

USAG 2510 C Original instructions

Expert E200143 manual

Expert

Expert E200143 manual

Napa 791-2300A manual

Napa

Napa 791-2300A manual

Draper 16407 instructions

Draper

Draper 16407 instructions

Motomaster 009-1032-0 instruction manual

Motomaster

Motomaster 009-1032-0 instruction manual

Challenger Lifts RJ6 Installation, operation & maintenance manual

Challenger Lifts

Challenger Lifts RJ6 Installation, operation & maintenance manual

manuals.online logo
manuals.online logoBrands
  • About & Mission
  • Contact us
  • Privacy Policy
  • Terms and Conditions

Copyright 2025 Manuals.Online. All Rights Reserved.