BROOD DRNX DUO User manual

DRNX DUO BY BROOD
MANUAL

3DRNX DUO BY BROOD
SAFETY REGULATIONS
NEVER ALLOW WATER TO COME INTO CONTACT WITH ANY OF THE ELECTRICAL PARTS OF
DRNX: THERE IS A DANGER OF CREATING A SHORT CIRCUIT.
INTENDED USE
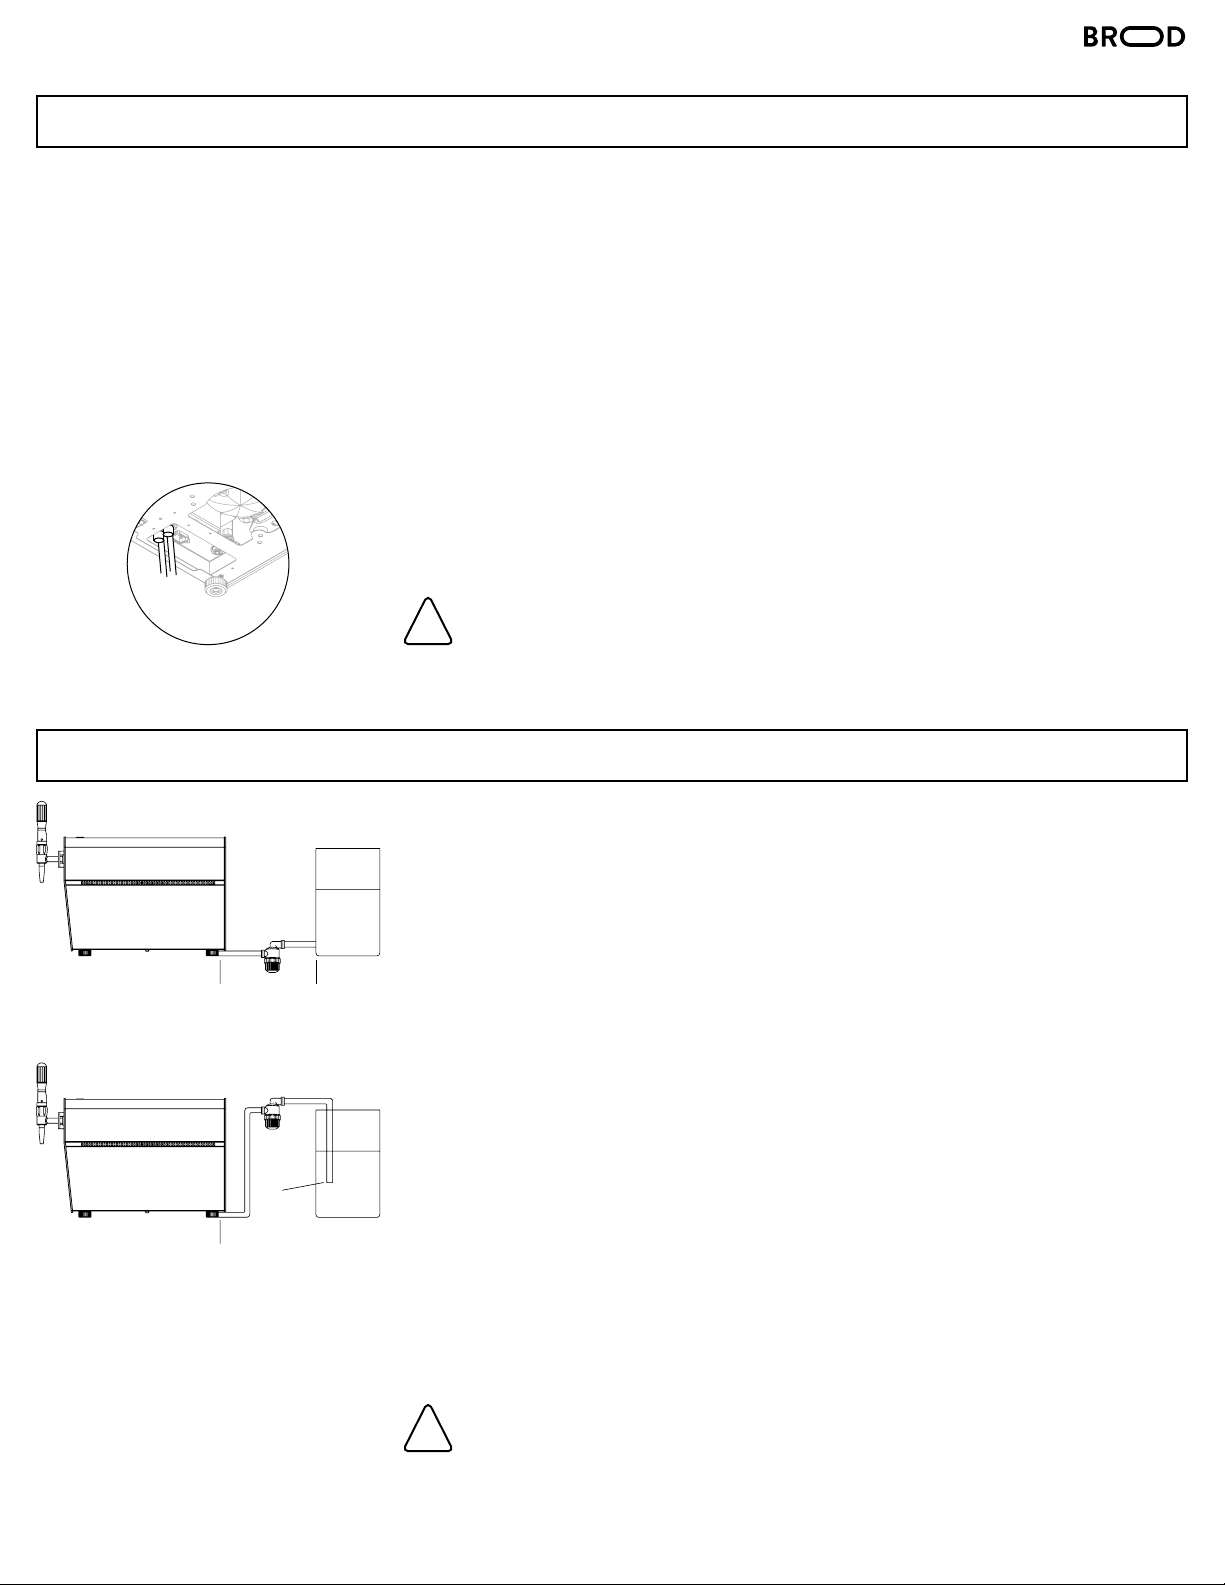
DRNX is intended to be used in cafes, restaurants, and pantries. It dispenses liquid from any non-pressurized
container by drawing liquid, infusing it with atmospheric nitrogen and chilling it to 2°C. Do not liquids that are
above room temperature or that are unfiltered. It must only be operated by a trained person. The appliance is
not to be used by persons (including children) with reduced physical, mental or sensory abilities or with scarce
experience and/or expertise, unless they are supervised by a person responsible for their safety, or they are
instructed by this person on how to properly use DRNX.
POWER SUPPLY
DRNX must be connected to the power supply in accordance with its specifications. Only connect it with the
specified supply voltage.
POWER CORD
Never use DRNX if the power cord is defective. Report any defects in the cord and/or plug to the service
provider immediately. Do not pass the power cord around corners, over sharp edges or over hot objects and keep
it away from oil. Do not use the power cord to carry or pull it. Do not pull out the plug by the power cord nor
touch it with wet hands. Do not let the power cord hang freely from tables or shelves.
FOR THE SAFETY OF OTHERS
Ensure that children cannot play with DRNX and/or the packaging materials. Observe the warning and safety
instructions on the electrical components and in this manual. Improper use of DRNX such as opening it during
operation, incorrectly operating it, or not following standard guidelines for operating electrical equipment may
lead to injury.
FIRE SAFETY PRECAUTIONS
In case of fire, use carbon dioxide (CO2) extinguishers. Do not use water or dry powder extinguishers.
SUITABLE LOCATION FOR OPERATION AND MAINTENANCE
DRNX should be installed in accordance with the safety regulations in force at the time of installation. Operate
it in an environment between 13°C and 32°C. Make sure it is a dust-free environment. Avoid placing open flames
and/or incandescent objects near it to avoid melting or other damage to the dispenser housing. If the dispenser
has been exposed to such conditions, alert the service provider who will carry out a safety check.
STORING DRNX
If DRNX is to remain inactive for a long time, turn it o and unplug it. Store it in a dry place, out of reach of
children. Make sure the storage area is between 13°C and 40°C. Keep it protected from dust and dirt.

4DRNX DUO BY BROOD
SAFETY REGULATIONS
GENERAL INFORMATION
REPAIRS / MAINTENANCE
In case of failure, problems or a suspected fault resulting from a fall, immediately remove the plug from the
power socket and alert the service provider or specialized technician. Never attempt to operate it if it is faulty.
Please report any fault to your service provider. Only the service provider and/or technician may carry out
servicing operations and repairs on DRNX, unless otherwise informed. Any repair of the dispenser must be done
only when it is switched o and it is ascertained that there is no electric current. All spare parts must be obtained
from your service provider. Follow the service and maintenance instructions in this operation manual.
USE
DRNX pulls any filtered liquid from an unpressurized container. It chills the liquid to 2°C and infuses it with
atmospheric nitrogen.
VISCOSITY OF LIQUID
Ensure that your beverage has been filtered in order not to clog the pre-filter or if that has been bypassed, not
to clog the machine. Thick liquids risk slowing down the liquid pump inside. DRNX comes with a pre-filter that is
already fitted onto the beverage tube. If the pre-filter is not attached, you can risk damaging components inside.
BEVERAGE CONTAINER
Any non-pressurized container can be used depending on what is required. We recommend using the designated
BROOD container (sold separately).

5DRNX DUO BY BROOD
COMPONENTS
1 — Tap Handle
2 — Tap Body
3 — Nozzle
4 — Exterior
5 — Inlet Connectors
6 — Main ON/OFF Switch
7 — Legs
8 — Forward Plate
9 — Rear Plate
10 — Side Panel(s)
11 — Infuser Dial
12 — Power Plug
13 — Vents/Exhaust
14 — Control Panel
15 — Beverage Tube
16 — Elbow Connectors
17 — Pre-Filter
18 — BROOD Beverage Container
19 — Inlet for Container
20 — Thermostat
21 — Calibration Knob
22 — Ventilation Valves
23 — Power ON/OFF
SPECIFICATIONS
Width: 9.75in Power Supply: 100-120V/60Hz; 200-240V/50Hz
Height: 14.75in Nominal Power: 334W
Depth: 18.25in
Weight: 73lbs
Dispensing Capacity: 1.5L/min (0.4gpm)
Coee Temp at Tap: 2°C (36°F)
2
3
4
16
14 18
19
17
16
9
13
10
8
7
5
22
15
23
6 12
20 21
1
11

6DRNX DUO BY BROOD
INSTALLATION
1. Install on a clean and dry surface.
Allow no less than 5 centimetres of space from all sides.
2. Assemble the tap handles.
3. Plug the power cord into an electrical outlet. Connect both beverage tubes
to DRNX by pushing the elbow fittings into the connections underneath
the machine.
Tilt the machine slightly if you need to. If you need to release a beverage
tube, push the metal spring next to the connection underneath.
4. Connect the beverage tubes to the pre-filters.
Make sure the arrow at the base of the pre-filter is pointing in the direction
of the flow.
WARNING: If you do not use the pre-filter, the following problem
may occur:
Blockage in the machine due to large coee particles.
Make sure all tubes are pushed firmly in place.
Connecting to the designated BROOD container.
1. Pour your beverage into the designated container.
Close the lid and push the seal.
2. Push one of the elbow fittings into the connector at the bottom of
the container. And push the other fitting into the connecter at the bottom
of the machine.
3. Make sure the arrow at the base of the pre-filter is pointing in the
direction of the flow.
Connecting to any container.
1. Pour your beverage in any container.
2. Push the elbow fitting into the connecter at the bottom of the machine.
3. Drop the loose end of your beverage tube into the container containing
your beverage.
4. Make sure the arrow at the base of the pre-filter is pointing in the direction
of the flow.
DRNX will pull from any container. If using a keg, then attach your beverage tube
to a keg coupler. If using a bag-in box, then attach your beverage tube to a bag-in-
box adaptor.
WARNING: Liquid containing solid matter cannot be used.
WARNING: Never run hot liquid above 30 °C (86 °F) through DRNX.
!
!
SETUP
CONNECT TO CONTAINER
CONNECTOR CONNECTOR
PRE-FILTER
BROOD
CONTAINER
CONNECTOR
PRE-FILTER
ANY CONTAINER
NO CONNECTION
LOOSE TUBE

7DRNX DUO BY BROOD
1. Switch on the main ON/OFF button at the bottom of the machine.
There will be a red light when the switch is on.
2. Switch on the pump ON/OFF button located at the top of the machine.
There will be a red light when the switch is on.
The pump will automatically turn o if it runs dry for one minute.
This will notify the operator that the beverage container is empty.
Simply switch the pump o, then on again to reset.
3. Place your cup beneath the stout at an angle. To pour a STILL beverage,
turn the infuser dial towards the hollowed circle. To pour a NITRO beverage,
turn the infuser dial towards the hollow circle.
Please note, if the last pour was nitro cold brew and the operator wants the
next pour to be still cold brew, there will be less than 10 mL (0.34 oz) of
nitro cold brew in the tap that will come out. Every subsequent still cold brew
pour will come out fully still, until the next nitro cold brew pour.
4. Return the tap to the start position when you have completed the pour.
Make sure the pre-filter adapter is installed in the beverage tube.
Ensure that the coee is filtered with a fineness of at least 100 μm (microns).
Not using the pre-filter risks damaging the internal components of DRNX.
OPERATION
!
STEPS
!
MAIN ON/OFF SWITCH
ON BOTTOM OF MACHINE
PUMP ON/OFF SWITCH
ON TOP OF MACHINE

8DRNX DUO BY BROOD
ADJUSTABLE SETTINGS
Locate the infuser dial at the front of the machine. Turn the dial towards the hollow circle a still drink. Turn the
dial towards the solid circle to pour a nitrogenated drink.
If the level of nitrogen infusion is too high, then follow the steps below to decrease the level of nitrogen
infusion. This is a one-time calibration process to adjust the amount of infusion at the maximum position only.
1. Locate and remove the four screws in the back panel.
2. Locate the calibration knob. Turning it clockwise will decrease the amount of nitro.
3. Return the back panel and screw it securely.
MODIFCATION OF DESIRED TEMPERATURE VALUE
Press button for at least half second, to display the setpoint value.
By keeping button pressed, use button or to set the desired value.
When button is released, the new value is stored.
If the operator sets the temperature at freezing, it runs the risk of freezing the Cold Brew. If this happens, turn
o the fridge as described in step 2. Keep o for 2 hours.
M
Info / Setpoint button.
Manual defrost / Decrease button.
Increase / Manual Activation button.
Exit / Stand-by button.
M
TEMPERATURE CONTROL
NITROGEN CALIBRATION

9DRNX DUO BY BROOD
CARE
Follow the cleaning procedures below as it is essential to both extend the life of the DRNX, and to achieve the
desired flavor of cold brew.
DRNX needs to be flushed with water every 24 hours. In addition, it must be
cleaned every week as described in the steps below.
1. Replace the cold brew in each container with clean water. Pull both taps downwards and keep them in this
position until all the cold brew is flushed out of DRNX and clean water begins to come out from the taps.
Return the taps to the idle position and switch o DRNX.
BROOD recommends the following cleaning detergent: 1-2-COLD BREW Cleaner by Urnex
1. Repeat the steps described in the above section titled “Daily Flush.”
2. Unscrew the nozzles from the taps by turning them counter-clockwise.
Please wash the nozzles with clean water.
After washing, please reassemble them onto the taps.
3. Unscrew the cover of each pre-filter by turning it counter-clockwise.
Remove the stainless steel mesh and wash with clean water.
Make sure the stainless steel mesh is not clogged.
4. 4. After this procedure is complete, switch on DRNX from the main
power source underneath.
5. Switch on the pump ON/OFF buttons.
6. Prepare the cleaning solution.
Dissolve any espresso cleaning detergent in water to create a cleaning
solution. Follow the directions outlined as per the cleaning detergent.
7. Pull the taps downward to run the solution through DRNX.
Keep pouring until all the solution has been flushed through the dispenser.
8. Fill the containers with water again and pull the tap downwards to flush
DRNX with water. Keep pouring until all the water has emptied.
Connect a 5/16″ tube to the ventilation ports (underneath the machine) and
drop the loose ends of the tubes into a container of water.
Observe water being sucked into the ventilation ports.
Only use clean water and NOT the cleaning solution for this step.
CLEAN & MAINTAIN
DAILY FLUSH
WEEKLY CLEANSE
!
!
STAINLESS STEEL
MESH
!

10DRNX DUO BY BROOD
TROUBLESHOOTING
QUICK SOLUTIONS
There is too much nitro The calibration knob is not
set correctly.
Follow steps in to decrease the level of infusion
outlined in section “Nitrogen Calibration”
There is no nitro even though it's set to
maximum.
There is a block in the spout Unscrew the spout and check to see if there is
any sediment. Remove the components inside
the spout and wash thoroughly.
Too many large bubbles Beverage tube is not pushed
in firmly.
Release the elbow fitting by pushing the spring
underneath DRNX and reconnect. If using a keg
or a Bag-in-Box make sure that the coupler is
secured firmly.
Product is not cold enough. The temperature setting is
too high.
Check to see if the main switch underneath the
machine is on. Follow the instructions in the
manual to change the temperature setting.
The cold brew in the
container is too hot.
The variance between the cold brew in your
container and at the tap is 20°C. This means
if your cold brew is 22°C (room temperature),
then the nitro cold brew at the tap will be 2°C.
Pause for a moment between
pours.
If pouring more than 1.5 litres (48oz.)
continuously and without stopping, then it
might be necessary to pause for a few minutes
for the exhaust fan to turn o until pouring a
subsequent drink.

11DRNX DUO BY BROOD
TROUBLESHOOTING
QUICK SOLUTIONS
DRNX is not pouring cold brew. The pre-filter is clogged. Unscrew the cap and check if the pre-filter is
clogged. Remove any sediment and then re-
attach.
There is no electrical power
connected to the machine
Check to see if the main switch underneath
DRNX is on. Then check to see if the pump
switch on the top of the machine is on. If either
one is o, please switch them on. If the pump
switch is flashing, switch it o then on to reset
the pump.
The pump ON/OFF switch needs to
be reset.
When your container is empty, the pump turns
o and the ON/OFF switch flashes red. Switch
it o then on to reset the pump.
The cold brew in the machine is
frozen. If the cold brew in the
external container is close to 0°C,
then the dispenser might freeze the
cold brew in the cooling block.
Disconnect the machine from its power supply.
Wait 2 hours before trying to pour again.
If DRNX is used without a pre-filter
in the beverage tube, coee particles
may get into the pump and damage
or block valves. Liquid may not be
drawn in anymore.
The machine and the pump must be flushed with
tap water.
1. Unscrew the tap nozzle.
2. Connect the beverage tube to the inlet
connector.
3. Disconnect the pre-filter.
4. Switch the machine o.
5. Attach a tube from a water main to the tap in
order to reverse flush the machine with water.
6. Re-attempt normal operation to check if the
blockage is gone.
The flow of the nitro pour
is weak
The foot of DRNX is on top of the
beverage tube
Lift the machine slightly and release the tube
from underneath the foot.
There is a kink in the beverage tube Make sure the beverage tube underneath the
machine stretches towards the back of the
machine. This means there can be no possible
kink underneath the machine.

12DRNX DUO BY BROOD
FAQ
Q. I JUST RECEIVED MY DRNX, HOW DO I SET IT UP?
A. Please follow the instruction manual that comes with DRNX. It is easy to set up!
Q. WHERE DO I PUT MY COLD BREW COFFEE OR TEA?
A. DRNX can pull cold brew from any non-pressurized container. DRNX comes with a beverage tube that clips into the
dispenser from underneath. The other end is loose so that an operator can drop it into any container. Alternatively, an
operator can attach a keg coupler, bag-in-box adaptor, or an elbow fitting to the other end of the beverage tube in order to
connect it to a keg, bag in-box, or BROOD container respectively. Please watch our instructional video on our website.
Q. I AM NOT GETTING ENOUGH CREMA, WHAT SHOULD I DO?
A. Firstly, pull the tap fully downward (90°) to trigger nitrogen infusion. Pulling it only a little bit will yield still cold brew
only. Secondly, rotate the infusion dial towards the 12 o’clock position. Thirdly, the pre-filter might be clogged and in need
of cleaning. Check our troubleshooting section.
Q. I AM GETTING LARGE BUBBLES IN MY NITRO COLD BREW, WHAT SHOULD I DO?
A. Make sure all the tubes are pushed in firmly and there is no air seepage. Observe if there are any air bubbles flowing
through the beverage tube. Air that seeps into the tubes will ultimately come out at the tap in the form of air bubbles.
This will also happen if your beverage tube is sucking in air from a loose connection. The quality of the cold brew also has a
marked eect on the size of the bubbles in the final head of the drink. The more filtered the cold brew, the smoother the
surface of the head.
Q. MY BEVERAGE IS NOT COLD ENOUGH, HOW DO I MAKE IT COLDER?
A. Follow the instructions in section “Temperature Control” on page 6 to decrease the temperature.
Q. DRNX IS NOT POURING COLD BREW, WHAT SHOULD I DO?
A. There are several reasons why this may happen. All of them are easily remedied. Please follow our troubleshooting guide
in this instruction manual.
Q. WHEN I POUR MANY GLASSES OF NITRO COLD BREW CONTINUOUSLY, THE FOURTH ONE IS
SOMETIMES SLIGHTLY LESS CHILLED THAN THE FIRST ONE. WHY IS THAT?
A. We recommend pouring for 45 seconds which is about 1 litre (32oz.) and then pausing for a few moments until the
exhaust fan switches o. This means the cold brew inside the fridge has been chilled to your desired temperature.
Q. DRNX HAS A SOUND THAT COMES AND GOES, WHY?
A. This is the sound of the exhaust fan. When this sound is heard it means that the fridge is cooling down to the pre-set
temperature. When the sound stops this means that the compressor has also stopped as the desired temperature has
been reached.
Q. I HAVE THE FRIDGE SET AT THE COLDEST POSSIBLE TEMPERATURE, BUT THE BEVERAGE IS NOT
COLD ENOUGH, WHY IS THIS?
A. The variance between the cold brew in your container and at the tap is 22°C. This means if your cold brew is 24°C (room
temperature) then the nitro cold brew at the tap will be 2°C. Never use cold brew or any other liquid that is warmer than
room temperature.
Q. DO I NEED TO KEEP A GAP AROUND THE VENTS ON THE TOP OF DRNX?
A. Yes, never cover the exhaust located on top of the machine. If covered, it may damage the compressor.

13DRNX DUO BY BROOD
WARRANTY
In order for the products to be stable, long lasting, AND covered under this manufacturer’s warranty, these requirements
must be met:
DRNX is designed to be installed in interior areas with relative humidity levels of 35%-60% and operate at temperatures
between (13°C - 32°C). DRNX must be stored at temperature between (13°C - 40°C). Prior to opening original packaging
or installation material, ensure that the spaces are enclosed and completely weatherproof, and the building temperature and
humidity conditions are consistently maintained at the indicated levels. The product MUST be stored in an environmentally
controlled space at all times. Do not store the product in direct sunlight.
THIS WARRANTY DOES NOT COVER:
• Any machine NOT distributed by BROOD Refreshments Company Ltd.
• Any machine NOT purchased from an Authorized BROOD Dealer (email us at [email protected] to check for
authorized dealers or check our website at www.drinkbrood.com).
• Damage caused by accident, abuse, negligence, or misuse.
• Improper operation or failure to follow instructions contained in the manual.
• Any service or alteration performed by an unauthorized person, company, or association.
• Damage caused by neglecting to clean and/or maintain upkeep of DRNX.
• Damage caused by use of undissolved instant coee or any other ingredients not allowed in the dispenser.
This warranty is not transferable and applies to the original purchaser only.
The warranty period begins on the delivery date. If our transportation, storage or installation instructions are not followed,
any warranty shall lapse. The warranty period is 1 year. The purchaser must inform BROOD Refreshments Company Ltd
in writing of any transportation damages without delay, but at the latest within one week of arrival of the equipment. The
purchaser must cease any processing or handling of the damaged units. BROOD does not accept any guarantee against
defects which are due to improper storage or use of the products. The storage and use of the products presuppose that full
knowledge and experience of the technology is taken into account to avoid detrimental eects on the quality and stability.
This warranty does not cover damage caused by improper maintenance or by use contrary to our recommendations. There
are no implied warranties, representations or conditions, except those required by statute, and they shall not extend beyond
the term of the warranty applicable to your purchase.
CLEANING IS A CRITICAL PART OF MAINTAINING THE LONGEVITY OF DRNX
• Prior to installation, use a clean soft cloth that has been dampened to remove dust or other foreign
materials from panel surfaces. Dirt and grit should not be allowed to build up as these may scratch the
finish during setup.
• Do not apply soap or cleaner directly to panel surfaces. Apply water to cloth and then wipe panel surfaces.
• Do not apply any solvents to panel surfaces, even by transfer from a cleaning cloth.
• Damage from solvents may not be immediately noticeable upon application. Do not use brushes to clean panels or vents
as bristles will scratch panel surfaces.
• Daily flushing of DRNX as outlined in the operation manual is required.
• Cleaning DRNX consistently is crucial to the operation and lifespan. Any negligence in daily cleaning and upkeep of
DRNX will risk damaging the machine over time. The warranty period is 1 year. Please review our warranty terms
and conditions. To make a warranty claim, please email [email protected]. For faster service, locate the model
type and serial number, and include them in your email.
The warranty period is 1 year. Please review our warranty terms and conditions.
type and serial number, and include them in your email.
!
!

14DRNX DUO BY BROOD
DECOMMISSIONING
Before placing DRNX out of service for a period longer than 2 weeks, we recommend the weekly cleanse as per
the instructions in the Care section. Store DRNX in a dust-free environment between 13°C and 40°C.
The packing materials can be recycled. Unplug the appliance and the power cord. Deliver the
appliance and power cord to a service centre or public waste disposal facility. This product
may not be treated as household waste. Instead it shall be handed over to the applicable
collection point for the recycling of electrical and electronic equipment. By ensuring this
product is disposed of correctly, you will help prevent potential negative consequences for
the environment and human health, which could otherwise be caused by inappropriate waste
handling of this product. For more detailed information about recycling of this product, please
contact your local city oce, your household waste disposal service or the shop where you
purchased the product.
STORAGE
DISPOSAL

15DRNX DUO BY BROOD
CONTACT

16DRNX DUO BY BROOD
This manual suits for next models
1
Table of contents
Popular Dispenser manuals by other brands

tatsuno
tatsuno ULTRA FN-1025 Series Instruction and maintenance manual

KWC
KWC STRATOS STRX602E Installation and operating instructions

Henkel
Henkel Loctite 97631 operating manual

Bennett
Bennett Horizon 2422FS-1 Series installation manual

FILTRENA
FILTRENA H2O My Dispenser Installation, use and maintenance handbook

Hilti
Hilti HDE 500-A22 manual