Brother MFC-5460CN User manual
USER’S GUIDE
MFC-5460CN

i
EC Declaration of Conformity under the R & TTE
Directive

ii
Table of Contents
Section I General
1 General Information 2
Using the documentation .......................................................................................2
Symbols and conventions used in the documentation ....................................2
Control panel overview ..........................................................................................3
2 Loading documents and paper 5
Loading documents ...............................................................................................5
Using the ADF .................................................................................................5
Loading paper, envelopes and other media .........................................................6
Loading paper and other media.......................................................................6
3 General setup 8
Power Save mode .................................................................................................8
Putting your machine in Power Save mode.....................................................8
Bringing your machine out of Power Save mode ............................................8
Power Save setting..........................................................................................8
Mode Timer............................................................................................................9
Paper settings........................................................................................................9
Paper Type ......................................................................................................9
Paper Size .......................................................................................................9
Volume Settings...................................................................................................10
Ring Volume ..................................................................................................10
Beeper Volume..............................................................................................10
Speaker Volume ............................................................................................10
Automatic Daylight Savings Time........................................................................10
LCD display .........................................................................................................10
LCD Contrast.................................................................................................10

iii
Section II Fax
4 Sending a fax 12
Entering Fax mode ..............................................................................................12
Faxing from the ADF ....................................................................................12
Faxing from the scanner glass ......................................................................12
Faxing Letter size documents from the scanner glass ..................................12
Colour fax transmission.................................................................................12
Broadcasting (Monochrome only)........................................................................13
Cancelling a Broadcast in progress...............................................................13
Additional sending operations..............................................................................13
Sending faxes using multiple settings ...........................................................13
Checking and cancelling waiting jobs............................................................13
5 Receiving a Fax 14
Receive modes....................................................................................................14
Choosing the Receive Mode .........................................................................14
Using receive modes ...........................................................................................15
Fax only.........................................................................................................15
Fax/Tel...........................................................................................................15
Manual...........................................................................................................15
External TAD .................................................................................................15
Receive mode settings ........................................................................................15
Ring Delay .....................................................................................................15
F/T Ring Time (Fax/Tel mode only)...............................................................15
Fax Detect .....................................................................................................15
6 Telephone and External devices 16
Voice Operations .................................................................................................16
Tone or pulse.................................................................................................16
Fax/Tel mode ................................................................................................16
Fax/Tel mode in Power Save condition.........................................................16
Telephone services..............................................................................................17
Setting the Phone Line Type .........................................................................17
Connecting an external TAD (telephone answering device)................................17
Connections...................................................................................................18
Recording an outgoing message (OGM) on an external TAD.......................18

iv
7 Dialling and storing numbers 19
How to Dial ..........................................................................................................19
Manual dialling...............................................................................................19
Speed-Dialling ...............................................................................................19
Search ...........................................................................................................19
Fax Redial .....................................................................................................20
Storing numbers ..................................................................................................20
Storing a pause .............................................................................................20
Storing Speed-Dial numbers .........................................................................20
Setting up groups for broadcasting................................................................21
8 Printing Reports 22
Fax reports...........................................................................................................22
Transmission Verification Report...................................................................22
Fax Journal (activity report) ...........................................................................22
Reports ................................................................................................................22
How to print a report ......................................................................................22
Section III Copy
9 Making copies 24
How to copy .........................................................................................................24
Entering Copy mode......................................................................................24
Making a single copy .....................................................................................24
Making multiple copies ..................................................................................24
Copy keys............................................................................................................25
Copy options..................................................................................................25
Section IV Direct Photo Printing
10 Printing photos from a memory card 28
PhotoCapture Center™ Operations.....................................................................28
Scanning to a memory card without a PC .....................................................28
Using memory cards......................................................................................28
How to print from a memory card ........................................................................29
Printing the thumbnail index ..........................................................................29
Printing Images..............................................................................................29
DPOF printing................................................................................................30
Borderless printing.........................................................................................31
Scan to Card........................................................................................................31
Changing the image quality ...........................................................................32
Changing the black & white file format ..........................................................32
Changing the colour file format......................................................................32

v
11 Printing photos from a camera with PictBridge 33
Before Using PictBridge.......................................................................................33
PictBridge requirements ................................................................................33
Section V Appendixes
A Safety and Legal 36
Choosing a location.............................................................................................36
To use the machine safely...................................................................................37
Important safety instructions..........................................................................41
IMPORTANT - For your safety ......................................................................42
LAN connection .............................................................................................42
EU Directive 2002/96/EC and EN50419........................................................43
Legal limitations for copying ..........................................................................43
Trademarks ...................................................................................................44
B Troubleshooting and Routine Maintenance 45
Troubleshooting...................................................................................................45
If you are having difficulty with your machine................................................45
Error messages .............................................................................................51
Document jam ...............................................................................................54
Printer jam or paper jam................................................................................55
Dial Tone detection........................................................................................56
Phone line interference..................................................................................57
Routine maintenance...........................................................................................57
Replacing the ink cartridges ..........................................................................57
Cleaning the scanner.....................................................................................59
Cleaning the print head .................................................................................60
Checking the print quality ..............................................................................60
Checking the printing alignment ....................................................................61
Packing and shipping the machine......................................................................61
C Menu and Features 63
Menu keys ...........................................................................................................63
Entering Text .......................................................................................................64
D Specifications 65
General................................................................................................................65
Consumable items...............................................................................................67
EIndex 68

vi


2
1
Using the
documentation 1
Thank you for buying a Brother machine!
Reading the documentation will help you
make the most of your machine.
Symbols and conventions
used in the documentation 1
The following symbols and conventions are
used throughout the documentation.
General Information 1
Bold Bold typeface identifies specific
keys on the machine’s control
panel.
Italics Italicized typeface emphasizes
an important point or refers you
to a related topic.
Courier
New
Text in the Courier New font
identifies messages on the
LCD of the machine.
Warnings tell you what to do to
prevent possible personal injury.
Electrical Hazard icons alert you to
possible electrical shock.
Hot Surface icons warn you not to
touch machine parts that are hot.
Cautions specify procedures you
must follow or avoid to prevent
possible damage to the machine or
other objects.
Notes tell you how you should
respond to a situation that may arise
or give tips about how the operation
works with other features.
Improper Setup icons alert you to
devices and operations that are not
compatible with the machine.
General Information
3
1
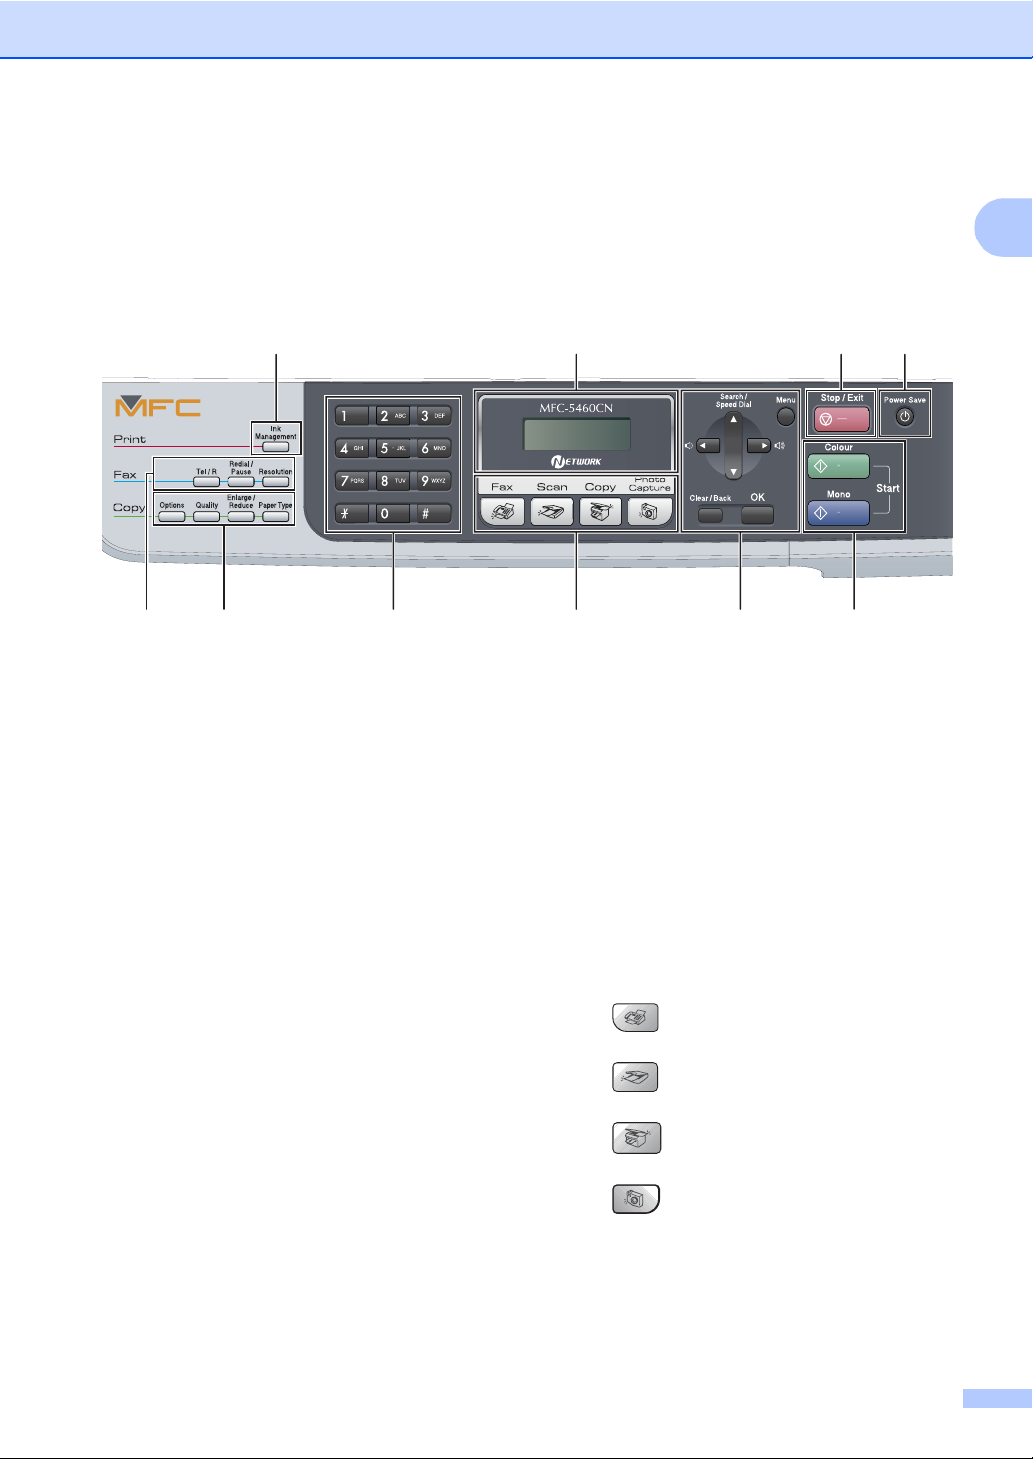
Control panel overview1
1 Fax keys:
Tel/R
This key is used to have a telephone
conversation after picking up the external
handset in F/T pseudo-ringing.
Also, use this key to gain access to an
outside line, or transfer a call to another
extension when it is connected to a PBX.
Redial/Pause
Redials the last number called. It also
inserts a pause when programming a quick
dial numbers.
Resolution
Lets you temporarily change the resolution
when sending a fax.
2 Copy keys (Temporary settings):
Options
Lets you temporarily change multiple copy
settings when in copy mode.
Quality
Lets you temporarily change the quality
setting.
Enlarge/Reduce
Lets you temporarily enlarge or reduce
copies depending on the ratio you choose.
Paper Type
Lets you choose which type of paper you
want to use for the next copy.
3DialPad
Use these keys to dial telephone and fax
numbers and as a keyboard for entering
information into the machine.
The #key lets you temporarily switch the
dialling mode during a telephone call from
Pulse to Tone.
4 Mode keys:
Fax
Lets you access Fax mode.
Scan
Lets you access Scan mode.
Copy
Lets you access Copy mode.
PhotoCapture
Lets you access PhotoCapture Center™
mode.
1
10 9 87
24563

Chapter 1
4
5 Menu keys:
Menu
Lets you access the main menu.
aSearch/Speed Dial
Lets you look up and dial numbers that are
stored in the memory.
Volume keys
dc
In Fax mode, you can press these keys to
adjust the ring volume.
d
Press to scroll backward to a menu
selection.
aor b
Press to scroll through the menus and
options.
Clear/Back
Press to cancel the current setting.
OK
Lets you choose a setting.
6 Start keys:
Colour Start
Lets you start sending faxes or making
copies in full colour. Also lets you start a
scanning operation (in colour or mono,
depending on the scanning setting in the
ControlCenter software).
Mono Start
Lets you start sending faxes or making
copies in monochrome. Also lets you start a
scanning operation (in colour or mono,
depending on the scanning setting in the
ControlCenter software).
7 Power Save
Lets you put the machine into Power Save
mode.
8Stop/Exit
Stops an operation or exits from a menu.
9 LCD (liquid crystal display)
Displays messages on the screen to help you
set up and use your machine.
10 Ink Management
Lets you clean the print head, check the print
quality, and check the available ink volume.
5
2
2
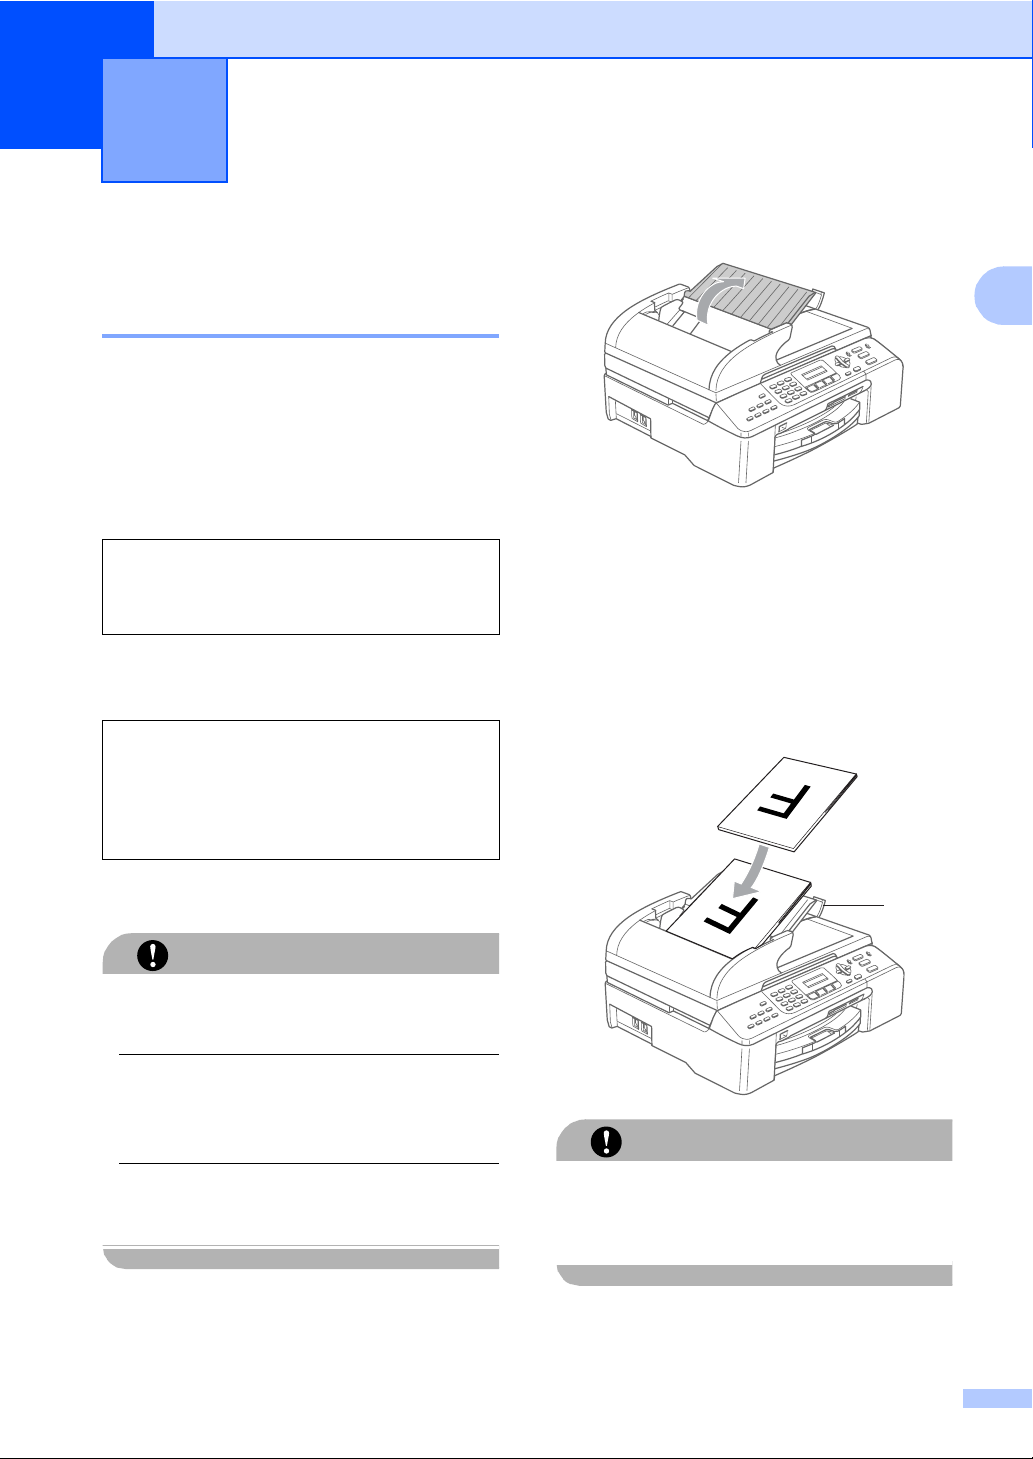
Loading documents 2
Using the ADF 2
The ADF can hold up to 35 pages and feeds
each sheet individually. Use standard
80 g/m2(20 lb) paper and always fan the
pages before putting them in the ADF.
Recommended environment 2
Document Sizes Supported 2
How to load documents 2
CAUTION
DO NOT pull on the document while it is
feeding.
DO NOT use paper that is curled, wrinkled,
folded, ripped, stapled, paper clipped,
pasted or taped.
DO NOT use cardboard, newspaper or
fabric.
Make sure documents written with ink are
completely dry.
aUnfold the ADF Document Support.
bFan the pages well. Make sure you put
the documents face up, top edge first
in the ADF until you feel them touch the
feed roller.
cAdjust the paper guides to fit the width of
your documents.
dUnfold the ADF Document Output
Support Flap (1).
CAUTION
DO NOT leave thick documents on the
scanner glass. If you do this, the ADF may
jam.
Loading documents and paper 2
Temperature: 20 to 30°C (68 to 86°F)
Humidity: 50% to 70%
Paper: 80 g/m2A4 (20 lb LTR)
Length: 148 to 355.6 mm
(5.8 to 14 in.)
Width: 148 to 215.9 mm
(5.8 to 8.5 in.)
Weight: 64 to 90 g/m2(17to24lb)
1
Chapter 2
6
Loading paper,
envelopes and other
media 2
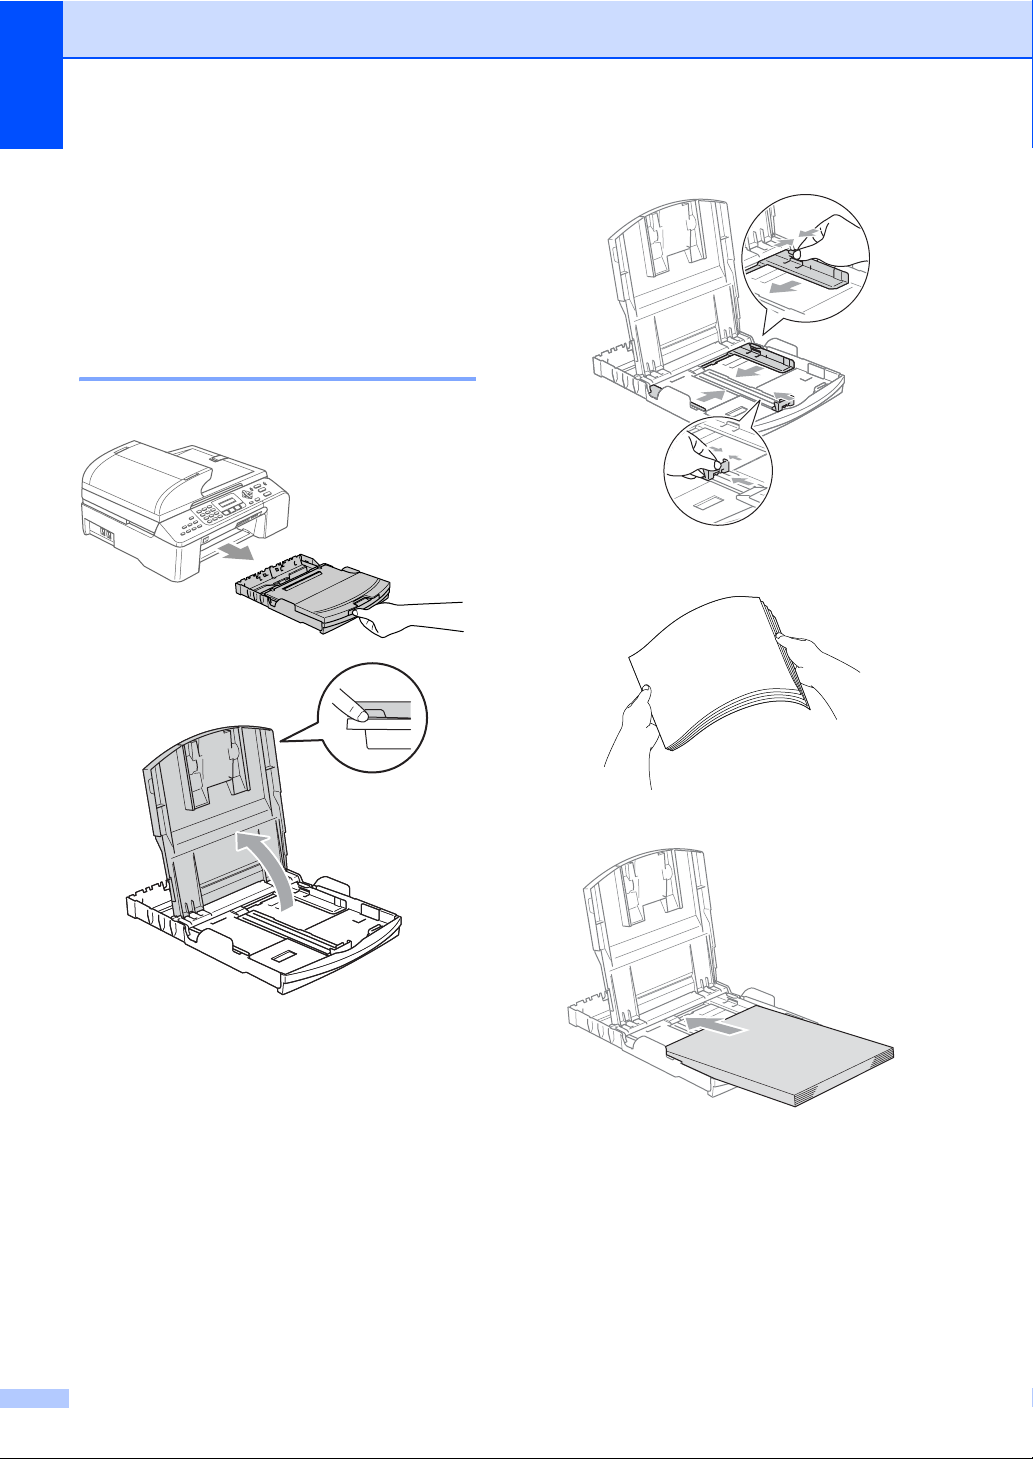
Loading paper and other
media 2
a
b
c
d

Loading documents and paper
7
2
Note
When you use Legal size paper, press
and hold the universal guide release
button as you slide out the front of the
paper tray.
eGently adjust the paper side guides with
both hands to fit the paper.
Note
Be careful that you do not push the paper
in too far; it may lift at the back of the tray
and cause feed problems.
fClose the output paper tray cover.
g
h

8
3
Power Save mode 3
Putting your machine in
Power Save mode 3
aPress and hold down the Power Save
key until the LCD shows
Shutting Down.
The LCD light goes off.
Bringing your machine out of
Power Save mode 3
aPress and hold down the Power Save
key until the LCD shows Please Wait.
The LCD shows the date and time.
Power Save setting 3
You can customize the machine's
Power Save key.
aPress Menu, 1, 6.
bPress aor bto choose
Fax Receive:On, or
Fax Receive:Off.
Press OK.
cPress Stop/Exit.
1Should be set before you switch off the machine.
2You cannot receive a fax automatically even if you
have set the receive mode to Fax/Tel.
General setup 3
On/Off
setting
Receive
mode
Available operations
Fax Receive:
On
(default)
Fax Only
External
TAD
Fax Receive
Fax Detect
Delayed Fax 1
Remote Fax Options 1
Remote Retrieval 1
You cannot receive
a fax with
Mono Start or
Colour Start.
Manual
Fax/Tel 2
Fax Detect
Delayed Fax 1
You cannot receive
a fax with
Mono Start or
Colour Start.
Fax Receive:
Off
— Nomachineoperations
will be available other
than cleaning the print
head.

General setup
9
3
Mode Timer 3
You can change the amount of time the
machine takes after the last Scan, Copy or
PhotoCapture operation before it returns to
Fax mode.
aPress Menu, 1, 1.
bPress aor bto choose 0 Sec,
30 Secs, 1 Min, 2 Mins, 5 Mins or
Off.
Press OK.
cPress Stop/Exit.
Paper settings 3
Paper Type 3
aPress Menu, 1, 2.
bPress aor bto choose Plain Paper,
Inkjet Paper, Brother Photo,
Other Photo or Transparency.
Press OK.
cPress Stop/Exit.
Paper Size 3
aPress Menu, 1, 3.
bPress aor bto choose Letter,
Legal, A4, A5 or 10x15cm.
Press OK.
cPress Stop/Exit.

Chapter 3
10
Volume Settings 3
Ring Volume 3
While in Fax mode , press dor c
to adjust the volume level.
Setting the Ring Volume from the
menu 3
aPress Menu, 1, 4, 1.
bPress aor bto choose Off, Low, Med
or High.
Press OK.
cPress Stop/Exit.
Beeper Volume 3
aPress Menu, 1, 4, 2.
bPress aor bto choose Off, Low, Med
or High.
Press OK.
cPress Stop/Exit.
Speaker Volume 3
aPress Menu, 1, 4, 3.
bPress aor bto choose Off, Low, Med
or High.
Press OK.
cPress Stop/Exit.
Automatic Daylight
Savings Time 3
aPress Menu, 1, 5.
bPress aor bto choose On or Off.
Press OK.
cPress Stop/Exit.
LCD display 3
LCD Contrast 3
aPress Menu, 1, 7.
bPress aor bto choose Light or
Dark.
Press OK.
cPress Stop/Exit.


12
4
Entering Fax mode 4
To enter fax mode, press (Fax), and
the key will glow green.
Faxing from the ADF 4
aMake sure you are in Fax mode .
bPut the document face up in the ADF.
cDial the fax number.
dPress Mono Start or Colour Start.
The machine starts scanning the
document.
Faxing from the scanner glass
4
aMake sure you are in Fax mode .
bLoad your document on the scanner
glass.
cDial the fax number.
dPress Mono Start or Colour Start.
If you press Mono Start, the
machine starts scanning the first
page. Go to step e.
If you press Colour Start, the
machine starts sending the
document.
eDo one of the following:
To send a single page, press 2to
choose No (or press Mono Start
again).
The machine starts sending the
document.
To send more than one page, press
1to choose Yes and go to step f.
fPut the next page on the scanner glass.
Press OK.
The machine starts scanning the page.
(Repeat step eand step ffor each
additional page.)
Faxing Letter size documents
from the scanner glass 4
aMake sure you are in Fax mode .
bPress Menu, 2, 2, 0.
cPress aor bto choose Letter.
Press OK.
dPress Stop/Exit.
Colour fax transmission 4
Your machine can send a colour fax to
machines that support this feature.
Sending a fax 4

Sending a fax
13
4
Broadcasting
(Monochrome only) 4
aMake sure you are in Fax mode .
bLoad your document.
cEnter a number. Press OK.
You can use either a Speed-Dial, a
Group, or a manually entered number
using the dial pad.
dRepeat step cuntil you have entered
all the fax numbers you wish to
broadcast to.
ePress Mono Start.
Cancelling a Broadcast in
progress 4
aPress Menu, 2, 6.
The LCD will show the fax number being
dialled.
bPress OK.
The LCD will show the job number.
XXXXXXXXX
1.Clear 2.Exit
cPress 1to clear.
The LCD will then show the Broadcast
job number and 1.Clear 2.Exit.
dTo cancel the Broadcast, press 1.
ePress Stop/Exit.
Additional sending
operations 4
Sending faxes using multiple
settings 4
aMake sure you are in Fax mode .
bLoad your document.
cChoose a setting you want to change.
Press OK.
dChoose one of the options below:
Next
1.Yes 2.No
Press 1to change another setting.
Press 2when you have finished
choosing your settings.
eSend the fax as usual.
Checking and cancelling
waiting jobs 4
aPress Menu, 2, 6.
Any waiting jobs appear on the LCD.
bPress aor bto scroll through the jobs
and choose the job you want to cancel.
Press OK.
cDo one of the following:
Press 1to cancel it.
Press 2to exit without cancelling.
dWhen you have finished, press
Stop/Exit.
Other manuals for MFC-5460CN
5
Table of contents
Other Brother Office Equipment manuals


