BRP FLINT RADIANT User manual

FLINT RADIANT GOGGLES
USER GUIDE

1
USER GUIDE
FLINT RADIANT
ENGLISH _

2
FLINT RADIANTGoggles
CONGRATULATIONS!
You have made an excellent choice withthe BRP FLINT Radiant goggles.
If properly cared for, we trust you will enjoy seasons of satisfaction
from these specially designed products.
You can feel secure in the knowledge that you now own quality goggles
that is designed to provide high standards of performance –on long
journeys–andthat will giveyoua greatdealof pleasureat the sametime.
Please take the time to read through this guide carefully so that your
goggles protect you properly when riding your vehicle. To ensure that you
do not overlook any aspect of the guide that is relevant to your safety, we
recommend that youreadit in theorder in which it appears.
BRP wishyouasaferide.

3
CONTENTS
A. GENERAL INSTRUCTIONS ........................................... 4
•SAFETY INFORMATION................................................................................... 4
• MINIMAL REQUIREMENT................................................................................. 4
B. THE GOGGLES .............................................................. 5
•ANATOMY ......................................................................................................... 5
•FEATURES........................................................................................................ 5
C. INSTALLATION .............................................................. 5
•CONNECTION TO VEHICLE............................................................................. 5
•NOSE GUARD................................................................................................... 6
•RADIANT LENS................................................................................................. 6
•GOGGLES CONNECTION................................................................................ 8
D. TROUBLESHOOTING.................................................. 10
E. ACCESSORIES AND SPARE PARTS.......................... 10
•ACCESSORIES ............................................................................................... 10
•SPARE PARTS................................................................................................ 11
F. BRP SERVICE............................................................... 11
•REPAIR SERVICE........................................................................................... 11
•WARRANTY..................................................................................................... 11
G. HOW TO CONTACT US............................................... 11

4
A. GENERAL INSTRUCTIONS
•SAFETY INFORMATION
These goggles are backed by the BRP warranty and a network of
authorized dealers and distributors ready to provide the parts, service or
accessories that you may require. Genuine BRP parts should be used for
replacement tomaintainthe warranty, consult an authorizedBRPdealer.
Use this User Guide to acquaint yourself with your new goggles and its
various functions. Make sure you read and understand the contents of this
guide and keep it for future reference. The information and components
descriptions contained in this guide are accurate at time of publication.
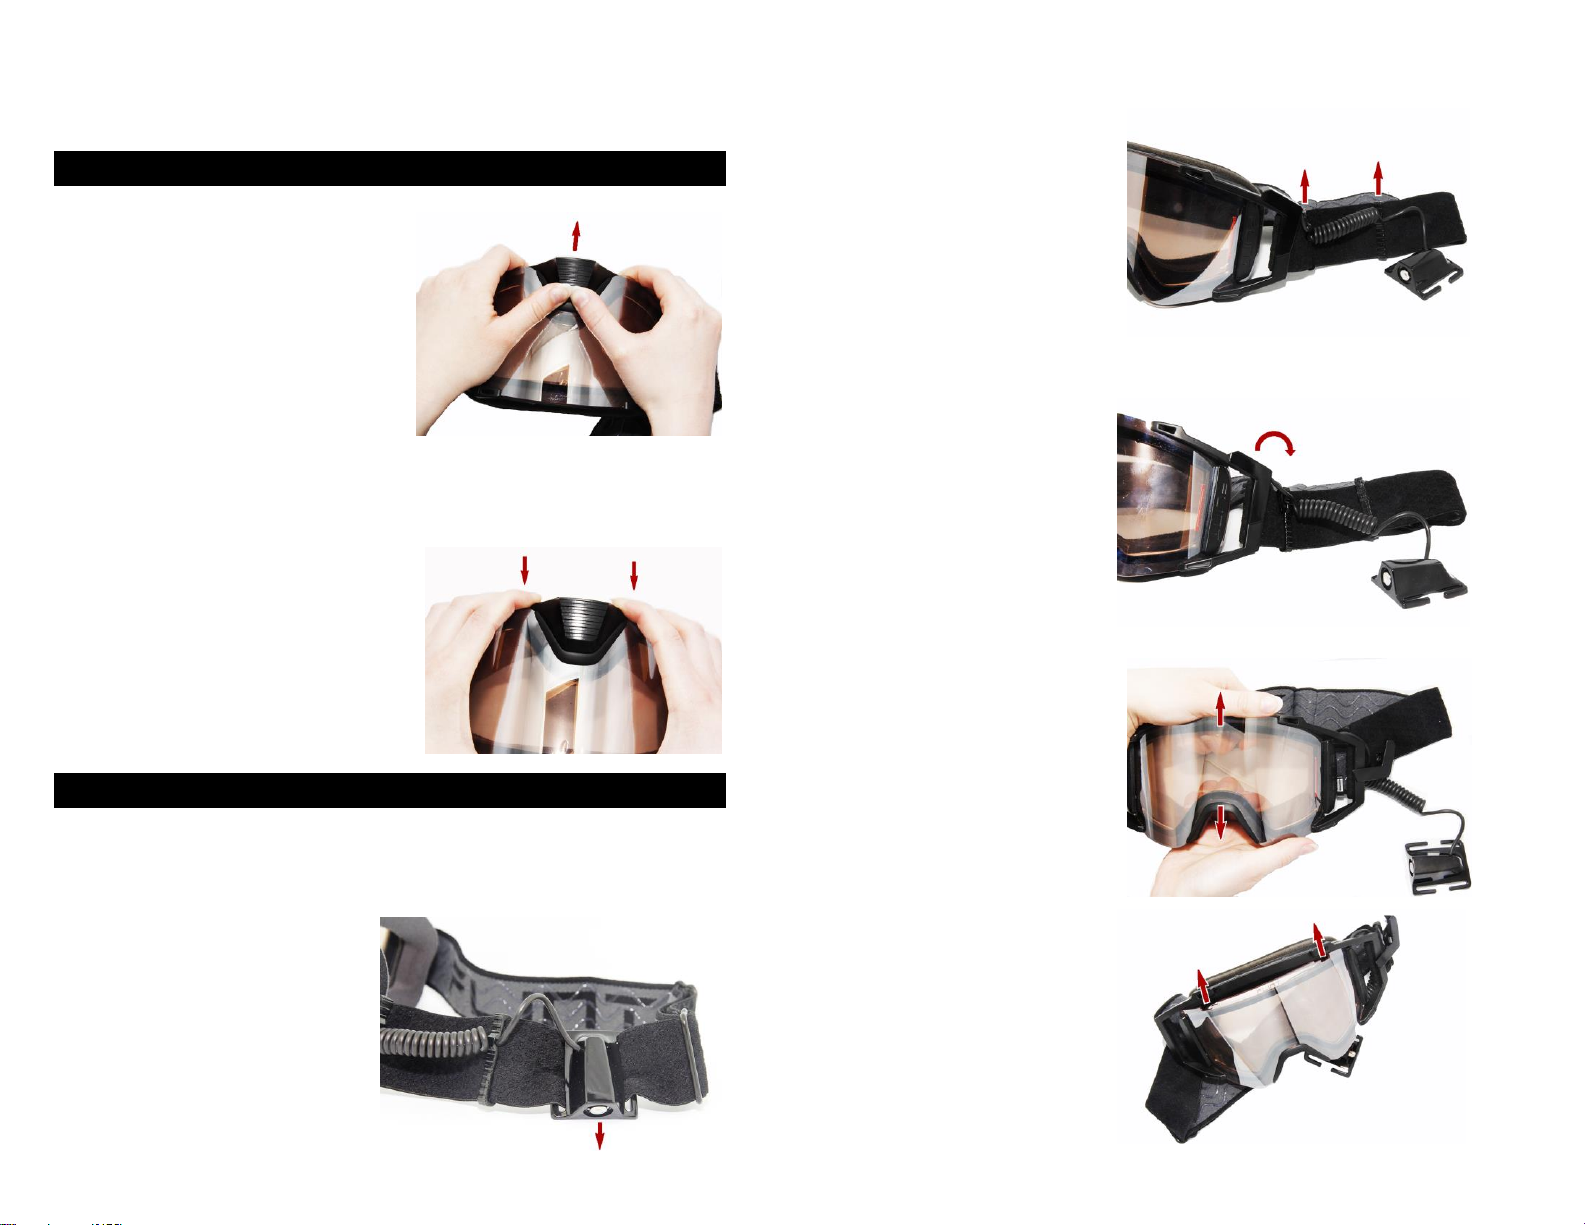
The illustrations in this document may not show the typical construction of
the different assemblies or may not reproduce the full detail or exact
shape of the parts shown, however, they represent parts which have the
same or asimilarfunction.
This guide uses the following safety alert symbols in conjunction with
signal words to indicate a potentialpersonal injury hazard.
WARNING
Indicates a hazardous situation which, if not avoided, could result in
deathorseriousinjury.
NOTICE
Address practices notrelatedto personalinjury.
Simply reading this guide will not eliminate hazards. The user must
understand and follow the instructions. Because of its ongoing
commitment to product quality and innovation, BRP reserves the right at
any time to discontinue or change specifications, designs, features or
equipment without incurring obligation. If anyone seeks to translate any
portion of this guide into any language, this person must ensure that the
translationisaccurate.
These goggles are intended for recreational off-road use only to reduce
wind, dust,andsmalldebrisfromcontact with eyes.
WARNING
These goggles are not designed for use as safety goggles and will not
protect youfromimpactswith hardobjects.Pleaseride safely.
•MINIMAL REQUIREMENT
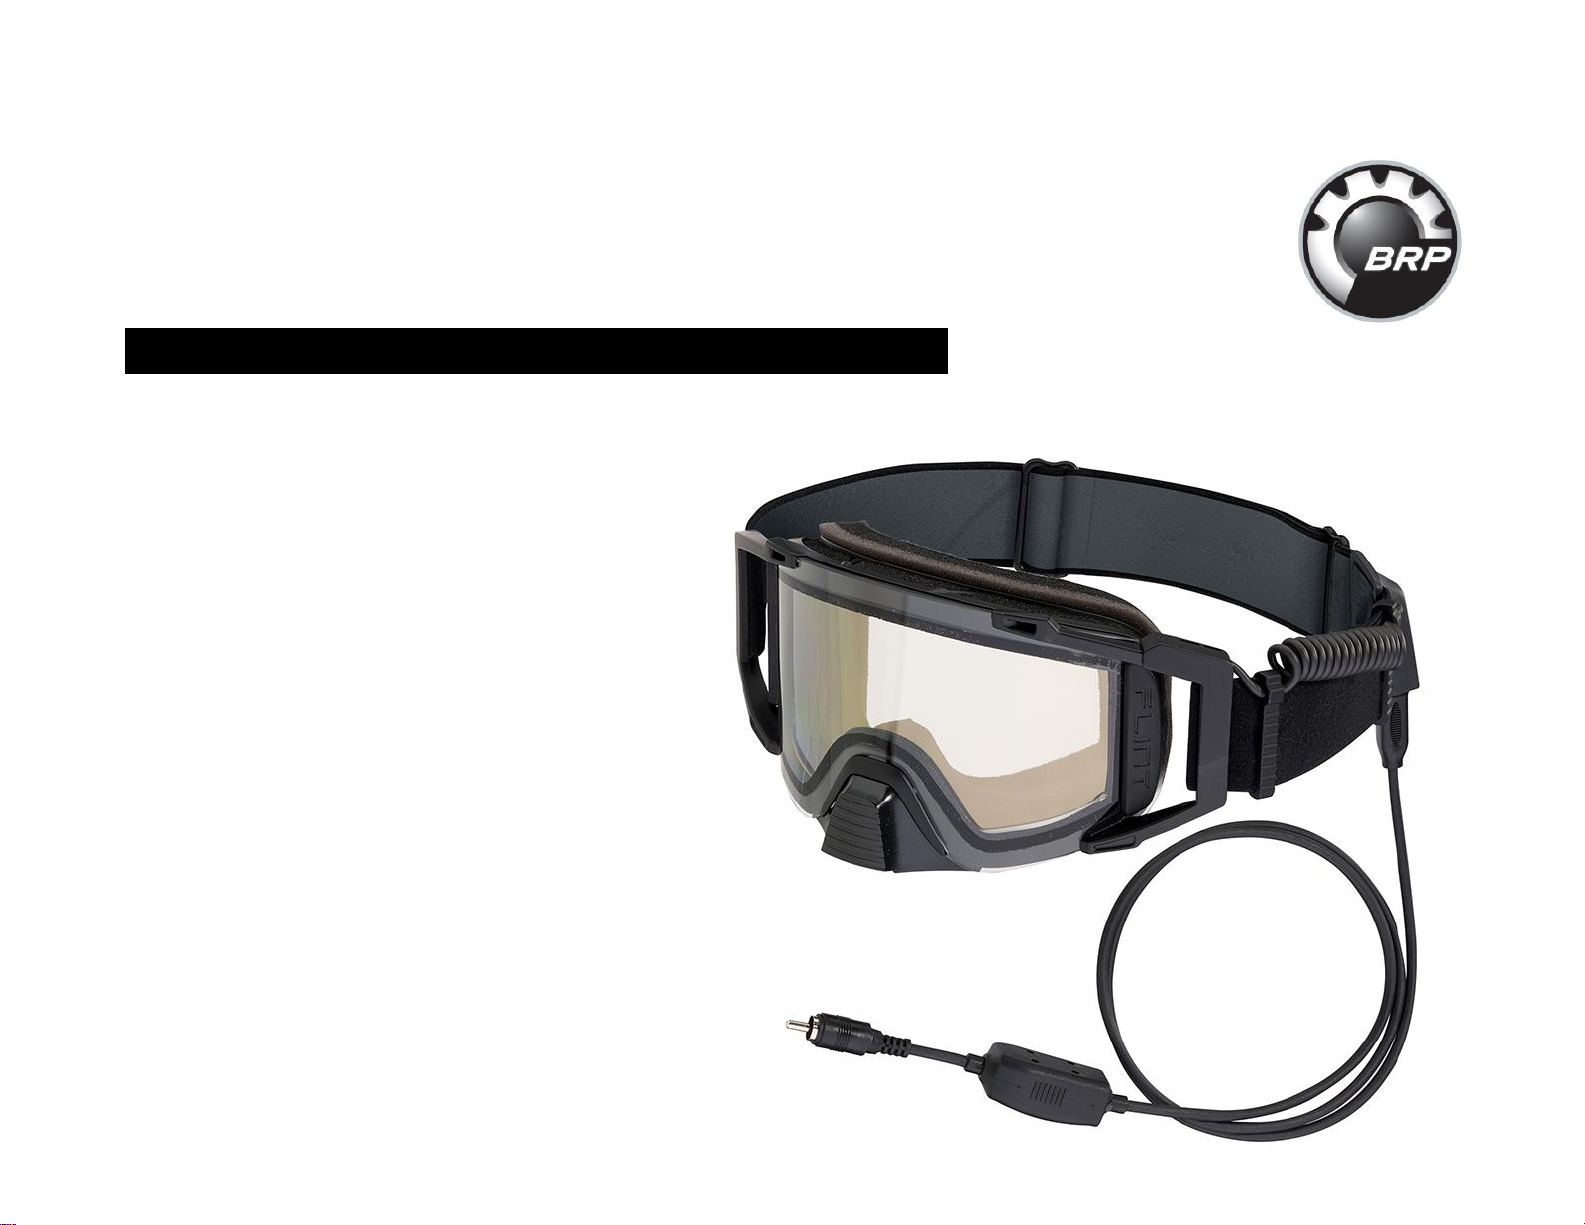
Your new FLINT Radiant goggles is equipped with electrified features
such as a heated lens who require to be operated on a 12VDC power
source.
WARNING
Always use the heated lens with the power cable with integrated
regulator to make sure the power is reduced to 7.4VDC. Using the
heated lens directly on a 12VDC power source would greatly reducethe
device’slifetime.
Note: Your vehicle power capacity (i.e.: generator, battery, etc.) combined
to the number of accessories installed (i.e.: heated seat, auxiliary light,
etc.) may affect the performance of the goggles. Please consult an
authorized BRP dealer and distributors at anytime for help andsupporton
that.
WARNING
It is extremely important that you do not splice this electrical lens into
other electric accessories, such as handlebar heaters to avoid any
overloadonother circuits.

5
B. THE GOGGLES
•ANATOMY
•FEATURES
•Durableheated lens that will withstand variable lowtemperatures.
•Anti-fog inner lens with the most effectiveanti-fogtechnology available.
•LEDlight indicatorshowsyou whenyou’reconnectedand powered.
C. INSTALLATION
•CONNECTION TO VEHICLE
1. BRP strongly recommend that the installation on the vehicle should be
made by an authorized BRP dealer so that he can refer to the owner
manual of the vehicle and determine the best connection point for hook
up.
2. If connected directly on the battery of the vehicle, please use a genuine
BRPpowercord.(Notincluded in thiskit)
3. Secure excess power cord to an accessible part of thesteering column,
awayfrommovingparts. Usenylonties.
4. Connect thecordstogether as shownbelow.
Before use, always inspect the power cord and make sure it is in good
operatingcondition.
WARNING
If any damage to the cables is noticed, do not use it. Replace the cables
immediately by a genuine BRP cables kit. Do not let power cables get
caught on or run over by vehicle. Make sure the cables are still away
from all moving parts. Failure to adhere to these warnings may result in
serious injuries or death.

6
C. INSTALLATION
•NOSE GUARD
REMOVAL
1. Press down firmly on the bridge of
the nose guard with your thumbs
while holding the bottom of the
goggles.
INSTALLATION
1. Align the3insertswith thegoggles’matchingholes.
2. Press firmly on the nose guard’s
sides with your fingers while holding
the top of the googles with your
thumbs.
•RADIANT LENS
REMOVAL
1. Removethe noseguard.
2. Unhook the RCA connector
from the strap. Start with the
bottom of the RCAconnector.
3. Unhook the cable from the
strap.
4. Open holding bracket to
unhookthecable.
5. Pull on the top and bottom of
the goggles from the inside to
unhookthe top of the lens.
6. Pull the top of the lens on top
of the goggles’branch and pull
the top of the lens to unhook the
bottom.

7
C. INSTALLATION
7. Pull in the center of the lens
to unhookthenosearea.
8. Pull the cable from under the
branch tothelens’side.
9. Pass the RCA connector
under the branch. Cable side
first.
INSTALLATION RADIANT LENS
1. Pass the RCA connector under
thebranch. Cable sidefirst.
2. Slide the lens’left side in its
place.
3. Slide the lens’right side (cable
side) in itsplace.
4. Clip goggles’nose area on
lens. Make sure the lens is in the
nose’sslit.

8
C. INSTALLATION
5. Place the cable in the holding
bracket and close the holding
bracket.
6. Hook the cable on the strap
each side of the coiled cable
section. Leave some slack in the
cable forthestrap’smotion.
7. Hook the RCA connector on
thestrap,cablesidefirst.
8.Installthenoseguard.
•GOGGLES CONNECTION
1. Take the goggles side of the
power cable. Sides are written on the
regulator.
2. Connect the power cable’s
goggles side in the RCA connector
withthearrowfacing up.
3. Lock by rotating a quarter turn
thepowercable.
4. Connect the power cable’s
source side in the power cable
(vehicle side).
5. Connect the power cable (vehicle side) in the accessory port of the
vehicle
6. Verify theconnection withthe lit LEDlight indicator.

9
C. INSTALLATION
If your jacket is equipped with cable passes-through, route the power
cable (goggles side) and power cable (vehicle side) in your riding coat as
shown below:
WARNING
The goggles use a regulator which becomes HOT when connected. Do
not put in direct contact with skin. Make sure to have a piece of fabric
betweenregulator andskin.
NOTICE
Never use petroleum based chemicals, solvents, gasoline, cleaning
agents or adhesives to cleanthe goggles and all its components as they
maybeseriously damaged by theuseof suchproducts.
Please take note that scratches to the lens once worn are considered
normal wear and tear and will not be considered for warranty
replacement orcredit.

10
D. TROUBLESHOOTING
E. ACCESSORIESAND SPARE PARTS
You will find a summary of all available accessories and spare parts on
internet at www.brp.com
WARNING
For safety reasons, all accessories and/or spare parts should be
replacedby an authorizedBRP dealer only.
•ACCESSORIES
Original BRP accessories are available at your dealer. To find BRP
dealers in your area, use the dealer search on the BRP website:
www.brp.com
PART NAME
PART
NUMBER
VEHICLE
PART
VEHICLERCA
POWER OUTLET
860201283
REV(G4)
860201234
REV-XP
REV-XR
REV-XU
TUNDRA
REV-XM
REV-XS
RCA
ADAPTATOR
PLUGKIT
515176794
NA
FUSED
ELECTRICWIRE
4478520090
NA
PROBLEM
ACTION
GOGGLES
ARE NOT
POWERED
LED LIGHT
INDICATOR
STAYS OFF
Make sure your goggles are properly connected.
1. Check if your power cable is damaged.
Replace it if necessary.
2. Check if you are properly connected to your vehicle or
another power source. If you are connected to your vehicle,
check the fuse on your vehicle.
Replace it if necessary.
3. Load shedding might happen on some vehicles, run the
engine at higher RPM (Rotation Per Minutes) just a few
seconds, it should turn ON the LED light indicator.
If the problem is still not resolved, go to your authorized BRP
dealer for detailed inspection.
FOG ON THE
LENS
1. Check if the heated lens has been damaged.
Replace it if necessary.
2. Disconnect the heated lens and check the electrical
connection integrity at the strap RCA connector.
Clean them if necessary.
If the problem is still not resolved, go to your authorized BRP
dealer for detailed inspection.
THE INNER
LENS
SEEMS HAZY
1. In unusual circumstances, a haze may appear on the surface
of the anti-fog coating.
This can be easily removed and never reappear by following
these steps:
a. Moisten a soft cloth with warm soapy water.
b. Gently clean and let air dry.
c. Let air dry without trying to rub dry.
d. Repeat if necessary.
2. If the problem is still not resolved, check if the haze seems to
be between the two lenses.
If this is the case, go to your authorized BRP dealer for
detailed inspection.

11
E. ACCESSORIES AND SPARE PARTS
•SPARE PARTS
Original BRP parts are available at your dealer. To find BRP dealers in
your area, use the dealer search on the BRPwebsite: www.brp.com
Flint Goggles Nose Guard
• 4487600090
Flint Radiant Electric Dual Lens
• 4487660036
Flint Radiant RCA Power CablesKit
•4487680090
F. BRP SERVICE
•REPAIR SERVICE
The FLINT Radiant Goggles are a BRP quality product that has been
designed and manufactured using the latest development and production
methods. If a repair to your goggles is necessary, please consult your
dealer.
If BRP receive an order from a customer to carry out a repair without a
clear description of the fault, BRP is entitled to examine the item and/or
delay completionoftheorder untilthe customerhas been consulted.
Even where a clear description of the original fault has been provided, if
BRP discover further faults during the repair, BRP is entitled, but not
obliged, to rectify these without a specific order if this is necessary to
restore the correct functioning of the goggles and the cost of this is low in
relation to the original repair job. Otherwise, BRP will seek the agreement
ofthecustomer.
•WARRANTY
BRPprovideswarrantyforpurchasedequipment.
The limited warranty period is 1 year from the purchasing date. Should
you have a reason to complain, please contact your authorized dealer or
itsserviceaddress.
BRP ask that you provide a precise description of the complaint as well as
a copy of your receipt.
ForyournearestauthorizedBRPdealerorformoreinformation on BRP products,pleasevisitour web site:www.brp.com
® ™ andtheBRPlogoaretrademarksofBombardierRecreationalProductsinc.oritsaffiliates.
©2022.BombardierRecreationalProductsInc.
BRP_20220801_R00EN

12
G. HOW TO CONTACT US
North America
565 de la Montagne Street
Valcourt (Québec) J0E 2L0
Canada
Sturtevant, Wisconsin, U.S.A.
10101 Science Drive
Sturtevant, Wisconsin
53177
U.S.A.
Sa De Cv, Av. Ferrocarril 202
Parque Ind. Querétaro, Lote2-B
76220
Santa Rosa Jáuregui, Qro.
Mexico
South America
Rua James Clerck Maxwell, 230
TechnoPark Campinas
SP 13069-380
Brazil
Asia
15/F Parale Mitsui Building,8
Higashida-Cho, Kawasaki-ku
Kawasaki 210-0005
Japan
Room Dubai, level 12, Platinum
Tower
233 Tai Cang Road
Xintiandi, Lu Wan District
Shanghai 200
Europe
Skaldenstraat 125
B-9042 Gent
Belgium
Itterpark 11
D-40724 Hilden
Germany
ARTEPARC Bâtiment B
Route de la côte d'Azur, Le
Canet
13590 Meyreuil
France
Ingvald Ystgaardsvei 15
N-7484 Trondeim
Norway
Isoaavantie 7
PL 8040
96101 Rovaniemi
Formvägen 16
S-906 21 Umeå
Sweden
Avenue d’Ouchy 4-6
1006 Lausanne
Switzerland
Oceania
6Lord Street
LakesBusiness Park
Botany,NSW 2019
Australia
Table of contents
Popular Accessories manuals by other brands

Big Daishowa
Big Daishowa BASE MASTER BM-50 Operation manual

Interactive Technologies
Interactive Technologies 60-362 user manual

miCoach
miCoach SMART BALL user manual

turck
turck uprox + BI4U-EM12WD-AP6X-H1141/3GD manual

Joolz
Joolz Geo lower raincover instruction manual

ORION TELESCOPES & BINOCULARS
ORION TELESCOPES & BINOCULARS Dew Zapper Pro 3517 manual

Microsoft
Microsoft 1865 quick start guide

PCB Piezotronics
PCB Piezotronics JT352C04 Installation and operating manual

Pioneer
Pioneer SGY-PM910H L Important information for the user

Manhattan
Manhattan 406260 quick start guide

Vocal Performer
Vocal Performer VE-20 owner's manual

Victron energy
Victron energy Smart Battery Sense manual