BT DieselWorks AutoSync User manual

Page | 1
BT DieselWorks AutoSync – Installation guide
Firmware v2.20 and up only (Dec. 2019+ and newer AutoSync’s will already have 2.20 or higher from the factory)
Requires ‘IO4’ (4” screen) or ‘IO5/IO6’ (8” screen) radios. Does not work on ‘IO3’
2014-2018 Silverado/Sierra 1500
2015-2019 Silverado/Sierra 2500-3500
2015-2020 Tahoe/Yukon/Suburban/Escalade/Denali
Thank you for purchasing the BT DieselWorks AutoSync. The AutoSync is a patent-pending revolutionary
new easy-to-install module that adds many enhanced functional and comfort features to your GM K2xx
truck or SUV. Please be sure to also follow the quick-start guide on the ‘AutoSync installation guides’
page on our website. It is important to register your AutoSync and pair it to your WiFi network as soon
as possible to receive the latest firmware updates and new feature additions.
NOTE: These instructions cover AutoSync’s with firmware v2.20 and up only! To check your firmware
version, access the AutoSync menu, go to page-4, and press “AutoSync info”.
I know these instructions are long/boring, but PLEASE try to at least glance over every page first. 95%
of tech support email/questions we get are simply due to misunderstanding/not reading the
instructions.
NOTE: 2017+ vehicles have several feature limitations and also require one additional minor wiring
change under the dash at the Serial Data Gateway module connector. Please see the additional 2017+
supplement document instructions on our website on how to perform this wiring change/pin swap.
NOTE: Some menu items are shown/hidden depending on whether the vehicle is in the “key on
engine off” mode, or “key on engine running”. If a menu button that you are looking for seems
“missing”, confirm that the vehicle is in the proper mode (engine running/not-running) first!

Page | 2
INDEX
Introduction…….Page 1
Installation/basic operation…….Page 3-4
EFILive/EZ Lynk SOTF tune switching (diesel only), Active Fuel Management disable (gas only)…….Page 5
Strobe lights mode/work lights mode/reverse spotlight mode…….Page 6
Viewing live engine data…….Page 7-8
Viewing backup camera while moving, turn-signal-activated backup camera…….Page 9
High idle mode, Reading/clearing engine codes (DTCs), SecurIdle (theft-deterrent shift lock)…….Page 10
Torque converter lockup controller (optional feature, and only available with diesel)…….Page 11
Diesel Particulate Filter force-regen…….Page 12
Launch Control (optional feature)…….Page 13
Transmission relearn functions (only available with diesel)…….Page 14
Viewing live vehicle dynamics data (G-forces, etc)…….Page 15
Reprogram TPMS warning threshold or disable TPMS…….Page 16
Learn new remote keyfobs…….Page 17
BCM / HMI reflashing (extend remote start, LED hyperflash disable) …….Page 17
Fuel system tests (only available with diesel)…….Page 18
0-60mph performance timer…….Page 19
Change daytime running light settings and fog lights w/ high beams…….Page 20
Video-in-motion, auto headlight override, remote keyfob window control, radio VIN clear…….Page 21
Installing DSP/SOTF control wire, AutoSync info page/Serial number location.……Page 22
Updating your AutoSync firmware…….Page 23-26

Page | 3
On the AutoSync, there two momentary push-buttons on the top of the module marked “A” and “B”, a
row of DIP switches (normally not used, covered by sticker), and a status LED. The AutoSync must
remain plugged in at all times for features to work. You can use AutoSync with an OBD port splitter (to
use simultaneously with another scan tool, Edge Insight, EZ Lynk, etc), however compatibility is NOT
guaranteed unless you use the BT DieselWorks OBD splitter, available at our website. AutoSync will
not drain your battery when left plugged in with the vehicle off, and it will not cause any harm if you
unplug/plug-in AutoSync while the vehicle is running.
Inline DIP switches (if present): ALL MUST BE SET TO “OFF”
You should NOT have to adjust any AutoSync DIP switches, they should already be correct from the factory
Installing the AutoSync is as simple as plugging it into your truck’s OBD port, located under the dash. Be
sure the ignition is OFF when installing the AutoSync. The AutoSync will NOT void any powertrain or
bumper-to-bumper warranties, and is completely undetectable by the dealer. As soon as the AutoSync is
unplugged, all traces/footprints are removed. The LED shows AutoSync system status at a glance: RED-
AutoSync is powered up, but vehicle CAN bus activity is NOT being detected. BLUE- AutoSync is powered
up, and vehicle CAN bus activity is being detected. GREEN- AutoSync is powered up, CAN bus is active,
and engine is running. If the LED does not turn on when plugged in, check the “DLC/DSM” fuse.
NOTE: AutoSync data display is default set to US/SAE units, if you wish to see data in metric units,
simply use the factory Driver Info Center (DIC) controls to set the vehicles units to “metric”. The
AutoSync will detect this change directly from the vehicles Body Control Module and automatically
reconfigure itself to metric units.

Page | 4
To activate/display the AutoSync main menu with the key on, engine NOT running, press the cruise
control “CANCEL” button on the steering wheel.
To activate/display the AutoSync main menu with the engine running, press the rear defrost button 4
times in a row (4 times within ~4 seconds). To step “back” a menu page at any time, press the “< BACK”
button on the radio controls, OR press the “
” icon at the top left of the screen. To exit the AutoSync
menu at any time, press the “home” button on the radio controls, OR press the “Exit” icon at the top
right of the screen.
If at any time the menu does not “draw” correctly or appears to freeze, simply press the “back” button
to manually refresh the menu. Sometimes if the truck is “really busy”, the menus might take an extra
second or so to “draw”…if that happens, just be patient and give it a second to breathe between clicking
the icons/buttons.
The AutoSync main menu will appear, as shown below, with the back/exit/home buttons circled:

Page | 5
ECM Tune Switching (diesel)
Active Fuel Management disable (gas)
Diesel vehicles: This ECM tune switching menu is found on AutoSync main menu, page 1. This menu
allows you to control EFILive DSP or EZ Lynk SOTF tune level. Simply tap whichever tune you want to
switch to, and the DSP/SOTF mode will immediately be changed. The currently selected tune will be
highlighted with a “( )” around the number, as shown in the picture below.
NOTE: requires additional AutoSync DSP/SOTF tune control wiring kit, sold separately. See page 17 of
this instruction manual for the AutoSync DSP/SOTF wire kit installation guide.
Gas vehicles: The icon that shows “ECM Tune Switching” in the picture below only shows on diesel
vehicles. When AutoSync is plugged into a gas vehicle, this icon will be replaced with “AFM:
Enabled/Disabled”. To disable the Active Fuel Management mode on your gas vehicle, set this to
“DISABLED”. This setting will be remembered permanently, you do NOT have to set AFM to disable
every time you drive the vehicle.

Page | 6
Strobe Lights
Work Lights
Reverse work lights/spot lights
Strobe Lights – Found on page 1 of the AutoSync main menu. This activates exterior strobe light mode.
This will rapidly flash all exterior lighting (headlights, front turn signals, rear turn signals, CHMSL, reverse
lights, fog lights) in an alternating pattern. CHECK LOCAL LAWS regarding use of this feature! In most
areas, using vehicle lighting in this manner on public roadways is considered ‘impersonating a police
officer’. 2017+ vehicles, this feature only works with key on, engine off. We are currently working on
an update to allow engine-running strobes on 2017+.
Work Lights – Found on page 1 of the AutoSync main menu. This activates exterior work light mode.
Work light mode manually turns on all cargo/bed lighting, as well as reverse lights. This feature is useful
for illuminating the rear of the vehicle at night, hooking up trailers at night, checking on cargo, etc. This
feature will also work while driving, unlike the factory cargo light button that will only work when in
park! 2017+ vehicles, this currently only works key on, engine off. We are currently working on a fix
for 2017+.
Reverse Work Lights – Found on page 3 of the AutoSync main menu, ONLY visible with key on, engine
NOT RUNNING. This menu item is hidden with engine running. Setting this feature to ON will make the
cargo lights and tow-mirror spot lights (if equipped) come on automatically whenever you shift into
reverse. This is helpful to automatically provide additional illumination while backing up, without having
to manually press the cargo light switch. This setting is saved permanently, even if the AutoSync is
unplugged. 2017+ vehicles, this currently only works key on, engine off.

Page | 7
Viewing Live Engine Data
The “Powertrain Data” feature is found on page 1 of AutoSync main menu
The powertrain data page displays live engine/transmission data, as shown below.
Diesel PIDs include boost, EGT, coolant temp (ECT), oil pressure, current gear, torque converter clutch
(TCC) locked/unlocked, DSP/SOTF tune, turbocharger vane position, actual fuel rail pressure (aFRP),
desired fuel rail pressure (dFRP), main injection fuel rate, main injection timing.
Gasoline PIDs include spark advance, knock retard, MAF, MAP, engine load, coolant temp (ECT), oil
pressure, current gear, torque converter clutch (TCC) locked/unlocked.
NOTE:the “EGT” reading is derived from the factory “EGT-1” sensor, located in the factory downpipe at
the outlet of the turbocharger (LML) or “EGR-1” in the manifold (L5P). If this sensor is unplugged or
removed due to an aftermarket downpipe, EGT will not display correctly and will default to “1832*F”.
If your truck is ‘deleted’, you can extend the factory sensor wiring and re-locate the factory EGT-1 sensor
to the exhaust manifold for a more accurate “pre-turbo” reading.
(continued on page 8 below)

Page | 8
There are two additional icons/buttons on the bottom of the Powertrain Data screen.
The “RECORDS” icon will display a page that shows the peak recorded values for each PID. These PID
peak records are stored permanently even if the AutoSync is unplugged. To clear/reset the PID peak
records, press the “ERASE” icon on the bottom of the “engine data records” page.
The “Minimize” icon will shrink the live engine data display to a small bar along the bottom of the
screen. This is helpful for keeping essential data at a glance, while still being able to view the navigation
map, radio controls, etc.
Due to the smaller size of the “minimized” view, only two PIDs are able to be displayed at once in this
mode. To cycle through the pages of minimized data display, press the drivers door lock button. To
switch back to the engine data full page, press the “Show Maneuver” icon.
Another great feature of the “minimized” mode, is that this minimized data is also mirrored on the
Driver Info Center (DIC) display in the instrument cluster, for easy/quick viewing without having to look
over at the radio/navigation screen. To view the engine data in the DIC, use the steering wheel DIC
controls to switch to the “NAVIGATION” page in the DIC, as shown below (non-Denali shown, Denali
instrument cluster is similar/works the same way). NOTE: DIC data display is only available when the
“minimized” engine data view is active. To fully hide the minimized data view on the radio/nav screen,
while still keeping the DIC data display active, press the “Dismiss” icon on the radio/nav screen, shown
above. Press “Show Maneuver” to return to the full engine data page (this will simultaneously cancel
the DIC engine data display, as explained above).
If the minimized view on the radio/nav screen has been “dismissed” or accidentally cleared, simply
press the rear defrost button 4 times to re-enter the AutoSync main menu.

Page | 9
Viewing backup camera while moving
Turn-signal-activated backup camera
View Rear Camera – This is found on page 2 of the AutoSync main menu. Press this icon to momentarily
switch to the backup camera display. The backup camera will display for roughly 5 seconds, and then
automatically return back to the AutoSync menu. Requires camera wiring mod on 2017+ vehicles.
Turn signal camera – This is found on page setting is to enable/disable the AutoSync feature that
automatically activates the backup camera for several seconds whenever a turn signal is activated
(helpful for checking blind spots). Requires camera wiring mod on 2017+ vehicles.
VERY IMPORTANT NOTE: There is a menu item on page 3 called “RVC Backup Lights”.
This item is only available/visible with key on engine OFF. The way the backup camera is wired from the
factory, the AutoSync must command the reverse lights on for a half second to power on the camera.
If you find this reverse light flash “quirk” objectionable, you can re-wire the backup camera to be
powered on all the time, eliminating the need for the AutoSync to flash the reverse lights. This involves
cutting/splicing a wire at the tailgate wiring harness. If you do NOT want to do any rewiring and do not
mind the fact that the reverse lights will flash for half a second if you manually turn the camera on while
driving, set the “RVC Backup Lights” button to ON. If you want to do the camera re-wire and eliminate
the reverse light flash, set the “RVC Backup Lights” to OFF.
NOTE: If you have the “RVC Backup Lights” set to OFF without having done the wiring modification,
the radio screen will be blank and/or say “service rear vision system” if you use the AutoSync to
manually turn the backup camera on while driving. CHECK THIS SETTING FIRST BEFORE EMAILING ME
SAYING “HEY, THE BACKUP CAMERA OR TURN SIGNAL CAMERA FUNCTION DOESN’T WORK!”

Page | 10
High Idle Mode
Read/Clear engine codes (DTCs)
SecurIdle (theft-deterrent shifter lock, 2015-2016 only)
High idle mode is found on page 2 of AutoSync main menu. When turned on, this will raise the engine to
~1200rpm. Excellent for warming up the engine in the cold, improving air conditioning performance
while parked in extreme hot weather, or jump starting other vehicles. NOTE: Vehicle must be stopped,
transmission in park, and foot off brake pedal. If brake pedal is applied while high idle is active, high idle
will automatically turn off. NOTE: high idle may take ~15 seconds to fully “kick in” and reach 1200rpm,
this is normal.
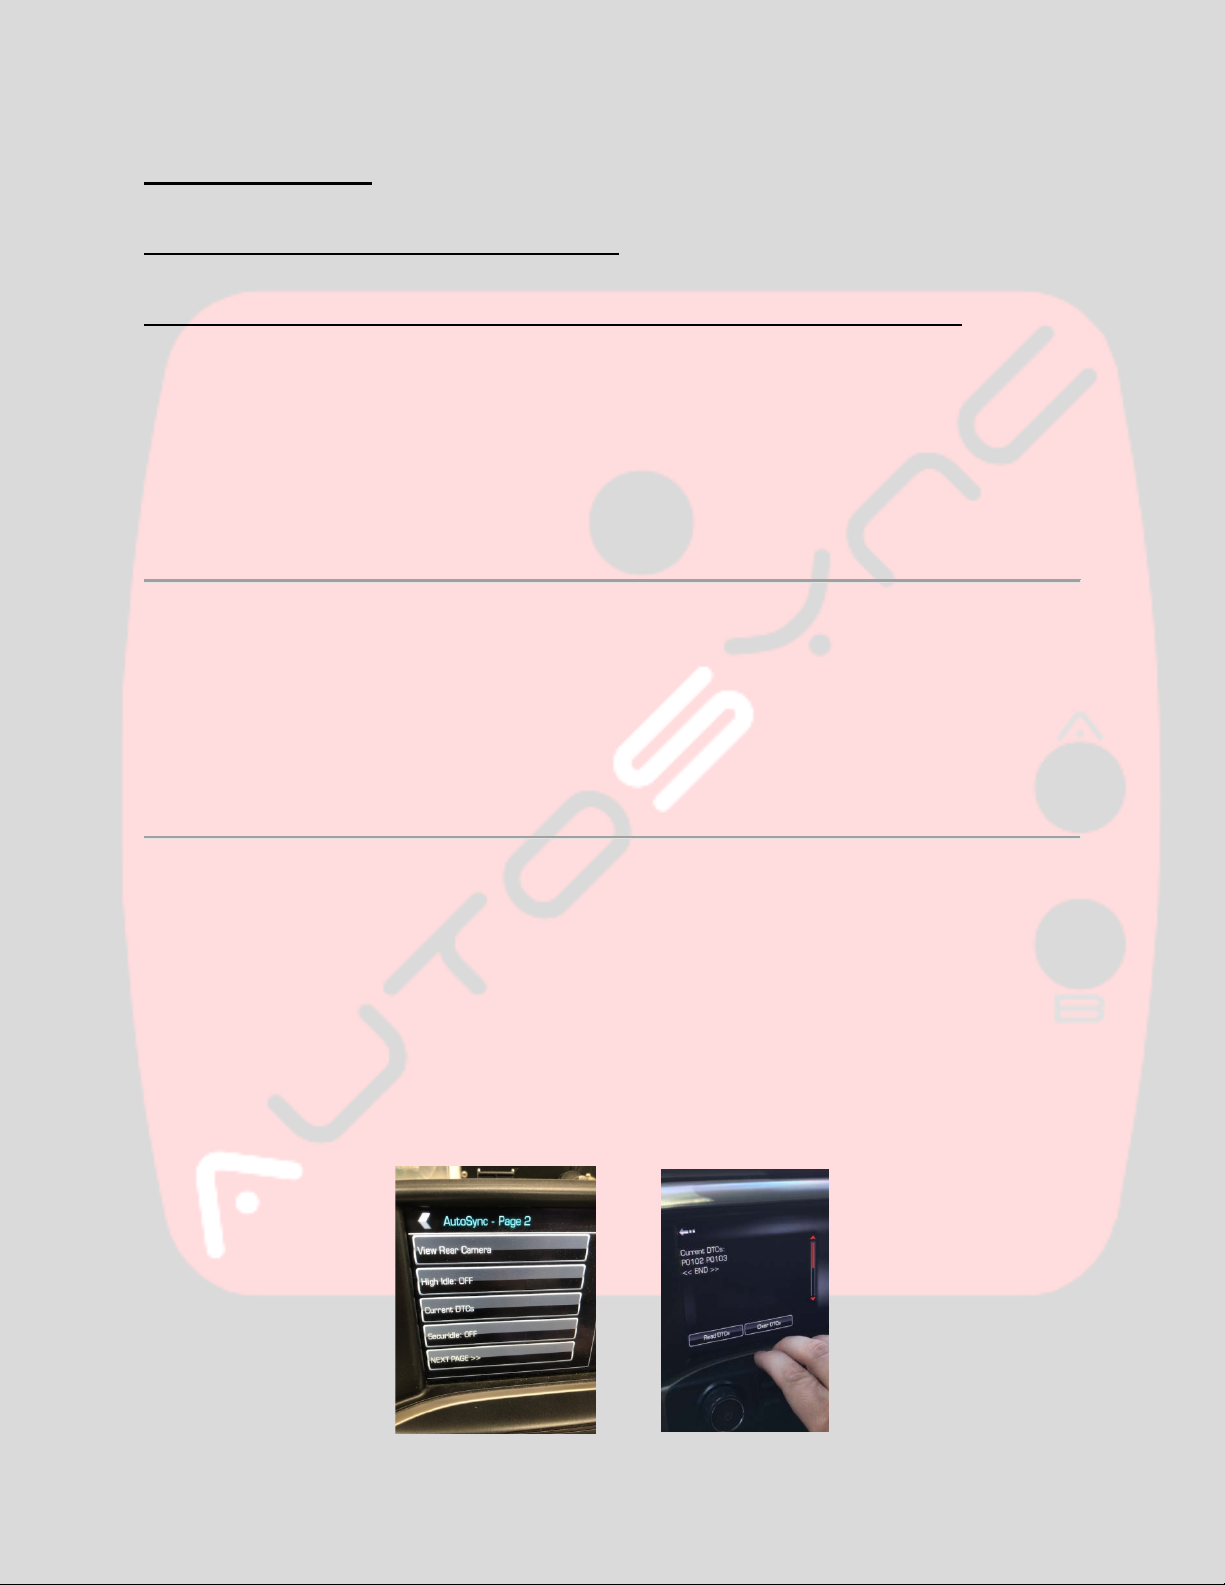
Current DTCs – This function is found on page 2 of the AutoSync main menu. This will read and display
any current or pending powertrain Diagnostic Trouble Codes. NOTE: DTC reading is automatically
initiated as soon as you press the “Current DTCs” menu icon. Do NOT immediately press the “read
DTCs” button.WAIT several seconds for DTCs to show up, and the screen to show “<<END>>”. If the
DTCs or “<<END>>” does not show up within ~5 seconds, press the “Read DTCs” icon to re-initialize the
DTC request process. To clear all current DTCs, press the “Clear DTCs” button.
SecurIdle – This feature (only visible/accessible on the AutoSync main menu page 2 with key on,
engine off), allows you to lock the shifter in “park”, even when the brake pedal is depressed. This is
useful if you want to leave your truck running but not allow anyone to easily drive it away. When this
menu button is set to “ON”, whenever the truck is locked using the remote keyfob while running (a
quick-release keychain for your remote keyfob is recommended), SecurIdle is activated. If SecurIdle is
activated and someone breaks into the truck, when they step on the brake pedal to try to shift out of
park, the stereo will beep continuously and the shifter will remain locked. SecurIdle is automatically
disarmed when the truck is unlocked with the remote keyfob. NOTE: Unplugging the AutoSync will
disable SecurIdle within ~5 seconds.

Page | 11
Torque converter lockup controller
TC Lockup Controller (optional extra-cost feature, only available with diesel/Allison transmission)–
This is found on page 2 of the AutoSync main menu. This menu option is only visible/accessible with
engine running.
The lockup controller has two modes: automatic and manual. Automatic mode will automatically
immediately force lock the torque converter whenever the accelerator pedal is greater than 95%,
vehicle speed is above 30mph, and engine speed is over 1900rpm. Manual mode allows the user to have
full manual control of the torque converter lockup, as long as the vehicle speed is above 25mph and the
brake pedal is NOT applied. When in manual mode, press the cruise control ON/OFF button to force-lock
the converter. Press the cruise control CANCEL button to force-unlock the converter. For safety, if the
brake pedal is applied, or if there is a stability-control intervention, the torque converter lockup
controller is immediately suspended and the torque converter control returns to factory state.
To select auto or manual mode, simply press the “AUTO” or “MANUAL” icon buttons on the bottom of
the screen. The lockup controller setting is NOT remembered across key-cycles.
NOTE: generally the only acceptable time to use the manual torque converter lockup mode is during
sled-pulling where true complete force lock/unlock capability is required, it is not recommended to be
used constantly during daily driving…this isn’t an old Cummins 4-speed!
The automatic lockup controller mode can be used any time, on the street or track.

Page | 12
Diesel particulate filter manual regeneration function
DPF force regen.– Manual/service/mobile Diesel Particulate Filter regeneration-cleaning procedure for
diesel vehicles. Use this if your truck is stuck in limp mode due to a clogged DPF, or the truck is
otherwise refusing to complete a normal DPF regen on its own. NOTE: If the truck is running in park,
when you click the “DPF force regen” button on Main-Menu-Page-3, the AutoSync will command a
“service/stationary DPF regen”. If the truck is NOT in park, the AutoSync will command a
“mobile/driving” DPF regen. Follow the on-screen instructions, and press start.
NOTE: If performing a stationary/parked regen, be sure the truck has at least ½ tank of fuel, the hood
is open, the truck is outside, and the exhaust area is COMPLETELY CLEAR. During the DPF service
regen, the exhaust exiting the tailpipe will be extremely hot and could start a fire if the truck is parked
on grass or the exhaust is pointed at combustible materials!
DPF “parked” service regen can sometimes take up to 45 minutes to complete, so plan accordingly
before initiating a DPF service regen! Mobile/driving regen may take up to a half hour of highway
driving.

Page | 13
Launch control
Launch control (optional feature) – This feature can be found on page 3 of the AutoSync main menu.
This menu option is only visible with the engine running.
This exclusive feature uses the ABS module to act as a ‘smart’ line-lock/automatic launch control
feature. The vehicle should be in 4-wheel-drive, and have the brake pedal firmly applied before
activating. Follow the on-screen instructions, and when you are ready to activate it, press the cruise
control “SET” button.
You will hear the ABS motor run for ~2 seconds and feel some vibration in the brake pedal and you
may see an ABS warning light; this is normal.
When the ABS motor stops running, the launch control braking is fully charged. An on-screen
countdown (5, 4, 3, 2, 1) will display, and you can release the brake pedal and bring the engine RPM’s up
to ~2200rpm. When the countdown hits 0, the ABS module will immediately dump brake pressure and
launch the truck.
You can also manually release brake pressure and force-launch the truck at any time during
the countdown by pressing the cruise control “RESUME” button.
NOTE: It is strongly advisable to NOT use launch control repeatedly, and you should allow
several minutes’ cool-down time for the ABS pump motor and ABS solenoids between launch
control events. Repeatedly/continuously using launch control MAY cause premature wear on
the ABS pump motor and solenoid valves.

Page | 14
Transmission learn functions (Diesel/Allison transmission only)
Transmission Learn Functions – This function is found on AutoSync main menu page 3. Allison
transmission TAPS reset and Allison transmission fast learn procedure functions. TAPS reset clears the
adaptive shifting values, and fast learn performs a complete clutch fill and release timing/volume learn
procedure.
TAPS reset can be used if the transmission is shifting harshly after drastically changing ECM tuning, or
otherwise increasing the engine power level.
Fast learn should ONLY be used once upon initial installation of a new or rebuilt transmission. Fast learn
is a three-stage dynamic process that will take several minutes and require the driver to shift the
transmission between forward/reverse while the TCM applies clutches and measures fill/apply times.
When fast learn is initiated, the radio screen will show further instructions on how to complete the
Fast Learn process (shift to drive, shift to reverse, etc).
Do NOT use TAPS reset or Fast Learn without first consulting your tuner or transmission builder!

Page | 15
Vehicle Dynamics Info
Vehicle Dynamics Info – This page is found on AutoSync main menu page 3. It displays live chassis-
dynamics data from the stability control and traction control systems. Vehicle dynamics PIDs include:
Longitudinal acceleration (forward/backward Y-axis G-force), Lateral acceleration (side-to-side X-axis G-
force). Oversteer/understeer (if the vehicle is steady on its driver-intended path, if there is adverse yaw
creating an oversteer-fishtailing event, or an understeer-‘plowing’ event). Yaw rate (yaw/Z-axis rotation
rate). TCS torque request (engine torque as requested by the traction control system, during wheel-slip,
you will see this PID showing that TCS is requesting torque reduction). Brake apply pressure (how much
brake fluid pressure is being applied to the brake calipers, whether it be by the driver pressing the brake
pedal, or the ABS module applying brake pressure during a TCS/ESC event).
In similar fashion to the engine data display page, the vehicle dynamics page also records peak records
that can be recalled by pressing the “RECORDS” icon, and cleared by pressing the “RESET” icon on the
vehicle dynamics records page.

Page | 16
TPMS reprogramming / disable
TPMS programming – This function is found within the “Module Setup” menu, which is accessed by
pressing “Module Setup” on AutoSync main menu page 4. This function is for resetting the TPMS
warning threshold pressure, or to disable the TPMS completely and suppress all warning messages/error
lights. The “Current setting” is what parameters the BCM is currently programmed with. The “Desired
setting” is what will be programmed into the BCM when you press “Program”.
To disable TPMS, keep scrolling “up” with the ‘+’ button on the transmission shift lever until the screen
shows “TPMS setting: DISABLED”. When the TPMS is disabled, the “current setting” will show 147psi.
Once you have the desired setting set, press the “Program” button. The AutoSync will reprogram the
BCM, and then clear the display within 10 seconds. Once the display has cleared, cycle the key OFF.
NOTE: The tire “Load range” parameter is just for reference. It is scaled automatically by the AutoSync
to keep the BCM happy with your desired pressure setting. It does NOT matter if the load range shown
on the screen does not match your actual tire load range.
NOTE: when the AutoSync is set to disable TPMS, the truck will still chime and display a temporary
“TPMS DISABLED” message on the radio/navigation screen after startup. This is simply to warn the
driver that TPMS has been disabled by AutoSync. Do NOT press “Show Maneuver” or “Dismiss”, this
on-screen TPMS warning message will automatically self-clear within 5 seconds.

Page | 17
Remote keyfob learn
Module Programming (BCM, HMI, Radio)
Remote Keyfob Learn – This function is found within the “Module Setup” menu, which is accessed by
pressing “Module Setup” on AutoSync main menu page 4. This function used for learning additional
remote keyfobs to the vehicle. New keyfobs can be easily purchased online, and then learned using the
AutoSync. No need to visit the dealer! Each vehicle can learn a total of 8 keyfobs. Press the “LEARN” icon
and follow the on-screen instructions.
NOTE: this procedure will NOT invalidate/clear/unlearn previous existing keyfobs, it will simply add
the new remote to the existing list of programmed remotes.
NOTE: This procedure will only learn new fobs on vehicles with “keyed” ignition, it will not learn new
fobs on vehicles with “keyless push-to-start”.
Module Programming – This menu option is to enter module reprogramming mode, to flash custom
third-party tuning into the BCM, HMI module, and radio.Custom BCM tuning can unlock additional
features such as speed limiter disable, remote-start timer extend, disable LED turn signal hyperflash,
and MUCH more!
Contact BT DieselWorks or White Auto & Media (www.whiteautoandmedia.com) to purchase tuning.

Page | 18
Fuel System Tests (diesel only)
Fuel System Tests– This feature is found on AutoSync main menu, page 4. This menu is only
accessible/visible with the engine running, and with the transmission in Park. The menu item is hidden
with engine off, and locked out when transmission is in drive.
This menu allows you to check the injector balance rates on your diesel, and also run performance tests
on the high-pressure fuel injection pump. Within the Fuel System Tests page, you will see the page
displaying injector balance rates. Generally acceptable values are +/-4.00 mm3 in Park, engine warm.
Injection pump test– This function runs a pressure test on the high pressure fuel injection pump, to
make sure that the pump is healthy and able to properly generate and maintain maximum rail pressure.
Vehicle must be in Park, engine warmed up, foot off brake pedal. Press “pump test” to start test. Test
will take approximately 10 seconds, during which the AutoSync will command the pump to increase and
hold max rail pressure for the duration of the test. The engine will sound rough during this test. When
the test is complete, the screen will display the maximum differential (delta) between desired and actual
rail pressure. If the injection pump is weak, or there are other fuel system problems, there will be a large
differential between desired and actual pressures, and then result will show FAIL.
Contact your local diesel shop for further diagnosis
.

Page | 19
Performance timer
Performance Timer – This feature is found on AutoSync main menu, page 4.
This function allows the user to measure the vehicles 0-60mph time. Follow the on-screen instructions
to use the feature. If the vehicle is moving, the status will show “NOT READY”. When the vehicle is
completely stopped and the timer is ready to begin, the status will show “READY”. As soon as the
vehicle starts moving, the timer will begin counting and the status will show “RUNNING”. When the
vehicle hits 60mph, the status will show “COMPLETE”, and the 0-60mph time will be displayed on the
screen. The AutoSync will automatically store the fastest time, and this time will be saved even if the
AutoSync is unplugged. If a faster 0-60mph time is accomplished, the AutoSync will automatically update
the saved “Best time”. To clear the “best time” records and reset the value to the default max time
(65.54 seconds, computer nerds will get this, ha), press the “Clear Records” icon.
NOTE: This test will only be accurate if your tire size is set correctly! If you have larger-than-stock tires
and your ECM tune/speedometer has not been corrected for the larger size tires, this 0-60mph time
will be inaccurate. Using GPS, verify that your speedometer is correct to ensure accurate results.

Page | 20
Daytime running lights settings (2015-2016 only)
Fog lights with high beam settings (2015-2016 only)
DRL setting – This function is found within the “Module Setup” menu, which is accessed by pressing
“Module Setup” on AutoSync main menu page 4. This “DRL Setting” menu item is only visible/accessible
with key on, engine off, trans in Park. It will be hidden with the engine running. This feature allows you
to modify the Daytime Running Light settings/configuration on your truck. There are 5 options to scroll
through. Stock, Fog lights, fog lights w/LED, disabled, disabled w/LED. The “w/LED” descriptor denotes
whether your truck has factory separate LED DRL’s, or just uses the low beam headlights as DRL’s.
For example: All GMC pickups (except base models) have the separate LED DRL’s, 2016-2018 half ton
Chevrolet pickups have LED DRL’s, and all fully loaded Tahoe/Suburban/Yukon/Escalade SUV’s have LED
DRL’s. All 2014-2015 Chevrolet pickup trucks do not have LED DRL’s, and 2015-2019 Chevrolet HD
pickups do not have LED DRL’s. Select “w/LED” if your truck has factory LED DRL’s.
However there may be some exceptions where you would want to use a different setting than described
above. For example if you have a GMC with factory LED DRL’s and you want to have the fog lights AND
the factory LED’s both be on during DRL operation, select the “fog lights” option, NOT the “fog lights
w/LED” option.
If there is a problem with the truck’s factory Ambient Light Sensor (the little bubble on the center dash
near the windshield that senses how light/dark it is), the menu button will say “ALS Invalid!”. When
there is a problem with the truck’s ALS, the AutoSync will disable its DRL features as a safety precaution.
NOTE: your truck’s ALS wiring and all other BCM wiring MUST BE STOCK!!!! DO NOT WIRE IN ANY
RESISTORS OR “ALL 6 ON HIGH” DIODES OR CUT ANY WIRES GOING TO THE ALS!
Fog lights with high beams – This feature is always activated automatically, there is no on/off setting.
Table of contents