BT RESPONSE 85 User manual

Userfriendly
Guide
Response 85

Lift flap

Delete/Time 0
R 85
Battery
Low
Answer
on/off Play
Skip Skip
Volume +
Pause
memo
2
mailbox
3
mailbox
1
Stop
2 3
At a glance
Play/Pause/
Memo button
Use to play
and pause
messages and
memos and
record memos
Page 14
Answer on/off
Stop button
Switches
answering
machine off
and on and
stops
procedures
Page 12
Volume button
Adjusts volume
for playback of
messages and
memos
Page 8
Mailbox 2
For private
messages
Pages 10,13
Mailbox 3
For private
messages
Pages 10,13
Skip >
Moves
forwards
through
messages and
memos and
sets Answer
delay
Pages 8, 9, 15
and 16
Speaker
cover
Contents
At a glance 2
Introduction 4
Setting up 5
Using your Response 85 8
Remote access 20
Help 26
Guide to the display 28
Technical information 29
Index 31
Wall- mounting 34
In this user guide, we’ve
included helpful tips and
useful notes. They are
shown in a white box
like this.
Hints and tips
boxes
Skip <
Moves back
through
messages and
memos and
switches
message alert
on and off
Pages 8, 9, 14
and 15
Delete button
Deletes
messages and
sets date/time
Pages 8,15
Delete/Time 0Battery
Low
Answer
on/off Play
Skip Skip
Volume +
Pause
memo
2
mailbox
3
mailbox
1
Stop
IF RED DOT SHOWS ON THE
DISPLAY, THE BATTERY NEEDS
TO BE FITTED OR REPLACED.
ONLY USE PP3 9V BATTERY
OGM select
button
Selects the
outgoing
message
played to
callers
Page 11
Mailbox 1
The main
mailbox, for
shared
messages
Page 10,13
VIP indicator light
Shows VIP is switched on
Page 19
VIP button
Use to set
security code
for VIP
feature
Page 18
Security
code button
Use to set
security code
for remote
access
Page 20
OGM check/
record button
Records and
replays
outgoing
messages
Page 12
Battery Low
indicator
Page 7
Message
indicator
(LED display)
Page 13
Microphone
Use to record
outgoing
messages and
memos
Back-up
battery
cover
Page 7

3
Contents
At a glance 2
Introduction 4
Setting up 5
Using your Response 85 8
Remote access 20
Help 26
Guide to the display 28
Technical information 29
Index 31
Wall- mounting 34
In this user guide, we’ve
included helpful tips and
useful notes. They are
shown in a white box
like this.
Hints and tips
boxes

4
Introduction
Your Response 85 answering machine
is designed for ease of use and made
to the high standards set by BT
We thank you for
making the right
choice and expect
that your machine
will give you many
years of quality
service.
Please read
the instructions
carefully before
use, and keep this
User Guide for
future reference.
Date of purchase:
Place of purchase:
Serial number:
(on base of answering
machine)
Purchase price:
(for warranty purposes,
proof of purchase is
required, so please keep
your receipt)
For your records
If you have problems
with your machine,
call the Response 85
Helpline Service,
Lo-call 08457 585 589.
Customer Helpline

5
Setting up
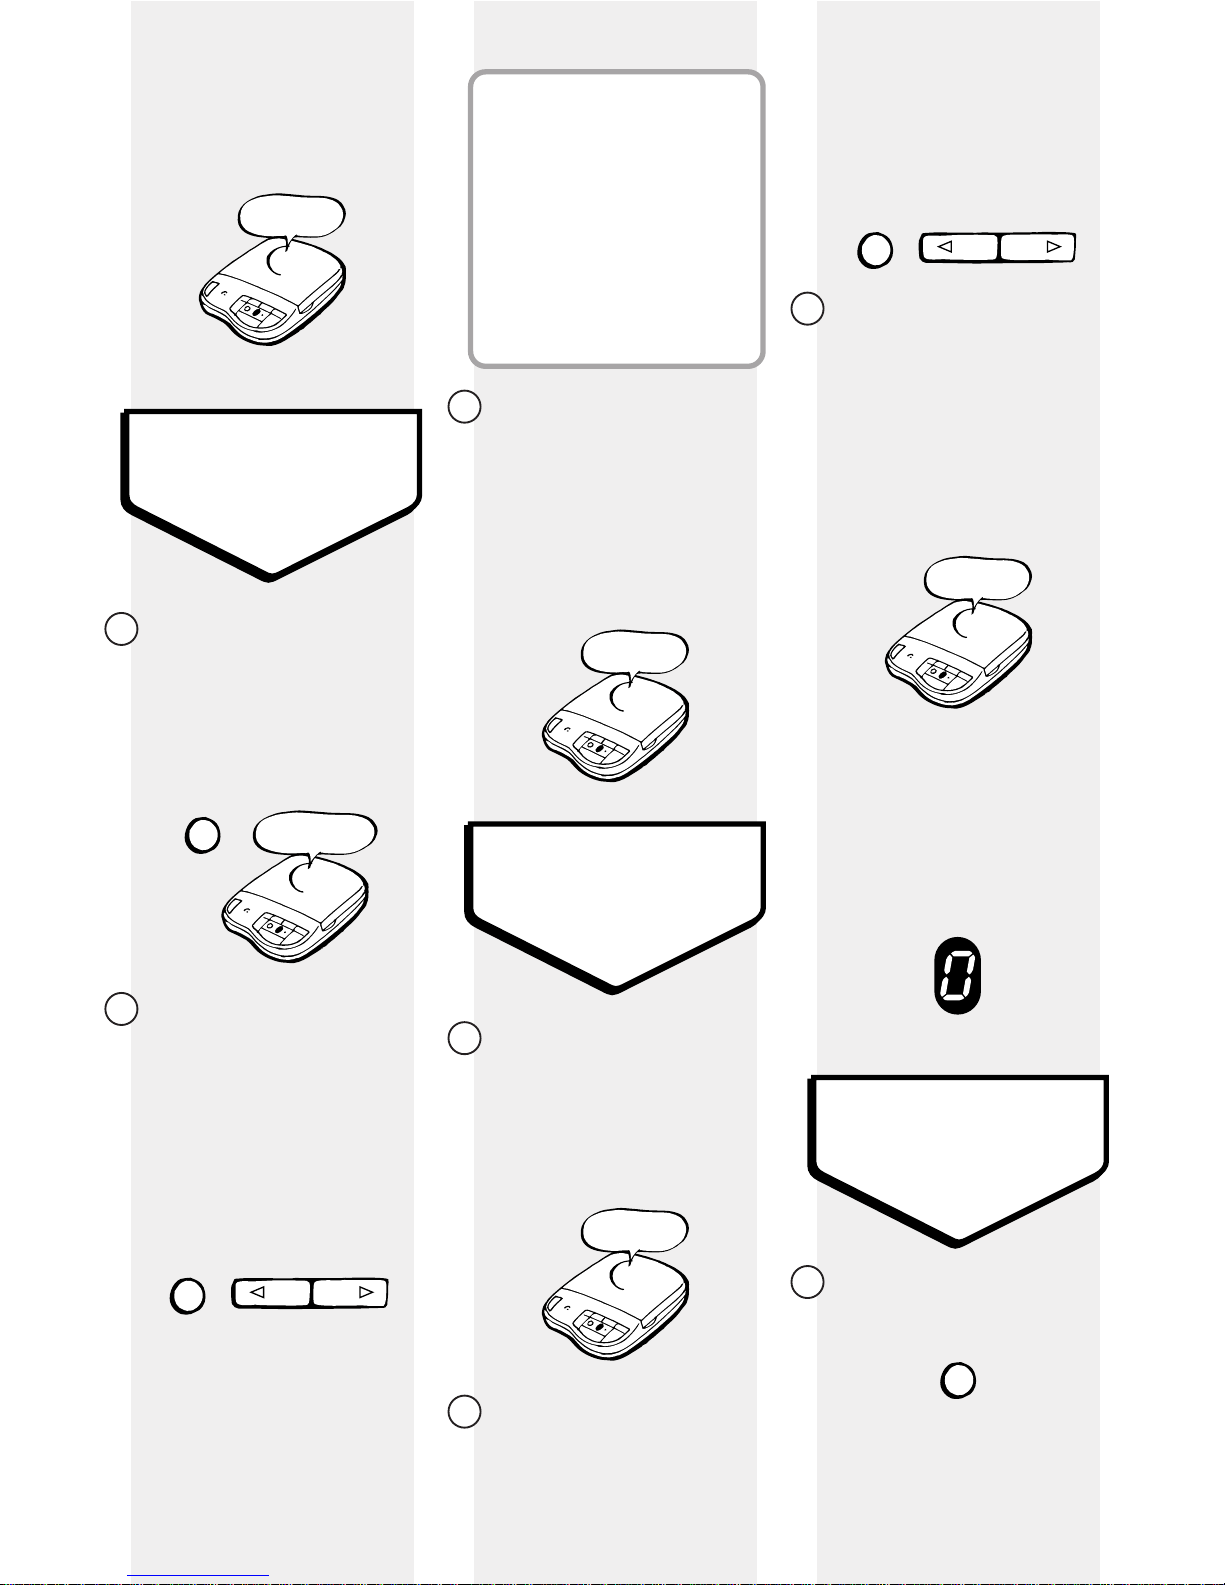
Follow these steps to get your
Response 85 ready to use
IMPORTANT
Check that your Response 85
is complete. When you unpack
you must have:
Response 85 answering
machine with
telephone line
cable attached
Mains power
adaptor plug
Screws and wall plugs for wall
mounting
✓
✓
✓The apparatus is only
designed to be operated in
a normal office or
domestic environment.
It should not be used in
bathrooms or near water.
Warning
Situating your
Response 85
Situate your Response
85 close enough to a
telephone socket and
a mains power supply
socket so that the
cables will reach.
Do not cover or
enclose the machine;
allow a free flow of air
to its surfaces.
To wall mount your
Response 85, use the
screws and wall plugs
provided. There is a
wall-mounting template
at the back of this
guide.

6
Check your
telephone wall socket
If you do not have a
modern-style socket,
call Freefone
0800 800 150
and ask for a BT
engineer to come and
fit the correct socket.
This is a chargeable
service.
Plug your
Response 85 into the
wall socket
Plug your
telephone line cord
into the back of the
machine
Plug the
mains adaptor into
the back of the
machine
Place the adaptor cord
behind the clip on the
back of the unit to
prevent it being pulled
out accidentally.
Failure to use the adaptor
supplied may result in
damage to the product.
Now plug the mains
adaptor plug into a
convenient mains
socket
The display will flash
for 30 seconds.
It will then show the
normal ‘no messages’
display.
Your Response 85
is now ready to
accept messages.

Electrical storm
warning
Note 1
During electrical storms,
you are advised to
disconnect your
apparatus because
damage may occur.
Note 2
If a fault occurs during
the 12-month warranty
period and it is due to
accidental or wilful
damage (including
lightning and electrical
damage), BT will not
replace or repair the
equipment free of charge.
Your Response 85’s spot
LED, located beside the
main display, indicates
back-up battery strength.
The LED will light up
when the battery power is
low. It also remains lit
when no back-up battery
is inserted.
0Battery
Low
1
7
PP3 9V
Insert back-up
battery
BT recommends that
you insert an alkaline
PP3 9V battery (not
supplied) to provide
up to 6 hours back-up.
This will ensure
messages are saved in
the event of power
failure.
Place the back-up
battery in the
compartment under
your Response 85’s
cover.

To set
the volume
The message playback
volume can be set to a
level suitable for you.
Press +to increase
the volume.
Press -to decrease
the volume.
As you press the
volume button, a beep
sounds at the level
you are selecting.
When the volume is at
its highest or lowest
you will hear 2 beeps.
Your Response 85 will
announce the day
currently set.
Still pressing the
DELETE button, press
either the SKIP 䊳
button (to move
forward through the
days of the week), or
press the 䊴SKIP
button (to move back).
When you hear the
correct day, release
the DELETE button.
1
2
Using your
Response 85
Volume +
Beep!
Saturday
If you alter the volume
during playback of a
message, the beep does not
sound but the volume will
change accordingly.
If the volume is below
mid-volume it will
automatically return to
the mid-volume setting
when any buttons are
pressed (for example, if a
message is played back).
The volume is unaffected
during remote access or
call screening.
To set the correct day
and time
Your Response 85
tells you the day and
time an incoming
message or memo
was recorded.
Press and hold the
DELETE button.
8
3
Delete/Time
Delete/Time
Delete/Time
Skip Skip

Your Response 85 will
announce the day you
have set.
You can now set the
current hour
Press and hold the
DELETE button again.
Your Response 85 will
announce the
currently set hour.
Still pressing the
DELETE button, press
either the SKIP 䊳
button, or the 䊴SKIP
button, to move
forwards or backwards
through the hours.
The time on your
Response 85 is
announced using the 12-
hour clock. Be sure to
hold down the 䊴or 䊳
buttons long enough for
your Response 85 to say
whether it is AM or PM.
When you hear the
correct hour, release
the DELETE button.
Your Response 85 will
announce the hour
you have set.
You can now set the
current minute
Press and hold the
DELETE button again.
Your Response 85 will
announce the minute
currently set.
Still pressing the
DELETE button, press
the SKIP 䊳button, or
the 䊴SKIP button, to
move forwards or
backwards through
minutes.
When you hear the
correct minute,
release the DELETE
button. Your Response
85 announces the new
day and time you have
set.
After setting the time
and day your machine
will automatically
return to ‘answer on’
mode.
To check the day and
time setting
Press the DELETE
button.
Your Response 85 will
announce the day and
time currently set.
1
3
3
1
2
2
Friday, set
Four pm,set
Friday, 4.30pm
0,One
9
Delete/Time
Twelve,midnight
Delete/Time
Delete/Time
Skip Skip
Delete/Time
Skip Skip

Mailboxes
Your Response 85 lets
you separate incoming
messages into three
mailboxes. This can
be useful both at
work and at home.
For example, you
could keep one
mailbox for business
messages and one for
personal messages.
Or you could allocate
mailboxes to specific
people.
Caller’s select the
mailboxes as follows:
Mailbox 1
Callers simply leave
their message after
the tone.
Mailbox 2
After the tone, the
caller presses 2on
their keypad and then
leaves their message.
Mailbox 3
After the tone, the
caller presses 3on
their keypad and then
leaves their message.
10
Hello,your call cannot
be taken at the moment,so please
leave your message after the tone.
An outgoing message
telling callers how to
use the mailboxes
might be:
“Hello, we cannot take
your call at the
moment, so please
leave your message
after the tone. If you
have a message for
Sally, dial 2 after the
tone and then speak.
If you have a message
for John, dial 3 after
the tone and then
speak.”
Outgoing Messages
The outgoing message
is the message a caller
hears when your
answering machine
answers a call.
Your Response 85
holds three outgoing
messages: OGM 1,
OGM 2 and Answer
Only OGM.
Setting your Response
85 to play either OGM
1or OGM 2 will allow
callers to leave a
message. The pre-set
Important
outgoing messages on
OGM 1 and 2are:
The pre-set OGM’s do not
tell callers how to leave
messages in Mailboxes 2
and 3. If you record your
own OGM, you can tell
callers they can leave
messages for specific
people by pressing 2 or 3
on their keypad after the
tone. See the previous
section - ‘Mailboxes’.
AO OGM is the
‘answer only’ outgoing
messages. If you
select this callers will
hear....
and they will not be
able to leave you a
message.
Hello,your call cannot
be taken at the moment and you
can not leave a message, so please
call later.

10cm from the built-in
microphone.
Your outgoing message
may sound something like
this: “Hello, I’m sorry I
can’t take your call at
present. If you would like
to leave a message, please
speak after the tone.”
Or if you are using the
mailboxes your message
might be: “Hello, we
cannot take your call
at the moment, so
please leave your
message after the tone.
If you have a message
for Sally, dial 2 after
the tone and then
speak. If you have a
message for John, dial
3 after the tone and
then speak.” See
‘Mailboxes’, page 10.
Read all the steps
before you begin
recording.
First select the
outgoing message you
wish to change…
select, release the
OGM SELECT button.
Your Response 85 will
announce the name of
the outgoing message
you have chosen and
it will be set to play to
incoming callers.
To record a new
outgoing message
You can record your
own outgoing
message to replace
any pre-recorded
message. If you
record your own
message the pre-
recorded message is
automatically removed
and stored in memory,
in case you wish to
reinstate it.
Your Response 85 has a
total recording capacity of
54 minutes. Any outgoing
message you record can be
up to 2 minutes long, but
you should keep it short to
allow more time for
recording incoming calls.
To record your
outgoing message
speak clearly, 5 to
11
1
2
1
To check which
outgoing message is
currently set
Press the OGM
SELECT button (under
the lid).
Your Response 85 will
announce either:
‘Outgoing
announcement 1’,
‘Outgoing
announcement 2’ or
‘Answer Only
announcement’.
The display will also
indicate the outgoing
message by displaying
either: for message1,
for message 2 or
for ‘Answer Only’.
To set a different
outgoing message
Press and hold the
OGM SELECT button.
When you hear the
name of the outgoing
message you wish to
Built-in
microphone

To re-record your
outgoing message, repeat
this procedure.
To reinstate the
pre-set OGM
You can delete your
outgoing message
and return to your
Response 85’s pre-
recorded outgoing
message.
Firstly, make sure you
have selected the
correct outgoing
message.
Press the OGM
CHECK/RECORD
button.
Your outgoing
message will be
played back to you
While the message is
playing, press the
DELETE button.
Press and hold the
OGM SELECT button.
Release the button
when you hear the
name of the message
you wish to change.
Then, to record your
new message…
Press and hold the
OGM CHECK/RECORD
button.
Your Response 85 will
beep to tell you when
it is starting recording.
Keep holding the OGM
CHECK/RECORD
button and record
your message into the
microphone.
When you have
finished, release the
button.
Your Response 85 will
beep, play back your
message, then beep to
confirm the recording.
The new message will
be set to play to
incoming callers.
Your Response 85 will
beep and play its pre-
recorded outgoing
message. This message
will be set to play to
incoming callers.
Your own message has
now been replaced by
the Response 85’s
original pre-recorded
message.
To switch your
Response 85 on and
off
Press the ANSWER
ON/OFF button. Your
Response 85 will
announce…
The display shows a
single dash.
12
Answer off
Hello,your call cannot
be taken at the moment,so please
leave your message after the tone.
Answer
on/off
Stop
1
2
1
2
3
1
2
3
(Your message)
Delete/Time

Mailbox 1
When your Response
85 has received a new
messages (or memos)
in the Mailbox 1 it will
beep (see ‘To switch
Message Alert off’,
page 14) and the
display will show the
number of messages
received, eg. 4.
If you have more than
9 messages the
display will show a
flashing 9.
Mailboxes 2 & 3
When new messages
(or memos) are left in
private mailboxes your
Response will not
beep but the light next
to the relevant
mailbox flashes.
When you have
listened to one of the
new messages, the
light stops flashing but
remains lit to indicate
that the mailbox still
contains messages.
Press the ANSWER
ON/OFF button again.
The machine will
announce…
The display shows the
number of stored
messages or if
switched to Answer Only.
When you switch your
Response 85 on again, it
will use the OGM you
were using before the
answering machine was
switched off.
To receive incoming
messages
Providing it is
switched on, your
Response 85 will
automatically record
an incoming message.
Remember, if the
machine is set to
Answer Only callers
cannot leave a message.
It must be set to either
OGM 1 or OGM 2,
(see ‘Outgoing
messages’, page 10).
Two minutes is the
maximum time allowed
for each incoming
message. If the maximum
message length is reached
your Response 85 will
announce, ‘Thank you for
calling’ and disconnect the
line.
Your Response 85 can
record up to 59 messages
and memos (divided
between mailboxes),
within a total recording
time of 54 minutes. If the
memory capacity is full,
the display will flash ..
.. and your answering
machine will not record
further messages in any
mailbox.
13
2
mailbox
3
mailbox
Answer on
Answer
on/off
Stop

To switch Message
Alert off
You can stop your
Response 85 from
beeping to indicate
new memos and
messages in
the Mailbox 1.
Press and hold the
䊴SKIP button.
Your Response 85 will
announce......
To switch Message
Alert on
Press and hold the
䊴SKIP button again.
Your Response 85 will
announce…
To pause a
message in Mailbox 1
While listening to a
message in Mailbox 1,
press the PLAY/MEMO
button.
Playback will be
paused and the
machine will beep.
Press the PLAY/MEMO
button again to
resume listening.
If you do not resume
listening within 60
seconds your Response 85
will return to standby.
To play messages in
Mailboxes 2 & 3
Press the MAILBOX 2
button to play
messages in mailbox 2,
or MAILBOX 3 to play
messages in mailbox 3.
14
To play back a
message from the
Mailbox 1
Press the PLAY/MEMO
button. Your Response
85 will announce…
The message will then
be played back with an
announcement of the
day and time it was
received.
If you have more than
one message,
messages will be
played back in the
order in which they
were received.
When all your
messages have been
played back, your
Response 85
announces…
Play
Pause
memo
1
2
mailbox
3
mailbox
Message alert
off
Message alert
on
You have xmessages
in mailbox 1.
Message 1.
Play
Pause
memo
End of messages
Skip
Skip
2

Your Response 85 will
announce…
and plays its messages.
To pause playback
of messages in
Mailboxes 2 & 3
While listening to a
message in Mailbox 2
or 3, press the
MAILBOX 2 button or
MAILBOX 3 button
(whichever one is
playing).
Playback will be
paused and the
machine will beep.
Press the relevant
MAILBOX button again
to resume listening.
To skip forward or
backward through
messages
When playing back
messages, you can
skip forward to the
next message or
backward to the start
of the current
message (or previous
message).
Press the PLAY/MEMO
button. Your Response
85 announces ‘Message
one’ and plays the first
message.
While the message is
being played back ...
Press the SKIP 䊳
button, to skip forward
to the beginning of the
next message.
Press the 䊴SKIP
button once to return
to the start of the
current message.
15
1
2
1
2
Skip
Skip
Delete/Time
Message
deleted
Skip Skip
Message 1.
Play
Pause
memo
You have x
messages in
Mailbox 2 (or 3).
2
mailbox
3
mailbox
1
2
Press the 䊴SKIP
button twice to go
back to the start of the
previous message.
To delete individual
messages
Press the PLAY/MEMO
button to play your
messages.
When the message
you wish to delete is
playing, press the
DELETE button.
Your Response 85
announces ...
Repeat the procedure
to delete any further
messages.

16
Your Response 85 will
announce…
It will then continue
its count down to 0,
and return to the set
answer mode.
If you accidentally delete
all messages, you can still
save them by pressing the
ANSWER ON/OFF button
before count down reaches 0.
To set the answer
delay
Answer delay sets the
number of times your
Response 85 will ring
before answering a
call.
Press and hold the
SKIP 䊳button.
Your Response 85 will
announce the current
1
Skip
All messages
deleted
2
2 rings
Time Saver, 2,3,
4,5,6, 7,8, 9
setting and it is shown
on the display.
Keep holding the
SKIP 䊳button. Your
Response 85 will
announce the answer
delay options…
Time Saver
Your Response 85 is pre-
set to Time Saver. This
means that during remote
access (see page 20), if
any messages have been
recorded, your Response
85 will answer after only
2 rings. If there are no
messages, it will answer
after 6 rings, thereby
allowing you the option of
hanging up before your
Response 85 answers. By
using Time Saver you can
avoid the cost of a call.
1
Delete/Time
When you have finished
deleting and your
Response 85 has finished
playing all messages, you
will hear ‘End of
messages’. If you press
the ANSWER ON/OFF
button within 8 seconds of
hearing this message you
can cancel all deletions
and retain your messages.
To delete all
messages
Following play back of
messages, your
Response 85 will count
down from 8to 0.
During this time you
can delete all stored
messages.
Press the DELETE
button while the
display is counting
down from 8 to 0.

1
2
When you hear your
desired setting,
release the SKIP 䊳
button. After 2
seconds your
Response 85 will
announce the new
answer delay setting
and then return to its
set answer mode.
To check the answer
delay setting
Press the SKIP 䊳
button. Your
Response 85 will
announce the current
delay setting.
To record a memo
in Mailbox 1
A personal memo can
be recorded in your
Response 85’s
Mailbox 1 and left as a
message for another
user. Memos can be
of any length, up to
maximum recording
capacity (54 minutes),
but you should keep
them short to allow
time for recording
incoming messages.
Read all the steps
before you begin
recording.
Press and hold the
PLAY/MEMO button.
Your Response 85 will
beep.
Speak clearly into the
built-in microphone.
17
Answer delay,
4 rings
Answer delay,
4 rings
3
Play
Pause
memo
Skip
Built-in
microphone
1
3
2
mailbox
3
mailbox
When you have
completed your
memo, release the
PLAY/MEMO button.
Your Response 85 will
beep again.
Your memo is now
stored and can be
played back later.
Your Response 85
stores memos and
treats them in the
same way as a
incoming messages.
To play back, delete or
skip forward or backward
through memos follow the
instructions for playing
back messages from the
Mailbox 1 (pages 14 and
15).
To record a memo
in Mailboxes 2 & 3
Press and hold the
MAILBOX button in
which you want to
leave the memo.

1
18
VIP feature
Your Response 85 has
a VIP feature which
allows designated
callers to beep you to
urge you to take their
call when your
answering machine is
switched on. If you do
not answer the call but
your Response 85 is
set to either OGM 1 or
OGM 2, they can still
leave a message.
Other callers will be
answered by your
Response 85 without
disturbing you.
To switch VIP
on and off
VIP is pre-set to OFF.
Press and hold the
VIP button then
immediately press the
ANSWER ON/OFF
button..
1
2
To use
call screening
Your Response 85 can
answer an incoming
call for you, allowing
you to identify the
caller and decide
whether to take the
call. (The VIP feature
must be set to off).
Make sure that the
volume is at an audible
level, (see ‘To set the
volume’, page 8).
Allow the incoming
call to be answered by
your Response 85 as
normal. You will hear
the caller begin to
leave a message
If you decide to take
the call, lift the phone
handset and you can
speak to the caller.
Recording will stop
automatically
If, when you lift the
telephone handset and
your Response 85 does not
stop recording, either
replace the handset and
lift again, or press the
ANSWER ON/OFF button.
2
3
Built-in
microphone
Speak clearly into the
built-in microphone.
When you have
completed your
memo, release the
MAILBOX button.
Your Response 85 will
beep again.
Your memo is now
stored and can be
played back later
To skip the outgoing
message
Callers can skip the
outgoing message and
go directly to the Main
Mailbox.
Upon start of outgoing
message…
Your caller dials #on
their phone. The
outgoing message is
skipped and your caller
can leave a message in
the Main Mailbox, or
switch to one of the
private boxes.
Answer
on/off
Stop
+

19
To check VIP code
and setting
Briefly press the VIP
button. Your Response
85 will announce the
code number and tell
you if the setting is on
or off.
To cancel any
procedure
Pressing the ANSWER
ON/OFF/STOP button
will cancel any
procedure currently in
progress.
After pressing the
button your Response
85 will return to
‘answer on’ mode.
Forty.
Off.
Answer
on/off
Stop
To change the VIP
code
Your VIP code can be
any number between
40 and 99 (inclusive).
Press and hold the
VIP button.
Keep holding VIP and
press the SKIP 䊳
button to move
forward through
numbers, or press
䊴SKIP to move
backwards.
When you reach your
desired code number
release both buttons.
Your Response 85 will
announce the new VIP
number.
1
2
3
Skip Skip
Fifty-five set
+
Delete/Time 0Batter
y
Low
1
VIP will switch on and
its indicator light will
be visible in the
display.
Repeat the procedure to
switch VIP off.
To allow special
callers to signal
their presence
Give your special
callers the VIP code.
Your pre-set code is 40.
Tell them to key in the
code (one number at a
time) when they hear
your outgoing
message. VIP alert
lasts for 30 seconds.
If the caller wishes to cancel
the alert, they press #.
Table of contents
Other BT Answering Machine manuals

BT
BT 4016 Classic User manual

BT
BT BT3570 Specification sheet

BT
BT RESPONSE 70 User manual

BT
BT RESPONSE 5 User manual

BT
BT RESPONSE 123e User manual

BT
BT Response RESPONSE75 User manual

BT
BT FREELANCE XA 5000 User manual

BT
BT RESPONSE 12 User manual

BT
BT RESPONSE 15 + User manual

BT
BT Sonus 1500 Specification sheet