BTC 9001BRF User manual

9001BRF QIG 中
3100505140 v1.2
無線鍵盤滑鼠組快速安裝指南
硬體安裝
頻道切換
CH1
CH2
Slide Switch
(-)
Battery 1.5V 2pcs
(+) ID Button
1. 用接收器後面的頻道切換開關,設定您所選擇的頻
道 CH1 或 CH2。設定後請記住您的選擇。
2. 將接收器連接到電腦上,接收器的接頭連接到電腦
的連接埠。
3. 安裝鍵盤的電池,並請注意電池正負極方向。
4. 在鍵盤背面也有一個頻道切換開關,請設定與接收
器相同的頻道。
5. 安裝滑鼠的電池,請注意電池的正負極方向。
6. 設定滑鼠的頻道,請設定與接收器和鍵盤相同的頻
道。
CHANNEL
SWITCH ID BUTTON
ID 設定 ID Button
CHANNEL
SWITCH ID BUTTON
這個 ID 辨識功能有助於防止相同環境中 RF 鍵盤的干
擾。在您更換電池後,或當您的鍵盤組無法正常工作
時,請您務必重新設定鍵盤組的 ID。
接收器、滑鼠和鍵盤上會有 CONNECT 字樣以標示 ID
設定鈕的位置。
在接收器下方的 LED 燈顯示信號接受狀態。
1. 電腦為開機狀態下,才可設定 ID。
2. 按一次接收器側邊的 ID 設定鈕。
3. 按一次滑鼠底部的 ID 設定鈕。
4. 按一次鍵盤底部的 ID 設定鈕。
CH2 CH1
ID Button
注意事項:
1. 您可以至控制台的滑鼠選項中,改變連按兩次滑鼠的速度。
軟體安裝
鍵盤驅動程式安裝
為使您的鍵盤發揮最大的功能,請安裝 KeyMaestro 驅動程式,KeyMaestro 驅動程式位於包裝
內所附的磁片中。
1. 請先移除電腦中其他的鍵盤驅動程式。
2. 將驅動程式磁片插入您的電腦中並找出"SetupKey.exe"檔名上點二下以執行。
3. 依照螢幕上的指示,以完成安裝的步驟。內定的安裝路徑為
c:\Program Files\KMaestro
,您可以
在安裝過程中改變路徑。
接收器接頭正面 接收器接頭背面
滑鼠底部示意圖 滑鼠底部的頻道
切換開關
接收器的 ID 設定鈕
滑鼠的 ID 設定鈕
鍵盤的 ID 設定鈕

9001BRF QIG 英
3100505140 v1.2
Wireless Keyboard & Mouse Kit Quick Installation Guide
Hardware Installation
Slide Switch Setting
CH1
CH2
Slide Switch
(-)
Battery 1.5V 2pcs
(+) ID Button
1. Connect the receiver to your PC by plugging in
the receiver connector into your PC.
2. Take the receiver and select channel CH1 or
CH2 by using the slide switch on the back of the
receiver. (Remember your selection.)
3. Take the keyboard and make sure the batteries
on the back are installed correctly. (Follow the
polarity signs in the battery compartment.)
4. Use the slide switch on the back of the
keyboard to select the same channel as the one
selected in step 3 on the receiver.
5. Take the mouse and make sure the batteries on
the back are installed correctly. (Follow the
polarity signs in the battery compartment.)
6. Use the slide switch on the back of the mouse to
select the same channel as the one selected in
step 3 and 5. CHANNEL
SWITCH ID BU TTON
ID Setting
ID Button
CHANNEL
SWITCH ID BUTTON
This ID-recognition function helps to protect against
interference from other RF keyboards in the same
environment. Remember to set the ID when you replace
the batteries or your key board kits do not work properly.
The word CONNECT labels the ID button on each unit.
The LED under ID button of receiver shows connecting
condition.
1. Your PC must be on to change the ID setting.
2. Press ID button on the side of the receiver once.
3. Press ID button on the bottom of the mouse once.
4. Press ID button on the bottom of the keyboard battery
compartment once.
CH2 CH1
ID Button
Important:
1. You can adjust the double-click speed of mouse by opening up the Mouse Properties in the
Windows Control Panel and changing the speed.
Software Installation
Keyboard Driver Installation
In order to take advantage of the special button functionality of the keyboard, you have to
install the keyboard driver disk included in the box.
1. Remove any existing keyboard software from the computer.
2. Insert the driver disk in your computers, and run "SetupKey.exe".
3. Follow the on screen instructions to finish the installation procedure. The driver by default will
be installed at C:\Program Files\KMaestro.
Slide Switch Setting
of Mouse
Back View of Receiver Plug
Front View of Receiver Plug
Bottom View of Mouse
ID Button of Receiver
ID Button of Mouse
ID Button of Keyboard

9001BRF QIG 法
3100505140 v1.2
Kit Souris et Clavier Sans Fil Guide d’Installation Rapide
Installation Matérielle
Réglage du curseur de sélection
CH1
CH2
Slide Switch
(-)
Battery 1.5V 2pcs
(+) ID Button
1. Connectez le récepteur à votre PC en branchant le
connecteur du récepteur sur votre PC.
2. Prenez le récepteur et sélectionnez le canal CH1
ou CH2 en utilisant l’interrupteur à l’arrière de votre
récepteur. (Rappelez-vous votre sélection.)
3. Prenez le clavier et assurez-vous que les piles à
l’arrière sont installées correctement. (Suivez les
signes de polarité dans le compartiment des piles.)
4. Utilisez l’interrupteur à l’arrière du clavier pour
sélectionner le même canal que celui réglé sur le
récepteur à l’étape 3
5. Prenez la souris, et assurez-vous que les piles à
l’arrière sont installées correctement. (Suivez les
signes de polarité dans le compartiment des piles.)
6. Utilisez l’interrupteur à l’arrière de la souris pour
sélectionner le même canal que celui sélectionné à
l’étape 3 et 5.
CHANNEL
SWITCH ID BUTTON
Réglage ID
ID Button
CHANNEL
SWITCH ID BUTTON
La fonction de reconnaissance-ID vous aide à vous protéger
des interférences provenant des autres claviers RF dans le
même environnement. Pensez à régler l’ID lorsque vous
remplacez les piles sinon votre clavier ne fonctionnera pas
correctement.
Le mot CONNECT désigne le bouton ID de chaque unité.
Le témoin LED sous le bouton ID du récepteur indique l'état
de la connexion.
1. Votre PC doit être mis en marche pour modifier le
Réglage d’ID.
2. Pressez une fois le bouton ID situé sur le côté latéral
du récepteur.
3. Pressez une fois le bouton ID situé sous la souris.
4. Pressez une fois le bouton ID situé sous le
compartiment des piles du clavier.
CH2 CH1
ID Button
Important
1. Vous pouvez régler la vitesse du double-clic de la souris en ouvrant les Propriétés de la Souris
dans le Panneau de Configuration Windows et en modifiant la vitesse.
Installation Logicielle
Installation du Pilote Clavier
Afin de profiter de la fonctionnalité spéciale du bouton du clavier, vous devrez installer le pilote du
clavier se trouvant sur le disk de pilotes livré dans la boîte.
1. Retirez tous les logiciels pour clavier existants sur l’ordinateur.
2. Insérez le disque des pilotes dans votre ordinateur, et exécutez le fichier "SetupKey.exe".
3. Suivez les instructions à l’écran pour terminer la procédure d’installation. Le chemin d’accès par
défaut du pilote sera C:\Program Files\KMaestro.
Curseur de sélection
du réglage
Fiche du Récepteur –
Vue Arrière
Fiche du Récepteur –
Vue avant
Vue de dessous de la souris
Bouton d’ID du Récepteur
Bouton d’ID de la Souris
Bouton d’ID du Clavier

9001BRF QIG 德
3100505140 v1.2
Kabelloses Tastatur- & Mauspaket Schnellinstallationsanleitung
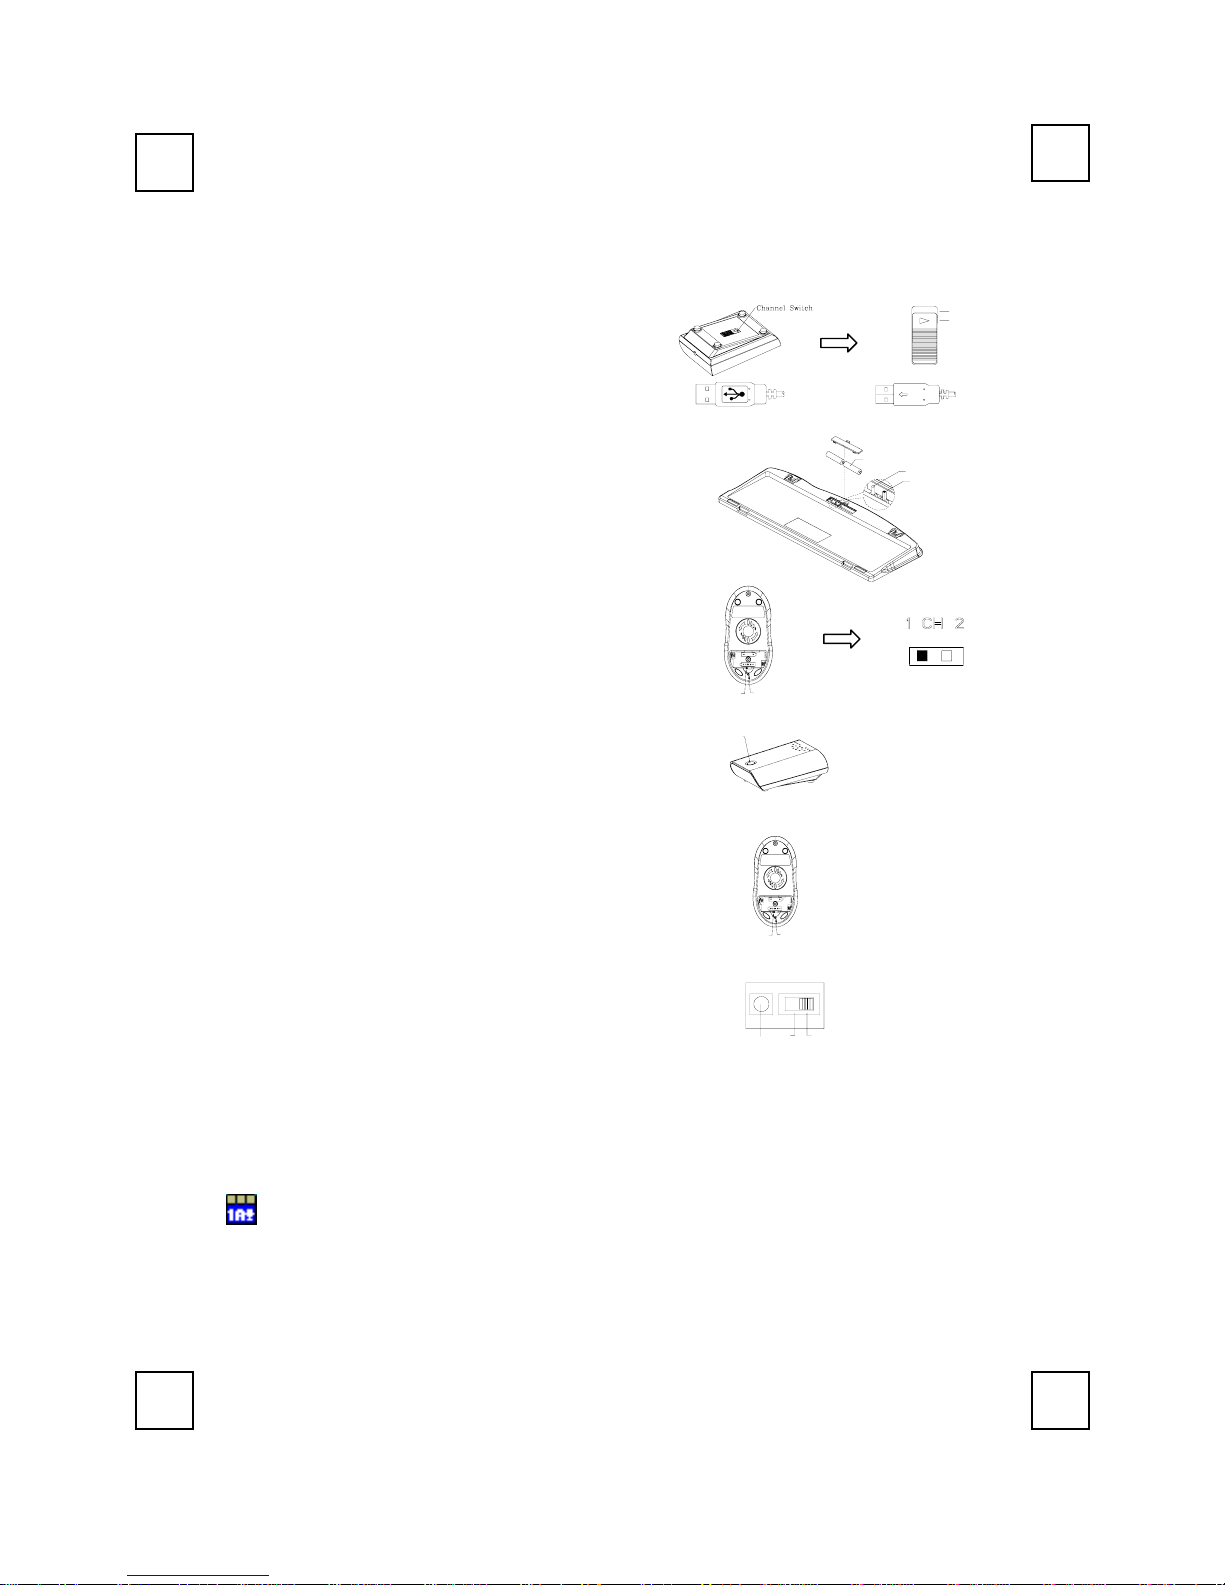
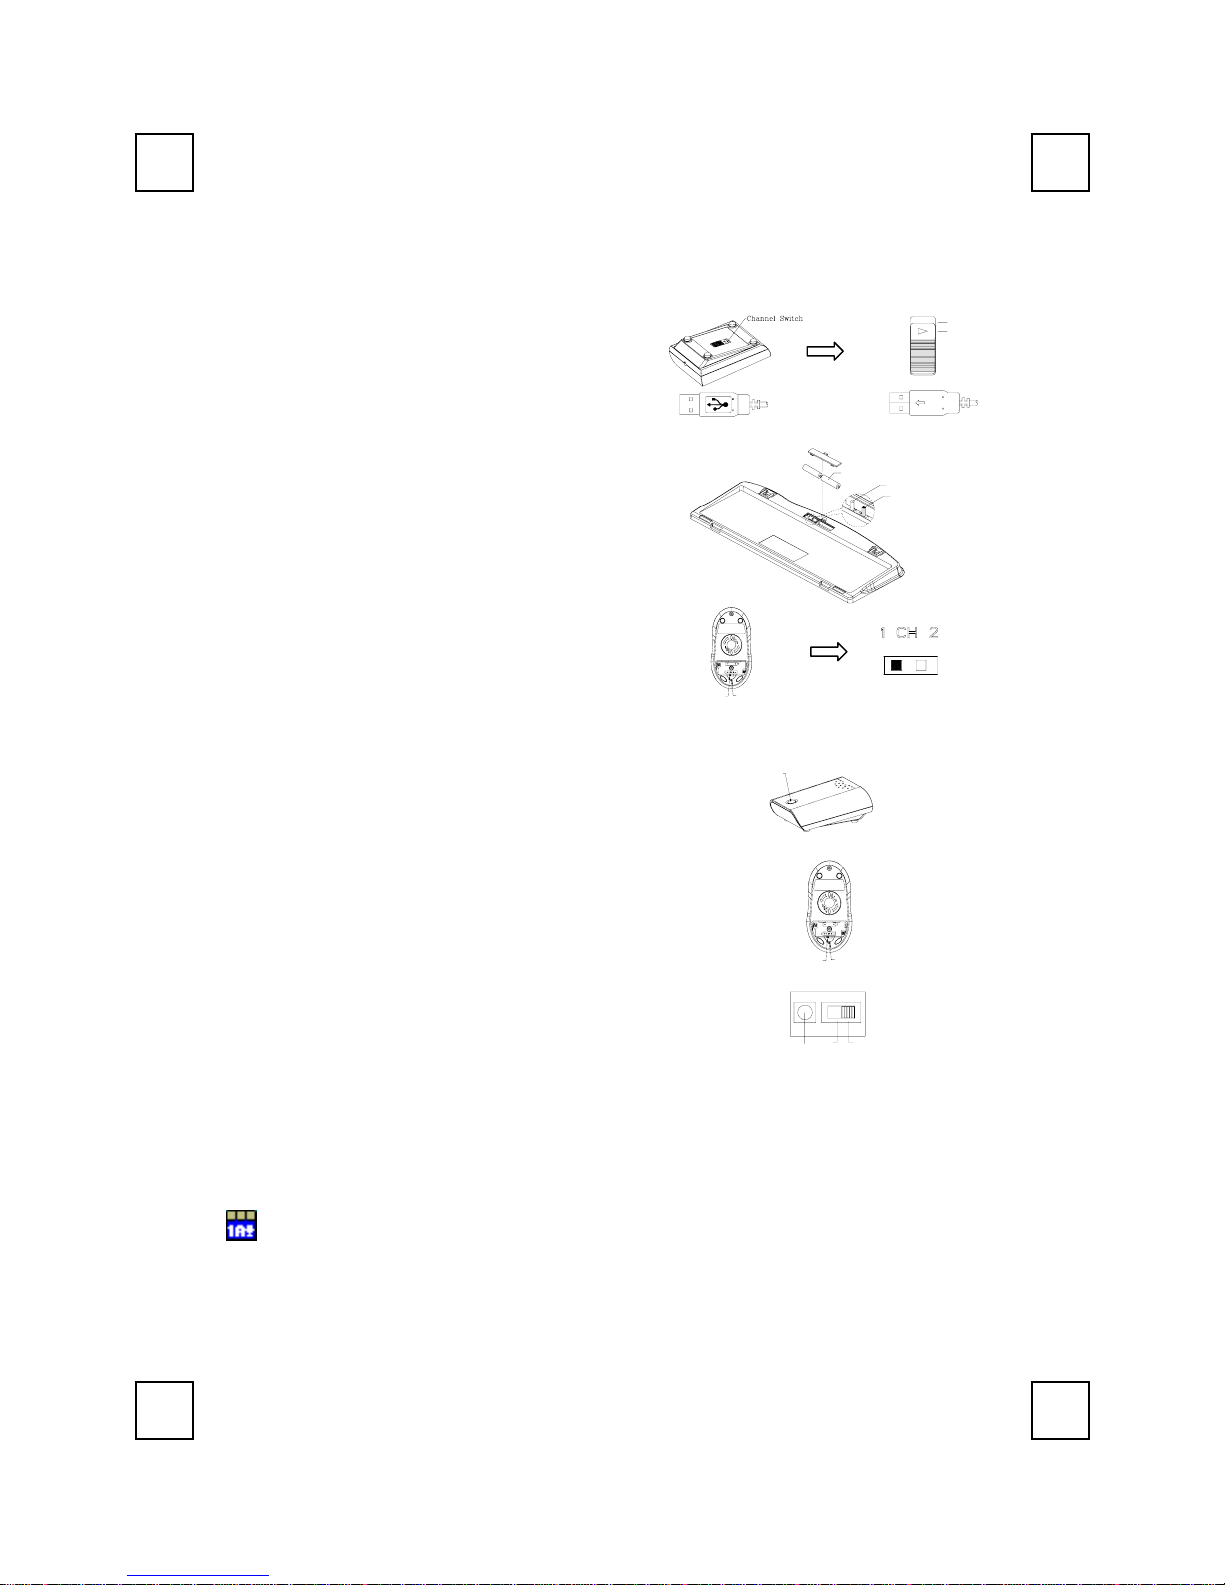
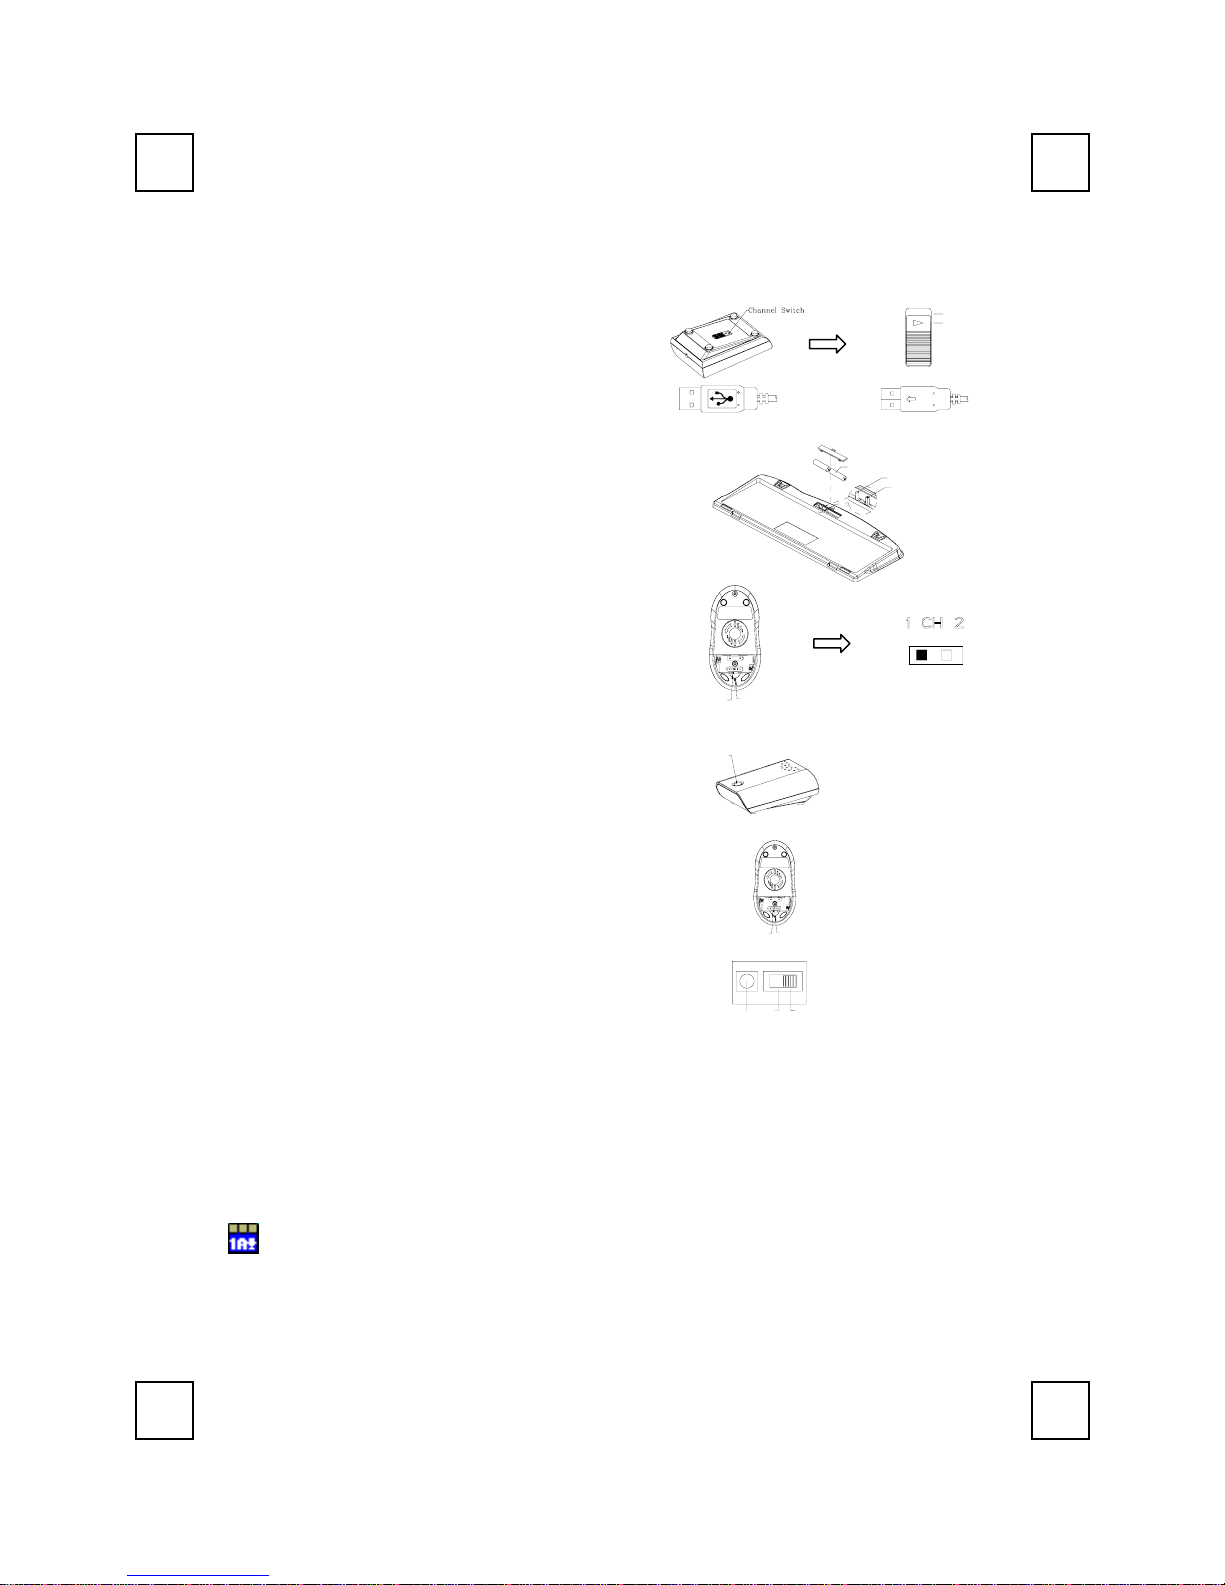
Hardwareinstallation
Schiebeschaltereinstellungen
CH1
CH2
Slide Switch
(-)
Battery 1.5V 2pcs
(+) ID Button
1. Verbinden Sie den Empfänger mit Ihrem PC, indem
Sie den Empfängerstecker in den PC einstecken.
2. Nehmen Sie den Empfänger und wählen den Kanal
CH1 oder CH2 mit Hilfe des Schiebeschalters auf der
Rückseite des Empfängers. (Behalten Sie Ihre
Auswahl in Erinnerung)
3. Vergewissern Sie sich bei Ihrer Tastatur, dass die
Batterien an der Rückseite richtig installiert sind.
(Beachten Sie die Markierung für die Polarität der
Batterien im Batteriefach)
4. Verwenden Sie den Schiebeschalter auf der
Rückseite der Tastatur, um den selben Kanal wie den
in Schritt 2 am Empfänger gewählten zu wählen.
5. Verwenden Sie den Schiebeschalter auf der
Rückseite der Tastatur, um den selben Kanal wie den
in Schritt 2 am Empfänger gewählten zu wählen.
6. Vergewissern Sie sich bei Ihrer Maus, dass die
Batterien an der Rückseite richtig installiert sind.
(Beachten Sie die Markierung für die Polarität der
Batterien im Batteriefach) CHANNEL
SWITCH ID BUTTON
ID-Einstellung
ID Button
CHANNEL
SWITCH ID BUTTON
Die ID-Erkennungsfunktion verhindert die Interferenzen
durch die anderen RF-Mäuse in der selben Umgebung.
Die ID muss neu eingestellt werden, nachdem die Batterien
ausgewechselt wurden oder wenn die Tastatur nicht richtig
funktioniert.
Der ID-Knopf jedes Gerätes wird mit dem Wort
"CONNECT" gekennzeichnet.
Die LED unter der ID Taste des Empfängers zeigt den
Verbindungsstatus.
1. Ihr PC muss eingeschaltet sein, um die ID-Einstellung
zu ändern.
2. Drücken Sie einmal die ID-Taste auf der Seite des
Empfängers.
3. Drücken Sie einmal die ID-Taste auf der Unterseite der
Maus.
4. Drücken Sie einmal die ID-Taste auf dem Boden des
Tastaturbatteriefachs.
CH2 CH1
ID Button
Wichtige Hinweise
1. Sie können in Eigenschaften von Maus unter Windows Systemsteuerung die
Doppelklickgeschwindigkeit der Maus einstellen.
Softwareinstallation
Installation des Tastaturtreibers
Um die Funktion der speziellen Taste der Tastatur ausnutzen zu können, müssen Sie den
Tastaturtreiber, der sich auf der Treiber-disk in der Box befindet, installieren.
1. Entfernen Sie alle existierende Tastatursoftware von dem Computer.
2. Legen Sie die Treiberdisk in Ihren Computer und führen dann "SetupKey.exe" aus.
3. Folgen Sie den Anweisungen auf dem Bildschirm, um den Installationsprozess zu vervollständigen.
Nach der Standardeinstellung wird der Treiber unter dem Verzeichnis C:\Program Files\KMaestro
installiert.
Unterseite der Maus
Schiebeschalter
zur Einstellung
Empfängerstecker –
Rückseite
Empfängerstecker –
Frontseite
ID-Taste des Empfängers
ID-Taste der Maus
ID-Taste der Tastatur

9001BRF QIG 義
3100505140 v1.2
Tastiera senza filo e Kit mouse Guida all’installazione veloce
Installazione Hardware
Impostazione interruttore di scorrimento
CH1
CH2
1. Collegare il ricevitore al PC inserendo il connettore
del ricevitore nel PC.
2. Prendere il ricevitore e selezionare canale CH1 o
canale CH2 utilizzando la linguetta sul retro del
ricevitore. (Ricordatevi la selezione fatta.)
3. Prendere la tastiera ed assicurarsi che le batterie
siano installate correttamente. (Seguire le indicazioni
della polarità nello scomparto delle batterie.)
4. Utilizzare la linguetta sul retro della tastiera per
selezionare lo stesso canale, selezionato al punto3,
del ricevitore.
5. Prendere il mouse ed assicurarsi che le batterie
siano installate correttamente. (Seguire le indicazioni
della polarità nello scomparto delle batterie.)
6. Utilizzare la linguetta sul retro del mouse per
selezionare lo stesso canale selezionato ai punti 3 e
5.
Channel Switch
(-)
Battery 1.5V 2pcs
(+) ID Button
CHANNEL
SWITCH ID BUTTON
Impostazione ID
ID Button
CHANNEL
SWITCH ID BU TTON
Questa funzione di riconoscimento ID aiuta a proteggere
da interferenza da altre tastiere RF presenti nello stesso
ambiente. Ricordarsi di impostare l’ID quando si
sostituiscono le batterie o quando i sistemi non
funzionano in modo appropriato.
La parola CONNECT indica il tasto ID su ciascuna unità.
Il LED sotto il pulsante ID del ricevitore mostra la
situazione del collegamento.
1. Il PC deve essere acceso per cambiare
l’impostazione dell’ID.
2. Premere una volta il pulsante ID sul lato del
ricevitore.
3. Premere una volta il pulsante ID nella parte inferiore
del mouse
4. Premere una volta il tasto ID, sulla parte inferiore
dello scomparto batterie della tastiera.
CH2 CH1
ID Button
Importante
1. Si può regolare la velocità del doppio clic del mouse aprendo la finestra Proprietà Mouse, nel
Pannello di controllo di Windows e modificando il valore della velocità.
Installazione Software
Installazione Driver Tastiera
Al fine di trarre vantaggio dalla funzionalità del pulsante speciale della tastiera, occorrerà
installare il driver della tastiera che si trova sul disk driver incluso nella scatola.
1. Rimuovere dal computer qualsiasi software tastiera esistente.
2. Inserire il disco driver nel computer, ed eseguire "SetupKey.exe"..
3. Seguire le istruzioni su schermo per completare l'installazione. Il driver sarà installato in
C:\Programmi\Kmaestro.
Vista infer. del mouse
Connettore ricevitore -
Vista
p
osteriore
Interr. di scorrim.
di impostaz.
Connettore ricevitore -
Vista frontale
Pulsante ID del ricevitore
Pulsante ID del mouse
Pulsante ID della tastiera
3100505140 v1.2 A
p
ril 2003 Printed in China
Other manuals for 9001BRF
1
Table of contents
Languages:
Other BTC Computer Accessories manuals