manuals.online logo
Brands
  1. Home
  2. •
  3. Brands
  4. •
  5. BUCKINGHAM MFG
  6. •
  7. Security Sensor
  8. •
  9. BUCKINGHAM MFG 488 Series Guide

BUCKINGHAM MFG 488 Series Guide

1
BUCKINGHAM MFG.
488 SERIES OUTER BROWN STRAP REPLACEMENT INSTRUCTIONS
(Note: This Outer Brown Strap must only be used with the SuperSqueeze Assembly)
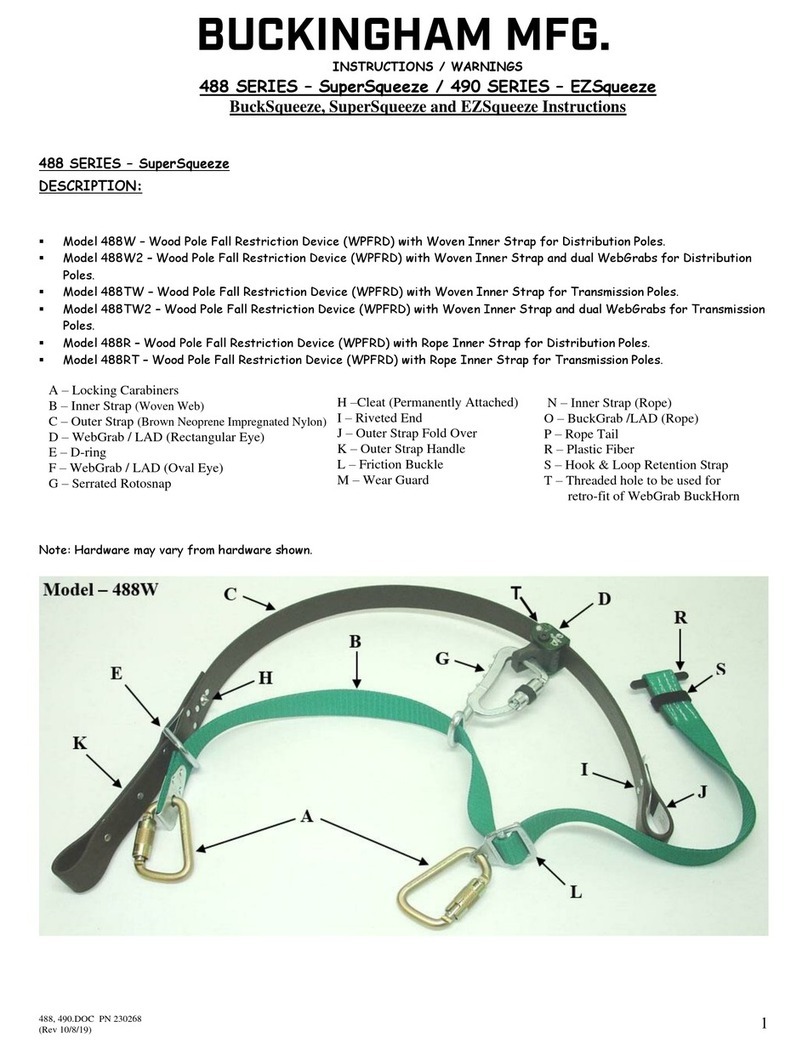
A. TO REMOVE THE INNER STRAP WITH CARABINERS FROM THE OUTER BROWN STRAP:
1. Figure 1 shows an overall view of the SuperSqueeze with Carabiners (Note: The Plastic Fiber may, or may not, be present
on the end of the Inner Strap).
2. Remove the Locking Carabiner from the Inner Strap (Fig.2).
3. Slide the Inner Strap out from the D-ring (Fig.3).
4. Remove the Serrated RotoSnap from the WebGrab on the Outer Brown Strap (Fig. 4).
5. The Outer Brown Strap should now be completely separated from the Inner Strap.
6. The WebGrab on the Outer Brown Strap (Fig.5) will now need to be disassembled.
a. Remove the Guide Bolt using two 7/16” wrenches, or similar tools (Fig.6). Discard the removed nut.
b. Next, remove the Shoulder Bolt using a 3/16” Allen wrench and a 1/2” wrench (Fig.7). Note: This bolt has thread
locker on it when it is installed. The Allen wrench may have to be placed into a vise to assist in removing the nut.
Discard the removed nut.
Fig. 2
Fig. 3
Fig. 4
Carabiner
Inner
Strap
D-ring
Plastic
Fiber
Fig.1
Serrated RotoSnap
WebGrab
Cleat
D-Ring
Carabiner
Inner Strap
(Woven)
Outer Brown
Strap
Fig.5
Fig.6
Fig.7
Fig.8
Push
Rotate
Shoulder
Bolt
Guide Bolt
Guide Bolt
Shoulder
Bolt
488 OUTERSTRAPREPL.INST
P/N: 230299, Rev._12/20/17
2
c. The cam is being held in place by the return spring and the frame. To remove the cam, push on the edge and rotate
the cam outward as shown in Figure 8. Be careful not to lose the spring upon removal (Fig.9).
d. The WebGrab frame can now be removed from the used Outer Brown Strap (Fig.10).
7. Now the New Outer Brown Strap can be replaced and the WebGrab can be re-assembled.
a. Place the new Outer Brown Strap onto the WebGrab frame with the Cleat and D-Ring facing upwards and the arrow
on the WebGrab frame pointing towards them (Fig.9).
b. Place the spring into the cam (Fig.11).
c. Align the cam and spring to install the spring tab into the small hole in the frame according to the diagram on the
base (Fig.12). The small spring tab should start into the hole. Next, you need to compress the spring slightly by
pushing on the side and rotating inward towards the base ears (opposite rotation as in Fig.8).
d. The cam should now “lay”inside the frame (Fig.13).
e. Ensure that the spring tab is FULLY inserted into the small hole in the side of the frame (Fig.14)
f. Align the hole in the cam with the holes in the frame and insert the shoulder bolt through the frame (from the spring
side) and cam (cam lever must be aligned as shown in the sketch on the side of the frame) (Fig.15).
g. Insert the Guide Bolt through both sides of the frame as shown in Figure 16.
h. Apply a small amount of Blue Loctite 242™ Removable Blue thread locker to the Shoulder Bolt and Guide Bolt
threads (Fig.17 & 18) protruding from the frame.
i. Install the two NEW nuts onto the threaded bolts (Fig19). The Shoulder Bolt nut should be tightened until the
threads come in contact with the shoulder of the bolt. The Guide Bolt nut should be installed as far as possible, but
not tightened, such that the Guide Bolt and nut FREELY ROTATE while installed into the cam frame. Both bolts
should be able to be rotated by hand (Fig.20). Test that the WebGrab cam rotates FREELY, and has sufficient spring
tension to bring the cam back into contact with the outer strap. Allow 24 hours for the thread locker to dry.
j. The WebGrab should now be fully assembled onto the new Outer Brown Strap.
8. The Serrated RotoSnap can now be reattached onto the Outer Brown Strap WebGrab Eye (Fig.4).
9. Re-insert the Inner Strap end through the D-ring and reconnect the Carabiner (Fig. 2 & 3).
10. The completed assembly should now look like Figure 1 above. Ensure there are no twists in the Inner Strap.
Fig.11
Fig.10
Fig.9
Fig.12
Small hole
in side of
frame
488 OUTERSTRAPREPL.INST
P/N: 230299, Rev._12/20/17
Fig.13
Fig.14
Fig.15
Fig.16
Fig.19
Fig.20
Fig.18
Fig.17
3
B. TO REMOVE THE INNER STRAP WITH SNAP HOOKS FROM THE OUTER BROWN STRAP:
1. Remove the Serrated RotoSnap from the WebGrab on the Outer Brown Strap (Fig.4).
2. IF a Plastic Fiber is included, it will be required to cut the tabs off on each side using cutters (Fig.22 & 23).
3. The WebGrab on the Inner Green Strap will now have to be partially disassembled.
a. Remove the nut from the Guide Bolt by using two 7/16” wrenches. Then remove the nut from the Shoulder Bolt
by using a 3/16” Allen wrench and a 1/2” wrench. The Shoulder Bolt has thread locker on it when it is installed.
Therefore, it may be necessary to place the Allen wrench in a vise to assist in removing the nut. Discard both
removed nuts. (Fig.24)
b. Remove the two bolts. Note: It is not necessary to remove the cam from the frame to remove the woven
material.
c. Unwrap the hook & loop strap retainer from the fold over end of the Inner Strap.
d. Pull the Inner Strap through the WebGrab. The cam may be rotated upwards slightly to assist in removing the
Inner Strap. (Fig.25-27)
e. Next, pull the Inner Strap through the Serrated RotoSnap eye (Fig.28 & 29).
f. Finally, pull the Inner Strap through the D-Ring (Fig.30).
4. The Inner Strap should now be completely separated from the Outer Brown Strap.
5. Replace the Outer Brown Strap by following the instructions A.6. through A.8. above.
6. Reinstall the Inner Strap by reversing step B.3.f above, and proceed to B.3.d (start at Fig.30 and work backwards to
Fig.25--Slide Inner Strap-fold over end-through the D-Ring, the Serrated RotoSnap eye, and then the WebGrab).
D-Ring
Fig. 28
Fig. 26
Fig. 27
Fig. 29
Fig. 25
Fig. 23
Fig. 24
Fig. 22
Shoulder Bolt
Guide
Bolt
Fig. 30
488 OUTERSTRAPREPL.INST
P/N: 230299, Rev._12/20/17
Plastic
Fiber
WebGrab
Serrated RotoSnap
Dee-Ring
Fig. 21
Cleat
Permanently
Attached Locking
Snap Hooks
Outer Brown
Strap
Inner Strap
(Woven)
4
7. Ensure the Inner Strap is oriented correctly, without any twists. The snap hook gates MUST face outward. Ensure the
WebGrab is oriented correctly with the arrow on the frame facing the permanently attached snap hook end of the
Inner Strap (Fig.31).
8. The Inner Strap WebGrab can be reassembled by following the instructions above beginning at A.7.e. through A.7.i.
9. Connect the Serrated RotoSnap to the WebGrab on the Outer Brown Strap.
10. The final assembly should be as shown in Figure 31.
It is imperative that a trial test while standing on the ground be
performed to ensure the SuperSqueeze is functioning properly prior
to climbing.
Patent Pending
BUCKINGHAM MFG. CO.
BINGHAMTON, NY
www.buckinghammfg.com
1-800-937-2825
Web site –www.buckinghammfg.com
Information contained in these written instructions supersedes all other information (written, audio, video etc.) produced by
Buckingham Mfg. prior to the revision date of this document.
Fig. 31
Snap gates MUST
Face outward
488 OUTERSTRAPREPL.INST
P/N: 230299, Rev._12/20/17
Other manuals for 488 Series

1

Other BUCKINGHAM MFG Security Sensor manuals

BUCKINGHAM MFG 108 Product manual

BUCKINGHAM MFG

BUCKINGHAM MFG 108 Product manual

BUCKINGHAM MFG SuperSqueeze 488PR Product manual

BUCKINGHAM MFG

BUCKINGHAM MFG SuperSqueeze 488PR Product manual

BUCKINGHAM MFG Buck Ergo Belt 4200 Product manual

BUCKINGHAM MFG

BUCKINGHAM MFG Buck Ergo Belt 4200 Product manual

BUCKINGHAM MFG 355 T Product manual

BUCKINGHAM MFG

BUCKINGHAM MFG 355 T Product manual

BUCKINGHAM MFG BuckTech 68K966 Series Product manual

BUCKINGHAM MFG

BUCKINGHAM MFG BuckTech 68K966 Series Product manual

BUCKINGHAM MFG 400000 BuckSorber Series Product manual

BUCKINGHAM MFG

BUCKINGHAM MFG 400000 BuckSorber Series Product manual

BUCKINGHAM MFG Buck Easy-Just Product manual

BUCKINGHAM MFG

BUCKINGHAM MFG Buck Easy-Just Product manual

BUCKINGHAM MFG 355B User manual

BUCKINGHAM MFG

BUCKINGHAM MFG 355B User manual

BUCKINGHAM MFG M3 User manual

BUCKINGHAM MFG

BUCKINGHAM MFG M3 User manual

BUCKINGHAM MFG 355TQ2 Product manual

BUCKINGHAM MFG

BUCKINGHAM MFG 355TQ2 Product manual

BUCKINGHAM MFG Buck LineBacker Series Product manual

BUCKINGHAM MFG

BUCKINGHAM MFG Buck LineBacker Series Product manual

BUCKINGHAM MFG 26 Series Product manual

BUCKINGHAM MFG

BUCKINGHAM MFG 26 Series Product manual

BUCKINGHAM MFG 488 Series Product manual

BUCKINGHAM MFG

BUCKINGHAM MFG 488 Series Product manual

BUCKINGHAM MFG BuckLimiter 5008 Series Product manual

BUCKINGHAM MFG

BUCKINGHAM MFG BuckLimiter 5008 Series Product manual

BUCKINGHAM MFG BuckSqueeze 483M Product manual

BUCKINGHAM MFG

BUCKINGHAM MFG BuckSqueeze 483M Product manual

Popular Security Sensor manuals by other brands

Nice LP21 User, installation and safety instructions

Nice

Nice LP21 User, installation and safety instructions

Eterna MHDB installation instructions

Eterna

Eterna MHDB installation instructions

PCB Piezotronics 109C11/PCS-2AF Installation and operating manual

PCB Piezotronics

PCB Piezotronics 109C11/PCS-2AF Installation and operating manual

Satel APMD-250 manual

Satel

Satel APMD-250 manual

ELRO FC451011 instruction manual

ELRO

ELRO FC451011 instruction manual

Greenlee FI-100 instruction manual

Greenlee

Greenlee FI-100 instruction manual

PCE Health and Fitness PCE-186 CB user manual

PCE Health and Fitness

PCE Health and Fitness PCE-186 CB user manual

BEA FALCON EXXL manual

BEA

BEA FALCON EXXL manual

Wenglor I08G003 operating instructions

Wenglor

Wenglor I08G003 operating instructions

Tyco Visonic SD-304C PG2 installation instructions

Tyco

Tyco Visonic SD-304C PG2 installation instructions

Conrad HZK202 operating instructions

Conrad

Conrad HZK202 operating instructions

ion science PhoCheck TIGER quick start guide

ion science

ion science PhoCheck TIGER quick start guide

Metrotech 9800XT SFL2 Series Operation manual

Metrotech

Metrotech 9800XT SFL2 Series Operation manual

Spectrex SharpEye 40/40R user guide

Spectrex

Spectrex SharpEye 40/40R user guide

brennenstuhl PIR 240 Directions for use

brennenstuhl

brennenstuhl PIR 240 Directions for use

PCE Health and Fitness PCE-LDC 8 user manual

PCE Health and Fitness

PCE Health and Fitness PCE-LDC 8 user manual

Honeywell Home 5800PIR-RES Installation and setup guide

Honeywell Home

Honeywell Home 5800PIR-RES Installation and setup guide

Dors 1250 user manual

Dors

Dors 1250 user manual

manuals.online logo
manuals.online logoBrands
  • About & Mission
  • Contact us
  • Privacy Policy
  • Terms and Conditions

Copyright 2025 Manuals.Online. All Rights Reserved.