Buffalo Tools BPROASTER User manual

BPROASTER
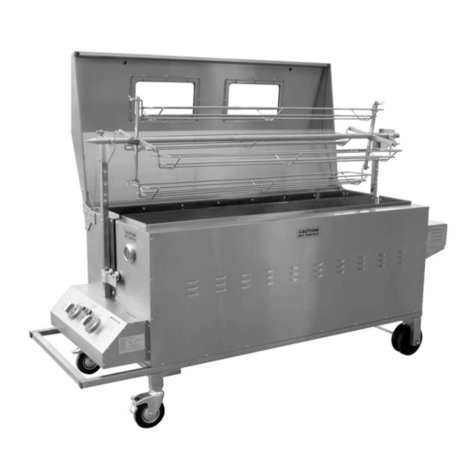
DELUXE PIG ROASTER
INSTRUCTIONS
READ ALL INSTRUCTIONS AND WARNINGS BEFORE USING THIS PRODUCT.
This manual provides important information on proper operation & maintenance. Every effort has been
made to ensure the accuracy of this manual. These instructions are not meant to cover every possible
condition and situation that may occur. We reserve the right to change this product at any time without
prior notice.
IF THERE IS ANY QUESTION ABOUT A CONDITION BEING SAFE OR UNSAFE,
DO NOT USE THIS PRODUCT!
DO NOT RETURN THIS PRODUCT TO THE RETAILER - CONTACT CUSTOMER
SERVICE FIRST.
If you experience a problem, have questions or need parts for this product, visit our website
http://www.buffalotools.com or call Customer Service at 1-888-287-6981, Monday-Friday, 8 AM - 4 PM
Central Time. A copy of the sales receipt is required.
KEEP THIS MANUAL, SALES RECEIPT & APPLICABLE WARRANTY FOR FUTURE
REFERENCE
ATTENTION: Assembly of this oven involves many large components. It
is advisable to have two people assemble the unit.

Page 2 of 8
READ THE INSTRUCTIONS BEFORE USING THE APPLIANCE.
USE OUTDOORS ONLY.
WARNING! ACCESSIBLE PARTS MAY BE VERY HOT! KEEP YOUNG CHILDREN AWAY.
DO NOT MOVE THE APPLIANCE DURING USE.
TURN OFF THE GAS SUPPLY AT THE GAS CYLINDER AFTER USE.
DO NOT MODIFY THE APPLIANCE.
THIS APPLIANCE MUST BE KEPT AWAY FROM FLAMMABLE MATERIALS DURING USE.
THE REGULATOR AND HOSE MUST BE CONNECTED CORRECTLY TO THE APPLIANCE.
A SPANNER MUST BE USED TO TIGHTEN THE NUT ONTO THE CONNECTION THREAD.
Know the Odor: In order to detect the presence and prevent an explosion from a buildup of propane
gas, odorant (almost always ethyl mercaptan) is added to liquid LP-Gas. Ethyl mercaptan has a
distinctive order and has a high odor impact. Everyone handling or using LP-Gas should realize that the
odorant used to give propane a distinctive smell may not be detected by all people under all
circumstances. The strongest odor may be near the floor, and consumers should be aware of possible
floor-to-ceiling concentration differences. Conditions such as sinus congestion, allergies, head colds,
smoking or recent use of alcohol or drugs (including certain medications) also may affect the ability to
detect odor at any particular time. Certain individuals (especially the elderly) can have an impaired sense
of smell. Environmental conditions also may exist which diminish odor detection. For example: 1) The
odorized gas may be masked or covered up by other odors such as musty basements, cooking odors
and certain foods, or 2) High concentrations of odor can shock or diminish the sense of smell which can
also occur from prolonged exposure to the odor of LP-Gas.
WARNING
Hazardous fire or explosion may result if instructions are ignored
It is the consumer’s responsibility to see that the oven is properly assembled, installed, and taken care of.
Failure to follow instructions in this manual could result in bodily injury and/or property damage.
FOR YOUR SAFETY IF YOU SMELL GAS:
1. Turn off gas supply at bottle.
2. Extinguish all naked flames; do not operate any electrical appliances.
3. Ventilate the area.
4. Check for leaks as detailed in this manual.
5. If odour persists, contact your dealer or gas supplier immediately.
PRECAUTIONS:
1. Leak test all connections after each tank refill.
2. Never check for leaks with a match or open flame.
3. Do not store of use gasoline or other flammable vapours and liquids in the vicinity of this or any other
appliance.
4. Any LP cylinder not connected for use shall not be stored in the vicinity of this or any other appliance.

Page 3 of 8
FEATURES
!Easy to transport with two swivel caster wheels (with brakes) and two double-wide stationary wheels
!Partially assembled upon delivery. Just attach wheels, motor mount, motor and carving rack.
!Uses propane gas. Propane tank not included. Gas pressure: BTU=13.5 KW * 3412 = 46062
!Double wall SS body provides durability & heat insulation
#430 Stainless Steel Body / #202 Stainless Steel Warming Rack
!Rotisserie requires 120V for power
!Adjustable twin burners with spark ignition. Electric igniter requires 1 AA battery (battery included)
!Adjustable carving area
!Burner covers prevent fat blocking burner holes
!Use 4 stainless steel roasting/carving trays to cook vegetables or warm meat
!Oven bottom is tapered to allow excess fat to flow toward the drain
!Temperature gauge
!Tray slides under drainage hole to contain fat dripping
!Front handle allows easy transportation by one person
!Max Dimensions w/Lid Closed: 7 ft L x 27 in D x 43 in H
!Max Dimensions w/Lid Open: 7 ft L x 31 in D x 56 in H
!Cooking Area: 54 in L x 18.5 in D
!Cooking Area Height: 29 in H
!Max Dimensions w/Lid Closed: 7 ft L x 27 in D x 43 in H
!Max Dimensions w/Lid Open: 7 ft L x 31 in D x 56 in H
!Cooking Area: 54 in L x 18.5 in D
!Cooking Area Height: 29 in H

Page 4 of 8
IMPORTANT
Upon receipt, your oven will be covered in a thin layer of oil which is used in the manufacturing process.
This needs removing prior to first use with either hot soapy water or a remover such as white spirit. If you
don’t remove this prior to getting the oven hot on the first occasion, the burnt oil will tarnish the metal,
especially on the inside.
Avoid rubbing the printed ‘HOT’ areas on the oven with thinners or similar agents as they may damage the
printing.
ATTENTION: Due to the heating and cooling of the oven and vibrations caused by the spit rotations, some
of the screws may become loose during transit or use. PLEASE tighten the screws periodically, in
particular the 4 screws on the motor MUST be checked every time you cook. As these are mounted
upside down, they are particularly venerable to becoming slack and a motor falling off could be a disaster
half way through the cooking process.
COOKING SUGGESTIONS
The oven with both burners running on full will use around 2.2 LBS of gas per hour
Monitor the meat closely at all times, the following is a rough guidance only and assumes you are cooking
a pig of around 150 lbs in weight
Ideally allow the meat to get to room temperature prior to cooking.
Place in the oven with both burners on full for the first 30-40 mins to ‘sear’ the meat (sealing the outer skin).
The meat skin should go crisp and darken, don’t let it go black! Next, turn down to either one burner on
almost full and the other off or both to low for the next approx 4.5 to 5 hours. The slower you cook the meat,
the more succulent will be the result.
Once cooked (use a temperature probe to confirm), lift the pig up to the carving position placing cut meat
into one of the 4 trays. Keep one burner on low to keep the 4 trays hot.
NOTE: You can cook a couple of joints on the trays as well as the hog, ideal if some customers want a
choice of beef or lamb or if you are catering for a lot of people
Technical Information:
TOTAL HEAT INPUT:
(ALL GAS CATEGORIES)
13.50 kW (964 g/h) for I3+(28-30/37) and I3B/P(30)
GAS CATEGORY:
I3+(28-30/37)
I3B/P(30)
TYPES OF GAS:
Propane
GAS PRESSURE:
37 mbar
INJECTOR SIZE:
1.20 mm for the grill burner
FOR USE OUTDOORS AND IN WELL VENTILATED AREAS
WARNING: ACCESSIBLE PARTS MAY BE VERY HOT. KEEP YOUNG
CHILDREN AWAY
Close the valve of the gas cylinder or the regulator after use.
DO NOT use this appliance in enclosed areas. It is dangerous and
PROHIBITED.
Never light the appliance with the hood in the closed position and the 4 trays
In place.
Ignition Main: 1.5 volt battery operated multi spark unit which lights the main burner

Page 5 of 8
IMPORTANT
Read the following instructions carefully and be sure your oven is properly installed, assembled and cared
for. Failure to follow these instructions may result in serious bodily injury and/or property damage.
If you have any questions concerning assembly or operation, call 888-287-6981.
When used on the ground always place the appliance and cylinder on flat level ground.
NEVER light the BURNERS with the HOOD in the closed position or the 4 stainless steel trays in position.
Your oven can be used with propane gas cylinders from 20 lb upwards. We suggest a bottle of at least 20
lbs. NOTE: Always ensure you have sufficient gas available to complete the cooking process.
CONNECTING THE GAS CYLINDER TO THE APPLIANCE
This appliance is only suitable for use with propane gas LPG mixtures, fitted with the appropriate low-
pressure regulator via a flexible hose. The hose should be secured to the regulator and the appliance with
hose clips. This barbecue is set to operate a 37 mbar regulator with propane gas 30 mbar for LPG
mixtures. Use only the supplied regulator certified to BSEN 12864: 2001.
Regulator and Hose
This oven comes complete with a hose and regulator. Use only the regulator and hose included with this
roaster. The life expectancy of the regulator is estimated as 2 years. It is recommended that the regulator
is changed within 2 years of the date of manufacture. The type of regulator needs to match the connector
on your propane gas bottle.
The use of the wrong regulator or hose is unsafe; always check that you have the correct items before
operating the oven.
Ensure that the hose is not obstructed, kinked, or in contact with any part of the barbecue other than at its
connection.
Storage of Appliance
Storage of an appliance indoors is only permissible if the cylinder is disconnected and removed from the
appliance. When the appliance is not to be used for a period of time it should be stored with protective
cover and in a dry dust free environment.
Gas Cylinder
The gas cylinder should not be dropped or handled roughly! If the appliance is not in use, the cylinder
must be disconnected. Replace the protective cap on the cylinder after disconnecting the cylinder from the
appliance. The gas cylinder must be sited outside the body of the appliance.
Cylinders must be stored outdoors in an upright position and out of the reach of children. The cylinder
must never be stored where temperatures can reach over 122°F. Do not store the cylinder near flames,
pilot lights or other sources of ignition. DO NOT SMOKE.
This oven is designed for use outdoors, away from any flammable materials. It is important that there are
no overhead obstructions and that there is a minimum distance of 3 FEET from the side or rear of the
appliance. It is important that the ventilation openings of the appliance are not obstructed. The barbecue
must be used on a level, stable surface. The appliance should be protected from direct draughts and shall
be positioned or protected against direct penetration by any trickling rain or water.

Page 6 of 8
Parts sealed by the manufacturer must not be altered by the user. No modifications should be
made to any part of this oven and repairs and maintenance should only be carried out by a
registered service engineer.
Rotisserie and Motor
WARNING
Rotisserie and motor must not be exposed to water or damp conditions or used when raining.
It should not be used in wet conditions because it may result in electrocution.
Connection to Appliance
Before connection, ensure that there is no debris caught in the head of the gas cylinder, regulator, burner
and burner ports. Spiders and insects can nest within and clog the burner/venturi tube at the orifice. A
clogged burner can lead to a fire beneath the appliance.
Clean burner holes with a heavy-duty pipe cleaner/wire brush.
Fit the hose to the appliance using a spanner to tighten it onto the connection thread. If the hose is
replaced it must be secured to the appliance and regulator connections with hose clips. Disconnect the
regulator from the cylinder (according to the directions supplied with the regulator) when the oven is not in
use.
The oven must be used in a well-ventilated area.
Do not obstruct the flow of combustion air to the burner when the oven is in
use. ONLY USE THIS OVEN OUTDOORS.
BEFORE USE, CHECK FOR LEAKS
Never check for leaks with a naked flame, always use a soapy water solution.
TO CHECK FOR LEAKS
Make 2-3 fluid ounces of leak detecting solution by mixing one part dishwashing liquid with 3 parts water.
Ensure the control valve is “OFF”.
Connect the regulator to the cylinder and ON/OFF valve to the burner, ensure the connections are secure
then turn ON the gas.
Brush the soapy solution onto the hose and all joints. If bubbles appear you have a leak, which must be
rectified before use. WARNING: DO NOT USE IF YOU HAVE A LEAK.
Retest after fixing the fault
Turn OFF the gas at the cylinder after testing.

Page 7 of 8
Lighting Instructions for barbecue
1. Open the hood of the oven before attempting to light the burners and remove the 4 stainless steel
trays.
2. Turn all the control knobs clockwise to “OFF” position.
3. Connect the regulator to the gas bottle. Turn the gas supply “ON” at the regulator. Check with the use of
soapy water for any gas leakage between the bottle and the regulator.
4. On one of the two burners, push in the control knob and turn it anti-clockwise to the “Full rate” position,
at the same time hold in the ignition button (a clicking sound will be heard) this will light the pilot and the
burner. Keep pressing in the knob for a further 15 seconds observe if the burner has lit. If not, repeat this
process. Then repeat for the second burner if required.
5. If the burner has not lit after retrying, wait 5 minutes and repeat step 4.
6. Adjust the heat by turning the knob to the High/Low position.
7. If the burner does not light with the ignition spark, it can be lit manually with a long reach lighter from the
inside.
8. To turn the burner ‘OFF,’ turn the control knob clockwise to the ‘OFF’ position. If you wish to turn the
complete oven ‘OFF’ turn the cylinder valve or regulator switch to the ‘OFF’, position and then turn the
control knob on the appliance clockwise to the ‘OFF’ position on both burners.
WARNING: If the burner fails to ignite, turn the control knob off (clockwise) and also turn the cylinder
valve off. Wait five minutes before attempting to relight with ignition sequence.
Before cooking for the first time, operate the oven for about 15 minutes with the lid closed and the gas
turned on HIGH. This will “heat clean” the internal parts and dissipate odour from the painted finish.
Clean your oven after each use. DO NOT use abrasive or flammable cleaners, as it will damage the parts
of the product and may start a fire. Clean in warm soapy water. Protect the motor from water ingression.
WARNING: Accessible parts may be very hot. Keep young children away from the hot appliance at all
times (even while cooling down). It is recommended that protective gloves (oven gloves) be used when
handling particularly hot components.
CLEANING AND CARE
CAUTION: All cleaning and maintenance should be carried out when the oven is cool and with the fuel
supply turned OFF at the gas cylinder.
CLEANING
“Burning off” the oven after every use (for approx 15 minutes) will keep excessive food residue to a
minimum.
OUTSIDE SURFACE
Use mild detergent or baking soda and hot water solution. Non-abrasive scouring powder can be used on
stubborn stains, then rinse with water.
If the inside surface of the oven lid has the appearance of pealing paint, baked on grease build-up has
turned to carbon and is flaking off. Clean thoroughly with strong hot soapy water solution. Rinse with
water and allow to completely dry. NEVER USE OVEN CLEANER.
INTERIOR OF OVEN BOTTOM
Remove residue using brush, scraper and/or cleaning pad then wash with a soapy water solution. Rinse
with water and allowed to dry.

Page 8 of 8
CLEANING THE BURNER ASSEMBLY
Turn the gas OFF at the control knob and disconnect the cylinder.
Clean the burner with a soft brush or blow clean with compressed air and wipe with a cloth.
Clean any clogged ports with a pipe cleaner or stiff wire (such as an opened paper clip).
Inspect burner for any damage (cracks or holes). If damage is found, replace with a new burner. Reinstall
the burner, check to ensure that the Gas valve orifices are correctly positioned and secured inside the
burner inlet (venturi).
TROUBLESHOOTING
PROBLEM
POSSIBLE CAUSE
SOLUTION
Burners will not light using
the ignition system
1. LP gas cylinder is empty
2. Faulty regulator
3. Obstructions in burner
4. Obstructions in gas jets or gas hose
5. Electrode wire loose or disconnected
on electrode or ignition unit
6. Electrode or wire is damaged faulty
pushbutton igniter
1. Replace with full cylinder
2. Have regulator checked or
replace
3. Clean burner
4. Clean jets and gas hose
5. Reconnect wire
6. Change electrode & wire
change igniter
Burner will not light with a
match
1. LG gas cylinder is empty
2. Faulty regulator
3. Obstructions in burner
4. Obstructions in gas jets or gas hose
1.Replace with full cylinder
2.Have regulator checked or
replace
3.Clean burner
4.Clean jets and gas hose
Low flame or flashback (fire
in burner tube-a hissing or
roaring noise may be heard)
1. LP gas cylinder too small
2. Obstructions in burner
3. Obstructions in gas jets or gas hose
4. Windy conditions
1.Use larger cylinder
2.Clean burner
3.Clean jets and gas hose
4.Use BBQ in a more
sheltered position
201503
Other manuals for BPROASTER
1
Table of contents
Other Buffalo Tools Kitchen Appliance manuals