Bunch Coupe User manual

User Manual The Coupe
Version 1.5
January 2021


3
CONGRATULATIONS
on the purchase of your Bunch cargo bike with pedal assist.
We recommend that you read this manual thoroughly before you take your bike on the road. This manual
provides information on the proper use and operation of the pedal assist, automatic stepless gearbox, brakes,
and battery. In addition, we will provide recommendations and tips for cycling on your Bunch cargo bike and
explanations of the warranty and maintenance.
The Bunch Bikes team wishes you many happy Miles of cycling!
Serial number
The serial number (frame number) is located on the information placard, on the main frame, just below the
battery.
Your frame number: …………………….


5
Table of Contents
1. Bicycles with pedal assist.......................................................................................................................... 7
2. Display and operation .............................................................................................................................. 8
3. Automatic acceleration (the Enviolo Automatic + system).................................................................... 188
4. Brakes.................................................................................................................................................... 22
5. Battery................................................................................................................................................... 23
6. Battery Charger...................................................................................................................................... 28
7. Accessories ............................................................................................................................................ 31
8. Tips for use and safety............................................................................................................................ 32
9. Maintenance................................................................................................................................................35
10. Warranty..................................................................................................... Error! Bookmark not defined.


7
1. Bicycles with pedal assist
1.1 What is the difference between "electrically pedal-assisted" and "electrically powered"?
Your Bunch cargo bike is electrically pedal-assisted; that is completely different from electrically powered.
Electrically pedal-assisted means that you will only be assisted by the electric motor if you yourself apply
(sufficient) pedaling force to the pedals. If you stop pedaling, the motor will also stop "helping" you. In an
electrically powered vehicle, you only have to keep a button pressed in or operate a lever, and the vehicle will
drive without you applying your own pedaling force.
1.2 Cycling with pedal assist
Cycling with pedal assist gives you the feeling that you are always "riding with the wind behind you," and the
experience is quite different from cycling without assist: it makes it easy to start from a stationary position or
on a hill, or to ride against a headwind, and of course you can reach higher speeds comfortably. Our advice is
first to try out The Coupe on a quiet bike path, for instance, without children in the cargo box and also with
limited assist (see Display and operation). Note that the rear frame will tilt slightly to the left or the right on
curves; this is completely normal and is specially designed to optimize riding behavior on curves and make it
feel more natural.
Set the pedal assist to a higher level once you feel like you have the bike "under control." The maximum
speed that may be reached with the assist is legally specified at 20mph; this means that if you cycle faster
than 20mph, the motor will stop providing assistance.
Note: We recommend greatly reducing the speed on curves to prevent the risk of tipping over. Please keep in
mind that 20mph is quite fast for a cargo bike; not everyone in traffic is ready for that yet!

8
2. Display and operation
2.1 Specifications
Rated voltage: 36 V/43 V/48 V
Rated power: 10 mA
Maximum operating power 30 mA
When turned off, the leakage current is: ≤1 uA
Working current delivered to regulator: 50 mA
Operating temperature: -4°F~113°F
Storage temperature: -22°F~158°F
IP level: IP65
Storage humidity: 30%-70%
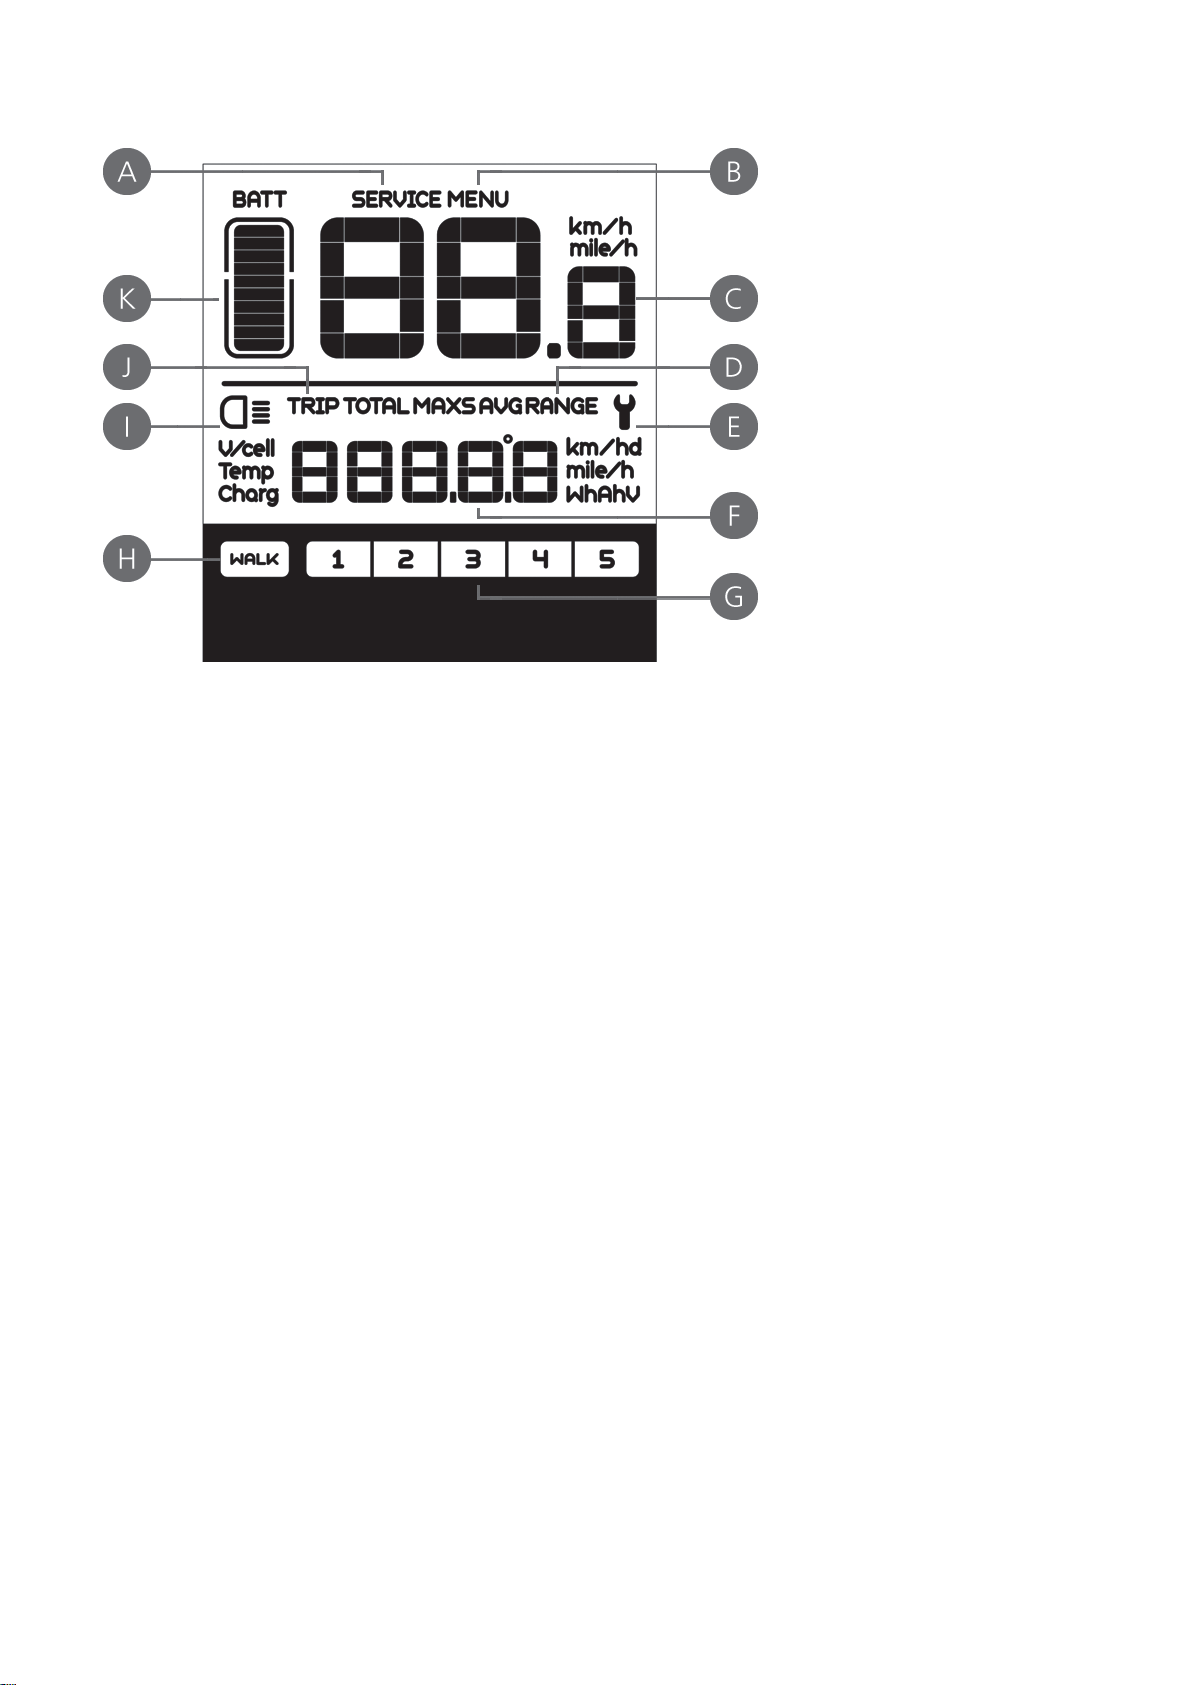
2.2 Overview of functions
Speed indicator: Screen showing current speed (SPEED), maximum speed (MAXS) and average
speed (AVG).
Speed displayed in kilometers or miles: You can switch between kilometers or miles on the
display.
Intelligent charge indicator: Stable display of the battery status is guaranteed by an optimization
algorithm. This avoids the problem, common to many displays, of fluctuating display of the battery
level.
Operation of lights: The headlight, taillight and screen display illumination switch on and off
automatically, depending on the light conditions.
Screen illumination: Choose between different lighting levels, from level 1 (dim) to level 5 (bright).
Assist level indicator: This indicates the current assist mode (level 0 to 5).
Trip distance indicator: The maximum distance is reached when 99999 appears on the screen. You can
display the distance for a single trip (TRIP) or the total distance (TOTAL).
Error indicator
Pedal assist
The service lights will appear depending on the charge status and the total distance traveled. The
display automatically estimates battery life and issues a warning if the set number of battery
charges is exceeded. A warning is also issued when the total distance traveled exceeds the set
value. This function can be turned off.

9
2.3 Normal range indicator
A - Service notification:
SERVICE appears on the display when your E-bike is ready for maintenance. This warning sign appears when
the distance traveled or the number of battery charges is exceeded. This function can be turned off. Contact
Bunch Bikes or a trained E-bike service shop.
B - Menu:
You can switch between different display modes.
C - Speed indicator:
Choose km/h or mile/h.
D - Speed mode:
Displays the selected average speed (AVG) and the maximum speed (MAXS).
E - Error code prompt:
This symbol is displayed if a problem is detected.
F - Trip distance indicator:
This shows the distance traveled during a single trip or the total distance traveled. (Depending on the setting
selected)
G - Assist level:
This shows the level of motor assist selected (1-5).
H - Pedal assist:
This shows that pedal assist is activated for support. When cycle assist is activated to pedal the bike forward,
the WALK symbol appears.
I - Lighting:
The characters will light up as soon as the headlight and taillights are turned on.
J - Distance mode:
You can display either the distance for a single trip (TRIP) or the total distance (TOTAL). The maximum
distance is reached when 99999 appears on the screen.
K - Battery charge status:
The charge status is indicated by 10 bars. The battery is fully charged when all the bars on the display are lit.

10
2.4 Definitions of buttons
A - "+" button: Switch to a higher level of motor assist.
B - "–" button: Switch to a lower assist level. Hold down for walk assist.
C - Lights on/off button: Pressing the button once turns the bike lights on. Pressing twice turns the lights off again.
D - On/off button: Switches the electric system on and then off again.
E - Display mode: Switching between the different displays and functions.
2.5 Normal operation
2.5.1 POWER ON/OFF
Press "D" and hold for 2 seconds: Turns on the display and the system.
Press "D" again and hold down for 2 seconds: Turns off the display and the system. The system is switched off
automatically after 5 minutes without activity.
2.5.2 Selecting the motor assist level
Press the "A" or "B" button to switch between the different assist levels. The lowest level is level 1; the highest is
level 5. The default level at power on is level 1. If no number is displayed, the motor is not providing assistance (see
examples below).
No assist
Assist level 1
Assist level 5

11
2.5.3 Switching display outputs
Press the "E" button to switch between trip distance and speed on the display. First the single-trip distance is
displayed (TRIP km) → then the total distance traveled (TOTAL km) → the maximum speed reached (MAXS
km/h) → and then the average speed (AVG km/h).
TRIP
TOTAL
MAXS
AVG
2.5.4 Turning the bike lights and display illumination on and off
Press "C" and hold for 2 seconds: The display illumination and your lights will turn on. Press "C" again and
hold for 2 seconds: The display illumination and your lights will turn off. When you use the display in the dark,
the illumination of your system is turned on automatically.
Exception: If you turned on the light manually, you must also turn it off manually.
The display offers five intensity levels.
Turned off
Turned on

12
2.5.5 WALK assist
Your E-bike has a walk assist feature that moves your bike forward at a speed of 3.5mph without you having
to pedal it. This is intended to help you get the bike up steep hills if you are walking the bike.
The models with walk assist are not intended to help you when riding or starting to ride your bike! If used in
this way the motor may overheat. Use walk assist only if you are walking alongside the bike. The wheels must
be in contact with the ground. There is a risk of injury if you do not follow these instructions.
Press and hold the "B" button on the control panel for 2 seconds. Walk assist is turned on. "WALK" appears on
the display. As soon as you release the button, walk assist mode is turned off.
Switching between pedal assist and walk assist modes.
Pedal assist indicator.
Walk assist indicator.
2.5.6 Charge status indicator
To ensure optimal performance of your E-bike, check your battery charge status before each trip. When the
display is on, the 10 LEDs will indicate the charge level. The number of bars in the LCD battery display
indicates the current charge status (see diagram). If all 10 bars are off and the digital screen is blinking, that
means you must charge your battery immediately.
Charge status display
Number of bars
Charge status
10
≥ 90%
9
75% ≤ C < 90%
8
60% ≤ C < 75%
7
50% ≤ C < 60%
6
40% ≤ C < 50%
5
30% ≤ C < 40%
4
20% ≤ C < 30%
3
10% ≤ C < 20%
2
8% ≤ C < 10%
1
5% < C < 8%
The digital display is blinking
≤ 5%

13
2.6 User settings
Do NOT change the settings while riding the E-bike.
2.6.1 General rules for operating your E-bike
•To activate the mode for entering parameter settings, turn on the display and then press and hold
the "E" button TWICE for more than 0.3 seconds each.
•You are now in the menu for entering parameter settings. Your settings can be changed.
•Press the "E" button briefly to confirm the settings. When you do this, the next setting will be
displayed immediately and you can scroll through your settings.
•To switch between the various settings, press the "E" button briefly.
•When the setting you selected begins to blink, press the "A" button to increase the parameter value
or the "B" button to decrease the parameter value.
•Once you have selected your setting, you can return to the main menu by pressing the "E" button
TWICE for more than 0.3 seconds.
•If no changes in the settings have been made within 10 seconds, the display will return to the
normal operating settings.
Normal operating settings
Parameter entry setting mode
2.6.2 Resetting the data from a single trip
For this setting mode, "tC" appears on the display.
•To delete the data from your last single trip (TRIP), the maximum speed (MAXS) and the average
speed (AVG), press the "A" button ("y" will appear on the display).
•If you do not reset the data from a single trip manually, it will be automatically reset once you have
traveled more than 99 hours and 59 minutes.

14
2.6.3 Distance shown in kilometers/miles
For this setting mode, "S7" appears on the display. Press the "A" or "B" button to switch between km/h and mile/h.
6.4 Bike lighting sensor, setting the light sensitivity
For this setting mode, "bL0" appears on the display.
Select a parameter value between 0 and 5 using "A" or "B". If you select "0," the sensor function will be
turned off. The lower the number, the darker it must be before the sensor turns the bike lighting on
automatically.
Function off
Lowest level
Highest level
2.6.5 Light brightness display
For this setting mode, "bL1" appears on the display.
Select a parameter value between 1 and 5 using "A" or "B." 1 is the dimmest background lighting, 5 the brightest.
Lowest level
Highest level

15
2.6.6 Automatic shut-off
For this setting mode, "OFF" appears on the display.
Select a parameter value between 1 and 9 using "A" or "B". The numbers indicate the minutes remaining
before the electrical system shuts down automatically.
1 minute (shortest)
9 minutes (longest)
2.6.7 Maintenance indicator
For this setting mode, "nnA" appears on the display.
Press the "A" or "B" button to choose the number "0" or "1." With "0" the function is turned off. With "1" the
function is activated and you will receive a maintenance warning for your E-bike.
The maintenance indicator appears when you have reached a certain number of charging cycles (100 charges)
and/or you have traveled a certain distance (5,000 kilometers). Each time you turn on the display, the word
"SERVICE" will appear and continue to blink for 4 seconds. The time intervals can be individually adjusted by a
supplier. They can also be changed later by a supplier or manufacturer with a USB connection on a computer.
Turned off
Turned on
Service
2.6.8 Information on battery status
For this setting mode, "b01" appears on the display.
In this mode you can see all relevant information about your battery. For this, press the "E" button and hold
for more than 3 seconds. The following information will be brought up in the following order:

16
Display
Information
b01
Current temperature
b02
Maximum temperature
b03
Lowest temperature
b04
Total voltage
b05
Current
b06
Average current
b07
Remaining capacity
b08
Total capacity
b09
Relative charge status
b10
Absolute charge status
b11
Charging/discharging status
b12
Longest period without charging
b13
Period since last charging
d01
Voltage of cell 1
d02
Voltage of cell 2
dn
Voltage of cell n
2.7 Error code definition
Do not work on your own bike. You need special skills, experience, and tools to work on a bike! Take your E-
bike to a bicycle repair shop to have the error fixed.
The display will indicate when a malfunction is detected in your E-bike. If a defect is noted, a picture of a wrench
will appear on the display. One of the following defects will be displayed in the area where speed is indicated:
Error
Explanation
Error resolution
03
Braking action
Check whether a brake is stuck or locked on.
07
Protection from high voltage
Take your electric bike to your dealer or to a
specialist to have the problem repaired.
08
Error in the Hall sensor of the motor
Take your electric bike to your dealer or to a
specialist to have the problem repaired.
10
The temperature of the motor is reaching
the maximum protection value
Stop the eBike for a while.
12
Problem with the sensor in the regulator
Take your electric bike to your dealer or to a
specialist to have the problem repaired.
13
Problem with the temperature sensor in
the battery
Take your electric bike to your dealer or to a
specialist to have the problem repaired.
21
Problem with the wheel speed detection
sensor
Take your electric bike to your dealer or to a
specialist to have the problem repaired.
22
BMS communication error
Take your electric bike to your dealer or to a

17
specialist to have the problem repaired.
25
Torsion sensor, torsion signaling error
Take your electric bike to your dealer or to a
specialist to have the problem repaired.
26
Torsion sensor, speed signaling error
Take your electric bike to your dealer or to a
specialist to have the problem repaired.
30
Communication error
Take your electric bike to your dealer or to a
specialist to have the problem repaired.
Explanation of Error Resolution
Note: Error code 10 will probably appear on the display when the eBike climbs for a
long, continuous period. This indicates that the temperature of the motor has reached
the maximum protection value. If this occurs, the user must stop the eBike and wait. If
the user lets the eBike continue to run, the motor will automatically stop the supply of
power.

18
3. Automatic acceleration (the Enviolo Automatic + system)
3.1. System Functionality
Integrated
The Automatic+ system is integrated in the eBike drive system and ensures automatic shifting at all times. It
can be operated with the display of the drive system, which usually offers fully automatic as well as manual
shifting options. If assisted by the drive system, the rider has the ability to shift between "manual" and
"automatic" modes. See the manual of the specific system for more information, since the integration is
different for each type of drive system.
Enviolo controller or app
It is also possible to use an enviolo AUTOMATiQ controller or to use the enviolo app on a smartphone. See the
article "Quick Start - AUTOMATiQ with Controller," for the functionality of the different types of controllers
offered by enviolo. Or check the article "AUTOMATiQ App download & installation" and get started with the
app!
NOTE: The hub can be shifted over ~50% of the range without pedaling. The AUTOMATiQ system will wait
until a pedaling motion takes place or the wheel turns before shifting over a broader range while stationary.
3.2. Calibration
During the initial installation, following system maintenance, or in the case of malfunctioning, the system
must be calibrated. Switch on the system. Start the calibration process via the drive system menu. For more
information, consult the manual of the eBike system or our manual.
Lift up the rear wheel or hang the bike up while the system switches from "low" to "high" and back again several
times and this completes the calibration.
Enviolo controller or app
If you are using an enviolo AUTOMATiQ controller, see the article on calibration with the AUTOMATiQ
controllers. When you use the enviolo app, you can also complete the calibration via the app in the
"configuration" submenu. For this, see the video: Calibration of the AUTOMATiQ hub interface with the enviolo
app.
3.3. Setup
Automatic mode
In automatic mode, the system automatically adjusts the transmission to maintain the desired pedaling
cadence of the rider. Riders can set their ideal pedaling cadence by a selection in the eBike drive system
menu, and they also have the option to do this via the enviolo controller or the enviolo app.
Setting personal preferences
NOTE: Setting the appropriate cadence can also be done via integration into the eBike drive system; the ratio
at the start of a trip and the ride mode can only be set using the enviolo app. Check the video: setting enviolo
AUTOMATiQ settings using the app.
Start by finding the right cadence: Start at 50 and increase (or decrease) in steps of 5 to 10, until you find the
best setting.

19
Then set the ride mode: Comfort/Eco/Sport (these are only available when using an SP or TR hub interface).
To discover which gear ratio you like for starting a ride: start at 0.5 and increase (or decrease) in steps of 0.1
until you find the best setting.
NOTE: Make sure you test ride the bike after every change in settings, so you can experience the differences
immediately!
Manual mode
In manual mode, riders can shift on their own electronically. The eBike drive system has usually integrated
this function by simulating gears. This can also be done via the enviolo app in the "Dashboard" submenu.
1. System functionality
The AUTOMATiQ SYSTEM ensures a continuous automatically shifting system. It can be combined with both
the CO and the CA controller, making shifting as easy as choosing the desired pedaling cadence by pressing
the button.
2. Setup
[A] ENVIOLO CO CONTROLLER
Set the desired pedaling cadence using the enviolo CO controller. The buttons on the enviolo CO controller
are set to provide a lower pedaling cadence when shifting up (UP) and a lighter pedaling cadence when
shifting down (DOWN), while the center button (CENTER) is for system calibration. To change the shifting
function stepwise from 1 to 5 rpm, press and hold the lower and upper buttons simultaneously.

20
App Download & installation
You can download the app in the Google play store or Apple store.
Search for "enviolo AUTOMATiQ."
Click on "install." The app should now install automatically.
Switch on the motor system.
Activate BLE (Bluetooth) on your mobile telephone.
Activate the wireless pairing mode of your hub interface bypressing the button for 5 seconds until a blue
light shows.
The app will now search for available devices.
Select the correct device, recognizable using the SN# that is also on the underside of the hub interface.
This manual suits for next models
1
Table of contents