Burg Wächter BWML-1000 User manual

BWML-1000
www.burg-guard.com
10” Monitor Videoüberwachungsmonitor
10” video surveillance monitor
Lieferumfang:
1x Monitor
1x Satz Schrauben
1x Standfuß
1x Fernbedienung
1x Kurzanleitung
Items included in the delivery:
1x Monitor
1x Set screws
1x table bracket
1x remote controller
1x Quick guide
Besondere Ausstattungsmerkmale:
10“ Monitor
1280x800 Pixel (nativ)
Robustes Metall Gehäuse
Format 16:9
Anti-Reflexion Beschichtung
MTBF 50.000 Stunden
VESA 75x75
Inklusive Fernbedieung
Special features:
10” Monitor
1280x800 Pixel (nativ)
Metal housing
Aspect Ratio 16:9
Anti-reflexion display
MTBF 50,000 hrs
VESA 75x75
Including remote control
KURZANLEITUNG / QUICK GUIDE
Abb. unverbindlich

2 | DEUTSCH ENGLISH BWML-1000
Sicherheitshinweise
Es gelten die allgemein anerkannten Standards im Umgang mit Elektrogeräten. Wenden Sie sich im
Zweifelsfall an Ihren Fachinstallateur.
UMGEBUNG
Dieser Monitor ist für den Einsatz im Innenraum konzipiert. Setzen Sie ihn keinen Vibrationen,
Staub oder korrosiven Gasen aus.
Installieren Sie den Monitor nicht im Freien oder in einer aggressiven Umgebung. Setzen Sie den
Monitor weder Regen noch Feuchtigkeit aus. Stellen Sie den Monitor nicht an Orten auf, die
extremen Temperaturen wie direkter Sonneneinstrahlung oder in der Nähe von Heizgeräten/-
geräten ausgesetzt sind, da dies zu Überhitzung und Beschädigung führen kann.
Setzen Sie den Bildschirm nicht direktem Sonnenlicht aus, um ein klares Bild zu erhalten. Die
Verwendung des Monitors vor einem hellen Hintergrund und dort, wo Sonnenlicht oder andere
Lichtquellen direkt auf den Monitor scheinen, kann die Ermüdung der Augen verstärken.
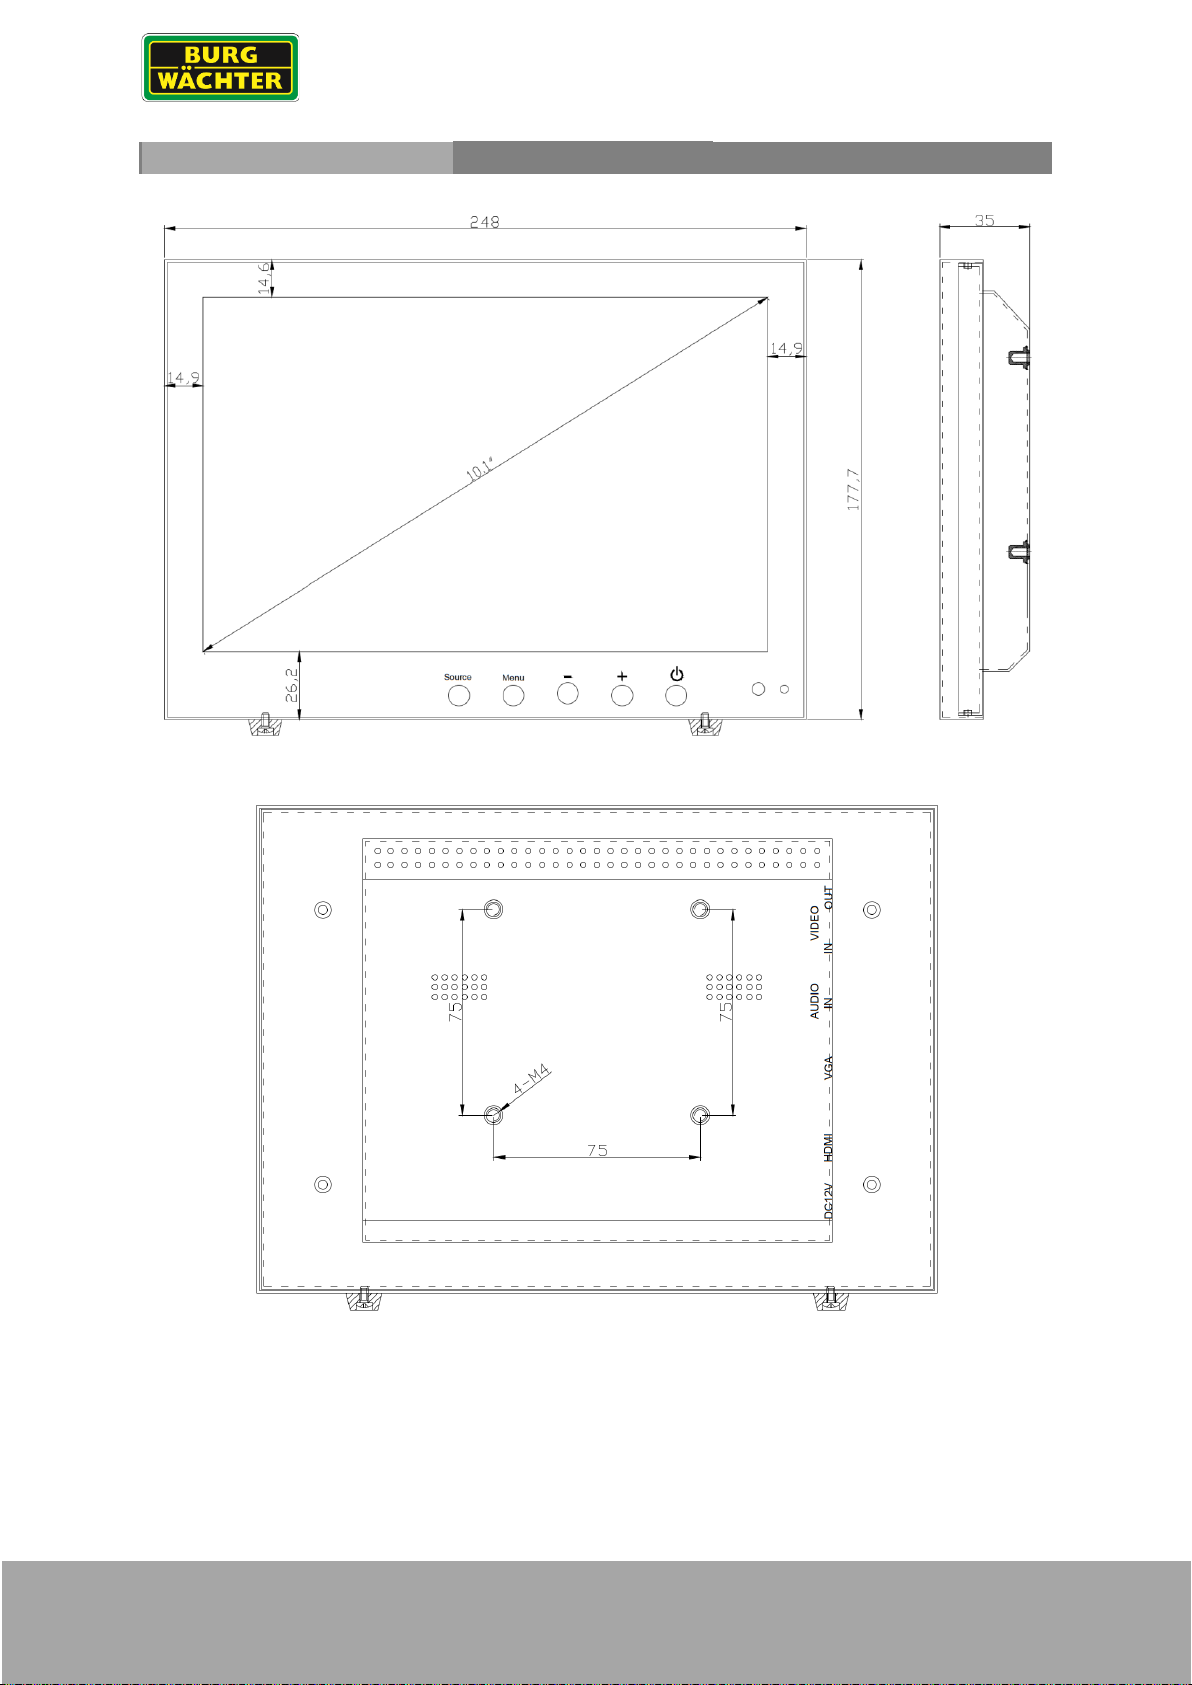
WAND-MONTAGE
Achtung: Jede Wand-Halterung muss für eine sichere Montage mindestens das 5-fache des
Nettogewichts des Monitors tragen. Der Ständer muss vor der Montage an eine VESA Halterung
zuerst entfernt werden.
•Lösen Sie alle Kabel vom Monitor
•Legen Sie den Monitor mit der Vorderseite nach unten auf eine saubere Oberfläche. Nutzen Sie
z.B. ein sauberes Tuch um den Monitor vor Kratzern zu schützen.
•Verwenden Sie einen passenden Schraubendreher, um die Schrauben aus den vier Löchern des
Monitorsockels zu entfernen.
•Befolgen Sie die der Wandhalterung beiliegenden Anweisungen, um den Monitor an der Wand
zu befestigen.
LAGERUNG
•Trennen Sie den Monitor vom Stromnetz, wenn er längere Zeit nicht verwendet wird.
BELÜFTUNG
•Decken oder blockieren Sie niemals die Lüftungsschlitze im Monitor. Um das Gerät sollte ein
Mindestabstand von mindestens 30 cm eingehalten werden, um eine ausreichende Belüftung zu
gewährleisten.
•Installieren Sie einen DVR oder andere Geräte nicht in unmittelbarer Nähe am Monitor. Halten
Sie mindestens 30 cm vom Monitor abstand.
WASSER UND FEUCHTIGKEIT
•Der Monitor darf keiner Feuchtigkeit oder Flüssigkeit ausgesetzt werden.
•Verwenden Sie den Monitor nicht in der Nähe von Wasser.
•Berühren Sie den Monitor oder das Kabel nicht mit nassen Händen, da dies zu Stromschlägen
oder Schäden führen kann.
REINIGUNG
•Trennen Sie das Gerät vor der Reinigung von der Steckdose.
•Verwenden Sie keine Flüssig- oder Sprühreiniger. Verwenden Sie zur Reinigung ein trockenes,
weiches, fusselfreies Tuch. Bei hartnäckigem Staub mit einem leicht feuchten Tuch abwischen.

BWML-1000 DEUTSCH ENGLISH | 3
Safty notes
The generally accepted standards for handling electrical equipment apply. If in doubt, consult your
professional installer.
ENVIRONMENT
•This monitor is designed for indoor use. Do not expose it to vibration, dust or corrosive gases.
•Do not install the monitor outdoors or in an aggressive environment. Do not expose the monitor
to rain or moisture. Do not place the monitor in locations exposed to extreme temperatures such
as direct sunlight or near heating devices/appliances, as this may cause overheating and damage.
•Do not expose the monitor to direct sunlight to maintain a clear image. Using the monitor against
a bright background and where sunlight or other light sources shine directly on the monitor may
increase eye fatigue.
WALL MOUNTING
Caution: Each wall mount stand must support at least 5 times the net weight of the monitor for
secure mounting. The stand must be removed first before mounting to a VESA mount.
•Disconnect all cables from the monitor
•Place the monitor face down on a clean surface. For example, use a clean cloth to protect the
monitor from scratches.
•Use a suitable screwdriver to remove the screws from the four holes in the monitor base.
•Follow the instructions included with the wall mount to attach the monitor to the wall.
STORAGE
•Unplug the monitor if it will not be used for an extended period of time.
VENTILATION
•Never cover or block the ventilation slots in the monitor. A minimum clearance of at least 30 cm
should be maintained around the unit to ensure adequate ventilation.
•Do not install a DVR or other equipment in close proximity to the monitor. Keep at least 30 cm
away from the monitor.
WATER AND MOISTURE
•Do not expose the monitor to moisture or liquid.
•Do not use the monitor near water.
•Do not touch the monitor or cable with wet hands as this may cause electric shock or damage.
CLEANING
•Unplug the unit from the wall outlet before cleaning.
•Do not use liquid or spray cleaners. Use a dry, soft, lint-free cloth for cleaning. For stubborn dust,
wipe with a slightly damp cloth.

4 | DEUTSCH ENGLISH BWML-1000
Technische Zeichnung / Technical drawing
Alle Angaben in mm. Zeichnung nicht
maßstabsgerecht. Irrtum, technische
Änderungen, geringe Maß- und
Gewichtsdifferenzen vorbehalten.
All dimensions in mm. Drawings not true to
scale. We reserve the right to change technical
specifications including slight variation in size
and weight, technical changes, errors excepted.

BWML-1000 DEUTSCH ENGLISH | 5
Anschlüsse / Interface
DE
Name
Beschreibung
Name
Beschreibung
DC
=12Vdc 10W
Video In
FBAS/CVBS Eingang
HDMI
HDMI Buche für Typ A
Video Out
FBAS/CVBS Loop Ausgang
VGA
15-poliger D-Sub Eingang
Audio
3.5mm Audio-Eingang
EN
name
description
name
description
DC
=12Vdc 10W
Video In
FBAS/CVBS Input
HDMI
HDMI socket for Typ A
Video Out
FBAS/CVBS Loop Output
VGA
15-pol. D-Sub Input
Audio
3.5mm Audio-Input
Inhalt Content
Deutsch S.6
English S.12

6 | DEUTSCH ENGLISH BWML-1000
DE
Bedienung über die Tasten am Monitor
1. Um auf das OSD-Menü zuzugreifen, drücken Sie „MENU“.
2. Verwenden Sie die Tasten '+' oder '-', um den gewünschten Menüpunkt auszuwählen,
und drücken Sie dann die Taste 'SOURCE', um das Untermenü auszuwählen.
3. Verwenden Sie weiterhin die Taste „SOURCE“, um das erforderliche Feld
hervorzuheben, und drücken Sie dann „+“ oder „-“, um die Einstellung anzupassen.
4. Drücken Sie die „MENU“-Taste, um zum vorherigen Menü zurückzukehren.
5. Drücken Sie die „MENU“-Taste erneut, um das OSD-Menü vollständig zu verlassen.
6. Hinweis: Zum Sperren oder Entsperren der OSD-Einstellungen nach der Einrichtung.
Halten Sie die „MENU“-Taste 5 Sekunden lang gedrückt.
Fernbedienung
Schaltet den Monitor um zwischen An/Standby
Power-S
Hintergrundbeleuchtung: hoch, mittel, niedrig
Skala: normal, Mitte, voll
MUTE
Schaltet den Ton ein/aus
LOCK
Menüsperre: sperren, entsperren
∧、∨
Nach oben / unten bewegen
Hervorhebungssymbol,
MENU
Öffnet das Hauptmenü des Bildschirms
< 、>
Lautstärke erhöhen / verringern
AUTO
Automatische Anpassung
(nur im VGA-Modus verfügbar)
INFO
Informationen werden angezeigt
VGA
VGA-Signal auswählen
HDMI
HDMI-Signal auswählen
AV
AV-Eingangssignal auswählen
SOURCE
Umschaltung der Videosignaleingänge
0~9
verfügbar nur Passwort eingegeben
NC
Sensor PIP POP SWAP einfrieren
EXIT
Menü verlassen

BWML-1000 DEUTSCH ENGLISH | 7
Das Layout des OSD ändert sich je nach ausgewähltem Eingang.
AV- Signal-Eingangskonfiguration
1. Bild
KONTRAST: (0–100) Unterschied heller und dunkler Bereiche im Bild.
HELLIGKEIT : (0–100) Stellen Sie ein, wie hell das Display ist.
FARBTON : -50 bis +50 (nur bei NTSC verfügbar)
SÄTTIGUNG : _ ( 0-100 )
SCHÄRFE : ( 0-100 )
FARBTEMP.: Wählen Sie die Farbtemperatur. (Normal / Warm / Kalt)
BILDMODUS: Wählen Sie die Standardeinstellungen oder speichern Sie die
Benutzereinstellungen. ( Benutzerdef. / Standard / Weich / Lebhaft )
2. OSD
SPRACHE: Wählen Sie die bevorzugte Sprache für das OSD. ( En / Ger / Fr / Sp / It / ..)
H-POSITION: (0-100) Stellen Sie die horizontale Position des OSD ein.
V-POSITION: (0-100) Stellen Sie die vertikale Position des OSD ein.
DAUER : (5-60 ) Anzahl Sekunden nach denen das OSD geschlossen wird.
BACKLIGHT : Stellen Sie die Leistungsstufe ein, die von der Hintergrundbeleuchtung
verwendet wird (HIGH/MID/LOW)
MEM-RECALL : Alle Werkseinstellungen wiederherstellen.
3. Funktion
HSTART: Legt den linken Ausrichtungspunkt des Bildes fest.
HSIZE: Stellen Sie die horizontale Größe des Bildes ein.
VSTART: Setzt den unteren Ausrichtungspunkt des Bildes.
VSIZE : Stellen Sie die vertikale Größe des Bildes ein.

8 | DEUTSCH ENGLISH BWML-1000
4. Audio
BASSE : ( 0-100 )
HÖHEN : ( 0-100 )
B ALANCE : (-50 bis +50)
SOUND MODE : Legen Sie Benutzer- oder voreingestellte Audiokonfigurationen fest.
(Benutzer/Standard/Film/Musik)
AVC : (EIN/AUS) Automatische Lautstärkeregelung
HDMI - Eingangskonfiguration
1. Bild
KONTRAST: (0–100) Stellen Sie den Unterschied zwischen den hellen und dunklen
Bereichen von ein das Bild.
HELLIGKEIT : (0–100) Stellen Sie ein, wie hell das Display ist.
FARBTEMP.: Wählen Sie das Farbtemperaturmenü.
FARBTEMP.: Voreingestellte Farbtemperatur auswählen.
USER - R: Stellen Sie die ROT-Farbstufe ein.
USER - G: Stellen Sie den GRÜNEN Farbpegel ein.
USER - B: Stellen Sie die BLAU-Farbstufe ein.

BWML-1000 DEUTSCH ENGLISH | 9
2. OSD
SPRACHE: Wählen Sie die bevorzugte Sprache für das OSD. ( En / Ch / Ger / Fr / Sp / It /
Pt / Pl / Ru)
H-POSITION: (0-100) Stellen Sie die horizontale Position des OSD ein.
V-POSITION: (0-100) Stellen Sie die vertikale Position des OSD ein.
DAUER : (5-60 ) Stellen Sie die Sekunden ein, in denen das OSD automatisch
geschlossen wird.
BACKLIGHT : Stellen Sie die Leistungsstufe ein, die von der Hintergrundbeleuchtung
verwendet wird (HIGH/MID/LOW)
MEM-RECALL : Alle Werkseinstellungen wiederherstellen.
3. Funktion
HSTART: Legt den linken Ausrichtungspunkt des Bildes fest.
HSIZE: Stellen Sie die horizontale Größe des Bildes ein.
VSTART: Setzt den unteren Ausrichtungspunkt des Bildes.
VSIZE : Stellen Sie die vertikale Größe des Bildes ein.
4. Audio
BASSE : ( 0-100 )
HÖHEN : ( 0-100 )
BALANCE : (-50 bis +50)
SOUND MODE : Legen Sie Benutzer- oder voreingestellte Audiokonfigurationen fest.
(Benutzer/Standard/Film/Musik)
AVC : (EIN/AUS) Automatische Lautstärkeregelung

10 | DEUTSCH ENGLISH BWML-1000
VGA - Eingangskonfiguration
1. Bild
KONTRAST: (0–100) Stellen Sie den Unterschied zwischen den hellen und dunklen
Bereichen von ein das Bild.
HELLIGKEIT : (0–100) Stellen Sie ein, wie hell das Display ist.
FARBTEMP.: Wählen Sie das Farbtemperaturmenü.
FARBTEMP.: Voreingestellte Farbtemperatur auswählen.
USER - R: Stellen Sie die ROT-Farbstufe ein.
USER - G: Stellen Sie den GRÜNEN Farbpegel ein.
USER - B: Stellen Sie die BLAU-Farbstufe ein.
2. OSD
SPRACHE: Wählen Sie die bevorzugte Sprache für das OSD. ( En / Ch / Ger / Fr / Sp / It /
Pt / Pl / Ru)
H-POSITION: (0-100) Stellen Sie die horizontale Position des OSD ein.
V-POSITION: (0-100) Stellen Sie die vertikale Position des OSD ein.
DAUER : (5-60 ) Stellen Sie die Sekunden ein, in denen das OSD automatisch
geschlossen wird.
BACKLIGHT : Stellen Sie die Leistungsstufe ein, die von der Hintergrundbeleuchtung
verwendet wird (HIGH/MID/LOW)

BWML-1000 DEUTSCH ENGLISH | 11
MEM-RECALL : Alle Werkseinstellungen wiederherstellen.
3. Geometrie
H-POSITION : Stellen Sie die horizontale Bildposition ein.
V-POSITION: Stellen Sie die vertikale Bildposition ein.
CLOCK : Stellen Sie die Uhrzeitsynchronisation manuell ein.
( Wenn die Uhreinstellung Ihres Bildes nicht fein eingestellt ist, können Sie
periodische vertikale Balken mit Videorauschen auf Ihrem Bild beobachten.
Diese Balken mit Rauschen werden normalerweise korrigiert, wenn eine
automatische Konfiguration durchgeführt wird. Wenn die Balken mit
Rauschen immer noch vorhanden sind , diese Einstellung kann verwendet
werden, um sie zu entfernen.
PHASE : Wenn die Phase Ihres Monitors nicht fein eingestellt ist, können Sie
beobachten, dass das Bild in der horizontalen Achse instabil ist. Verwenden
Sie diese Option, um manuell zu korrigieren.
AUTO ADJUST: Führt eine automatische Konfiguration von Phase, Takt, vertikaler und
horizontaler Position durch.
4. Audio
BASSE : ( 0-100 )
HÖHEN : ( 0-100 )
BALANCE : (-50 bis +50)
SOUND MODE : Legen Sie Benutzer- oder voreingestellte Audiokonfigurationen fest.
(Benutzer/Standard/Film/Musik)
AVC : (EIN/AUS) Automatische Lautstärkeregelung

12 | DEUTSCH ENGLISH BWML-1000
EN
ON-SCREEN DISPLAY SETUP
1. To access the OSD Menu press ‘MENU’.
2. Use the ‘+’or ‘-’ buttons to select the required menu item, then press the ‘SOURCE’ button to
select the Sub menu.
3. Continue to use the ‘SOURCE’ button to highlight the required field, then press ‘+’or ‘-’to
adjust the setting.
4. Press the ‘MENU’ button to return to previous menu.
5. Press the ‘MENU’ button again to exit the OSD Menu completely.
6. N.B. To Lock or Unlock OSD settings after set up.
Press and hold "menu" button for 5 seconds.
Remote control
Power
Turn On & off the monitor
Power-s
Back light : high, mid , low
Scale : normal, center, full
Mute
Switches the sound on or off
Lock
Menu lock: lock, unlock
∧、∨
Move Up / down highlight icon,
Menu
Display the main on-screen menu
< 、>
Press them to turn up or turn down the
volume
Auto
Auto adjust (available only VGA mode)
INFO
Press it to display information on the
monitor screen
VGA
VGA signal
HDMI
HDMI signal
AV
AV input signal
Source
Press it to display and select the
available video signal
0~9
available only password entered
NC
Sensor Freeze PIP POP SWAP
EXIT
Press this button to exit the menu

BWML-1000 DEUTSCH ENGLISH | 13
The layout of the OSD will change depending on the selected input
AV - Input Configuration
5. Picture
CONTRAST: (0–100) Set the difference between the light and dark areas of the picture.
BRIGHTNESS: (0–100) Set how bright the display is.
HUE: -50 to +50 (only available if NTSC)
SATURATION: (0-100)
SHARPNESS: (0-100)
COLOR TEMP: Select the color temperature. (Normal/Warm/Cool)
PICTURE MODE: Select defaults or save user setting. (
User/Standard/Soft/Vivid)
6. OSD
LANGUAGE: Select preferred language for OSD. (En/Ch/Ger/Fr/Sp/It/Pt/Pl/Ru)
H-POSITION: (0-100) Set the horizontal position of the OSD.
V-POSITION: (0-100) Set the vertical position of the OSD.
DURATION: (5-60) Set seconds for the OSD to automatically close.
BACKLIGHT: Set power level in use by backlight (HIGH/MID/LOW)
MEM-RECALL: Restore all factory defaults.
7. Function
HSTART: Set left alignment point of image.
HSIZE: Set horizontal size of image.
VSTART: Set lower alignment point of image.
VSIZE: Set vertical size of image.

14 | DEUTSCH ENGLISH BWML-1000
8. Audio
BASS: (0-100)
TREBLE: (0-100)
BALANCE: (-50 to +50)
SOUND MODE: Set user or preset audio configurations.
(User/Standard/Movie/Music)
AVC: (ON/OFF) Automatic Volume Control
HDMI - Input Configuration
5. Picture
CONTRAST: (0–100) Set the difference between the light and dark areas of the picture.
BRIGHTNESS: (0–100) Set how bright the display is.
COLOR TEMP: Select the color temperature Menu.
COLOR TEMP: Select color temperature preset.
USER - R: Set RED color level.
USER - G: Set GREEN color level.
USER - B: Set BLUE color level.

BWML-1000 DEUTSCH ENGLISH | 15
6. OSD
LANGUAGE: Select preferred language for OSD. (En/Ch/Ger/Fr/Sp/It/Pt/Pl/Ru)
H-POSITION: (0-100) Set the horizontal position of the OSD.
V-POSITION: (0-100) Set the vertical position of the OSD.
DURATION: (5-60) Set seconds for the OSD to automatically close.
BACKLIGHT: Set power level in use by backlight (HIGH/MID/LOW)
MEM-RECALL: Restore all factory defaults.
7. Function
HSTART: Set left alignment point of image.
HSIZE: Set horizontal size of image.
VSTART: Set lower alignment point of image.
VSIZE: Set vertical size of image.
8. Audio
BASS: (0-100)
TREBLE: (0-100)
BALANCE: (-50 to +50)
SOUND MODE: Set user or preset audio configurations.
(User/Standard/Movie/Music)
AVC: (ON/OFF) Automatic Volume Control

16 | DEUTSCH ENGLISH BWML-1000
VGA - Input Configuration
4. Picture
CONTRAST: (0–100) Set the difference between the light and dark areas of the picture.
BRIGHTNESS: (0–100) Set how bright the display is.
COLOR TEMP: Select the color temperature Menu.
COLOR TEMP: Select color temperature preset.
USER - R: Set RED color level.
USER - G: Set GREEN color level.
USER - B: Set BLUE color level.
5. OSD
LANGUAGE: Select preferred language for OSD. (En/Ch/Ger/Fr/Sp/It/Pt/Pl/Ru)
H-POSITION: (0-100) Set the horizontal position of the OSD.
V-POSITION: (0-100) Set the vertical position of the OSD.
DURATION: (5-60) Set seconds for the OSD to automatically close.
BACKLIGHT: Set power level in use by backlight (HIGH/MID/LOW)
MEM-RECALL: Restore all factory defaults.

BWML-1000 DEUTSCH ENGLISH | 17
6. Geometry
H-POSITION: Set horizontal image position.
V-POSITION: Set vertical image position.
CLOCK: Manually adjust clock synchronisation.
(If the clock setting of your image is not fine-tuned, you may observe periodic
vertical bars of video noise on your image. These bars of noise are usually
adjusted out when an Auto Configuration is performed. If the bars of noise are
still present, this setting can be used to remove them.
PHASE: If the phase of your monitor is not fine-tuned, you may observe the image
being unstable in the horizontal axis. Use this option to manually correct.
AUTO ADJUST: Perform an automatic configuration of the Phase, Clock, vertical and
horizontal position.
5. Audio
BASS: (0-100)
TREBLE: (0-100)
BALANCE: (-50 to +50)
SOUND MODE: Set user or preset audio configurations.
(User/Standard/Movie/Music)
AVC: (ON/OFF) Automatic Volume Control
14.

18 | DEUTSCH ENGLISH BWML-1000
Technische Daten / Technical specifications BWML-1000
Modell / Model
BWML-1000
Typ / type
Videoüberwachungsmonitor
Installation / Installation
Innenbereich / indoor
Größe / size
10.1“
Unterstützte Videostandards
supported video standards
960H CVBS/FBAS (Analog)
Unterstützte Auflösungen
1280x800 (nativ); 1920x1080 (skaliert)
960H (CVBS/FBAS)
HDMI Eingang / HDMI Input
1x HDMI 1.4
VGA Eingang / VGA Input
1x
FBAS Eingang / Loop Ausgang
CVBS Input / Loop output
1x BNC / 1x BNC
Audio Eingang / Ausgang
Audio Input / Output
1x / Lautsprecher
1x / Speaker
Bedienung
Remote controll
Button, Fernbedienung
Buttons, remote controller
Gehäuse
Housing
Metall
Frontglas
Front glass
Entspiegelt
Anti-glare
Kontrast Verhältnis
Contrast ratio
800:1
Helligkeit
Brightness
300cd/m²
Display Farben
Display colors
16,7 M
Blickwinkel
Viewing angle
80/80/80/80 °
VESA
75x75
MTBF
50.000h
Betriebstemperatur
Operation temperature
min. 0°
max. +45°
Maße / dimensions
mm
Betriebsspannung
Power Supply
12Vdc über ext. Netzteil (im Lieferumfang enthalten)
Leistungsaufnahme
Power consumption
Max. 10W
Gewicht
Weight
1,3kg (net)
1,75kg (gross)
Lieferumfang
Monitor BWML-1000
Standfuß, fix
Set Schrauben
Fernbedienung
Netzteil
Irrtum und technische Änderungen vorbehalten.
Subject to technical changes without notice. Errors excepted.

BWML-1000 DEUTSCH ENGLISH | 19
Ausführliches Benutzerhandbuch
Diese Kurzanleitung dient dazu, das Gerät
einfach und unkompliziert in Betrieb zu
nehmen. Eine ausführliche Beschreibungen
der einzelnen Funktionen finden Sie im
Benutzerhandbuch, das Sie auf unserer
Webseite als pdf-Datei herunterladen
können.
Alternativ können Sie für einen schnellen
Zugriff auf das Handbuch diesen QR-Code
einlesen, um das Handbuch direkt auf Ihr
Smartphone oder Tablet zu erhalten.
Link
Aktuelle Informationen finden Sie auf unserer
Webseite unter www.burg-guard.com
Detailed user manual
The purpose of this quick installation guide is
to start the device in an easy and convenient
way. Further detailed explanations and
descriptions of the various functions are
available in the user manual which you can
download as pdf file from our website.
Alternatively, for quick access to the user
manual, you can scan the below QR-code to
view the user manual on your smartphone or
tablet.
Link
Latest updates can be found on our homepage
www.burg-guard.com

20 | DEUTSCH ENGLISH BWML-1000
Hinweise
Wir weisen darauf hin, dass
derart gekennzeichnete Elektro-
und Elektronikgeräte sowie
Batterien, nicht über den Haus-
müll, sondern getrennt bzw.
separat gesammelt werden
müssen. Bitte erkundigen Sie
sich bei der zuständigen Stelle
in Ihrer Stadt/Gemeinde nach
Sammelstellen für Batterien und
Elektromüll.
Hiermit erklärt die BURG-
GUARD GmbH, dass das vorliegende
Gerät der Richtlinie 2014/35/EU
Niederspannungsrichtlinie, 2014/53/EU
(EMC), 2011/65/EU (RoHS).
Der vollständige Text der EU-Konformitäts-
erklärung ist unter der folgenden Internet-
adresse abrufbar: www.burg.biz Bei
technischen Fragen zum Produkt lesen Sie
bitte die ausführliche Bedienungsanleitung
und beachten Sie die FAQ, die Sie auf
folgender Webseite finden: www.burg.biz.
Sollten Sie dennoch Fragen haben, wenden
Sie sich bitte per E-Mail an:
camera-servic[email protected]z
Impressum
Das Copyright dieser Bedienungsanleitung
liegt ausschließlich bei der BURG-GUARD
GmbH. Jegliche Vervielfältigung auch auf
elektronischen Datenträgern bedarf der
schriftlichen Genehmigung der BURG-
GUARD GmbH. Der Nachdruck –auch
auszugsweise –ist verboten. Alle
genannten Firmen- und Produktnamen sind
Warenzeichen oder eingetragene
Warenzeichen bzw. Marken der jeweiligen
Inhaber. Irrtum und technische Änderungen
vorbehalten.
Irrtum und technische Änderungen
vorbehalten.
Notes
Please be aware that electrical
and electronic equipment and
batteries shall not be disposed
of as household waste, but
rather collected separately.
Please obtain information on
the collecting points for
electrical waste from the
responsible authority of you
municipality.
BURG-GUARD GmbH hereby
declares that this device
complies with Directive 2014/35/EU Low
Voltage, 2014/53/EU, (EMC), 2011/65/EU
(RoHS). The full text of the EU Declaration
of Conformity can be found on
www.burg.biz. If you have technical
questions about this device, please read the
detailed user manual and the FAQ sheet
which you will find on the following website:
www.burg.biz. If, however, you still have
questions, please send an e-mail to:
camera-service@burg.biz
Copyright
All rights reserved. This publication may not
be reproduced, stored in a retrieval system
or transmitted, in any form or by any means
(electronic, mechanical, photocopying,
recording or otherwise), without the written
prior permission of BURG-GUARD GmbH.
No reproduction of any part or excerpts
thereof are permitted. Errors excepted.
Specifications are subject to change without
notice for quality improvement. All
companies or products mentioned in this
publication are trademarks, registered
trademarks or brands of the respective
company. Subject to technical changes
without notice. Errors excepted.
Specifications are subject to change without
notice for quality improvement.
© Copyright: BURG-GUARD GmbH
Wormgermühle
58540 Meinerzhagen, Germany
www.burg-guard.com
Version 1.00cko/0622/dt-en/A5
Table of contents
Languages:
Other Burg Wächter Monitor manuals

Burg Wächter
Burg Wächter SANTEC SLS-1505D User manual

Burg Wächter
Burg Wächter SANTEC SLS-1900 User manual

Burg Wächter
Burg Wächter BWML-2712H User manual

Burg Wächter
Burg Wächter SANTEC SLM-17HCV User manual

Burg Wächter
Burg Wächter SANTEC SLS-1045 User manual

Burg Wächter
Burg Wächter SPM-IP-CVI User manual

Burg Wächter
Burg Wächter SML-3222Q User manual