Burleigh Wagon Burleigh Wagon Series User manual

Burleigh Wagon –Instruction and assembly manual
For assembly instruction video visit:
www.burleighwagon.com.au/pages/instruction-use-and-care-manual
Quick Start Guide
Please keep this manual as it contains important information.

Thank you for purchasing the Burleigh Wagon, the world’s most versatile wagon.
We are pleased to enclose the following instructions to help you get the most out
of your Burleigh Wagon.
By following this manual, you will be able to enjoy the Burleigh Wagon to its
designed potential.
Please note it is crucial to adhere to these instructions as damaged caused from
failure to comply will not be covered under warranty.
For assembly instruction video visit:
www.burleighwagon.com.au/pages/instruction-use-and-care-manual
Welcome to the Burleigh Wagon Family!
Quick Start Guide
Please keep this manual as it contains important information.

•Instruction manual
•Burleigh Wagon (body, small door, large door, cup holder, boot door)
•5th wheel
•Handle
•4 wheels
•2 rods for wheels
•1 rod for handle
•4 spacers for wheels
•7 star washers – 1 spare
•Star washer installation tool, ring spanner, allen key
•Hardware for 5th wheel assembly
•Optional - If Burleigh Wagon Bundle
•Snack Tray
•Speaker
•Umbrella
•Umbrella Pole
•2 Surfboard Rack (2 pieces)
•Number Plate (2 screws)
Included in the box
Tools Needed for Assembly -Adult Assembly Required
Tools Required (not included)
•Mallet
•Hammer
•Screwdriver
•Block
Tools Required (included)
•Ring spanner – also used for star washer installation
•Allen key
•Star washer installation tool
Quick Start Guide
Please keep this manual as it contains important information.

•PRIOR TO ASSEMBLY, THIS PACKAGE CONTAINS SMALL PARTS/HARDWARE
WHICH IS A CHOKING HAZARD AND MAY CONTAIN SHARP EDGES AND SHARP
POINTS. KEEP AWAY FROM CHILDREN UNTIL ASSEMBLED.
•CHILD MUST BE 18 MONTHS OF AGE TO RIDE IN THE WAGON.
•WHEN NOT PULLED BY AN ADULT, AVOID USING THIS WAGON NEAR
SWIMMING POOLS, ON OR NEAR STEPS, HILLS, ROADWAYS OR INCLINES.
•FOLLOW THE MANUFACTURER’S INSTRUCTIONS.
•ALLWAYS APPLY THE BREAK WHENEVER THE WAGON IS STATIONARY.
•MAKE SURE CHILDREN ARE CLEAR OF ANY MOVING PARTS IF YOU ADJUST THE
WAGON, OTHERWISE THEY MAY BE INJURED.
•AVOID SERIOUS INJURY FROM FALLING OR SLIDING OUT. ALWAYS USE SEATBELT
HARNESS AT ALL TIMES FOR BOTH RIDERS.
•SECURE THE CHILD IN THE HARNESS AT ALL TIMES.
•ONE CHILD PER SEAT AND MUST ALWAYS WEAR SEATBELTS AT ALL TIMES.
•ALL RIDERS MUST ALWAYS BE UNDER DIRECT ADULT SUPERVISION.
•ENSURE ALL SCREWS, NUTS, WASHERS, ETC. ARE FIRM AND TIGHT PRIOR TO
FIRST USE AND PERIODICALLY CHECK THESE COMPONENTS TO AVOID POSSIBLE
INJURY/DAMAGE.
•KEEP AWAY FROM CHILDREN UNTIL ASSEMBLED.
•SHOES MUST BE WORN AT ALL TIMES.
•MAXIMUM WEIGHT: 100KG. LIMIT 2 OCCUPANTS.
•THOROUGHLY WASH WAGON AND SNACK TRAY AREA BEFORE CONTACT WITH
FOOD OR BEVERAGE.
•PROTECT YOUR EYES. ALWAYS WEAR SAFETY GLASSES WHEN USING TOOLS AND
ASSEMBLING PRODUCT.
•FALL HAZARD. WHEEL CAN DETACH AND CAUSE TIP OVER. PULL ON THE
WHEELS TO ASSURE THEY ARE SECURELY ATTACHED.
•USE THE TETHER STRAP TO STOP THE WAGON ROLLING AWAY.
•2 ADULTS REQUIRED TO LIFT WAGON IN/OUT OF STORAGE.
Warnings –Do
Warnings –Do not
•DO NOT LEAVE CHILDREN UNATTENDED.
•DO NOT CARRY EXTRA CHILDREN OR BAGS ON WAGON.
•DO NOT LET CHILDREN STAND UP IN THE WAGON.
•NOT RECOMMENDED FOR A CHILD UNDER 18 MONTHS OLD.
•NEVER RUN OR WALK FAST WHILE PULLING/PUSHING THE WAGON.
•DO NOT LIFT WAGON WITH 1 PERSON, 2 ADULTS REQUIRED TO LIFT WAGON
IN/OUT OF STORAGE.
Quick Start Guide
Please keep this manual as it contains important information.

1. Use star washer tool and mallet to install washer to 1 end of all 3 rods provided.
Washer into groove, 5mm from end of rod.
Step 1 -Attach tyres to 5th wheel.
Axle
Star washer
Star washer tool
2. Add tyre, spacer, 5th wheel.
Quick Start Guide
Please keep this manual as it contains important information.

3. Turn on side, place block between floor and rod. Add spacer, tyre, and star
washer to other side with ring spanner tool and hammer.
Step 1 -(continued)
Same as step 1 but with wagon instead of 5th wheel
Step 2 -Attach wheels to wagon.
Quick Start Guide
Please keep this manual as it contains important information.
Ring Spanner
Block
Block

Step 3 -Attach 5th wheel to wagon
M12 bolt -
Washer -
-washer
- nut
Step 4 -Attach the handle to the 5th wheel
- tube
bolt -
Star
washer
Quick Start Guide
Please keep this manual as it contains important information.
- Ring Spanner
Allen Key -

The Burleigh Wagon was designed for easy care and maintenance. After each use
we recommend to remove all salt water, sand, and dirt by hosing with fresh water
or wiping down with a wet cloth. Remove speaker accessory and umbrella prior to
hosing with fresh water. Use a soft brush to gently remove any sand or dirt from
the wagon. Dry off wheels and axle rods completely. Good cleaning and
maintenance will keep your Burleigh Wagon operating smoothly. When not in use,
keep wagon stored out of direct sunlight and rain.
See speaker instruction manual for instructions and care.
Care and Maintenance
Quick Start Guide
Please keep this manual as it contains important information.

Your Burleigh Wagon and/or any accessories are warranted to be free from any
manufacturing defects for a period of 12 months from the date of purchase under
normal use and in compliance with the operating instructions.
This warranty is not transferable and extends only to the original retail purchaser and
is only valid when supplied with proof of purchase.
PLEASE RETAIN PROOF OF PURCHASE FOR THIS LIMITED WARRANTY
The warranty is valid only in the original country of purchase. This warranty is subject
to the conditions set forth by the country in which the items were purchased.
Conditions may vary. Burleigh Wagon will not ship replacement or repair parts out of
the country of purchase.
Burleigh Wagon will provide replacement parts or conduct repairs as determined
fitting by the company. Burleigh Wagon reserves the right to exchange the item with a
replacement part. Some parts may be replaced with newer model parts as the wagon
is improved over time.
Please note that a repair issue will NOT be covered by this warranty if:
The issue is caused by misuse or poor maintenance. (Please refer to the instructional
manual for guidance on the Burleigh Wagon use and maintenance.)
Damage is caused by improper installation of Burleigh Wagon parts and/or accessories.
Damage is corrosion, mold or rust caused by lack of maintenance or service.
Damage is due to general wear and tear, which is the result of everyday use or
negligence.
Damage is caused by sun intensity, sweat, detergents, damp storage or frequent
washings.
Repairs or modifications are carried out by a third party.
Burleigh Wagon is purchased from an unauthorized retailer. *Approved retailers are
listed on our website at: www.burleighwagon.com.au.
Burleigh Wagon is second-hand.
Burleigh Wagon is damaged as a result of an accident, airline or freight damage.
If you receive a damaged or defective item, please contact us within 5 business days of
from your original confirmation e-mail, as well as a description and images of the
damage or defect, along with your e-mail address and phone number. Once we receive
all the necessary information we will authorise for the return of the goods and arrange
a credit towards your next purchase or send a replacement product after we receive
the original item(s) back. Please pack the item(s) securely in the original product
packaging. Please include all paperwork, parts, and accessories.
12 Month Limited Warranty
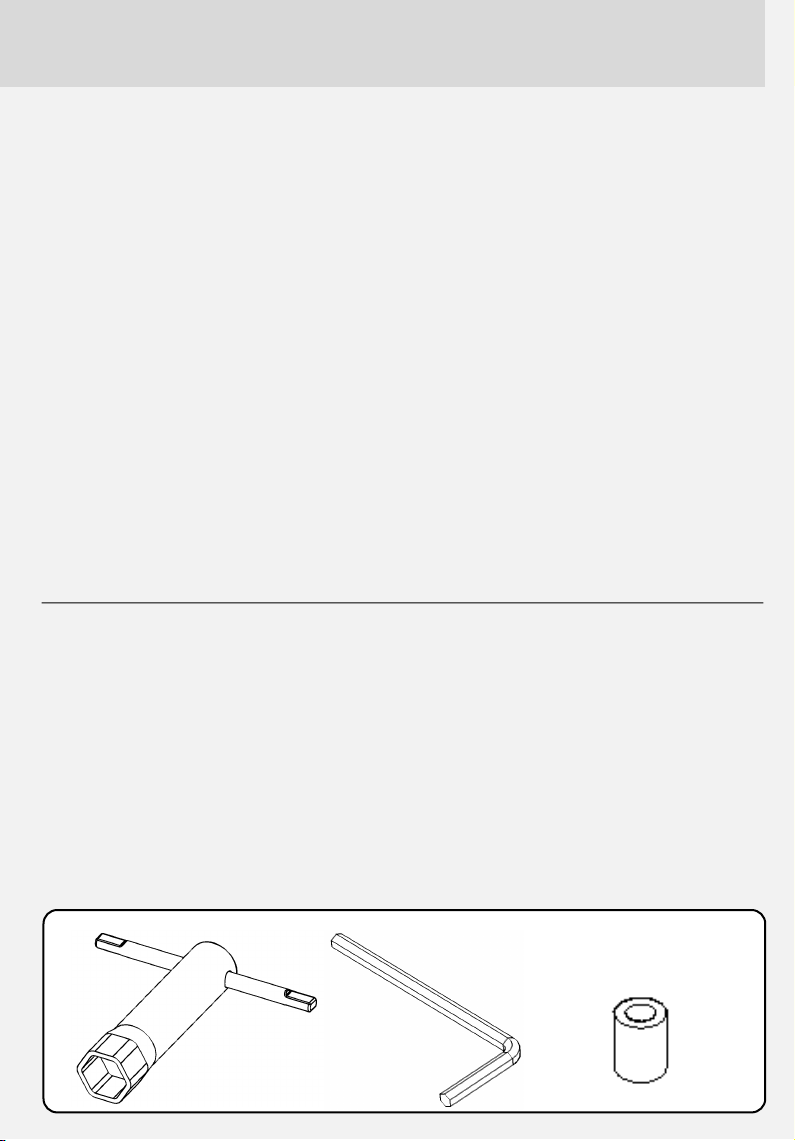
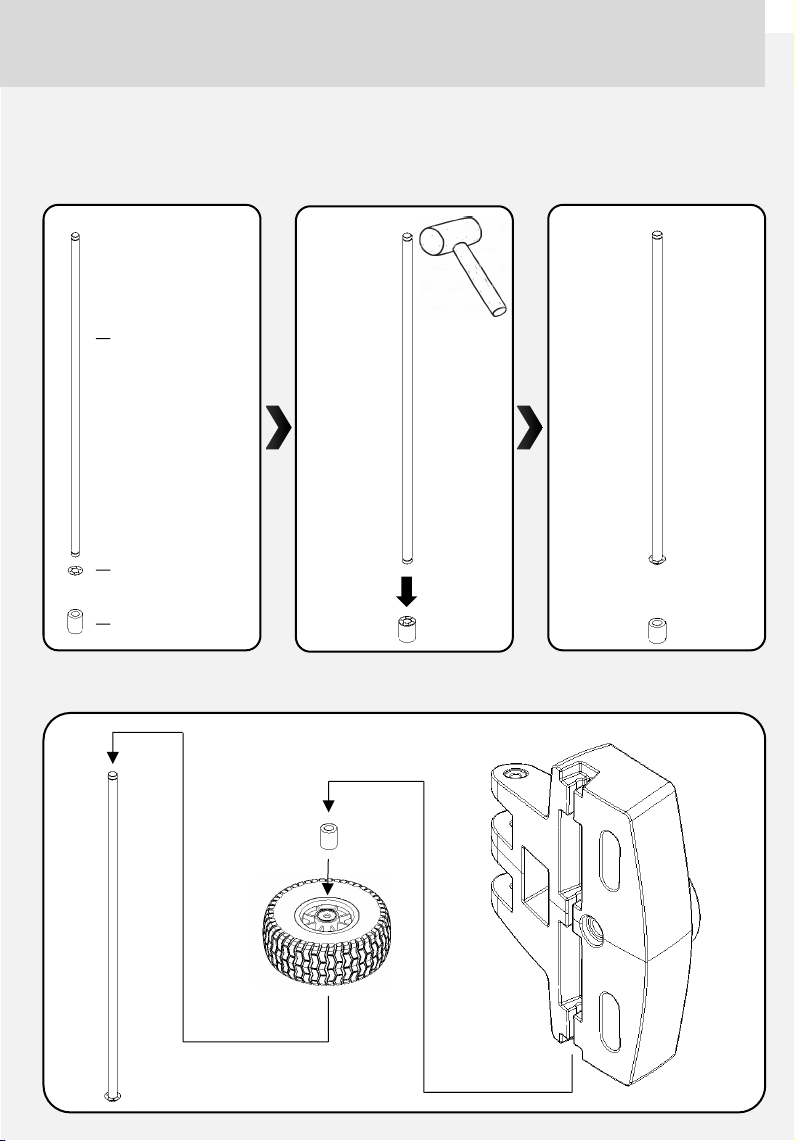
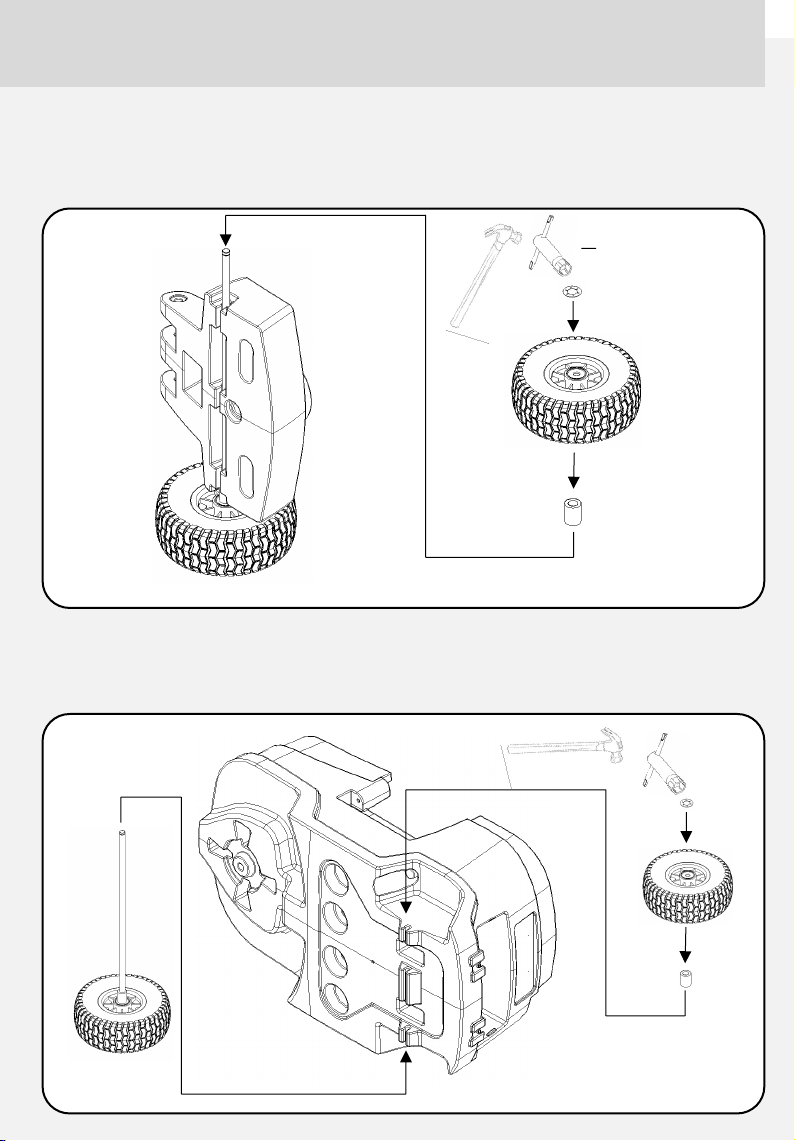
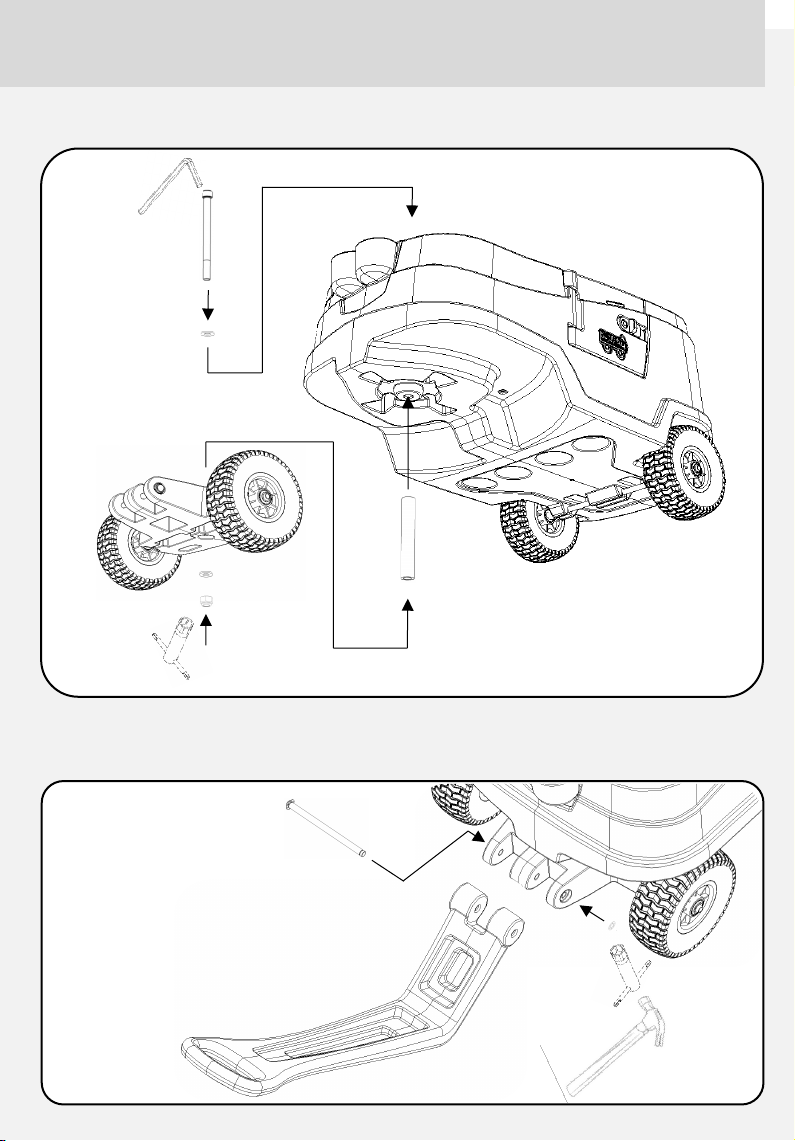
Quick Start Guide
Please keep this manual as it contains important information.

Quick Start Guide
Please keep this manual as it contains important information.
BURLEIGH WAGON PTY LTD
PO BOX 3124, ROBINA TOWN CENTRE,
QLD 4220 AUSTALIA
TEL: +61 439 989 054
EMAIL: [email protected]
WWW.BURELIGHWAGON.COM.AU
MODEL: THE BURLEIGH WAGON
Table of contents