Bush 1080P User manual

INSTRUCTION MANUAL
32”/40” 1080P Digital LED LCD Television
Customer helpline: 0845 604 0105

BUSH | 1080p Digital LED LCD | User Manual | Helpline: 0845 604 0105 1
Contentss
01 Safety Warnings 2
Welcome ................................................................................2
Important Information ......................................................2
Safety notice.........................................................................3
Electrical connections........................................................4
02 About your LED LCD TV 5
Viewing the Control Panel................................................5
Viewing the Connection Panel .......................................5
Get to know your remote control..................................6
Installing the Stand ........................................................... 7
Connecting your TV............................................................7
Preparation of your remote control..............................8
03 Getting Started 9
Setting up...............................................................................9
Tuning your TV .....................................................................9
Common interface......................................................... 12
Using your TV..................................................................... 14
Adjusting picture settings............................................. 14
Adjusting sound settings.............................................. 15
Function settings.............................................................. 16
Time settings...................................................................... 17
Lock menu settings......................................................... 18
Shortcut menu display ................................................... 19
04 Using the features 21
Teletextfunctions............................................................. 21
USB mode............................................................................ 22
Using external USB disk for recording ...................... 24
05 Reference Sections 26
Troubleshooting ............................................................... 26
Specification ...................................................................... 27
06 Product Guarantee 28

P.02 BUSH | 1080p Digital LED LCD | User Manual | Helpline: 0845 604 0105
01Safety Warningss
WELCOME
Thanksfor buying this 32"/40" 1080P Digital LED LCD TV. This guidewill helpyou set up and begin using your TV.
First, check the contents of your box with the parts checklist below:
32"/40" 1080P Digital LED LCD TVt
Remote controlt
AAA batteryt ×2
Instruction Manualt
Quick Start Guidet
TV standt
5x Screwsfor TV standt
Component adapter , Component audio adapter , SCART adaptert
TV Digital Guidet
Cover-Bottomt
Now you canget started!
IMPORTANT INFORMATION
READ ALL INSTRUCTIONS BEFORE USE AND KEEP FOR FUTURE REFERENCE.
CAUTION
TOREDUCE THE RISK OF ELECTRIC SHOCK, DONOT REMOVE COVER(OR BACK).NO USERSERVICEABLE PARTSINSIDE.
FOR ANY PROBLEMS, REFERSERVICING TOTHE CUSTOMERHELP LINE. THERE IS ALIGHTNING ARROW SYMBOL IN
THE TRIANGLE:THIS SYMBOL INDICATESHIGH VOLTAGE IS PRESENT INSIDE. IT IS DANGEROUS TOMAKE ANY KIND OF
CONTACT WITH ANYINSIDE PART OF THIS PRODUCT.
THERE IS AEXCLAMATION MARK IN THE TRIANGLE:THIS SYMBOL ALERTSYOU THAT IMPORTANT LITERATURE
CONCERNING OPERATION AND MAINTENANCE HAS BEENINCLUDED WITH THIS PRODUCT.
CAUTION:TOREDUCE THE RISK OF ELECTRIC SHOCK AND FIRE, DONOT PUT THE TV SET NEAR
SOURCESOF HUMIDITY. DONOT USE ANY ABRASIVE CLEANERS WHICH MAY SCRATCH OR DAMAGE
THE LCD SCREEN. AVOID CONTACT WITH OBJECTSTHAT MAY SCRATCH THE LCD SCREEN.
NOTE:SERVICING THE UNIT YOURSELF IS UNAUTHORISED AND COULD LEAD TOINJURY OR PRODUCT
DAMAGE. REFERALL SERVICING TOTHE CUSTOMERHELPLINE.

BUSH | 1080p Digital LED LCD | User Manual | Helpline: 0845 604 0105 P.03
01 Saftety Warnings
SAFETY NOTICE
For your protection,please read these instruction completely and keep this manual for future reference.O
Please ensure thatthe set hasadequate ventilation.O
Donot placethe set neara heatsourceor in directsunlight.O
Donot put the unit nearwater or oil asit may cause a re.O
During thunderstorms, unplug both the antenna and power plug to prevent damage.O
Donot use a damaged power plug or put the power supply neara heatsourceasit may cause electric shock orO
re.
Toprevent potential re, donot overload anelectrical outlet with too many plugs.O
Placethe set on a level surfaceto prevent it from tipping and potential damage.O
Donot removethe cover of the set or try to serviceyour TV. This may resultin electrical shock or re. All serviceO
work must becompleted by anauthorised technician.
If there are any abnormal soundsor smellsfrom the unit, unplug it immediately and contactanauthorisedO
serviceprovider.
Toprevent re, donot use or store any ammablematerialsnearthe unit.O
Toprevent re, donot placethe unit neara damp wall.O
Toprevent electric shock, ensure thatany external antenna connected to the set is clearof contactwith anyO
power lines.
Donot plug/unplug the unit whileyour handsare wet. This may cause anelectric shock.O
Please ensure a solid connection with the AC wall socket in order to avoid shock and potential re.O
Toprevent electric shock or re, please prevent rain from entering the set along the wire connected to theO
outsideantenna.
When cleaning, please unplug the unit. Use a softcotton cloth. Donot use any abrasivecleansers, and preventO
water from entering the set.
If any plugsor input wires are dirty, unplug the set and cleanthem. This will prevent the risk of electric shock orO
re.
If the set is not going to beused for anextended period, unplug the unit from the main power.O
The apparatus should not beexposed to dripping or splashing and no objects lled with liquids, suchasvases
should beplaced on the apparatus.
The mains plug is used for disconnecting the device, makeit easily accessible.
Do not use any accessories that are not recommended by the manufacture.

P.04 BUSH | 1080p Digital LED LCD | User Manual | Helpline: 0845 604 0105
ELECTRICAL CONNECTIONS
CONNECTING TO POWER
Check thatthe voltagemarked on the productcorrespondswith your supply voltage. This productis tted with a
13Aplug complying with BS1363. If this plug is unsuitableor needsto bereplaced, please note the following:
PLUG REPLACEMENT
If you need to replacethe tted plug:
WARNING
Never connectliveor neutral wires to the earth terminal of the
plug. Only tanapproved 13 Amp BS1363/Aplug and the correct
rated fuse. If in doubt, consulta qualied electrician.
IMPORTANT
The wires in this mains lead are coloured asfollows:
Blue Neutral
BrownLive
As the colours of the wires in the mains lead of this apparatus may not correspond
with the coloured markingsidentifying the terminalsin your plug, proceed
asfollows:
The wire whichis coloured blue must beconnected to the terminal, whichis marked with Nor coloured blue. The
wire whichis coloured brownmust beconnected to the terminal whichis marked Lor coloured brown. The green
and yellow wire must beconnecting to the terminal marked with the letter E or the earth symbol . Alwaysensure
thatthe plug cord grip is fastened correctly.
If a 13A(BS1363) fused plug is used it must betted with a 3Afuse conforming to BS1362 and beASTAapproved. If
in doubtcontacta qualied electrician.
WASTE ELECTRICAL PRODUCTSSHOULD NOT BE DISPOSED OF WITH
HOUSEHOLD WASTE. PLEASE RECYCLE WHERE FACILITIESEXIST. CHECK
WITH YOUR LOCAL AUTHORITY FOR RECYCLING ADVICE.
TruSurround XT, SRS and the symbol are trademarksof SRS Labs, Inc. TruSurround XT technology is
incorporated under license from SRS Labs, Inc.
TruSurround XT® creates a truly immersivesurround sound experiencewith richbass and cleardialog from only
twospeakers.

BUSH | 1080p Digital LED LCD | User Manual | Helpline: 0845 604 0105 P.05
02About your LED LCD TVs
HDMI 1 IN
USB
DIGITAL AUDIO OUT
(OPTICAL )
ANT IN
8
9
10
11
12
13
2 INIMDH
NITNENOPMOC
CP
Y P
b
P
r
L
OIDUA
R
NICP 3 INIMDHTRACS
1
2
34 5 6 7
PC/DVI AUDIO
Viewing the Control Panel
Viewing the Connection Panel
[TV Rear Panel] [TV Side Panel]
1SCART input
2Component input
3Component Audio
input
4PC input
5PC/DVI AUDIO
input
6HDMI3 IN input
7HDMI2 IN
input
8Common Interface
9Earphone
0ANTENNA input
AOptical output
BUSB
CHDMI1 IN input
1
2
3
4
5
LOV
HC
UNEM
ECRUOS
1SOURCE Toggles between all the available input
sources
2MENU Press to see an on-screen menu of yourTV’s
features.
3VOL+/- Press to increase or decrease the volume .
4CH+/-
Press to change channels.
5POWER Press to turn theTV on and o.

P.06 BUSH | 1080p Digital LED LCD | User Manual | Helpline: 0845 604 0105
GET TO KNOW YOUR REMOTE CONTROL
When using the remote control, aim it towardsthe remote sensor on the TV.
1Stand By
2DVD Menu / REC
3
DVD open / close
4Picture Mode
5Sound Mode
6Call Screen Display
7Sleep button
8DTV Audio / NICAM / DVD Audio
9Aspect Ratio Control button
0Channel list button
ASubtitle button
BProgram Number Channel selection
C
Source Exchange
DQ.VIEW / Swap Channel
EV+/V-: Volume selection
FP+/P-: Channel selection
GMute
HMenu button
IGUIDE button (only for DTV)
JFavourite list button
KOK button
LCursor Mover button
MBack button (only for USB)
NExit Screen Display
OREPEAT (only for DVD, USB, REC & Timeshift)/CANCEL button
PZoom (only for DVD & USB)/Teletext index (only forTV) / REC index
QPlay / Pause button (only for DVD & USB) / Timeshift
RStop (only for DVD, USB, REC &Timeshift)
S
Fast Reverse (only for DVD, USB, REC & Timeshift)
T
Fast Forward (only for DVD, USB, REC & Timeshift)
UPrevious (only for DVD, USB & REC)
VNext (only for DVD, USB & REC)
WDVD Set up / Text
XDVD Title / Teletext Mix
Y
DVD Search /Teletext Subcode
ZDVD 10+ /Teletext Hold
[DVD Program / Teletext Reveal
\DVD A-B Repeat /Teletext Size
]DVD Call /Teletext Mode
`DVD Angle/Teletext Time
Note
RED button, GREENbutton,OBLUE
button and YELLOW button are fast
textbutton in analog signal. Function
button in DVBT (just referencethe
OSD)

BUSH | 1080p Digital LED LCD| User Manual | Helpline: 0845 604 0105 P.07
02 About your LED LCD
Installing the Stand
Toget started, you need the (5) screwsthatare included in the box with your TV .
Glass stand is BSEN12150: 2000 comply
Model / Catalogue Number: 529-6091
Retailer: Argos
Retailer address: 489-499 Avebury
Boulevard
Saxon Gate West
Central Milton Keynes
MK9 2NW
To attach the stand to your TV, follow these steps:
Lay your TV screen downon a softsurfacesuchasa couchor bed.
A
Makesure to distinguish between the front and back of the stand when assembling them.B
Attachyour stand to the TV.C
Makesure the stand is installed on the stand ata proper level, donot apply excess pressure.D
Fasten the (5) screwsatthe vepositons asthe right picture.E
CONNECTING YOUR TV
ANTENNA CONNECTION
Connectyour aerial to the sideof the TV into the ANTENNA IN socket.
IMPROVE YOUR SIGNAL
Toimprovepicture quality in a poor signal area, use a signal amplifier (not supplied).
CONNECT YOUR PC TO THE TV
You canuse your TV asa monitor for your personal computer by connecting it with a VGAcable(not supplied).
Read your computer user guideand check it hasa VGAconnector.
A
Turn the power o on your TV and PC.B
Connecta D type 15-pin VGAinterfacecableto the VGAvideo interfaceconnector on the PC. Connectthe otherC
end of the cableto the PCinterfaceconnector on the TV. Tighten the screwson the VGAconnectors and connect
the audio cable(not supplied) to the audio input socket on the back of the TV.
Turn on the power of the TV firstly and then the PC.
D
Press the button on the TV or TV remote control to set the video input modeto PC.E
Oncethe imageshows, if there is noise present, changethe VGAmodeto another resolution, changethe refreshF
rate to another rate or adjust the brightness and contrast on the menu until the picture is clear.

P.08 BUSH | 1080p Digital LED LCD | User Manual | Helpline: 0845 604 0105
CONNECT A DVD PLAYER TO YOUR
TV
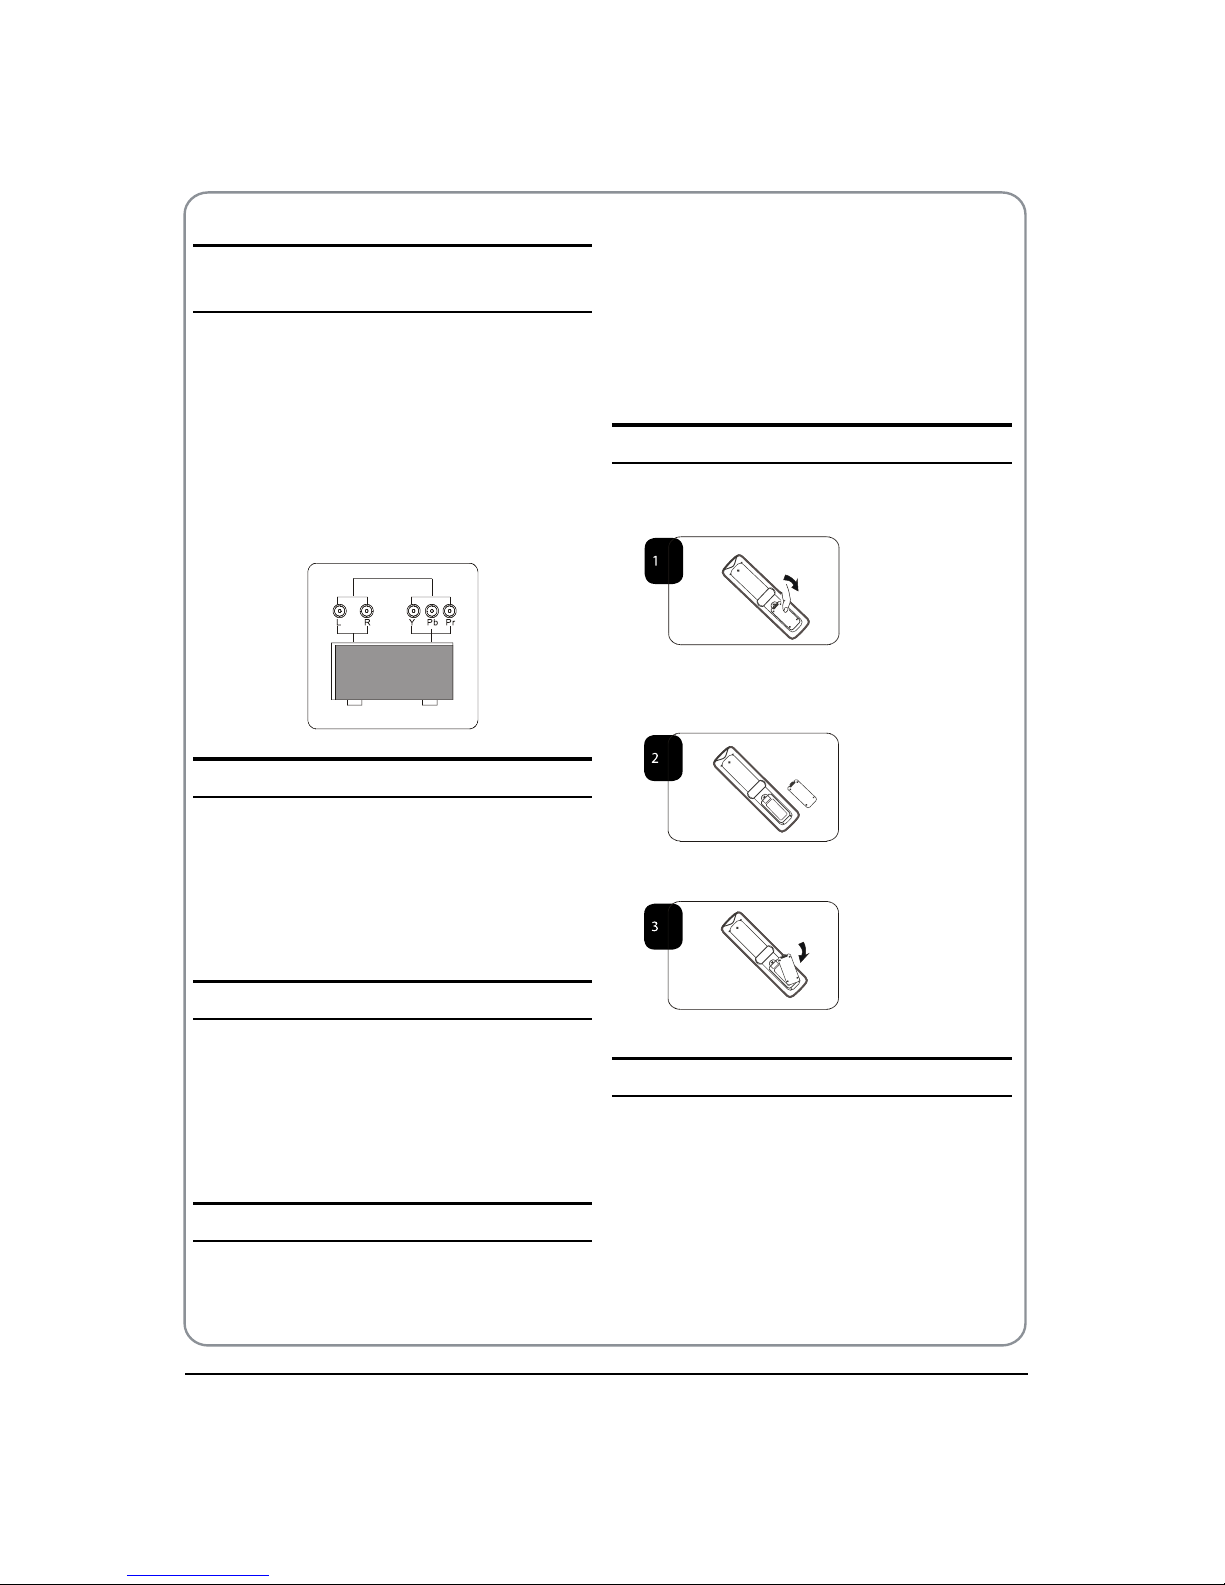
Connectthe DVD video outputs (Y, Pb, Pr) with the
supplied component adapter and component audio
adapter to the COMPONENT (Y, Pb, Pr) IN socket on your
TV.
Turn on the DVD player and insert a DVD.
A
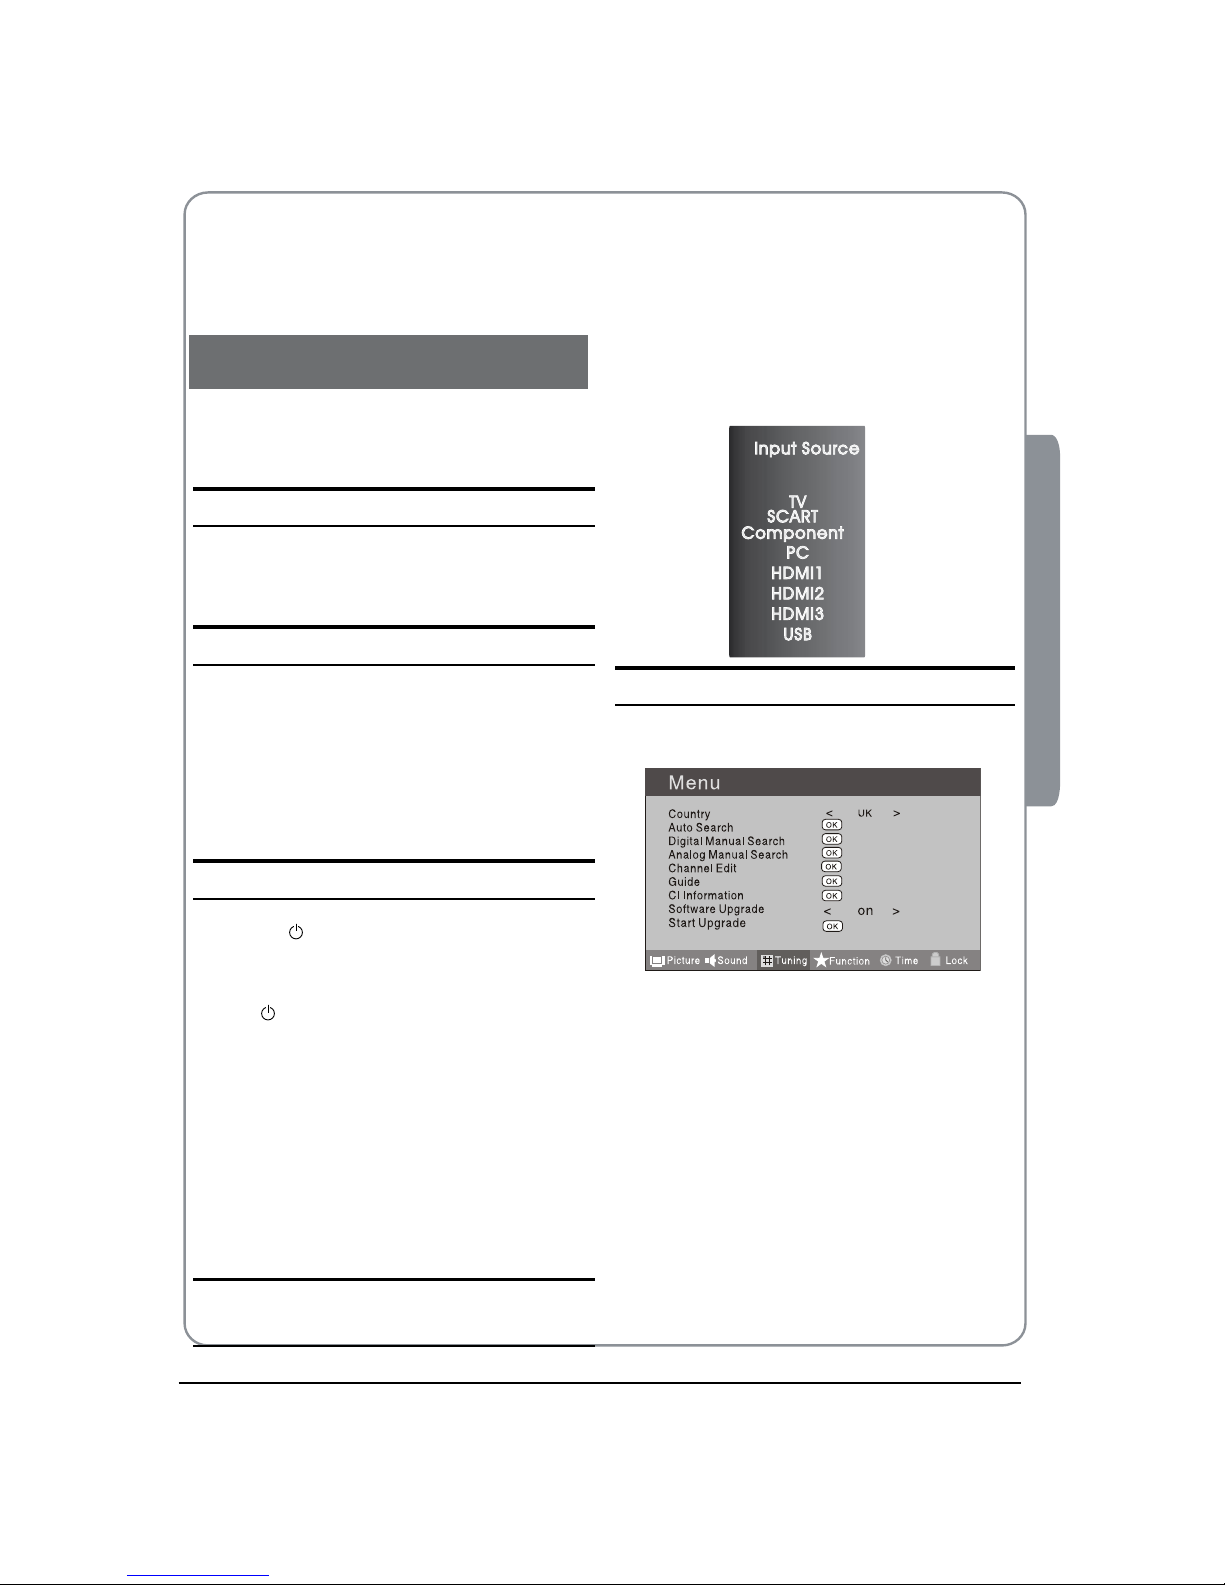
Press the sourcebuttom on the remote control toB
selectthe sourceof COMPONENT in your TV .
Refer to the DVD player user guidefor operating
C
instructions.
DVD
SCART INPUT
Connectthe scart lead from the external deviceA
(DVD player, Set-top box or games console) with the
supplied SCART adapter to the TV scart socket.
Press the
BSOURCE button to selectSCART mode.
Press the
CPLAY button on the external device.
HDMI INPUT
Connectthe cablefrom the HDMI deviceto the TVA
HDMI socket.
Press the
BSOURCE button to selectHDMI mode.
Refer to the HDMI deviceuser guidefor how to
C
operate.
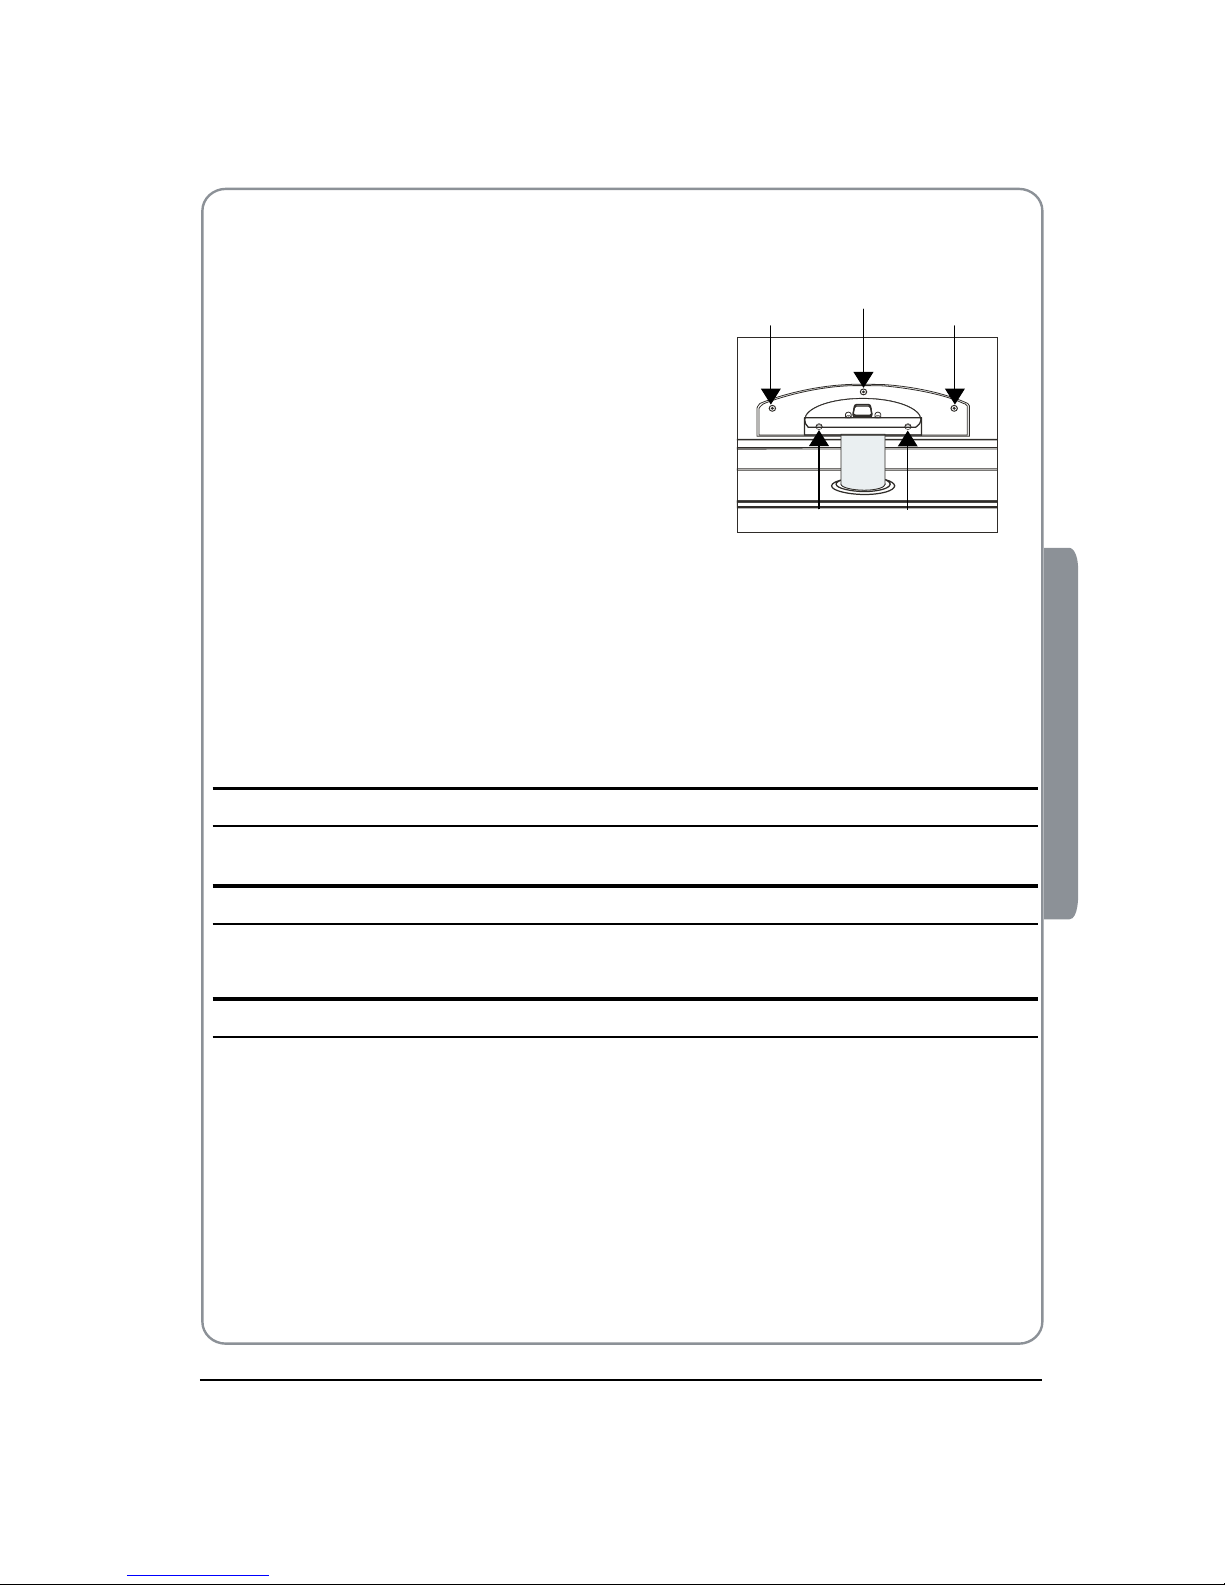
MOUNT YOUR TV ONTO THE WALL
You canmount your TV onto the wall by using a wall
bracket (not supplied). Use M4/M6 machine screws(4
pcs) to screw the TV onto the bracket (not supplied).
PREPARATION OF
YOUR REMOTE
CONTROL
BATTERY INSTALLATION
Placethe remote control facedown, then open theA
cover of the battery compartment.
Install twoAAA batteries. (The + and - symbol of theB
battery must matchwith the markson the remote).
Close the cover of the battery compartment.C
BATTERY CAUTION
Confirm there is no objectbetween the remote control
and the remote sensor of the TV set.
Sunshine or other strong light will interfere with the
signal sent by the remote control. In this situation turn
the TV set to avoid the directlight source.
Donot put the remote control in directheator in a
damp placeasyou may damagethe remote.
Please use twoAAA 1.5V batteries. Donot mix battery
types. Install the batteries atthe correctpolarities. Do
not use rechargeablebatteries. If your TV is to bestored

BUSH | 1080p Digital LED LCD | User Manual | Helpline: 0845 604 0105 P.09
03 Getting Started
for a period of time, removethe batteries from the
remote control.
03 Getting Started
Setting up
LOCATION
You will need to placeyour TV nearyour plug socket (so
the power cablecancomfortably reach) and within reach
of your aerial socket or extension lead.
CONNECTION
Insert your TV aerial lead into the Antenna input atA
the sideof the TV.
Insert the batteries into the remote control. Make
B
sure they are inserted the right way around,
matching the polarity asindicated insidethe battery
compartment.
SWITCHING YOUR TV ON
Press theAbutton on the right sideof the TV once.
Ared ashing light will appearin the middleof the
screen.
Press
Bon the remote control. The TV will turn on
and the red light will ash. This may takea few
moments.
Selectyour chosen languagewhen prompted from
C
the list thatwill appearon screen. Use the button
to scroll to the languageyou want and press to
confirm.
TUNING YOUR TV
SWITCHING TO AN EXTERNAL
SOURCE OTHER THAT TV
If you haveattached a DVD player or similarexternal
deviceto the TV, you will need to tell the TV to display
the content from it. Simply press SOURCE whichwill
bring up the sourcemenu in the leftcorner of the
screen, use the and button to highlight the
required sourceand press OK select.
For detailsof how to plug in other equipment see GET
TOKNOW YOUR TV on page5.
AUTO SEARCH
PressAMENU button.
PressB button to selectTuning menu, press
button to enter.
Press
C button to selectCountry item.
Press button to selectyou needed.
Press
D button to selectAuto Searchitem, press
OK button to enter.
Press button to selectthe OK option, and press
OK button to start searching.
Press the MENU button, you canchoose to skip the
TV /DTV Searchor not.
DTV

P.10 BUSH | 1080p Digital LED LCD | User Manual | Helpline: 0845 604 0105
PressEEXIT button to stop auto searchduring
searching.
Note
It may takea few moments to complete the AutoO
Search.
DIGITAL MANUAL SEARCH
PressAMENU button.
PressB button to selectTuning menu, press
button to enter.
Press
C button to selectDigital Manual Search
item, press button to enter.
PressD button to selectthe Channel.
Press OK button to start searching.
Oncea channel is located, you canpress
EOK button
to saveit.
Press EXIT button to exit.
Analog Manual Search
Follow the below steps when you need to havea manual
search.
Press
AMENU button.
PressB button to selectTuning menu, press
button to enter.
Press
Cbutton to selectAnalog Manual Search
item, press button to enter.
PressD button to selectSearchitem, press
button is used to selectthe higher frequency
channel.
Press button is used to selectthe lower frequency
channel.
And then selectStorageTo, press
E button to
selectthe position number you want the channel
on. Oncea channel is located, you canpress red
button to saveit. Press EXIT button to exit.
Sound SystemV
Press button to select“Sound System”, then
press button to selectthe correctsound system.
Current CHV
Press button to selectthe channel number to

BUSH | 1080p Digital LED LCD | User Manual | Helpline: 0845 604 0105 P.11
03 Getting Started
edit.
Storage ToV
Press button to selectthe programnumber you
want to storageto.
Fine tuneV
If the picture and/or sound are poor, try using the
FINE TUNE feature. Donot use this feature unless
reception is poor.
Repeatabovesteps
AA-C, then press button to
selectthe Fine Tune item.
Press
B button repeatedly to carry out fine
tune, till the best picture and sound are obtained,
then loosen the button.
Channel Edit
Using this function, you canrename, move, set favorite
channel and skip the channel in the analogue mode.
Press
AMENU button.
PressB button to selectTUNING menu, press
button to enter.
Press
C button to selectCHANNELEDIT item.
Press button to enter the sub-menu. You can
press red, green, yellow or blue button to enter the
menu you need.
RENAME
PressA button to selectthe channel, and press
green button to rename.
PressB button to selectthe number position of
channel name. Press button to selectnumber.
You canpress the
CEXIT button to cancel the changes
atanytime.
Note
The RENAME function is only availablein ATVO
program.
MOVE
PressA button to selectthe channel and press
yellow button to selectthe position.
Press
B button to selectthe number position you
want to removeto, press yellow button to confirm.
You canpress the
CEXIT button to cancel the changes
atanytime.
Setting favourite channel
PressA button to selectthe channel, press red
button to set your favourite channel.
You canpress the red button to cancel the changes
B
atanytime.
Press
CFAV button on the remote control and
Favourite List will bedisplayed.
Press
D button to selectthe channel, and press
OK button to enter.
SKIP
PressA button to selectthe channel and press
blue button to skip the current channel.

P.12 BUSH | 1080p Digital LED LCD | User Manual | Helpline: 0845 604 0105
You canpress theBblue button to cancel the changes
atanytime.
GUIDE (Electronic Program Guide)
Using this function, you canaccess the DTV program
information.
Press
AMENU button.
PressB button to selectTUNING menu.
Press button to enter.
Press
C button to selectthe guideitem.
Press OK button to enter the submenu, the
electronic programguideis displayed.
You canquickly call up Guidemenu by GUIDE
button on the remote control.
Note
Only DTV mode.O
COMMON INTERFACE
The common interface(CI) slot is designed to accept the
Conditional Access (CA) Moduleand Smart card in order
to view the pay TV programmes and additional services.
Contactyour Common Interfaceserviceprovider to get
more information about the modules and subscription.
Please noted thatCA modules and smart cardsare
neither supplied nor optional accessories from us.
Warning
Switcho your TV before any moduleis inserted int
the Common Interfaceslot.
Insert the CAM correctly, then Smart Card to the CIA
slot thatis located atthe sideof the TV.
CI Slot
CAM
Smart Card
Turn on the TV and it will display the below messageB
if the CA moduleis detected. Wait for few moments
until the card is activated.
Press the
CMENU button to display the Main Menu
and use the and button to highlight the “CI
information” line and press the “OK” button.
Detailed information on the CI card in use is
D
displayed.

BUSH | 1080p Digital LED LCD | User Manual | Helpline: 0845 604 0105 P.13
03 Getting Started
PressEOK button to access the card menu. Refer to
the moduleinstruction manual for setting details.
When moduleis removed, the following message
F
will appearon the screen.
Software Update function
When you get the updating newsfrom the TV shop’st
web, you canupdate the operating software using
the Download menu. The data for various units are
transferred consecutively on a special receiving
channel.
You need to searchthe channel with updating codet
stream.
Note
You canget information from the TV shop orO
internet.
Operation
PressAMENU button.
PressB button to selectTUNING menu, press
button to enter.
Press
C button to selectSoftware Upgradeitem.
Press
D button to set it asOn. (The defaultis O)
The Start Upgradeitem canbeselected.(The default
E
is grey and cannot beselected).
13%
Press EXIT to cancel download
PressF button to selectthe Start Upgrade
option and use OK button to enter. Then the TV will
restart and searchthe upgradeinformation.
Note
If the upgradeinformation is received, the TV willO
begin to upgrade. Or else, the TV will beback the
DTV source.
Load the receiver identification. This process may
G
also takeseveral minutes. You canpress EXIT button
to cancel the download and your TV set will beback
the DTV source.
100%
15%
Press EXIT to cancel download
Updating in progress - Do not turn off the TV

P.14 BUSH | 1080p Digital LED LCD | User Manual | Helpline: 0845 604 0105
After the download hasfinished, your TV set willH
enter burning state and the indicator light is shining.
The menu 4of right appears.
The set will beback the DTV sourcewhen the update is
completed.
USING YOUR TV
How to select the TV program
Using Programnumber button Enter the channelA
number with the number keypad on the remote
control.
Using
BP+/P- button.
Press the P+/P- button to selecta channel number.
HOW to adjust volume
Press V+/V- button on the remote control or the sideof
the TV to adjust the volume level.
CH.LIST function
Press CH.LIST button on the remote control will display
Channel List menu, and then press button to enter.
Press button to selectthe channel, and then press
OK button to enter.
ADJUSTING PICTURE
SETTINGS
Changing the Picture Setting
PressAMENU button.
PressB button to selectPicture menu, press
button to enter.
Press
C button to selectthe item requires
adjusting.
Press
D button to adjust the selection item.
When you are satisfied with your choice, press the
E
EXIT button to return to normal viewing or press
MENU button to return to the previous menu.
ContrastV
This will adjust the intensity of bright parts in the
picture but keep the dark parts unchanged.
BrightnessV
This will adjust the light output of the complete
picture, whichwill mainly aectthe darker areasof
the picture.
ColourV
This will adjust the saturation level of the colours to
suit your personal preference.
SharpnessV
This will adjust the sharpness of fine detailsin the
picture.
TintV
Allowsyou to selectthe colour mix (Tint) of the
picture.
Note
The Tint function is only availablein NTSC mode.O
ModeV
This will selectthe picture mode. SelectStandard/
Mild/User/Vivid according to the program. You can
quickly selectthe desired modeby P.MODE button on
the remote control.

BUSH | 1080p Digital LED LCD | User Manual | Helpline: 0845 604 0105 P.15
03 Getting Started
Colour temperatureV
This will increase or decrease Warm (red) and Cool
(blue) colours to suit personal preferences.
SelectCool to givethe white colour a blue tint,
Normal to givethe white colour a neutral tint, Warm
to givethe white colour a red tint.
Noise ReductionV
Automatically filters out and reduces the imagenoise
and improves picture quality when receiving weak
video signals.
SelectO/Low/Standard/High according to the
imagenoise.
ResetV
Torecover to the defaultvalue.
ADJUSTING SOUND
SETTINGS
Changing the Sound Setting
PressAMENU button.
Press
B button to selectSound menu, press
button to enter.
Press
C button to selectthe item requires
adjusting.
Press
D button to adjust the selection item.
When you are satisfied with your choice, press the
E
EXIT button to return to normal viewing or press
MENU button to return to the previous menu.
BalanceV
This will adjust the output of the right and left
speakers to obtain the best stereo reproduction for
your listening position.
ModeV
This will selectthe sound mode.
Press button to selectStandard/Music/Theater/
User according to the program. You canquickly select
the desired modeby S.MODE button on the remote
control.
AVLV(Automatic volume control)
This will reduces the dierences in volume level
among broadcasters.
SRS TS XTV
This will control the Woofer output.
Press button to selectSRS TSXT.
Press button to set SRS TSXT asOFF, ON.
Digital Audio OutputV
This will control the Digital Audio Output.
Press button to selectDigital Audio Output.,
Press button to set Digital Audio Output. asOFF,
RAW , PCM.
EqualizerV
This sound setting canbeadjusted to suit your
personal preference.
Audio LanguagesV
Press button to selectPrimary/Secondary item,
and then press button to selectthe languages
you needed.
Press button to selectClose item, press OK button
to close it.
Function
Tuning
Balance
Mode
AVL
SRS TS XT
Digital Audio Output
Equalizer
Audio Languages
Reset
Picture
!
!
!
!
!
OK
Sound Lock
Time
0
Standard
Off
Off
OK
OK
English
Menu
Off
Function
Tuning
Balance
Mode
AVL
SRS TS XT
Digital Audio Output
Equalizer
Audio Languages
Reset
Picture
!
!
!
!
!
OK
Sound Lock
Time
0
Standard
Off
Off
OK
OK
English
Menu
Off
2XWSXW
JHV
OK
OK
OK
(QJOLVK
2II

P.16 BUSH | 1080p Digital LED LCD | User Manual | Helpline: 0845 604 0105
Note
The Audio Languagefunction is only availableO
in DTV mode.
ResetV
Torecover to the defaultmenu setting.
FUNCTION SETTINGS
PressAMENU button.
PressB button to selectFunction menu, press
button to enter.
PressC button to selectthe item requires adjusting.
PressD button to adjust the selection item.
When you are satisfied with your choice, press the
E
EXIT button to return to normal viewing or press
MENU button to return to the previous menu.
LanguageV
Toselectthe menu language.
Subtitle LanguageV
Toselectthe Subtitlelanguage.
Display ModeV
Toset the picture proportion, press button to
select4:3/Zoom1/Zoom2/Wide/16:9/Auto. You can
quickly selectthe desired modeby SCREEN button on
the remote control.
4:3 modet
Choose 4:3 when you want to view a picture
with anoriginal 4:3 aspectratio, with gray bars
appearing atboth the leftand right sides.
16:9 modet
Choose 16:9 when you want to adjust the picture
horizontally, in a linearproportion to fill the entire
screen.
Zoom1t
Choose Zoom1 when you want to view the picture
without any alteration. However, the top and
bottom portions of the picture will becropped.
Zoom2t
Choose Zoom2 when you want the picture to be
altered, both vertically extended and cropped.
The picture taking a halfway tradeo between
alteration and screen coverage.
Widet
Choose Widewhen you want to adjust the picture
in a non-linearproportion, thatis, more enlarged
attop sides and no alteration, atbottom side.
Blue ScreenV
This will selectthe character background colour.
Note
The Blue Screen function is only availableforO
ATV mode.
RecorderV
Torecorder the DTV program. Detailsof Recorder are
described in the pageof 24-26.
SCART InputV
The item is not ableto beselected.
OSD Time OutV
Toset how long you want the menus to appear
on-screen. Eachpress of button repeatedly to
selectthe number of preset minutes, the Time will be
set in sequence: o, 10sec, 15sec, 30sec, 45sec, 60sec.

BUSH | 1080p Digital LED LCD | User Manual | Helpline: 0845 604 0105 P.17
03 Getting Started
OSD TransparencyV
Toset the transparency background of OSD, the
transparency will beset in sequence: O, 25%, 50%,
75%, 100%.
ResetV
Torecover to the defaultvalue.
TIME SETTINGS
ClockV
PressAMENU button.
Press
B button to selectTime menu, press
button to enter.
Press
C button to selectClock item, press
button to enter setting.
Press button to selecthour or minute, press
button to adjust the value.
DateV
PressAMENU button.
Press
B button to selectTime menu, press
button to enter.
PressC button to selectDate item, press
button to enter setting.
Press button to selectthe option, and then
press button to adjust value.
Note
In DTV mode, because the time information isO
from the signal, the Clock and Date are not able
to bechanged.
If you want to changethe time, turn o the TV in
ATV mode, then turn on the TV.
O TimeV
PressAMENU button.
Press
B button to selectTime menu, press
button to enter.
Press
C button to selectO Time item, press
button to enter setting.
Press button to selectRepeatoption, and
then pressbutton to set it on.
Press button to selecthour or minute, press
button to adjust the value.
When the o time hasarrived, the TV set will
enter into standby mode.
SleepV
The sleep timer automatically shuts o the TV after a
preset time (from 5to 240 minutes).
OK
OK
OK
OK
OK
OK
OK
Hour < 02 >
Minute < 03 >
Close
Menu
OK
OK
OK
OK OK
OK
OK
Date < 02 >
Month < 3 >
Year < 2009 >
Close
Menu
OK
OK
OK
OK
Repeat < Off >
Hour < 00 >
Minute < 00 >
Close
Menu

P.18 BUSH | 1080p Digital LED LCD | User Manual | Helpline: 0845 604 0105
Press theAMENU button and then use button
to selectthe Time menu.
Press the
Bbutton and then use button to
selectthe Sleep.
Press the
C button and then use button
to selectthe number of minutes. SelectO, 5Min,
10Min, 15Min, 30Min, 45Min, 60Min, 90Min,
120Min, 180Min, 240Min.
When you are satisfied with your choice, press
D
MENU button to return to the previous menu or
press the EXIT button to return to TV viewing.
And the time begins to count downfrom the
number of minutes selected.
Time ZoneV
PressAMENU button.
Press
Bbutton to selectTime menu, press
button to enter.
Press
Cbutton to selectTime Zone item.
Press
D button to selectthe correcttime zone.
Press
EMENU button to saveand exit.
LOCK MENU
SETTINGS
Using this function cancontrol the tuner, program,
sourcevolume and so on. Pressing MENU on the remote
control, press button to selectLock menu, press
button to enter the sub-menu, and you will berequired
to enter the password. The initial password of the
television is 0000. If you forget your password, you can
alwaysinput 9443 to regain control.
CHANGE PASSWORDV
PressA button to selectChangePassword
item. Press button to enter the submenu.
When you haveinputted the four digits you will
B
beprompted to enter it again.
Your new password will then beautomatically
saved.
CHILD LOCKV
Press button to selectChild Lock.
Press button to set On or O mode. If lock on
modeis set, Child Lock is in activated automatically.
In suchcase, if Child Lock button (button on the
television) is pressed, the screen will display Child
Lock, whichcanbeerased by press ofMENU button.
5secondslater after the latest press, the screen
display will disappearautomatically. The Child Lock
modecanberesumed by entering Lock Set menu, set
Child Lock On or O.
Tuning LockV
Press to selectTuner Lock and to set On/O.
OK
OK
Menu
OK
OK
Menu
OK
OK
OK
OK
Menu
OK
OK
OK
Menu

BUSH | 1080p Digital LED LCD | User Manual | Helpline: 0845 604 0105 P.19
03 Getting Started
(Toset On, some operation suchassearchwill benot
available. When enter the Tuning menu, Tuner Lock
will beon the screen. If you want to operate Tuning
menu, you need to enter the Lock menu to set Tuner
Lock O or operate unlock.)
Channel NO.V
Channel NO. is opted for setting up preset channel.
Press button to selectpreset Channel. Press
button to selectchannel number.
Source setV
Channel set is opted for setting up start source.
Press button to selectO, DTV, TV, SCART ,
Component, PC, HDMI1, HDMI2, HDMI3, USB in turn.
DVD is availablefor some model.
Source LockV
SourceLock will control the On or O of hinder
external input modes.
Press button to set ason or o.
When the sourcelock is set ason, TV sourcewill
display, atthis time, when press SOURCE button,
the TV canswitchto corresponding sourceand will
display the Sourceis locked.
Max VolumeV
Press button to selectMax Volume. Press
button for adjustment between 0-100. If a certain
Value is set, when volume is being adjusted, the
sound value cannot exceed maximum volume value.
If current volume is over Max Volume, when lock set
menu is set, current volume will become set maximum
volume, if current volume is below maximum volume,
customer set volume will stay unchanged.
Initial VolumeV
The TV will remember it after your setting, thatwill be
the volume when turn on the TV nexttime.
Parental LockV
Press button to selectparental lock. Press
button to selectOFF or 4-18to limit the ageof
children who will watchTV.
Clear LockV
Press button to selectUnlock mode. Press
button to unlock all set modes, setting all lock options
to o, and the maximum volume returns to 100.
SHORTCUT MENU
DISPLAY
Subtitle FunctionV
PressASUBTITLE button on the remote control will
display Subtitlelanguages menu, press button
to enter.
PressB button to selectthe item and press OK
button to enter. You canpress the EXIT button to
cancel the changes atanytime.
Note
PressOSUBTITLE button on the remote, it will
display subtitlelanguages menu only in the DTV
mode.
CH.LIST FunctionV
PressACH.LIST button on the remote control, will
display Channel List menu.
PressB button to selectthe channel and press
OK button to enter. You canpress the EXIT button
to cancel the changes atanytime.
OK
OK
Menu
This manual suits for next models
2
Table of contents
Other Bush LCD TV manuals

Bush
Bush S642F1 User manual

Bush
Bush LCD32F1080PS Manual

Bush
Bush DLED43287FHDDVD User manual

Bush
Bush IDLCD3205HDV User manual

Bush
Bush LED24265DVDCNTD Manual

Bush
Bush Q41T2201672 1B User manual

Bush
Bush IDLED2601 User manual

Bush
Bush IDLCD2204HD User manual

Bush
Bush S624D User manual

Bush
Bush LED32K1 User manual