Bush A322D User manual

Customer helpline: 0845604 0105
19 /22 Digital LCD Television
INSTRUCTION MANUAL


P. 0 2
P.12
P.04
P.05
01 Safety Notice
02 About your LCD
03 Getting Started
04 Basic Operation
P.06
P.07
P.08
P.09
P.09
P.09
P.10
P.10
P.11
P.12
P.12
P.12
P.13
Safety Notice
Front Panel Control
Connection
Remote Control
Installing Batteries
Connection Instructions
External equipment connections
Antenna Connection
VGA Input
YPbPr Input
S-VIDEO Input
SCART Input
CI Card Input
HDMI Input
USB Input
Basic Operating Instructions
Turn on the LCD-TV
Inputs selection
V+/V-
Mute
Sound Mode
Select the TV Channel
Picture Mode
Q.VIEW
Sleep/ARC/Zoom
Menu Operations
Picture Menu Options
Contents
P.13
P.14
P.14
P.14
P.14
P.14
P.15
P.16
P.13
P.13
P.14
P.17
P.18
P.19
P.21
P.22
Sound Menu Options
Function Menu Options
Lock Menu Options.
Lock Menu OptionsContinued
Tuning Menu Options
Tuning Menu Options Continued
Time Menu Options
Time Menu Options Continued
P.23
P.25
P.26

P. 0 3
05 Using the features
06 Reference Sections
P.31
P.37
P.38
P.46
TELE TEXT
Basic Playback
Advanced Playback
Special Function Playback
DVD System Setup
Playable Discs
Disc Protection andDVD Characteristics
Streaming Media PlayingSystem
Troubleshooting Guide
Specifications P.47
P.32
P.30
P.29
P.27
P.36

P. 0 4
Safety Notice
Toprevent fire or electric shocks please read the instructionbefore
installing, using and cleaning the television.
Please read all the instructions before operation;
Please keep themanual for future reference ;
Do not useany accessories that are not recommended by the manufacturer:
Before operation, make sure the operating voltage of this unit is corresponds
with your houseelectrical supply;
Do not placethe unit on unstable or in dusty and humidplaces;
Never put theunit in direct sunlight or near heat sources;
Allow enough space for proper ventilation;
Please keep wateraway from the LCD-TV . If water comes into contact with
the LCD-TV, disconnect the power cord from the power source, then wipe the
set with a dry soft cloth;
Do not removethe back cover. If servicing is required , please referto
customer helpline.

P. 0 5
Front Panel Control
Control Panel Function
1. Standby switch
2. SOURCE Call the Input Source menu/Confirm button when operation
menu.
3. MENU Press to select the main menu
4. VOL- Volume down/ Left orientation to adjust the item in the OSD
VOL+ Volume up / Right orientation to adjust the item/Press to enter
5. CH- TV channel down / to select the item in the menu
CH+ TV channel up / to select the item in the menu
6. Power indicator
7. Remote Sensor
(The figure above and the description of the button may be different,
all picture in this manual is just for reference, please see the actual set.)
SOURCE MENU VOL- VOL+ CH- CH+ STANDBY
02 About your LCD
02 About your LCD TV

ANT IN COAXIAL S-VIDEO
VGA IN
PC AUDIOIN
Common Interface
Common Interface
R-AUDIO-L TV SCART
TV SCART
Pr Pb Y
HDMI USB
Connection
USB
HDMI
TV SCART
YPbPr
Common Interface
S-VIDEO
AUDIO IN
VGA IN
PC AUDIO IN
ANT IN
Connect to HDMI output of other equipment
Connect a component video/audiodevice to these jacks
Component/S-Video Audio Input
Earphone port
COAXIAL
Connect to the VGA 15PIN analog output connector of the Pc display card for PC
display purpose
Connect the PC outpu tconnec tor from a PC to the audio
Connect cable or antenna signals to the TV, either direc-tly or through your
cable box.
P. 0 6
02 About your LCD TV
Just take oneTV with DVDfor example,
please see thereal)
DVD insert
STOP
PLAY/PAUSE
OPEN/CLOSE
PREV
NEXT
(Please refer to actualproduct
of the DVD slotand buttons)

Remote Control
When using the remote control, aim it
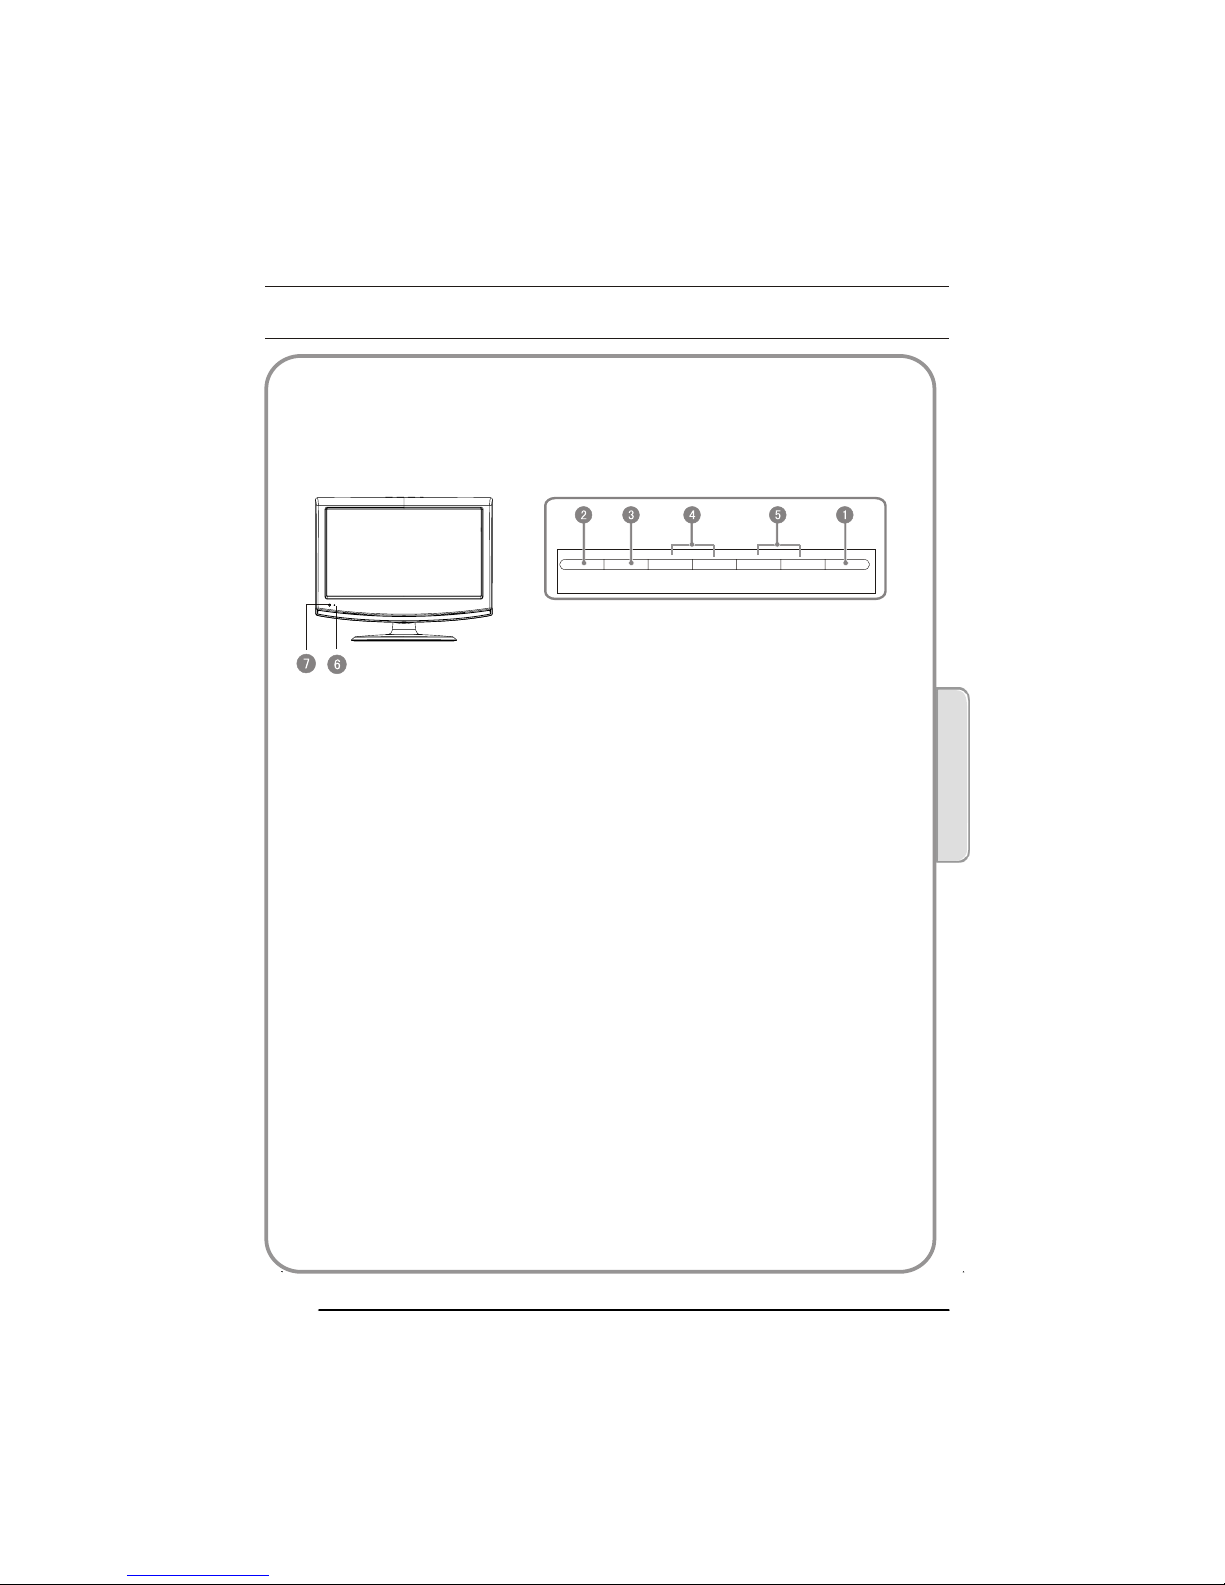
towards the remotesensor on the TV
Stand By
DVD Menu
DVD open/close
Picture Mode
Sound Mode
Call Screen Display
Sleep button
DTV Audio/NICAM/DVD Audio
Aspect Ratio Control button(except for DVD&USB )
Channel list button
Subtitle button
Program Number Channel selection
Source Exchange
Q.VIEW
V+/V- :Volume selection
P+/P-:Channel selection
Mute
Menu button
GUIDE Button (only for DTV)
Favourite button
OK button
Cursor Mover Button
Back button (only for USB)
Exit Screen Display
REPEAT (only for USB)/CANCEL button
Zoom(only for DVD &USB)/Teletext index(only for TV)
Play/pause button(only for DVD &USB)
STOP(only for DVD &USB)
FAST REVERSE(only for DVD &USB)
FAST FORWARD(only for DVD &USB)
PREVIOUS(only for DVD &USB)
NEXT(only for DVD &USB)
DVD SET UP/ TEXT
DVD TITLE/TELETEXT MIX
DVD SEARCH/TELETEXT SUBCODE
DVD 10+/TELETEXT HOLD
DVD PROGRAM/TELETEXT REVEAL
DVD A-B REPEAT/TELETEXT SIZE
DVD ANGLE/TELETEXT TIME
DVD CALL/TELETEXT MODE
Buttons on the remote control
NOTE:Red button GREEN button
blue button andyellow button arefast
text button inanalog signal .Function
button in DVBT(just reference theOSD)
P. 0 7
SCREEN
STOP
.

Installing Batteries
1.Open the cover of the battery compartment at the back of the remote
control.
2.Insert two AAA alkaline batteries in the compartment. (plus and minus poles to
respective mark)
3.Replace the cover of the battery compartment.
Precautions
Make sure that there is no
obstacle between the remote
controller and television set.
As strong light may interfere the
signals, change your position to
operate the remote controller if
the television cannot be turned
on or off as you expect.
Keep the remote controller
away from heat source or
humid area to ensure
effective performance of
the remote controller.
Make sure that two AAA 1.5V alkaline
batteries are loaded. The batteries
must be of the same type. The batteries
must be located properly. The batteries
are not rechargeable. If your TV is to be
stored for a period of time, remove the
batteries from the remote control.
3
2
1
P. 0 8
02 About your LCD TV

Connection Instructions
External Equipment Connections
Antenna Connection
- Antenna or Cable Service with a Cable Box Connections
- For optimum picture quality, adjust antenna direction if needed.
Multi-family Dwellings/Apartments
(Connect to wall antenna socket)
wall antenna
socket
VHF antenna
UHF antenna
outdoor
antenna
Single-family Dwellings /Houses
(Connect to wall jack for outdoor antenna)
Be careful not to bend the bronze
wire when connecting the antenna.
To improve picture quality in a poor
signal area, purchase and install a
signal amplifier.
If the antenna needs to be split for two
TV s, install a 2-Way Signal Splitter
in the connections.
If the antenna is not installed properly,
contact your dealer for assistance.
NOTE: All cables shown are just for example.
RF coaxial wire (75 ohm)
ANT IN
ANT IN
P. 0 9
03 Getting Started

Connection Instructions
You can use your LCD-TV as a monitor for your personal computer using a VGA cable
(not supplied).
VGA Input
Connection and use steps:
1.Read the user guide supplied with
your computer and ensure that it has
a VGA connector;
2.Make sure that the power of the LCD
-TV and the PC are off;
3.Connect a D type 15-pin VGA interface
cable ( not supplied ) to the VGA video
interface connector on the PC. Then
connect the other end to the PC video
interface connector on the back of the
LCD-TV.Tighten the screws on the VGA
connectors once they are firmly
connected, connect the audio cable(not
supplied)to the audio input on the back of
your LCD-TV;
4.Turn on the power of the LCD-TV first ,
and then turn on the power of the PC;
5.Set the video input mode of the LCD-TV to PC;
6.Check the image on your TV. There may be noise associated with the
resolution, vertical pattern, contrast or brightness in PC mode. If noise
is present, change the PC mode to another resolution, change the refresh rate to another rate
or adjust the brightness and contrast on the menu until the picture is clear. If the refresh rate
of the PC graphic card cannot be changed,change the PC graphic card or consult the
manufacturer of the PC graphic card.
Frame frequency (Hz)Line frequency (Khz)
VGA
SVGA
XGA
640*480 31.5KHz 60Hz
800*600 37.9KHz 60Hz
1024*768 48.4KHz 60Hz
Mode Resolution
Note: All above listed are subject to VESA Criteria.
YPbPr Input
How to connect
Connect the DVD video outputs (Y, PB, PR)
to the Component(Y, Pb, Pr) in socket on
the TV and connect the DVD audio outputs
to the AUDIO jacks on the TV, as shown
in the figure.
NOTE: If your DVD player does not have
component video output, use S-Video.
How to use
1. Turn on the DVD player, insert a DVD.
2. Set the mode of the LCD-TV to Component.
VGA IN
P. 1 0
03 Getting Started

Connection Instructions
(If connected to S-Video,select the S-Video external input source.)
3. Refer the DVD player's manual for operating instructions.
Component Input ports
To get better picture quality, connect a DVD player to the component
input ports as shown below.
S-VIDEO Input
Connection and use steps:
1.Read the user guide supplied with your AV devices and ensure that it has
S-Video connectors;
2.Make sure that the power of the LCD-TV and the AV device are switched off;
.Turn on the power of the LCD-TV first ;
and then turn on the power of the AV
device;
4.Set the video input mode of the LCD-TV
to S-Video mode .
Connection Option 1
Set VCR output switch to 3 or 4 and then
tune TV to the same channel number.
Connection Option 2
1. Connect the audio and S-Video cables
from the VCR's output jacks to the TV
input jacks, as shown in the figure.
2. Insert a video tape into the VCR and
press PLAY on the VCR. (Refer to the
VCR owner s manual.)
3
- To avoid picture noise (interference), leave an adequate distance between the
VCR and TV
.
VCR
1
2
P. 1 1

Connection Instructions
SCART Input
1.Connect the scart lead from the external device(DVD
players, settop boxes or game consoles, to the TV SCART
socket.
2.Set the mode of the LCD-TV to SCART.
3. Press Play button on external equipment and it should
appear on the screen.
HDMI
HDMI
HDMI Input
HDMI Devices
Connect the cable from the HDMI devices
to the TV HDMI, as shown in the figure.
How to use
1. Set the mode of the LCD-TV to HDMI.
2. Operate the corresponding external equipment.
Refer to external equipment operating guide.
SCART
External equipment
TV
HDMI Devices
CI Card Input
The common interface (CI) slot is designed to accept the Conditional
Access (CA) Module and Smart card in order to
view the pay TV programmes and additional
services. Contact your Common Interface
service provider to get more information about
the modules and subscription. Please noted that
CA modules and smart cards are neither
supplied nor optional accessories from us.
Warning: switch off your TV before any module
is inserted in the Common Interface slot.
Insert the CAM correctly, then Smart Card to the
CI slot that is located at the side of the TV.
USB Input
USB
USB Devices
Connect the USB device to the USB IN jack on the side
of TV(or on the back of TV).
How to use
After connecting the USB IN jack, you use the USB
function. The USB function is illustrated in the page 38-42.
P. 1 2
03 Getting Started

Basic Operating Instructions
Turn on the LCD-TV
When the POWER(STANDBY) button on the remote control is pressed and the LCD-
TV is turned on, the indicator light on the front of the LCD-TV changes from red to
green. When the LCD-TV is turned off using the POWER(STANDBY) button, the
LCD-TVwill go into standby mode and the indicator light turns red.
You can also turn on the TV from standby mode by pressing the digits(1-9) or P-/P+.
V+/V-
Press the V+/V- button to increase/decrease the volume and there will be display
on the bottom of the screen.
The display will appear on the screen
when the TV is turned on for the first
time:
Press to select the language you
want, then press to select the
Auto Search and OK to enter the submenu:
press to select the country you are in,
then press to move to the following
item and to select Start , then press
OK to confirm.
All channels will be stored after the
searching.
/
/
/
/
/
Inputs selection
Press SOURCE button to display the Source menu.
Press button to select the inputs you need and
the TV will turn to the source automatically
in 3 seconds or press OK to confirm.
/
Installation Guide
Language English
Auto Search
Please select country first
Then select Start to update info.
Country selection UK
Start Cancel
EXIT
MENU
OK
DTV
TV
SCART
Component
PC
HDMI
S-Video
USB
DVD
Source
EXIT OK
P. 1 3
04 Basic Operation

Select the TV Channel
You can use the number keys on the remote control to directly select TV channels.
The LCD-TV can store up to 100 channels , and you can press the P+/P- keys on the
remote control or on the TV set to make a selection.
Picture Mode
Press P.MODE button on the remote control for menu display . For desired mode as
follows:
Standard Mild Personal Fresh
Q.VIEW
1 S
2
3
uppose the TV set is in channel 8 just now and in channel 18 now .
If you want to return to the last watched program in channel 8, you can simply press
the Q.VIEW button.
If you want to return to channel 18, press the button again. Through this function,
you can easily change between the channel you are watching and the channel you
watched just now.
Sleep
Press SLEEP button to set the sleep timer among Off/10min/20min/30min/60min/
90min/120min/180min/240min.
Sound Mode
Press S.MODE button on the remote control for menu display . For desired
mode as follows:
Standard Music Theatre Voice Personal
Zoom/SCREEN
ZOOM key is not only available in Picture and Movie which from USB part,but also
available in DVD part.
In other sources, press SCREEN to select the picture with different aspect ratio.
P. 1 4
Mute
1.Press the MUTE button to mute the sound temporarily. A mute icon appears on the
screen.
2.Press the MUTE button again or V+ to restore the sound.
The mute icon disappears.
04 Basic Operation

Menu Operations
1. Press MENU button to display the main menu, and to select the
main menu .
2. Press to scroll through the options
3. Press buttons to make changes to the parameters
4. Press MENU to exit the menu step by step
5. Press the EXIT button to exit the menu
/
/
/
PICTURE MENU
TUNING MENU
EXIT
MENU
OK
PICTURE
Video Mode Personal
Contrast
Brightness
Colour
Sharpness
Tint
50
50
50
50
0
FUNCTION MENU
EXIT
MENU
OK
FUNCTION
Language English
Subtitle Language English
Display Mode Auto
Blue Screen Off
Software update Off
Carry out system update V1.1
EXIT
MENU
OK
TUNING
Auto Search
DTV Manual Search
ATV Manual Search
Tuning Program
Guide
CI Information
LOCK MENU
LOCK
Change Password
Menu Lock Off
Program Set Off
Program No . 1
Source Lock
Child Lock Off
MENU
OK
EXIT
EXIT
MENU
OK
TIME
Clock -- -- -- --
Off Time Off
On Time Off
Sleep Off
Time Zone London GMT
TIME MENU
SOUND MENU
EXIT
MENU
OK
SOUND
Audio Language English
Audio Mode Personal
Treble
Bass
Balance
AVL Off
50
50
0
P. 1 5

Menu Operations
3.Press button to increase and decrease the level to match your preference .
4. Repeat step 2 and step 3 until desired picture quality has been achieved .
/
Functions:
Video Mode: Press to set the picture mode .
Contrast : Used to set the contrast balance of the picture.
Brightness : Used to set the brightness level of the picture.
Colour : Press to adjust the colour saturation of the picture.
Sharpness : By increasing the level, it will show cleaner and clearer images
and by decreasing the level, it will make picture smoother.
Tint(Only available in NTSC): Set the colour tone of the picture.
Colour Temperature : Press to select the colour temperature from Normal/Cool/
Warm .
Noise Reduction: Adjust the quality of the picture by selecting Off,Low,
Middle,High.
PC Adjust (can be adjust only in PC mode and there is PC signal): Press OK button
to enter the submenu. Press to adjust the value.
/
/
/
Picture Menu Options
Picture quality can be adjusted for any input separately .
The picture quality on the screen can be adjusted as follows:
1. Press MENU button and until the picture menu appears on the screen.
2. Press button to enter the picture menu and go up and down to select
the desired option .
/
/
NOTE: Using your remote control to navigate in the on-screen menus.
The on-screen menus shown in this manual may be different from those on your TV. These
are example to illustrate your TVs operation.
EXIT
MENU
OK
PICTURE
Auto Sync
H.Position
V.Position
Size
Phase
50
50
50
0
P. 1 6
04 Basic Operation

Menu Operations
2. Press button to enter the sound menu and up and down to
select the desired option .
3.Press button to increase and decrease the level to match your preference .
4. Repeat step 2 and step 3 until desired sound quality has been achieved .
//
/
Functions :
Audio Language(only available in DTV mode) : Press OK to enter the submenu.
Then press to select the Primary and the Secondary item and press
to select the language you need.
Audio Mode : Press to select among Music/Theatre/Voice/Personal/
Standard.
Treble : Increases or decreases the level of the treble sounds.
Bass : Increases or decreases the level of the bass sounds.
Balance : Adjust the audio output between left and right speakers.
/
/
Sound Menu Options
Sound can be adjusted as follows:
1. Press MENU and button until the following menu appears on the screen
/
EXIT
MENU
OK
SOUND
Audio Language English
Audio Mode Personal
Treble
Bass
Balance
AVL Off
50
50
0
Auto Sync: Adjust the picture location frequency and phase parameters
automatically in PC.
H.Position: Picture horizontal adjust.
V.Position: Picture vertical position adjust.
Size: Adjust the size of the LCD to match the PC input source.
Phase: Removes any horizontal distortion and clears or sharpness the
displayed characters.
P. 1 7

Menu Operations
Function Menu Options
1. Press MENU button and until the following menu appears on the screen.
2. Press button to enter the function menu and go up and down to
select the desired option .
3.Press button to increase and decrease the level to match your preference .
4. Repeat step 2 and step 3 until desired function quality has been achieved .
/
/
/
Note: Bass and Treble can be adjust in any audio mode, and if the numerical
value is changed, the audio mode will be changed to personal automatically.
AVL: Automatic Volume Limit Control . Reduces the differences in volume level
between different broadcasters.
SRS TS XT :Used to turn SRS TS XT the option On or Off.
EXIT
MENU
OK
FUNCTION
Language English
Subtitle Language English
Display Mode Auto
Blue Screen Off
Software update Off
Carry out system update V1.1
Functions:
1. Language: Used to set the language of the on-screen display.
2. Subtitle Language (in DTV mode only): To switch the subtitle languages .
3.Display Mode: Used to set the aspect ratio of the display. Choices include Auto
/Full Screen/Zoom1/Zoom2/4:3( Display mode may differ from different
inputs. )
4. Blue Screen(in ATV mode only): Used to turn the blue screen option On or Off.
With the option on, your TV screen turns blue after 3 seconds without an input
signal.
7. Reset : Press OK button to enter the dialogue Are you sure? And press
to select Yes, then press OK button to reset the TV setting to factory default.
5.Software update:Used to turn software update the option On or Off.
6.Carry out system update: when new software is detected, the option can be
selected, and the process will take several minutes.you can press EXIT button to
cancel the upgrade ,then your TV set will be in standby mode.
Warning: you must not turn off the TV during the process.
/
P. 1 8
04 Basic Operation

Menu Operations
Lock Menu Options
1. Press MENU button and until the following menu appears on the screen.
2. Press OK button to display the following menu .
Press the number buttons (0~9) to enter the password.(The initial password is
0000. If you forget your password, you can enter 9443 at any time to access the
lock menu), the lock menu opens.
3.Press button to go up and down to select the desired option .
4.Press button to increase and decrease the level to match your preference .
5.Repeat step 3 and step 4 until desired quality has been achieved .
/
/
/
EXIT
MENU
OK
LOCK
Change Password
Menu Lock Off
Program Set Off
Program No . 1
Source Lock
Child Lock Off
EXIT
MENU
OK
LOCK
Change Password
Menu Lock Off
Program Set Off
Program No . 1
Source Lock
Child Lock Off
Please enter password
Functions:
1. Change Password: The password can be changed. Press OK to enter the menu
as follows. Enter the password , if the same password is entered correctly twice,
the old password will be changed.
P. 1 9
This manual suits for next models
3
Table of contents
Other Bush LCD TV manuals