Busse C-eMap User manual


Available maps
C-eMap will accompany you by sea, rivers, lakes
and along the coast thanks to the highly detailed
E-MAX cartography developed by C-Map for
Pocket PCs. E-MAX is a standard of electronic
cartography for leisure boating, extremely rich of
navigation-oriented information.
• Mediterranean and Black Sea
• France and Italy
• Iberian Peninsula and Islands
• Uk and Ireland
• Benelux, Germany and Denmark
• Norway and Denamark
• Baltic Sea and Gulf of Bothnia
• Finnish and Russian Lakes

ENGLISH
3
1. Introduction 5
2. How to insert and remove the memory card 5
3. Getting started 6
3.1 The bar Menu 6
3.2 The Info Menu 7
4. Map visualization Functions 8
4.1 How to consult the map 8
4.2 Zoom in and Zoom out 8
4.3 How to centre the map on the boat 8
5. Navigation Functions 9
5.1 How to set a destination 9
5.1.1 Course Over Ground visualization 9
5.1.2 Track visualization 9
5.1.3 How to deactivate a destination 10
5.2 Managing Marks 10
5.2.1 How to insert a Mark 10
5.2.2 How to delete a Mark 11
5.2.3 How to customize a Mark 11
5.3 How to measure the distance from A to B 12
5.3.1 Measuring with GPS signal 12
5.3.2 Measuring without GPS signal 12
5.3.3 How to consult the Map when the measurement
function is active 13
5.4 How to Visualize the Navigation data 13
5.4.1 Navigation data with no an active destination 13
5.4.2 Navigation data with an active destination 14
5.4.3 Full info on cartographic objects 14
6. Software settings 15
7. Legend of abbreviations and nautical terms used by the
software 15
Index

ENGLISH
4
C-eMap USER MANUAL
Warnings
• The electronic charts used by C-eMap navigation derive from National
hydrographical Institutes but they do not substitute the approved
versions released by the Ofcial authorities.
The information contained in this manual has been checked carefully.
The manufacturer and the dealer disclaim any liability deriving from an
improper use of the device in a way that may cause accidents, damage,
or that may violate the law.
• Using C-eMap implies that the user accepts and follows all these
warnings and all the instructions contained on this manual.
Nota: the data contained in this manual are updated to October
2005. Any change in the system, in the functions, in the tools bar or
maps introduced after this date cannot be present in this manual.

ENGLISH
5
C-eMap USER MANUAL
Content of the Packaging
• C-eMap Software with E-MAX maps on Secure Digital memory
• Get Started User Manual
• CD-ROM with User Manual, Catalogue of available maps and Legend
of cartographic objects
1. Introduction
If this is the rst time you use a C-eMap Software for marine navigation,
it is suggested to read carefully this user manual to familiarize with the
available functions and features.
2. How to insert and remove the memory card
To insert the memory card switch on the unit, and then insert the Secure
Digital memory card in the PDA or Smartphon SD slot with the C-eMap
label facing up. The software will install automatically.
To remove the memory card, rst close the C-eMap application then
extract the memory from the SD slot without switching the unit off.

ENGLISH
6
Intensity of GPS signal
This bar shows the intensity of the GPS signal. One bar
indicates the minimum intensity (3 satellites received),
Four bars indicate the maximum intensity (6 or more
satellites received).
Settings
Opens the settings menu to set up the software.
Home
Centres the map on the boat
(when GPS signal is received).
Navigation Data
Visualizes the navigation data.
Caliper
Activates the A to B measuring function.
Zoom Out
Reduces the map.
Zoom In
Magnies the map.
Map scale
Indicates the map scale, the unit of measure can be
choosen in the settings menu.
3. Getting started
3.1 The bar Menu

ENGLISH
7
LAT Indicates the Latitude of the selected point.
LON Indicates the Longitude of the selected point.
Info
Activates the informations related to the selected object. If the
selected point is a Mark, then the info button will allow you to
visualize the data associated to that mark (name and date of
creation).
Dsc
Opens the virtual keyboard to edit the description for a Mark
Icon
Allows to change the Icon associated to a Mark
Nam
Opens the virtual keyboard to edit the name for a Mark
Mark
Inserts a Mark point on
the selected point.
Delete Mark
Deletes the Mark point
selected.
GO
Activates the navigation
towards the selected
point.
Disactivate GO
Disactivates the
navigation towards the
selected destination.
Close
Closes the window.
3.2 The Info Menu

ENGLISH
8
4.Map visualization Functions
4.1 How to consult the map
To pan manually on the map press the touchscreen with the stylus: the
map will be centered on the selected point.
4.2 Zoom in and Zoom out
Zoom buttons
The zoom in and zoom out buttons allow to reduce or magnify the
map by shifting to a lower or higher scale map. The zoom centre is the
display’s center.
Map Scale
The Map scale icon is placed
at the bottom right corner of
the display (IMG 1). The unit of
measure can be changed in the
settings panel. To set the unit of
measure,click on the “Settings”
button, select the folder named
“Unit 1” and then choose the
desired unit for “Distance”:
Kilometres, Nautical Miles or
Statue Miles.
Click on OK to conrm your
choiceand to go back to the Map
visualization.
4.3 How to centre the map on
the boat
In order to centre the Map on your boat manually, click on the “HOME”
button on the bar menu; this button is activated only when GPS data is
received. It is also possible to activate the “auto-centre” function from
the settings menu so that when the GPS signal is received, the map is
automatically centred on the boat’s position. When activating any other
function, the auto-centre is temporarily deactivated.
It is possible to activate the “auto-centre”, function click on the “Settings”
button, select the rst folder named “Map” and then mark the checkbox
to enable“auto-centre”. Click on OK to conrm your choice and to go
back to the map visualization.
IMG 1 - Zoom buttons and map scale

ENGLISH
9
5. Navigation Functions
5.1 How to set a route toward a destination
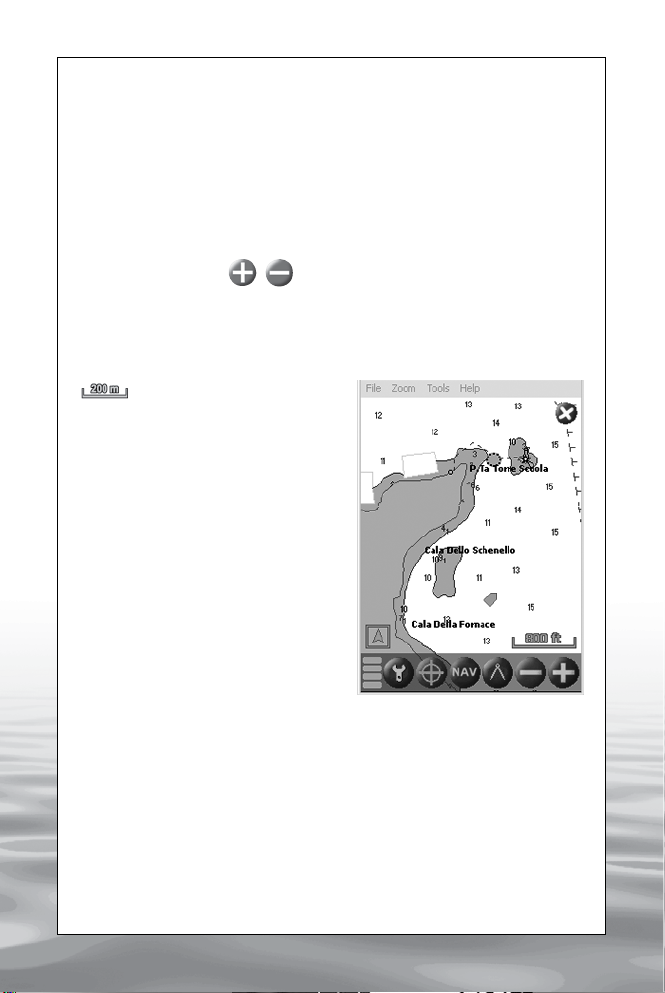
Click with the stylus on the desired destination and hold for 2 seconds: a
red cross will indicate the select-
ed point and the Info Menu win-
dow will open. Click the “GO”
button to activate the navigation
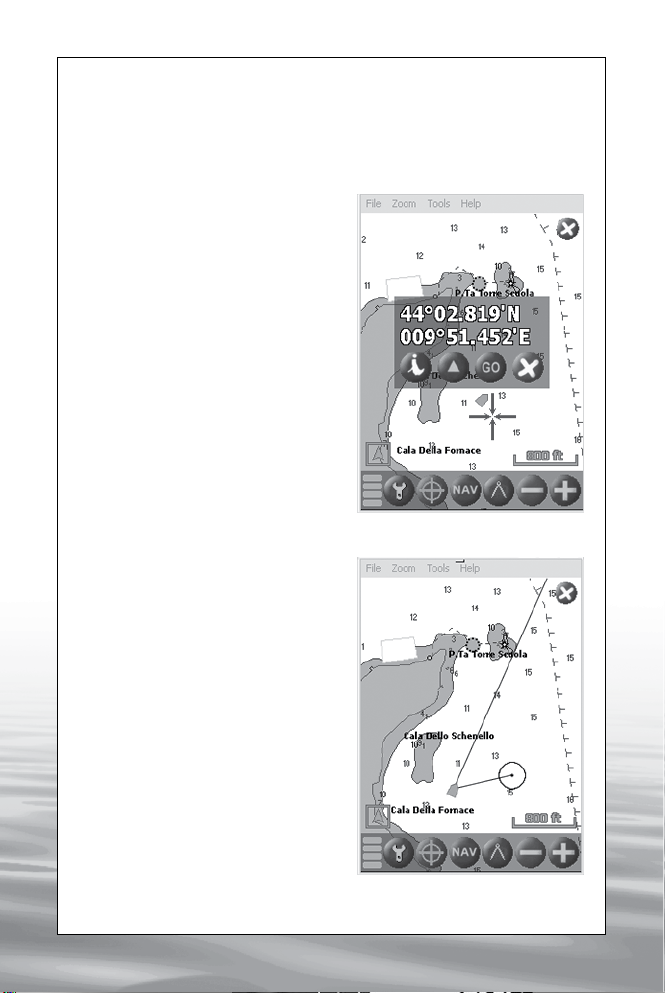
toward the selected point (IMG
2), a black circle will be traced
on the map around the selected
point (IMG 3).
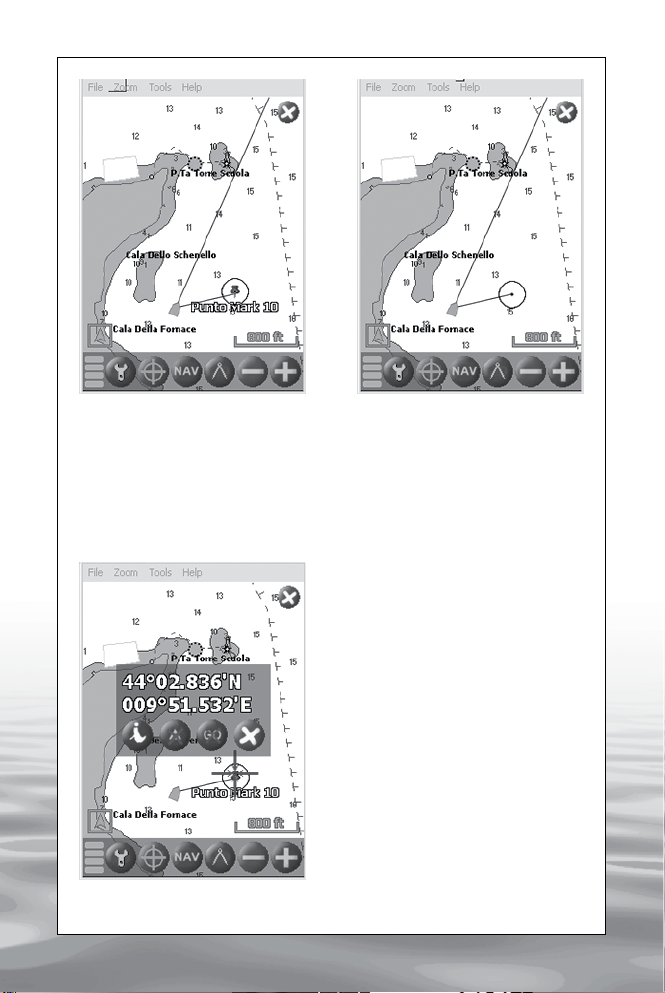
When you select a Mark as de-
sired destination, a black circle
will be traced around the Mark’s
yellow triangle (IMG 4).
5.1.1 Course Over Ground
visualization
When the GPS signal is
received, and the speed over
round is higher than 0,3 Knots, a
grey line will indicate the Course
Over Ground “COG” (IMG 5).
It is possible to deactivate the
“COG” line visualization in the
software settings menu.
5.1.2 Track visualization
When the Track option is
activated in the settings Menu,
the track points are automatically
saved at intervals of time or
space.
To enable the track visualization
option, click on the “Setting”
button, select the folder named
“Tracks”, then select the option
“enabled”. In the same window
it is possible to set the saving
mode (only distance,only
time, time and distance, time
or distance), and to introduce
IMG 2 - Info Menu
IMG 3 - Navigation toward
a destination

ENGLISH
10
manually the desired time or distance intervals. Click OK to conrm your
choice and to go back to the Map visualization. Tracks are visualized
as red lines.
5.1.3 How to deactivate a
destination
To deactivate the destination,
click and hold for more than 2
seconds on the set destination
and click on the “deactivate
GO” button (“Go” crossed in
red) (IMG 6).
5.2 Managing Marks
It is possible to add on the
cartography your personal Mark
points that can be easily saved
and be set as destination.
5.2.1 How to insert a Mark
Click with the stylus on the
desired point and hold for 2
IMG 4 - Navigation toward a Mark IMG 5 - Active destination and COG line
IMG 6 - Deactivating a route
towards a mark

ENGLISH
11
se onds to open the Info Menu window. Click on the “Mark” button to
createthe mark. (IMG 2)
5.2.2 How to delete a Mark
Click with the stylus on the Mark you want to remove and hold for 2
seconds to open the Info Menu window.
Click on the “Delete Mark” button to remove the mark (IMG 7).
5.2.3 How to customize a Mark
Click with the stylus on the desired Mark and hold for 2 seconds to open
the Info Menu window, then click on the “Info” button to open the Mark
Menu window.
The Mark Menu shows the name of the Mark, the date of creation and
the following buttons: “Nam” (name), “Dsc” (description), “Icon” and
“Close” (IMG 8).
Click on the “Nam” button to edit the name of the Mark with the virtual
keyboard (IMG 9).
Click on the “Dsc” button to edit a short description of the Mark with the
virtual keyboard. To modify the icon associated to a Mark click on the
“Icon” button and the icon will change next to the Mark name.
Once the Mark has been customized click the “Close” button to close the
Mark Menu window.
IMG 7 - Info Menu referred to
an existing Mark
IMG 8 - Mark Menu

ENGLISH
12
5.3 How to measure the distance from A to B
To activate the measurement function from A to B, click on the “Calliper”
button. To deactivate the function, click again on the calliper button.
5.3.1 Measuring with GPS signal
When the measurement function is active and the GPS receives the
signal, the starting point (A) is the GPS boat’s position; to dene the nal
point (B), click on the Map with the stylus.
The starting point (A) is updated as the GPS position changes.
To set a new starting point (A) different from the GPS position, click and
hold for more than 2 seconds.
The Range line from A to B will be visualized, and the Bearing and the
Distance will appear on top of the display (IMG 10).
5.3.2 Measuring without GPS signal
The measurement function can be activated even when the GPS is not
receiving any signal, in this case the rst click on the map will set the
starting point (A) while the following clicks will dene the nal point (B).
To change the starting point (A) click and hold for more than 2 seconds.
IMG 10 – Measurement function:
The Bearing and the Distance are
visualized on top of the display
IMG 9 -Virtual Keyboard

ENGLISH
13
5.3.3 How to consult the Map when the measurement
function is active
To move manually on the map while the measurement function is active,
click on one of the eight arrows appearing at the edge of the map.
5.4 How to visualize the navigation data
In order to visualize the navigation data click the “Navigation Data”
button on the bar menu.
To hide the navigation data, press the “Navigation Data” button once
more, or activate another function. It is possible to customize the data
to be visualized: click the “Settings” button, select the “Nav data” folder
then choose the data you would like to visualize: Latitude, Longitude,
Speed Over Ground, Course Over Ground, Bearing, Distance To Go,
Time To Go. Click OK to conrm your choice and to go back to the Map
visualization.
5.4.1 Navigation data with no active destination
When there is no active destination the navigation data consist of:
Latitude, Longitude, Speed over Ground (“SOG”) and Course over
Ground (“COG”) (IMG 11).
IMG 12 - Navigation data
with active destination
IMG 11 - Navigation data
with no active destination

ENGLISH
14
5.4.2 Navigation Data with active destination
When routing toward a destination, the navigation data also includes:
Bearing (“BRG”), Distance to go (“DTG”) and Time to go (“TTG”) (IMG
12).
All the values for Bearing (“BRG”) and Course Over Ground (“COG”)
are real values, thus magnetic variation should not be taken into
consideration.
5.4.3 Full Info on Cartographic
Objects
It is possible to get detailed info on
any point of the map.
Click with the stylus on any
Cartographic Object or point on the
map and hold for 2 seconds to open
the Info Menu.
Click on the “Info” button to open the
Full Info window (IMG 13).
This window shows the list of the
objects found; danger areas, depth,
buoys etc.
Click on “Info” to visualize the Object
info window for a detailed description
of the attributes of each object found
(IMG 14).
IMG 13 Full info
IMG 14 Object info

ENGLISH
15
6. Software Settings
To access to the Software settings menu click on the “Settings” button.
The settings include:
1. Map Auto-centre function, COG line visualization,
GPS icon
2. Track Track visualization
3. Nav data Navigation Data
4. Unit 1 Units for Space and Speed
5. Unit 2 Units for Depth and Coordinates
6. GPS GPS status
7. Satellites Bar visualization or Circular visualization
8. Language English or Italian
9. Panels Menu background
10. About Info on software and Cartography version
7. Legend of abbreviations and nautical
terms used by the software
BRG Bearing
COG Course Over Ground
DTG Distance To Go
NAVAIDs Navigation Aids
SOG Speed Over Ground
TTG Time To Go

X
C-eMap ed E-MAX sono marchi registrati di C-MAP
C-eMap and E-MAX are registered trademarks of C-MAP
Table of contents