manuals.online logo
Brands
  1. Home
  2. •
  3. Brands
  4. •
  5. BYOC
  6. •
  7. Music Pedal
  8. •
  9. BYOC Amp Selector and Stereo FX Router User manual

BYOC Amp Selector and Stereo FX Router User manual

1
Build Your Own Clone
Amp Selector and Stereo FX Router
Kit Instructions
Warranty:
BYOC, Inc. guarantees that your kit will be complete and that all parts and
components will arrive as described, functioning and free of defect. Soldering,
clipping, cutting, stripping, or using any of the components in any way voids this
guarantee. BYOC, Inc. guarantees that the instructions for your kit will be free of
any major errors that would cause you to permanently damage any components in
your kit, but does not guarantee that the instructions will be free of typos or minor
errors. BYOC, Inc. does not warranty the completed pedal as a whole functioning
unit, nor do we warranty any of the individual parts once they have been used. If
you have a component that is used, but feel it was defective prior to you using it, we
reserve the right to determine whether or not the component was faulty upon
arrival. Please direct all warranty issues to:
[email protected] This would include any missing parts issues.
Return:
BYOC, Inc. accepts returns and exchanges on all products for any reason, as long as they
are unused. We do not accept partial kit returns. Returns and exchanges are for the full
purchase price less the cost of shipping and/or any promotional pricing. Return shipping
is the customer’s responsibility. This responsibility not only includes the cost of
shipping, but accountability of deliver as well. Please contact
[email protected] to receive a return authorization before mailing.
2
Tech Support:
BYOC, Inc. makes no promises or guarantees that you will successfully complete your
kit in a satisfactory manner. Nor does BYOC, Inc. promise or guarantee that you will
receive any technical support. Purchasing a product from BYOC, Inc. does not entitle
you to any amount of technical support. BYOC, Inc. does not promise or guarantee that
any technical support you may receive will be able to resolve any or all issues you may
be experiencing.
That being said, we will do our best to help you as much as we can. Our philosophy at
BYOC is that we will help you only as much as you are willing to help yourself. We
have a wonderful and friendly DIY discussion forum with an entire section devoted to the
technical support and modifications of BYOC kits.
www.byocelectronics.com/board
When posting a tech support thread on the BYOC forum, please post it in the correct
lounge, and please title your thread appropriately. If everyone titles their threads
“HELP!”, then it makes it impossible for the people who are helping you to keep track of
your progress. A very brief description of your specific problem will do. It will also
make it easier to see if someone else is having or has had the same problem as you. The
question you are about to ask may already be answered. Here are a list of things that you
should include in the body of your tech support thread:
1. A detailed explanation of what the problem is. (Not just, “It doesn’t work, help”)
2. Pic of the top side of your PCB.
3. Pic of the underside of your PCB.
4. Pic that clearly shows your footswitch/jack wiring and the wires going to the PCB
5. A pic that clearly shows your wiring going from the PCB to the pots and any other
switches(only if your kit has non-PC mounted pots and switches)
6. Is bypass working?
7. Does the LED come on?
8. If you answer yes to 6 and 7, what does the pedal do when it is "on"?
9. Battery or adapter.(if battery, is it good? If adapter, what type?)
Also, please only post pics that are in focus. You're only wasting both parties' time if you
post out of focus, low res pics from your cell phone.
Revision Notes:
Rev 2.1 (current) No issues.
Rev 1.2 Corrected rev1.1 issues.
Rev 1.1 C5 is backwards. C7 is not labeled. Added C101 & C102
For Rev 1.0 instructions go to http://buildyourownclone.com/ampselectorrev1.pdf
Copyrights:
All material in this document is copyrighted 2019 by BYOC, Inc.
3
AMP SELECTOR & STEREO FX ROUTER KIT
INSTRUCTION INDEX
Parts Checklist---------------------------------------------page 4
Assembly----------------------------------------------------page 6 - 18
Installing the ICs------------------------------------------page 19
Operation Overview--------------------------------------page 20
Schematic---------------------------------------------------page 21
PCB Map---------------------------------------------------page 22
4
Parts Checklist for BYOC
Amp Selector & Stereo FX Router Kit
Resistors:
1 - 470R (Yellow/Purple/Black/Black/Brown)
2 - 4k7 (Yellow/Purple/Black/Black/Brown)
8 - 10k (Brown/Black/Black/Red/brown)
1 - 100k (Brown/Black/Black/Orange/Brown)
1 - 1M (Brown/Black/Black/Yellow/Brown)
Capacitors:
1 - 1n0 or .001µfilm (102)
3 - 100n or .1µfilm (104)
2 - 10µaluminum electrolytic
2 - 100µf aluminum electrolytic
Diodes:
1 - 1N4001 (black plastic with a silver or white stripe)
IC's:
2 - TL072
1 - 7660SCPA
3 - DIP8 IC sockets
Hardware:
1 - Drilled enclosure w/ 4 screws (optional)
1 - BYOC Amp selector PCB
2 - 3PDT footswitches
1 - SPDT On-On Toggle switches
1 - DC Jack (optional
2 - LEDs (optional)
2 - Enclosed ¼” Audio Jacks
1 - Isolated ¼” Audio Jack
2 - Nylon Standoffs
4 - bumpers
hook-up wire
Transformers:
1 – TM018-R
5
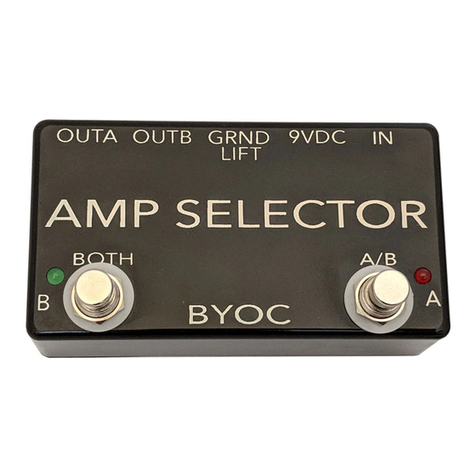
This is what your finished pedal should look like. Your kit may come with different
color components, but they will still do the exact same thing.
6
Populating The Circuit Board
Step 1: Add the Resistors. Resistors are not polarized and can be inserted into the circuit
board in either direction.
7
Step 2: Add the diode. The diode will have a white or gray strip on one end. Match this
strip up with the picture on the circuit board.
8
Step 3: Add the IC sockets. DO NOT ADD THE ACTUAL IC's. Only add the sockets.
The sockets get solder to the circuit board. The IC's go in the sockets and do not get
soldered. Make sure to match the side of the socket with the “U-Shaped” notch to the
picture on the circuit board.
9
Step 4: Add the film capacitors. These are not polarized and can go into the PCB in
either direction.
10
Step 5: Add the electrolytic capacitors. These are polarized. The positive lead will be
the longer lead and will go into the square solder pad. The negative lead will be the
shorter lead and will go into the round solder pad. The negative side of will usually also
have a stripe running down the side of the capacitor body.
11
Step 6: Add the transformer. The primary side of the transformer will be marked with a
“P”. Orient the transformer so that the side with the P matches up with the side of the
PCB marked with a P. Note that there are two tabs on the transformer. You should not
solder these tabs to the PCB. Simply bend the tabs so that they hold the body of the
transformer firmly to the PCB. The tabs are not part of the circuit, so soldering them is
just a waste of solder and it will make it more difficult if you need to remove the
transformer. However, if you do solder the tabs, it will not harm anything.
12
Main PCB Assembly
Step 1: Cut 11 pieces of 2.5 inch wire and solder them to the board. This will allow you
to wire the hardware a bit easier later.
13
Step 2: Add the standoffs and LEDs to the board. The standoffs will snap into the holes,
so push them until you hear them click. DO NOT SOLDER THE LED YET. You will
solder them in the next step. Remove the paper backing of the standoffs to reveal the
adhesive.
14
Step 3: Using the LEDs as your guides, place the PCB into the enclosure so that the
bottom edge of the PCB is against the wall of the enclosure. If your LEDs are lined up,
the rest of the board will be lined up too. At this point, apply a little pressure to the
standoffs so they stick to the inside of the enclosure. Your board it now mounted, and you
can press the LEDs into their holes, and solder the LEDs.
15
Step 4: Install the footswitches. Orient the footswitches so that the flat sides of the
solder lugs are like the diagram below. NOTE: There are no actual number markings
on the footswitches. There are two correct ways you can orient the footswitches.
They are both 180 degrees of each other. Either way is fine. It does not matter as
long as the flat sides of the solder lugs are running horizontal, not vertical.
16
Step 4a: Wire the footswitches to the board. Connect the lug number to the eyelet
number.
17
Step 5: Add the hardware. Be mindful of the orientation of the jacks. The green arrows
are pointing to the SLEEVE side.
18
Step 6: Connect the wires to the respective hardware lugs.
19
That's it! You're done!
20
Operating Overview
Power Supply: Standard Guitar FX power supply (9VDC 2.1mm or 2.1mm
negative tip)
Current Draw: 12mA
A/B footswitch: Selects between OUT A and OUT B
BOTH footswitch: Turns both OUT A and OUT B on at the same time.
IN: Signal input.
Transformer Isolation Switch : Turns the isolation transformer for OUT B
on and off. Toggle left is “ON”. Toggle right is “OFF”.

Other manuals for Amp Selector and Stereo FX Router

1

Other BYOC Music Pedal manuals

BYOC Spring Reverb User manual

BYOC

BYOC Spring Reverb User manual

BYOC Bass Overdrive User manual

BYOC

BYOC Bass Overdrive User manual

BYOC Phase Royal User manual

BYOC

BYOC Phase Royal User manual

BYOC Crown Jewel Manual

BYOC

BYOC Crown Jewel Manual

BYOC Echo Royal User manual

BYOC

BYOC Echo Royal User manual

BYOC Scrambled Octave User manual

BYOC

BYOC Scrambled Octave User manual

BYOC MK2 User manual

BYOC

BYOC MK2 User manual

BYOC Phaser User manual

BYOC

BYOC Phaser User manual

BYOC El Distorto Segundo User manual

BYOC

BYOC El Distorto Segundo User manual

BYOC Reverb User manual

BYOC

BYOC Reverb User manual

BYOC Octavefuzz User manual

BYOC

BYOC Octavefuzz User manual

BYOC Bass Chorus User manual

BYOC

BYOC Bass Chorus User manual

BYOC Classic Fuzz User manual

BYOC

BYOC Classic Fuzz User manual

BYOC Parametric Multi-Band Compressor User manual

BYOC

BYOC Parametric Multi-Band Compressor User manual

BYOC E.S.V. Fuzz User manual

BYOC

BYOC E.S.V. Fuzz User manual

BYOC Vibrato BA662A User manual

BYOC

BYOC Vibrato BA662A User manual

BYOC E.S.V. User manual

BYOC

BYOC E.S.V. User manual

BYOC Large Beaver NYC User manual

BYOC

BYOC Large Beaver NYC User manual

BYOC A/B True Bypass Looper User manual

BYOC

BYOC A/B True Bypass Looper User manual

BYOC Mimosa Jr. User manual

BYOC

BYOC Mimosa Jr. User manual

BYOC ESV Fuzz Silicon User manual

BYOC

BYOC ESV Fuzz Silicon User manual

BYOC 27V Boost User manual

BYOC

BYOC 27V Boost User manual

BYOC Classic Delay User manual

BYOC

BYOC Classic Delay User manual

BYOC Phase Royal User manual

BYOC

BYOC Phase Royal User manual

Popular Music Pedal manuals by other brands

MORLEY JDBES manual

MORLEY

MORLEY JDBES manual

Roland PK-6 owner's manual

Roland

Roland PK-6 owner's manual

Oz inventions Xpression fX quick start guide

Oz inventions

Oz inventions Xpression fX quick start guide

BOSSCO Drive Zone OD-20 owner's manual

BOSSCO

BOSSCO Drive Zone OD-20 owner's manual

Lehle Basswitch Clean Boost user manual

Lehle

Lehle Basswitch Clean Boost user manual

TC-Helicon Perform-V Reference manual

TC-Helicon

TC-Helicon Perform-V Reference manual

Dunlop CBM95 Cry Baby Mini Wah Setup instructions

Dunlop

Dunlop CBM95 Cry Baby Mini Wah Setup instructions

Carl Martin Classic Chorus user manual

Carl Martin

Carl Martin Classic Chorus user manual

MORLEY SLWV2 manual

MORLEY

MORLEY SLWV2 manual

Expert Sleepers Warbler user manual

Expert Sleepers

Expert Sleepers Warbler user manual

neutral labs SCRAT v1.1 manual

neutral labs

neutral labs SCRAT v1.1 manual

AKG BX20 manual

AKG

AKG BX20 manual

Behringer DIGITAL REVERB DR600 quick guide

Behringer

Behringer DIGITAL REVERB DR600 quick guide

Heusinkveld Sim Handbrake product manual

Heusinkveld

Heusinkveld Sim Handbrake product manual

Fortin NATAS quick start guide

Fortin

Fortin NATAS quick start guide

Dunlop JHF3 BAND OF GYPSYS FUZZ FACE user manual

Dunlop

Dunlop JHF3 BAND OF GYPSYS FUZZ FACE user manual

Donner Dynamic Wah owner's manual

Donner

Donner Dynamic Wah owner's manual

Alto TOPVerb user manual

Alto

Alto TOPVerb user manual

manuals.online logo
manuals.online logoBrands
  • About & Mission
  • Contact us
  • Privacy Policy
  • Terms and Conditions

Copyright 2025 Manuals.Online. All Rights Reserved.