ByronStatics Gaumont User manual

Instruction Manual
Retro AM/ FM Radio with Bluetooth
Gaumont/ AM29

Getting to know your Retro FM/AM Radio/B T
You’ll be up and running in no time
Ready? Let’s begin...
Please read these instructions carefully. They contain important information which will
help you get the best from your product and ensure safe and correct installation and
operation.
If you require any further assistance, our technical experts are happy to help. For full
details, refer to the product support section at the end of these instructions.
Fig 1.
Your Retro FM/AM Radio/BT Outview
123
2
-

456789
10
1. AC in jack (AC/AC Power adaptor)
2. Earphone jack
3. Battery compartment
4. Telescopic antenna
5. Function select switch
6. FM Function indicator LED
7. AM Function indicator LED
8. BT Function indicator LED
9. Volume control knob
10. Tuning knob
11
11. Speaker
3
Your Retro FM/AM Radio/BT Outview

Connection
1. Connect the AC/AC power adaptor to ‘AC IN’ jack on the back of the Radio and fully
extend the radio aerial in a vertical position to obtain the maximum signal strength.
2. Plug the AC/AC power adaptor into the mains power wall socket and switch on.
3. Slide the OFF/FM/AM/BT function switch to select mode (AM/FM/BT).
Inserting the batteries (optional)
1. Before installing the batteries (not included) please ensure that the Radio is switched
off (Slide the OFF/FM/AM/BT function switch to ‘OFF’) and is unplugged
2. On the back of the Radio, push down the tabs to release and remove the battery
compartment cover.
3. Insert 4 x 1.5V ‘C’ size (also known as LR-14) batteries, making sure to note
the ‘+’ an ‘-‘ markings and position the batteries the correct way around.
4. Replace the battery cover, making sure it ‘clicks’ shut.
If used continuously on battery power, your Radio has an approximate battery life of 5
hours when using good quality alkaline batteries. When the battery power is low, please
switch off the Radio and replace the batteries.
Note: For battery operation please ensure that the mains power is switched off and
remove the AC/AC power adaptor plug from the socket on the back of the Radio.
Switch on/Change mode (AM/FM/BT).
Slide the OFF/FM/AM/BT function switch to select mode ‘AM/FM/BT’. Into any mode
Note: Always make sure that the aerial is fully extended, to ensure the maximum signal
strength and the best possible sound quality.
the AC/AC power adaptor into the mains power wall socket.
for the product ‘ON’
U s ing your Retro FM/AM Radio/B T
4

Switch o
Slide the OFF/FM/AM function switch to ‘OFF’ position. To completely switch off the
Radio, switch off the mains power at the wall socket.
Adjusting the volume
Turn the rotary volume wheel on the top of the radio, anti-clockwise to decrease the
volume and clockwise to increase the volume.
U s ing your Retro FM/AM Radio/B T
5
Telescopic aerial
Please make sure that the aerial on the back of the Radio is fully extended before you
attempt to tune to an FM station. This will ensure that the maximum signal strength is
available when the Radio is tuning to a station. Extending the aerial also ensures the best
possible sound quality.
FM Radio mode
Tuning to an FM station
In FM mode:
Use the rotary tuning dial on the front of the radio to tune to your favourite FM station.
Please use the frequencies marked on the dial as a guide.
The tuning dial will move both clockwise and anti-clockwise but does have a ‘stop’ point.
If you turn the tuning dial and reach the ‘stop’ point, please turn the dial in the opposite
direction to tune.
Note: If reception is still poor, check that the aerial is fully extended and then adjust the
tuning dial slowly, or try moving the Radio to another location.
Slide the function switch to the FM position, the FM indicator LED(6) will be on.

AM Radio mode
Tuning to an AM station
In AM mode:
Use the rotary tuning dial on the front of the radio to tune to your favourite AM station.
Please use the frequencies marked on the dial as a guide.
The tuning dial will move both clockwise and anti-clockwise but does have a ‘stop’ point.
If you turn the tuning dial and reach the ‘stop’ point, please turn the dial in the opposite
direction to tune.
Note: If reception is still poor, check that the aerial is fully extended and then adjust the
tuning dial slowly, or try moving the Radio to another location.
Slide the function switch to the AM position, the FM indicator LED (7) will be on.
Bluetooth operation
1. Slide the function switch to the BT position, the blue indicator LED (8) will begin to flash.
3. Select the Bluetooth pairing name ‘Gaumont’ or ‘AM29’ to connect to the Radio device.
4. Once you are connected the blue indicator LED will stop flashing, you can now play music.
2. Turn your devices Bluetooth setting on, and search devices.
The devices are now connected and will hear a voice prompts ‘Bluetooth
connected successfully’.
After initial pairing the Radio device will stay paired to your device.
Note: To unpair, you need to manually remove it from your Bluetooth device.
and will hear a voice prompts 'Bluetooth disconnected'.
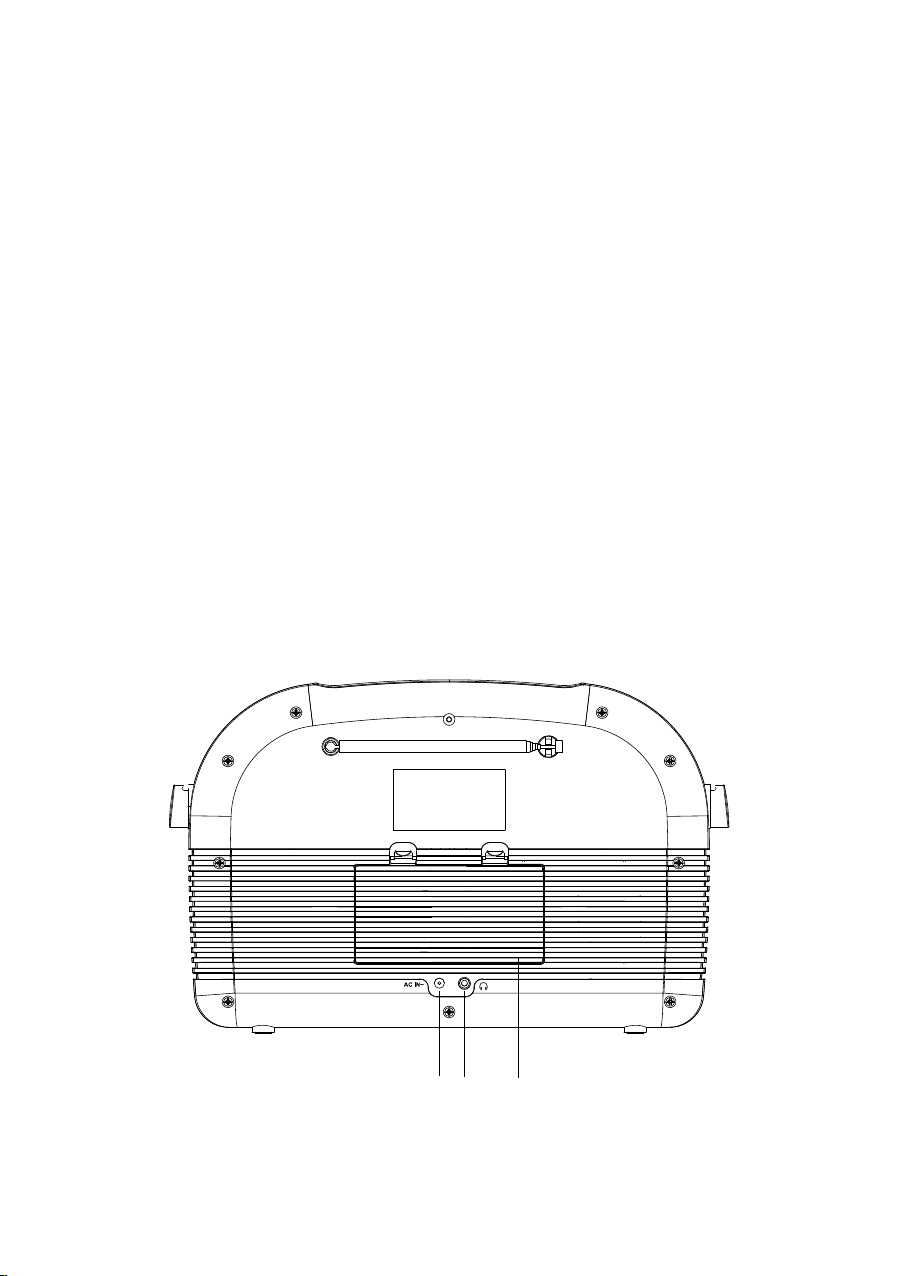
Using earphone (not included)
You can connect earphones with a 3.5 mm plug to the radio, plug in the earphones into the
Warning! Ensure that children don’t adjust the sound volume too high.
Excessive sound pressure from earphones and headphones can cause hearing loss.
Note: When you have earphones connected the radio speakers (11) are switched off and all
sound is via the earphones
earphone jack 3.5 mm (2) on the backside of the radio.
Adjust a pleasant sound volume, the radio speaker (11) will be muted as long as earphone
is connected
6

Power source:
Batteries:
Input AC:120V~/60Hz
4 x 1.5V C size (LR14)
(Optional, not supplied)
Frequency range:
Any support you need, anything you feel like to share, You are more than welcome to contact us. [email protected]
Changes or Modifications not expressly approved by the party responsible could void the user's
authority to operate this device.
This equipment has been tested and found to comply with the limits for a Class B digital device,
pursuant to Part 15 of the FCC Rules. These limits are designed to provide reasonable protection
against harmful interference in a residential installation. This equipment generates, uses and can
radiate radio frequency energy and, if not installed and used in accordance with the instructions,
may cause harmful interference to radio communications. However, there is no guarantee that
interference will not occur in a particular installation.
If this equipment does cause harmful interference to radio or television reception, which can be
determined by turning the equipment off and on, the user is encouraged to try to correct the
interference by one or more of the following measures:
-- Reorient or relocate the receiving antenna.
-- Increase the separation between the equipment and receiver.
-- Connect the equipment into an outlet on a circuit different from that to which the receiver is connected.
-- Consult the dealer or an experienced radio/TV technician for help.
This equipment complies with the FCC RF radiation exposure limits set forth for an uncontrolled
environment. This equipment should be installed and operated with a minimum distance of 20
centimeters between the radiator and your body.
CAUTION
Power adaptor: Input:120V~ 60Hz 5W
Output:5.0V~, 400mA
FCC ID: 2AVTM-GAUMONT
This device complies with Part 15 of the FCC Rules. Operation is subject to the following two conditions:
(1) This device may not cause harmful interference,
(2) This device must accept any interference received, including interference that may cause undesired operation.
Technical data
BT: 2402 - 2480 MHz
AM: 520 - 1710 KHz
FM: 88 - 108 MHz
7
GAUMONT
This manual suits for next models
1
Table of contents
Other ByronStatics Radio manuals