C. Bechstein VARIO User manual

Version 05/18
C. Bechstein Vario
«High Definition Sensor Technology »
User Manual

C. Bechstein Vario Contents
2 User Manual
1 Contents
1Contents .......................................................................................................................................... 2
2Getting Started................................................................................................................................ 3
2.1 Installation...............................................................................................................................3
2.2 Mute.........................................................................................................................................3
2.3 Switching On...........................................................................................................................3
3Operation ........................................................................................................................................ 4
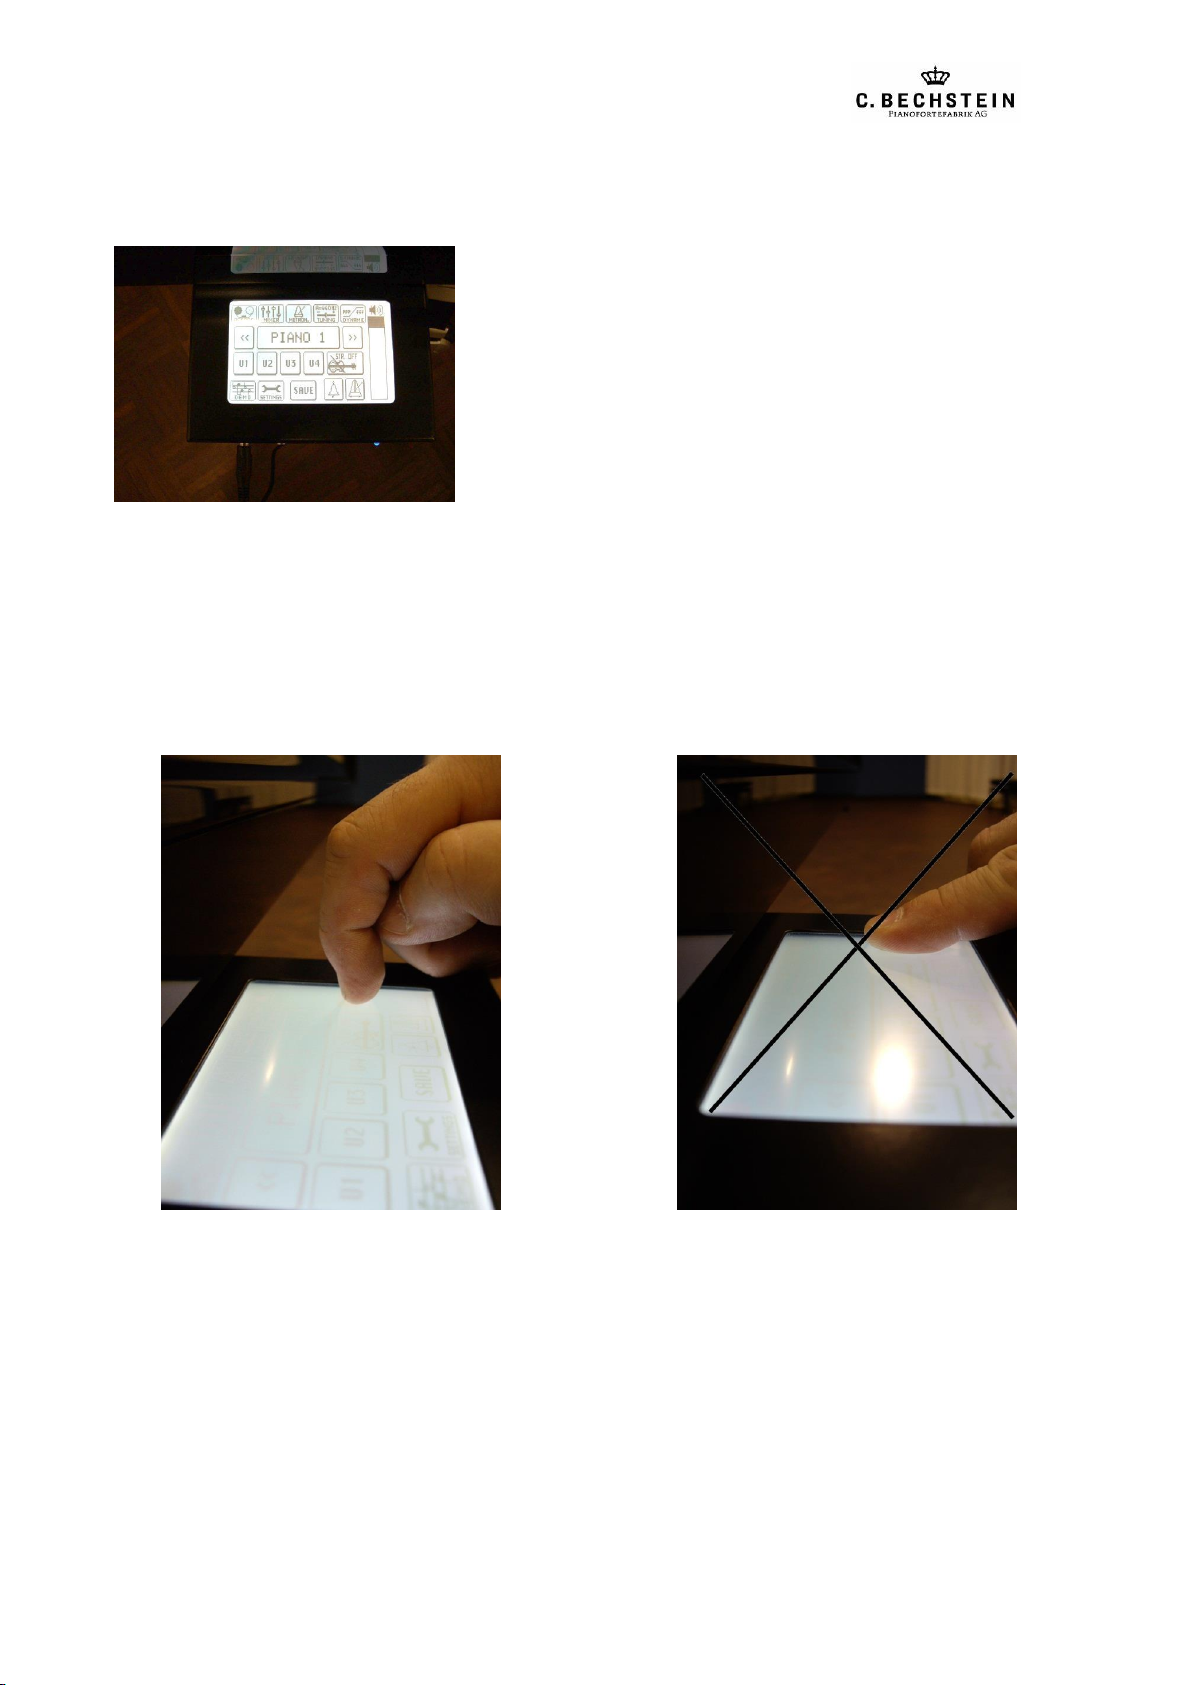
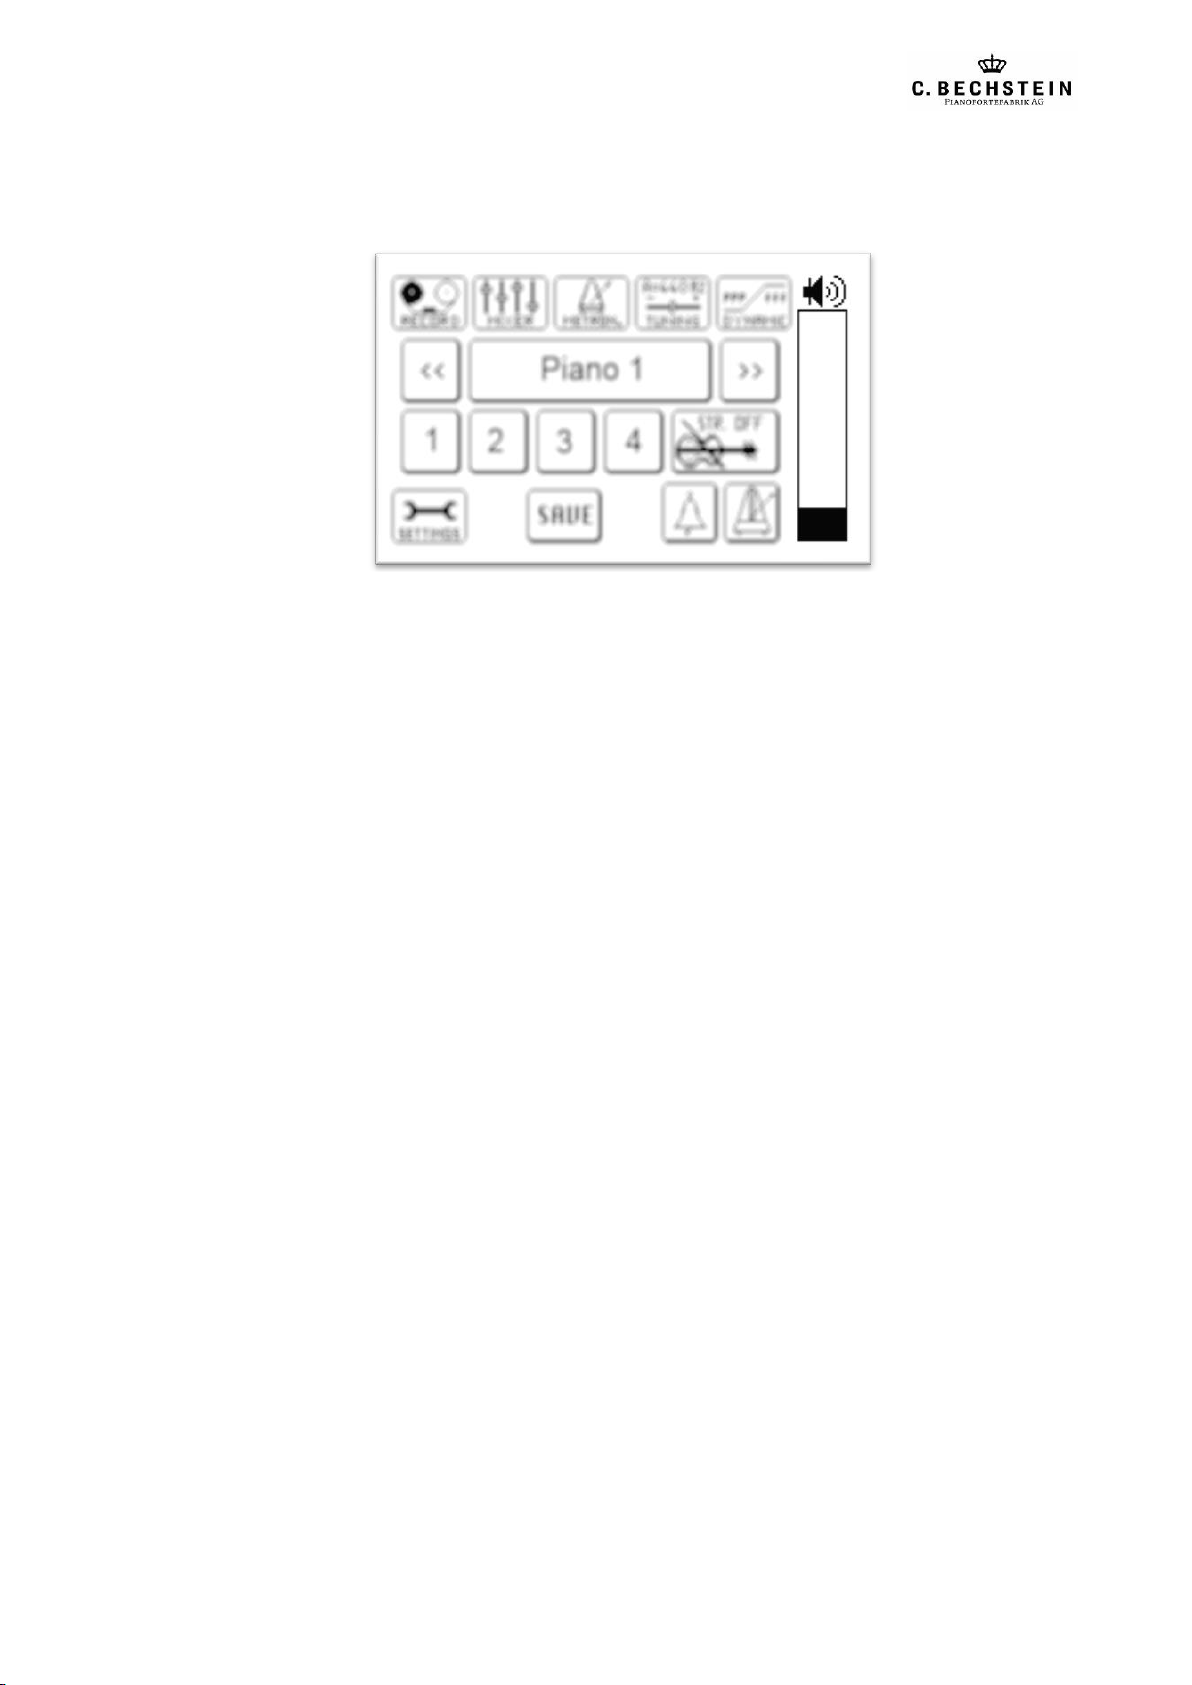
3.1 Display.....................................................................................................................................4
3.2 Working with the Display........................................................................................................4
3.3 Volume Adjustment.................................................................................................................5
4Main Menu...................................................................................................................................... 6
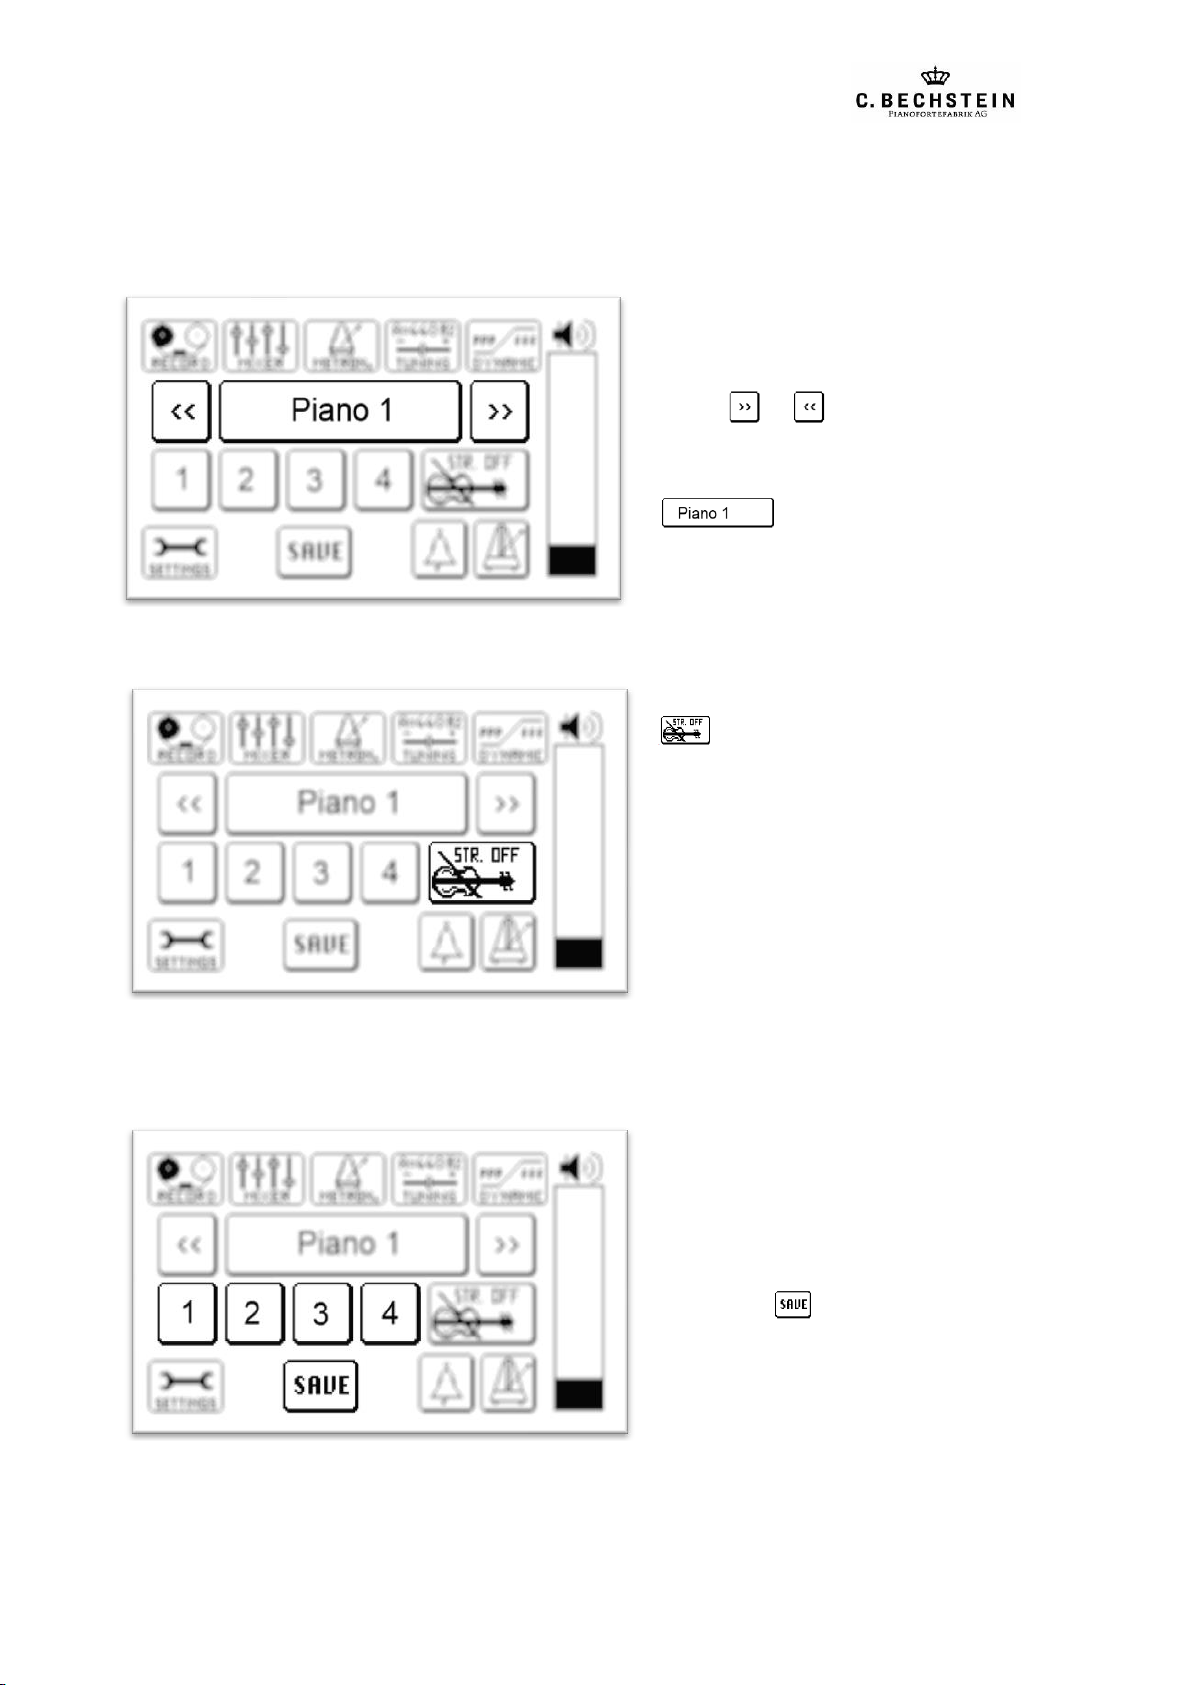
4.1 Select Instrument.....................................................................................................................6
4.2 Background Strings .................................................................................................................6
4.3 Memory Settings ..................................................................................................................... 6
4.4 Metronome ..............................................................................................................................7
4.5 Sub Menus...............................................................................................................................7
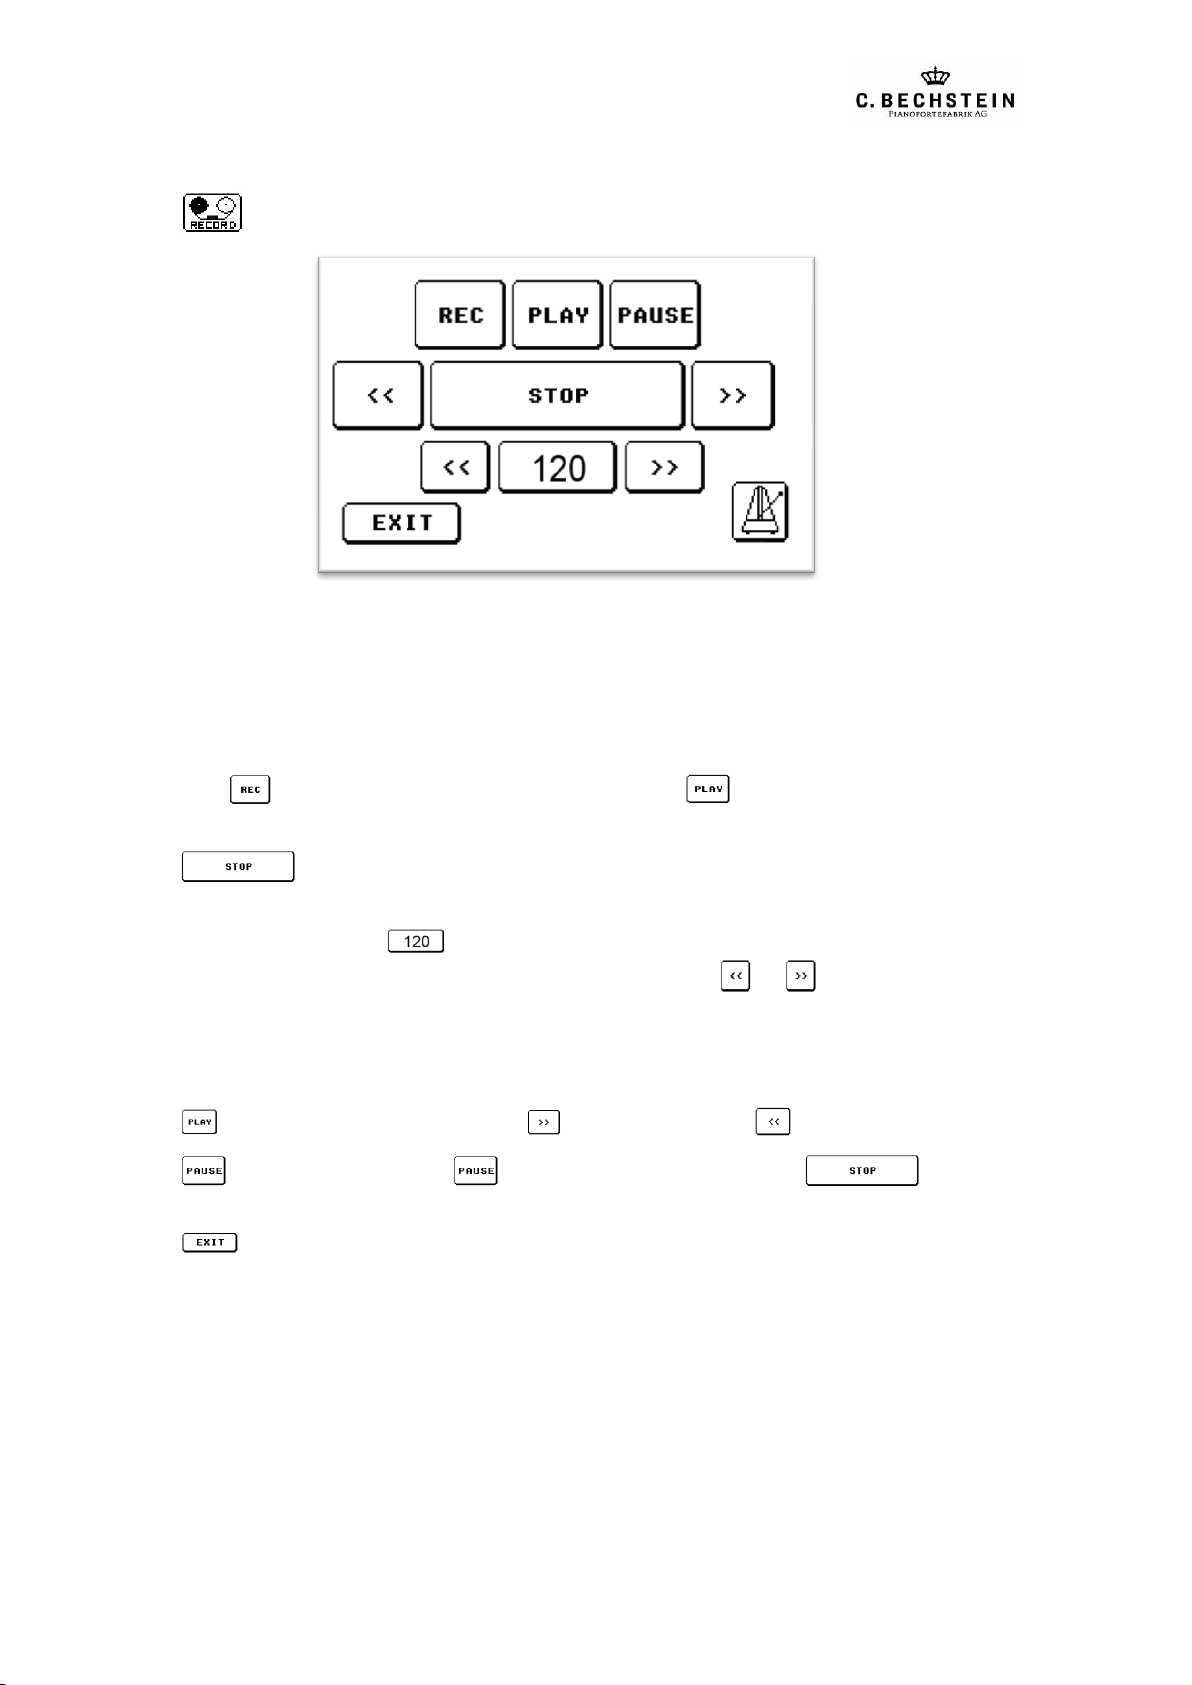
5Recorder.......................................................................................................................................... 8
5.1 Record......................................................................................................................................8
5.2 Playback ..................................................................................................................................8
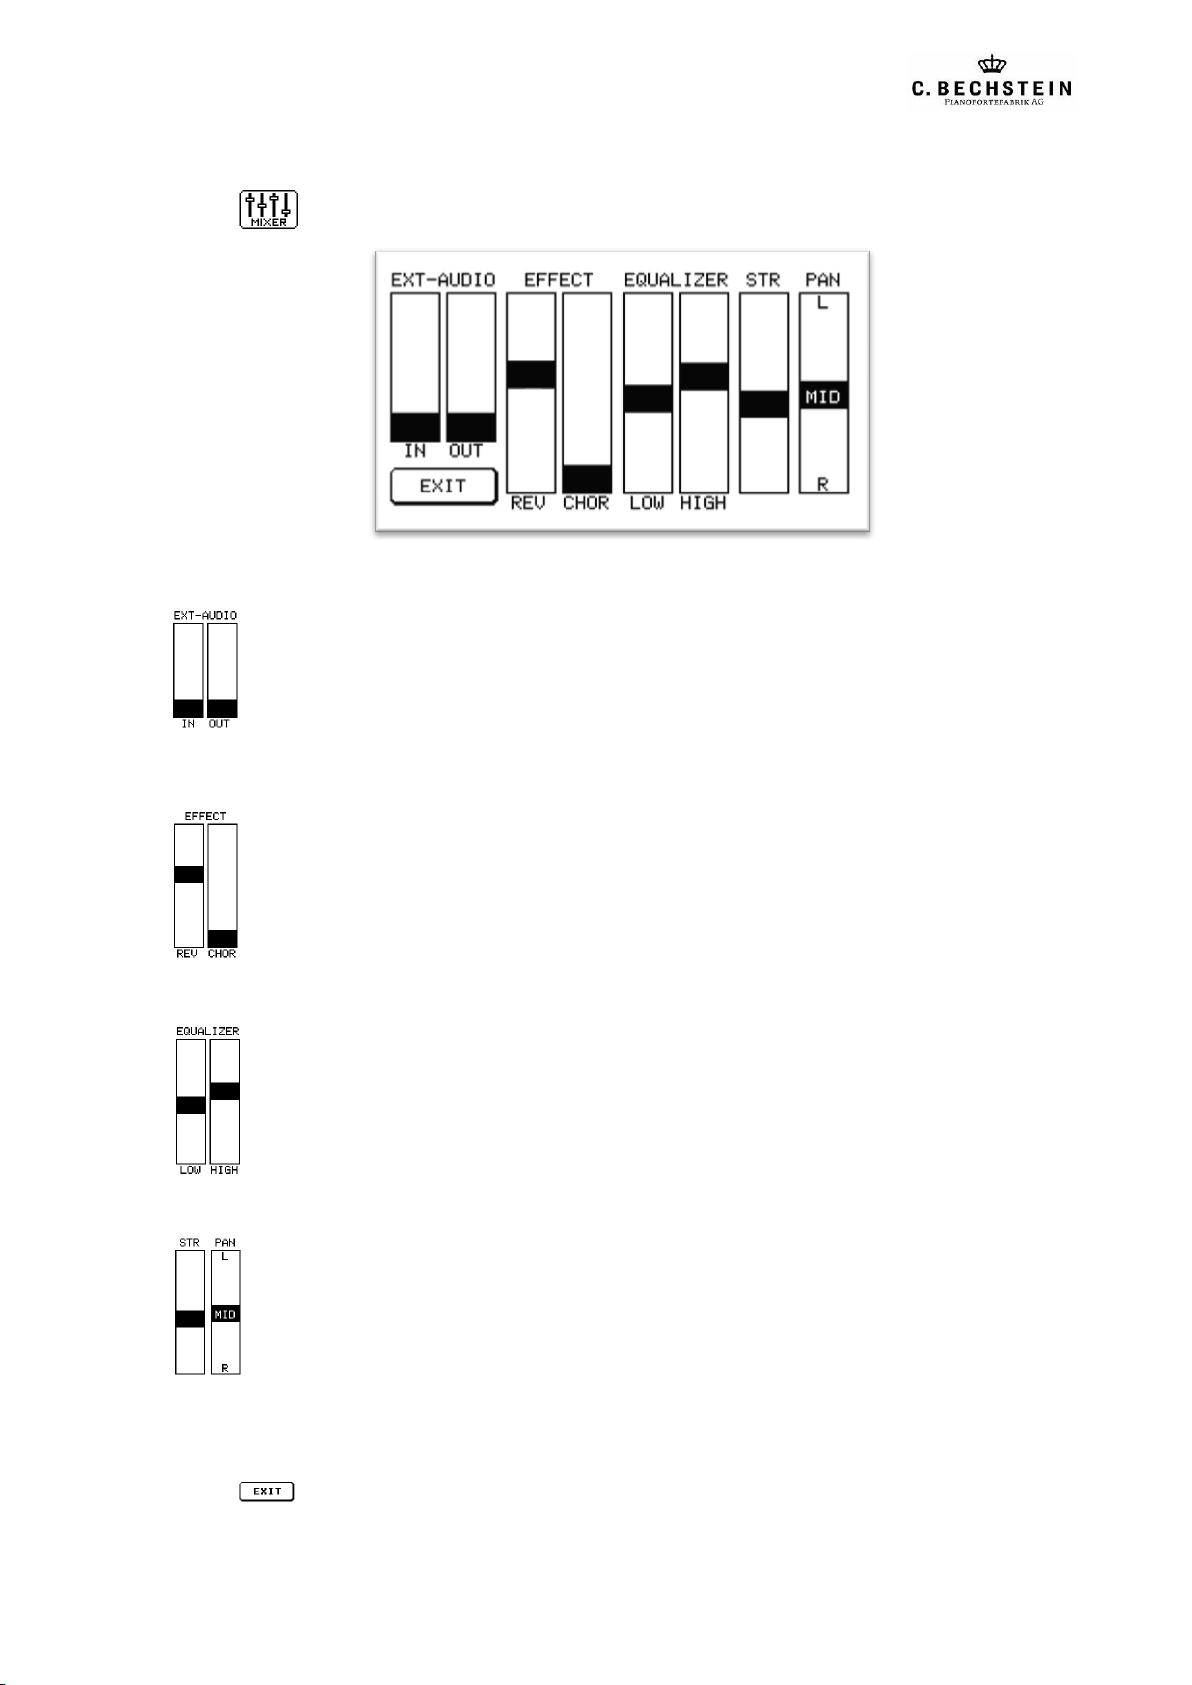
6Mixer ............................................................................................................................................... 9
6.1 Audio In/Out............................................................................................................................ 9
6.2 Effects......................................................................................................................................9
6.3 Equalizer..................................................................................................................................9
6.4 Strings/Panorama.....................................................................................................................9
7Metronome ................................................................................................................................... 10
7.1 Measure ................................................................................................................................. 10
7.2 Tempo/Beats per Minute.......................................................................................................10
7.3 Activation, Bell, Volume.......................................................................................................10
8Tuning............................................................................................................................................ 11
8.1 Transposing ...........................................................................................................................11
8.2 Tune/Pitch..............................................................................................................................11
9Dynamics/Touch Sensitivity ......................................................................................................... 12
10 Settings.......................................................................................................................................... 13
10.1 Brightness..............................................................................................................................13
10.2 Energy Saving Mode (ECO-mode) .......................................................................................13
10.3 Memory Protect.....................................................................................................................13
10.4 Save Global Settings..............................................................................................................14
10.5 Reset......................................................................................................................................14
10.6 Pedal Adjustment...................................................................................................................14
a) Left (Piano) ..........................................................................................................................................15
b) Mid (Sostenuto)....................................................................................................................................15
c) Right (Sustain) .....................................................................................................................................15
11 Connectivity .................................................................................................................................. 16
11.1 Front ......................................................................................................................................16
11.2 Back.......................................................................................................................................16
12 Principle of the C. Bechstein Vario system .................................................................................. 17
13 Piano Care, Use and Service ......................................................................................................... 18
14 Advantages of the C. Bechstein Vario system ............................................................................. 20
15 Technical Specifications................................................................................................................ 22

C. Bechstein Vario Getting Started
3 User Manual
2 Getting Started
2.1 Installation
Congratulations on choosing the C. Bechstein Vario system! We hope you enjoy using your
new device.
The C. Bechstein Vario
system is only installed by the manufacturer or certified specialists.
Once the transformer and headphones are connected, the system is ready to use.
Please only use the power cable and transformer supplied for mains power connection.
Transformer on upright piano
Transformer on grand piano
2.2 Mute
You will see a lever under the keyboard to activate the
hammer bar that puts your piano in mute mode.
Moving this lever forwards on a grand piano or
backwards on an upright makes the hammers strike the
strings normally, causing them to vibrate. Pulling the
lever backwards on a grand piano, or forwards on an
upright puts the instrument in mute mode.
2.3 Switching On
Connect the headphones to one of the two jacks on the
front of the control unit. Pull the unit to its final position.
The system switches on as you slide out the control unit.
A click is audible through the headphones, and the blue
LED light up.
The system switches off and the blue LED fades when
you push back the control unit to its original position.
Partially sliding the unit back does not switch off the
system.

C. Bechstein Vario Operation
4 User Manual
3 Operation
3.1 Display
When you have pulled out the control unit as far as it
will go, the screen lights up and displays a welcome
message, and then the Main Menu with an overview of
all functions.
Please note: to facilitate easy reading of the User
Manual, all functions are described below using
graphics.
3.2 Working with the Display
A touchscreen display allows you to control all system functions.
For best results, use your fingertips to touch the display screen. If you use the pad of your finger,
the system cannot identify the exact position and may run a wrong command.
Correct
Incorrect

C. Bechstein Vario Operation
5 User Manual
3.3 Volume Adjustment
You can practise using the touch screen, for example, by adjusting the volume. In the Main
Menu, you will find the volume control as a column topped with a loudspeaker symbol.
The black bar inside the column indicates the volume level.
To adjust the volume, please touch any area just above or below this bar. The bar will move to
the exact point you touched inside the column.
Alternatively, you can push the bar to adjust the volume. Use your fingertips to move the
black bar upwards and downwards. The volume increases or decreases accordingly.
Congratulations! You have mastered the touch screen, and we now invite you to find out more
about your C. Bechstein Vario system.

C. Bechstein Vario Main Menu
6 User Manual
4 Main Menu
The Main Menu displays all the key settings at a glance.
4.1 Select Instrument
You can select an instrument in the
second row of the Main Menu.
Touch or to select an
instrument.
In this case, a piano was selected:
.
4.2 Background Strings
In the third row, you will find a button
.
Touch this button once or twice to select
one of the two strings that will play in
the background.
Simply touch the button again to
deactivate this function.
Please note that selecting a background
string decreases the polyphony.
4.3 Memory Settings
Still in the third row, you will see four
buttons numbered 1 to 4.
Here, you can save the currently
selected instrument and your custom
settings.
First, touch , and then one of the
buttons 1, 2, 3 or 4.
You can change the memory settings at
any time to store new custom settings.
The previous memory settings will be
deleted, however.

C. Bechstein Vario Main Menu
7 User Manual
The following settings will be saved:
Instrument (4.1)
Background Strings (4.2)
Effects (Reverb, Chorus) (6.2)
Equalizer (High and Low Frequencies) (6.3)
Strings Volume (6.4)
Dynamics/Touch Sensitivity (9)
You can store further general parameters using the Save Global Settings function (10.4)
4.4 Metronome
On the last row of the menu, you
can switch the metronome on or
off by touching the corresponding
button.
This button activates a bell on the first
beat of every measure. Touch the
button again to switch off the
bell.
You can change the tempo, measure and
volume in the Metronome Menu (see
Chapter 7).
4.5 Sub Menus
The buttons in the first row of the Main
Menu control the following sub menus:
1. Record
2. Mixer
3. Metronome
4. Tuning
5. Dynamics/Touch Sensitivity
The instructions for using these sub
menus are set out below.

C. Bechstein Vario Recorder
8 User Manual
5 Recorder
Touch in the Main Menu to open the Record Sub Menu:
This sub menu enables you to record and play back your music on the C. Bechstein Vario
system.
5.1 Record
The button flashes when you touch it. Upon touching recording begins and the
counter is activated.
Touch to end the recording.
You can switch on the metronome while you are recording: the recorder will ignore the beats.
The button in the third row ( in this case) displays the tempo of the metronome and the
playback. You can increase or decrease the tempo by touching or .
5.2 Playback
Touch to listen to your recording. Use to fast forward and to rewind.
Touch to interrupt, and touch again to resume playback. Use to end the
playback of your recording.
Touch to exit the sub menu.

C. Bechstein Vario Mixer
9 User Manual
6 Mixer
Touch in the Main Menu to open the Mixer Sub Menu:
6.1 Audio In/Out
The left pot (IN) controls the volume of a device connected to the Audio In socket at
the back of the system.
The right put (OUT) controls the output signal.
6.2 Effects
The left pot (REV) controls the reverb effect.
The right pot (CHOR) controls the chorus effect.
6.3 Equalizer
The left pot (LOW) controls the low frequencies intensity.
The right pot (HIGH) controls the high frequencies intensity.
6.4 Strings/Panorama
The left pot (STR) controls the volume of the background strings.
The right pot (PAN) balances the sound between the right and left channels.
Equalizer and Effect settings only influence the currently selected instrument. You
can save your settings using the buttons 1–4 of the Main Menu (see 4.3).
Touch to exit the sub menu.

C. Bechstein Vario Metronome
10 User Manual
7 Metronome
Touch in the Main Menu to open the Metronome Sub Menu:
7.1 Measure
Use one of the buttons in the top row to select a measure.
7.2 Tempo/Beats per Minute
Displays the tempo.
Reduces the tempo.
Increases the tempo.
7.3 Activation, Bell, Volume
Activates a bell on the first beat of every measure. Touch the button again to deactivate
the bell.
Starts the metronome function. Touch the button again to stop the function.
Controls the metronome’s volume.
Touch to exit the sub menu.

C. Bechstein Vario Tuning
11 User Manual
8 Tuning
Touch in the Main Menu to open the Tuning Sub Menu:
8.1 Transposing
Raises the key in semi-tone intervals.
Lowers the key in semi-tone intervals.
Reverts to the original key.
8.2 Tune/Pitch
Raises the pitch in 0.25 Hertz or cent intervals.
Lowers the pitch in 0.25 Hz or cent intervals.
Switches between Hz and cent.
Reverts to the original pitch (a1 at 440 Hz).
Touch to exit the sub menu.

C. Bechstein Vario Dynamics/Touch Sensitivity
12 User Manual
9 Dynamics/Touch Sensitivity
Touch in the Main Menu to open the Dynamics Sub Menu:
This menu allows you to design your personal touch curve, allowing you to control in which
way the volume increases in relation to the power or speed with which you play the keys. The
diagonal line shows the designed touch curve in a simplified way.
You can adjust the curve in three different ways.
1. Pianisimo offset: By moving the controller at the lower left side of the graph upwards, the
lower left end of the curve moves upwards. By doing so, you increase the minimal
achievable volume level.
2. Fortissimo offset: By moving the controller at the upper right of the graph upwards, the
right end of the curve moves to the left. By doing so, you will need less power to play
fortissimo.
3. By moving a random part between the two ends of the curve in any direction, left, right, up
or down or tapping on a random position within the diagram, you change the form of the
curve by positioning the inflexion point of the curve.
A gentle incline of the curve’s lower left part indicates a slower increase of loudness from
pianissimo to piano. The steeper the curve, the faster the volume increases.
By pulling the inflexion point more to the right, you need more power to reach higher
volume levels. The more you pull the inflexion point to the left, the easier you will access
higher volume levels.
Please note that compared to the simplified angled graph the resulting curve is smoothed.
Accepts your settings and exits the menu.
Reverts to the original dynamics curve.
The setting only influences the currently selected instrument. You can save your
settings using the buttons 1–4 of the Main Menu (see 4.3).
Damper Resonance
When pressing the right pedal, all dampers lift off the strings, allowing all strings to vibrate,
when you play, not only the string of the tone you play. You can adjust the intensity of this
effect with the controller at the lower right of the display.
By moving the controller upwards, you increase the effect intensity.

C. Bechstein Vario Settings
13 User Manual
10 Settings
Touch in the Main Menu to open the Settings Sub Menu:
10.1Brightness
You can control the screen’s brightness using the top bar. You can control the brightness in
exactly the same way as volume or mixer functions. Moving the bar further to the right
increases the brightness of the display screen.
10.2Energy Saving Mode (ECO-mode)
In the ECO mode, the display backlighting switches off after a preset inactivity time (20
minutes, 5 minutes, always on).
Please note that the control unit remains switched on and the display screen is still active even
if the backlighting is switched off. Lightly touching the display screen will immediately
restore the screen backlighting to its original brightness.
10.3Memory Protect
You can protect settings from involuntary deleting.
Switches off the memory protect function so any content stored in the system can be
overwritten at any time.
Enables recording after touching and overwrites the memory content.
Overwrites the settings stored under the buttons 1 to 4 of the Main Menu.
Protects the settings stored under the buttons 1 to 4 of the Main Menu. Touch to save
new settings.

C. Bechstein Vario Settings
14 User Manual
10.4Save Global Settings
saves general settings of the system and enables you to customize your system.
The following parameters are stored at their current settings and immediately available when
you restart the device:
Volume (3.3)
Instrument (system starts with the selected Instrument) (4.1)
Recorder Tempo (5)
Volume Audio IN / OUT (6.1)
Panorama (6.4)
Metronome, Measure (7.1)
Metronome, Tempo (7.2)
Metronome, Volume (7.3)
Tune/Pitch (8.2)
Energy Saving Mode settings (10.2)
Memory Protect settings (10.3)
The screen displays the message “SAVE OK” to confirm that all the parameters are stored.
You can change and store the parameters or reset the default settings at any time. The previ-
ous memory settings will be deleted, however.
10.5Reset
restores the above Global Settings to their original default settings. Any custom
settings will be permanently deleted.
10.6Pedal Adjustment
opens the Pedal Adjustment Menu:
You can determine from which position the pedals will send a signal to the C. Bechstein
Vario.

C. Bechstein Vario Settings
15 User Manual
Please note that a specialist adjusted these settings when the system was installed on
your piano. You should only change them if you are certain that they need to be
adjusted. The pre-installed settings will then be permanently deleted.
a) Left (Piano)
This pedal lowers the timbre and reduces the volume. When you step on the pedal, the bar on
the display screen indicates the pedal movement. When you have reached the right point, hold
the pedal in position and touch the bar. The marker immediately moves and indicates the
position at which the system will react to your step on the pedal. You can repeat this
procedure as many times as required.
b) Mid (Sostenuto)
The C. Bechstein Vario
system also registers the movement of the sustain pedal. Stepping on
the pedal dampens all notes except for those keys pressed down at the time. The adjustment
procedure is the same than for the left pedal.
c) Right (Sustain)
This pedal suspends the electronic mute. The adjustment procedure is the same than for the
other pedals.
Activates a sound when the pedal sends a signal to the system.
Invert the sensors from the ON/OFF to the OFF/ON position to facilitate
the installation of the system.
Touch to save your settings and exit the Pedal Adjustment Menu.

C. Bechstein Vario Connectivity
16 User Manual
11 Connectivity
11.1Front
11.2Back
Line In
Input for devices such as stereos or MP3 players.
Line Out
Output to devices such as stereos or active loudspeakers.
System
Connection of the control unit to the C. Bechstein Vario system.
USB
Connection to a computer or MIDI device.
Two headphone sockets ON/OFF LED

C. Bechstein Vario Principle of the C. Bechstein Vario system
17 User Manual
12 Principle of the C. Bechstein Vario system
Mute rail
The mechanical components of the C. Bechstein Vario
system prevent the hammers touching the strings and
making them vibrate.
The mute components can be controlled with extreme
precision and leave your acoustic piano’s action
assembly and sound properties virtually unchanged.
Sensors
Sensors beneath the keys (blue in the picture above) constantly measure the key movements
via light signals (red arrows). The return signal enables the sensor to identify the speed of the
key movement, which in turn determines the volume and timbre of the digital sound to be
reproduced. This technology was exclusively developed for the C. Bechstein Vario
system.
The sensors function purely optically and thus do not alter your strike.
Control Unit
A variety of sounds including the 88 notes of a grand
piano and the notes from various other instruments were
recorded and stored in the control unit as “samples”. The
control unit processes the data from the key sensors
according to your custom settings (volume, timbre, tone
length) and transfers them to the connected devices.

C. Bechstein Vario Piano Care, Use and Service
18 User Manual
13 Piano Care, Use and Service
Cleaning
Please do not clean the control unit using liquids, as any moisture seeping in may damage the
device. Please do not use aggressive cleaning agents or those with abrasive particles. A clean,
dry microfibre cloth delivers bests results for cleaning the control unit.
You should only allow a well-trained piano technician to clean inside the piano. Ask your
technician to dust the area beneath the keys. All electronic components (key sensors, etc.)
should only be cleaned using a dry, soft brush. If you use a vacuum cleaner, avoid any contact
with the electronic components.
Checking action, mute and sensors
Only a qualified piano technician should service and maintain your C. Bechstein Vario
system. A good technician will not only tune your piano, but also check the instrument,
especially the action assembly. Not performing this extensive servicing could impair your
guarantee rights.
Please ask your piano technician to check the action assembly when the mute is switched on
and to check in particular the key and pedal sensors.
Before removing the action assembly, it is vital to disconnect the cable of the key
sensors and deactivate the hammer bar (no mute mode). On upright pianos, the
hammer bar must be disconnected from the cable using the Allen key supplied with
the system.
Volume adjustment
The C. Bechstein Vario system is supplied with a set of Sennheiser dynamic headphones that
allows you to ear also surrounding noise. The output volume of the system matches the
properties of the headphones. To prevent damage to the system, the headphones and your
hearing, you should never use another set of headphones.
Please note that the system delivers high dynamics. Therefore, you should adjust the volume
to prevent any damage to your hearing. Moreover, the different instruments have different
dynamics, so that you should adjust the volume for each instrument.
You should also adjust the volume if you use the Audio Out function. C. Bechstein accepts no
liability for damage caused to your hearing due to connected devices.
Avoid direct light onto the keyboard!
Intense light can impair the functioning of the key sensors.
Remove the headphones before leaving the piano!
Before you leave the piano, please remember to remove the headphones. Strong juddering
movements on the headphones or control unit (especially the headphone jacks) can damage
the system.

C. Bechstein Vario Piano Care, Use and Service
19 User Manual
Safety instructions
Extra care was paid to the development of the C. Bechstein Vario
to avoid any risks when the
system is in operation. But please read and always follow the following safety instructions:
Never operate the system near moisture and keep all liquids away.
The control unit is designed to respond to light pressure with the fingertips. Avoid excessive
pressure being caused by heavy objects, massive shocks or other pressure exceeding gentle
movement of the fingertips.
The control unit will protrude slightly when pulled out. Please make sure that nobody,
especially young children, can injure himself or herself on the protruding control unit or
headphones support. Please remember to slide the control unit back after use.
Only use the supplied transformer and power cable.
Only plug the system into a mains socket that corresponds to the information provided on the
transformer.
Please avoid damage to the power cable and do not stand any heavy objects on it. Avoid
squashing, bending or clamping the power cable.
Please make sure that nobody can trip over the power cable.
Never open the control unit or the transformer and ensure that no modifications are made.
Please make sure that no foreign objects (paper clips, nails, coins, liquids etc.) get inside the
control unit or onto the key sensors.
When used with an output device, the system can produce a noise level that may permanently
damage your hearing or the connected device. Never use the system with the sound set at
maximum level.
Refrain from switching the system on or switch it immediately off if:
oliquids or foreign objects get inside the control unit or the piano;
othe transformer is damaged;
othe system emits smoke or the smell of fumes;
othe system comes from a damp, wet or cold place.
othe system does not work as anticipated or stops performing.
Keep products containing solvents (nail varnish, spray cans, alcohol, cosmetics etc.) away
from the system.
The control unit and transformer should always be operated in areas with adequate
ventilation.
When disconnecting external and internal cables, only pull on the plug and never on the cable.
When disconnecting cables at the back of the control unit, the plug-in lock must
simultaneously be held down.
Never handle devices, cables and the transformer with wet or damp hands.
Please make sure that all cables are properly reconnected after transporting the piano and that
the system is neither damp nor cold.
Please disconnect the system from power supply during a thunderstorm.
Remove the headphones before leaving the instrument and hang them on the support.

C. Bechstein Vario Advantages of the C. Bechstein Vario system
20 User Manual
14 Advantages of the C. Bechstein Vario system
An excellent device –made in Germany.
Dynamics
Unique dynamics from pianissimo to fortissimo
High definition recording of the key movement (“high definition sensor technology”)
Easily adjustable via graphics on a display screen
Sensor Technology
Optical key and pedal sensors
Continuous measurement and adjustment of the sensors
High resolution technology
No influence on the strike
Display
Large touchscreen display
All functions easily and clearly controlled in the Main Menu
Clear graphics, easy to understand in all countries
Various functions (Record, Metronome, Settings, etc.) controlled in sub menus with simple
architecture and exit button
Sub menus with required functions clearly visible at a glance and fully controllable
No complicated keys, no buttons with dual or triple functions
Control unit
Multifunctions
Small, unobtrusive design, with large touchscreen display
Purely functional case without superfluous details
Clear and elegant front, with LED and headphone jacks only
Connections on the back: USB, Line In/Out, power
Easy, self-explanatory operation
Easily operated from above
Easily adjusted settings with option to save and revert to original settings using a reset button
Automatic switch on when pulling out the control unit
Display switch off
Acoustically sampled metronome with optional bell
Memory setting for four custom configurations
Sounds: 6 pianos, 3 organs, 1 harpsichord, 3 digital pianos, 2 strings (in the background)
Main Menu: Instrument, Volume, Metronome, Memory Settings, Sub Menus
Sub Menus: Record, Mixer, Dynamics, Tuning, Metronome, Settings
International
Graphic menus easily understandable the world over
Transformer (100–240 V) with several plugs
Energy Saving
Automatic switch off (no standby)
Other manuals for VARIO
3
Table of contents
Other C. Bechstein Music Equipment manuals