manuals.online logo
Brands
  1. Home
  2. •
  3. Brands
  4. •
  5. C. Crane
  6. •
  7. Transmitter
  8. •
  9. C. Crane 024 S User manual

C. Crane 024 S User manual

This manual suits for next models

2

Other C. Crane Transmitter manuals

C. Crane FM Transmitter 2 User manual

C. Crane

C. Crane FM Transmitter 2 User manual

C. Crane FM Transmitter User manual

C. Crane

C. Crane FM Transmitter User manual

C. Crane FM Transmitter 2 User manual

C. Crane

C. Crane FM Transmitter 2 User manual

Popular Transmitter manuals by other brands

Seneca K120RTD installation manual

Seneca

Seneca K120RTD installation manual

Nautel GV40 installation manual

Nautel

Nautel GV40 installation manual

HumanTechnik cm-light operating instructions

HumanTechnik

HumanTechnik cm-light operating instructions

INOR APAQ C130 TC User instructions

INOR

INOR APAQ C130 TC User instructions

Linear DXS-64 operating instructions

Linear

Linear DXS-64 operating instructions

FeinTech ABT00102 instruction manual

FeinTech

FeinTech ABT00102 instruction manual

Geo Web Pack quick start guide

Geo

Geo Web Pack quick start guide

Inovonics EchoStream EN1210W installation instructions

Inovonics

Inovonics EchoStream EN1210W installation instructions

IKONNIK KA-6 quick start guide

IKONNIK

IKONNIK KA-6 quick start guide

Rohde & Schwarz SR8000 Series System manual

Rohde & Schwarz

Rohde & Schwarz SR8000 Series System manual

Audio Technica UniPak ATW-T93 Installation and operation

Audio Technica

Audio Technica UniPak ATW-T93 Installation and operation

NIVELCO EasyTREK SCA-300 Series Programming manual

NIVELCO

NIVELCO EasyTREK SCA-300 Series Programming manual

Honeywell 5816WMBR installation instructions

Honeywell

Honeywell 5816WMBR installation instructions

Kamstrup READy MTU Installation and operation guide

Kamstrup

Kamstrup READy MTU Installation and operation guide

Omega ZW Series user guide

Omega

Omega ZW Series user guide

ABB Field 264H Instructions for installation

ABB

ABB Field 264H Instructions for installation

Dejero EnGo 3x manual

Dejero

Dejero EnGo 3x manual

Rosemount 4600 Reference manual

Rosemount

Rosemount 4600 Reference manual

manuals.online logo
manuals.online logoBrands
  • About & Mission
  • Contact us
  • Privacy Policy
  • Terms and Conditions

Copyright 2025 Manuals.Online. All Rights Reserved.

Operating Instructions
LEASE READ ALL THE INSTRUCTIONS COM LETELY BEFORE USE
AND SAVE THIS MANUAL FOR FUTURE REFERENCE.
FM Transmitter 2
Patent #US D483,024 S
Copyright © 2011 by C. Crane Company Inc., Fortuna, CA 95540
Phone: 1-800-522-8863 Web: ccrane.com
All rights reserved. No part of this booklet may be reproduced, in any form or means
whatsoever, without permission in writing from C. Crane Company Inc.
Before Use
lease read IM ORTANT SAFETY INSTRUCTIONS
on pages 10 - 11 before use. It is important to read
and understand all instructions.
Warning: To reduce the risk of fire
or shock hazard, do not expose
this product to rain or moisture.
CAUTION
CAUTION: TO REDUCE THE RISK OF
ELECTRIC SHOCK, DO NOT
REMOVE COVER OR BACK. NO
USER-SERVICEABLE PARTS INSIDE.
REFER SERVICIN TO QUALIFIED
PERSONNEL
RISK OF ELECTRIC SHOCK.
DO NOT OPEN
This symbol is
intended to alert you
to the presence of
uninsulated dan-
gerous voltage with-
in the productʼs
enclosure that might
be of sufficient mag-
nitude to constitute a
risk of electric shock.
Do not open the
productʼs case.
This symbol is
intended to inform
you that important
operating and main-
tenance instructions
are included in the
literature accom-
panying this product.
For your future reference:
Serial No. Date of purchase
(found inside battery compartment)
Name & address of dealer
Introduction ........................................................................... 4
Audio Sources ....................................................................... 4
Location of Controls ............................................................. 5
Connection to ower ............................................................. 6
Battery Installation ................................................................ 6
Tuning .................................................................................... 7
Tips to Make It Work Better ................................................... 8
Troubleshooting Guide ......................................................... 9
Service Information ............................................................... 9
Safety Instructions ................................................................. 10
Specifications ......................................................................... 12
Table of Contents
Included Accessories:
Optional Accessories:
FM Transmitter Cigarette Lighter Adapter
Item Code: FMDC
Power your FM Transmitter in your car or truck
with this Cigarette Lighter Adapter. $10.00
1. AC Adapter
2. Patchcord For Use With RCA Line Out
age 4 FM Transmitter 2
Thank you for purchasing the FM Transmitter. It transmits high-fidelity audio
from any audio source such as a mobile phone, computer, or music player to
any nearby FM radio. Superior engineering and construction techniques were
used to bring you the highest quality FM transmitter possible. Digital tuning
and Phase Locked Loop technology have been incorporated for FM band fre-
quency coverage from 88.3 MHz to 107.7 MHz, with stability and superb
audio quality.
Introduction
Audio Sources
From your internet radio or computer to your home stereo: Connect the
plug that is attached to the FM Transmitter to the headphone jack on your
speakers or to the audio output of the computerʼs sound card. Tune your
receiver to the transmitting frequency.
From a music player to a radio: Connect the plug that is attached to the FM
Transmitter to the Line Out or headphone jack of the MP3 player. Tune your
radio or car stereo to the transmitting frequency.
From a portable radio to a pocket radio: Connect the plug that is attached
to the FM Transmitter to the Line Out or headphone jack of your radio. Tune
your pocket radio to the transmitting frequency.
This is sometimes good for office or warehouse environments where
reception is only available in a window or other specific location.
From a mobile phone to your car stereo: Connect the plug that is attached
to the FM Transmitter to the Line Out or headphone jack of the phone. Tune
your car stereo to the transmitting frequency.
FM Transmitter 2 age 5
7
3
5
4
6) Up/Down Tuning
7) Frequency Display
8) DC Input Jack
9) Telescopic Antenna
1) Power Button/Timer
2) Audio Input Indicator
3) Input Level Control
4) Battery Strength Meter
5) 1/8'' Audio Input Cable
Control Identification
9
8
Location of Controls
12
6
age 6 FM Transmitter 2
Connection to ower
The FM Transmitter 2 will operate on the
included AC Adapter. It will also operate
on two “AA” size Alkaline batteries
(optional).
.
I
I
I
1. Open the cover by pushing down on the
textured tab firmly and pushing the cover off
toward the side of the unit, the same direc-
tion the textured arrow is pointing.
Battery Installation
2. Insert two “AA” batteries into the compartment as
indicated in the drawing (at left). Be sure the nega-
tive (-) end is against the spring. Refer to the draw-
ing to ensure correct battery installation. See page
5, #4 for location of Battery Strength Meter.
FM Transmitter 2 age 7
Tuning
To transmit audio from the FM Transmitter 2, it is best to find a clear FM fre-
quency that is not being broadcast on and is free from interference.
1. To find an unused frequency in your area, you can go to www.radio-
locator.com, click on “find unused frequencies” and enter your zip code
and state. It will list vacant frequencies as “best”, “next best”, “third best”.
You can also use a radio and scan through the entire FM band (using a
digital radio will be easiest). Look for the largest gap in between stations.
Once you find a gap, select a frequency located somewhere in the middle.
Example: If there are no stations broadcasting between 90.1 - 93.5, select
91.5. Preferably there wonʼt be a station broadcasting on either side of the
frequency you have selected.
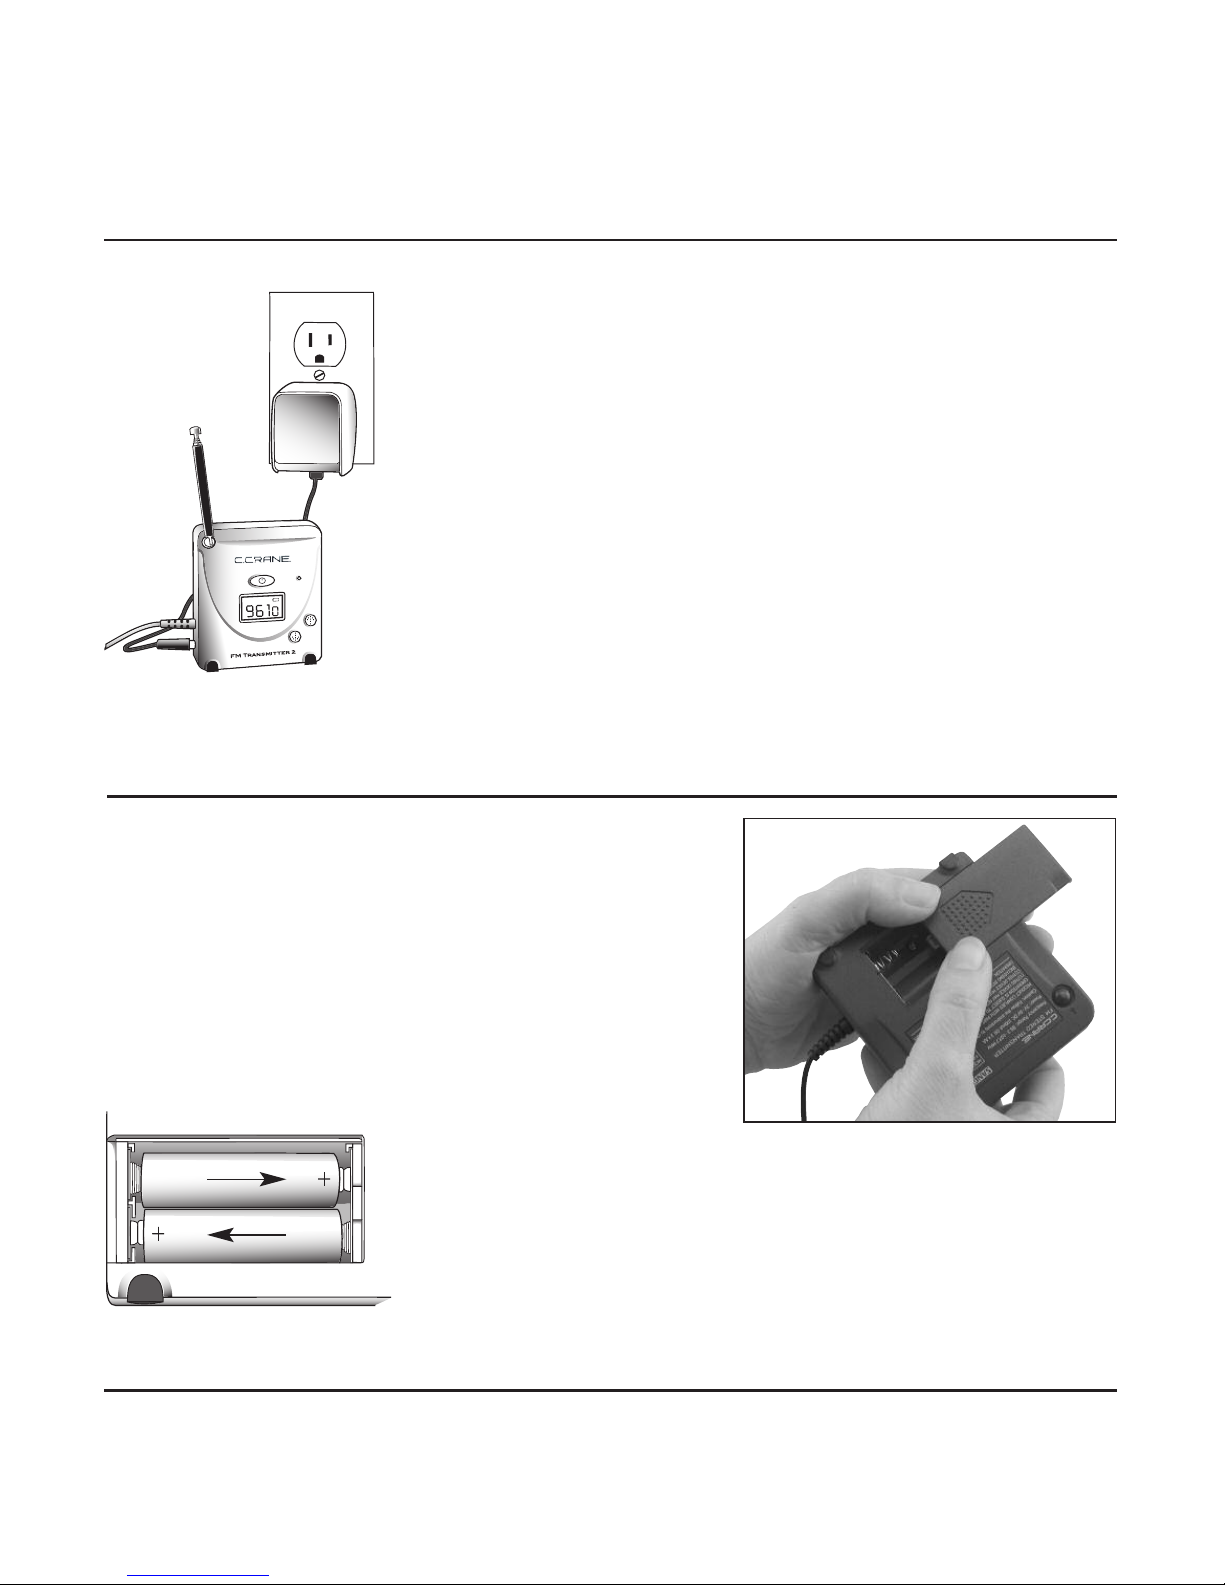
2. Now on your FM Transmitter 2, turn the power on.
Use the Up or Down Tuning Arrows to select the
same frequency as you have set on your radio. Hold
the arrows down for faster tuning.
3. With the FM Transmitter 2 plugged into the radio, or other audio source,
make sure you have adequate volume. The Audio Input Indicator LED will
flash green in normal use. If the LED light rapidly flashes red or glows
steadily red, it is indicating there is too much volume, causing distortion.
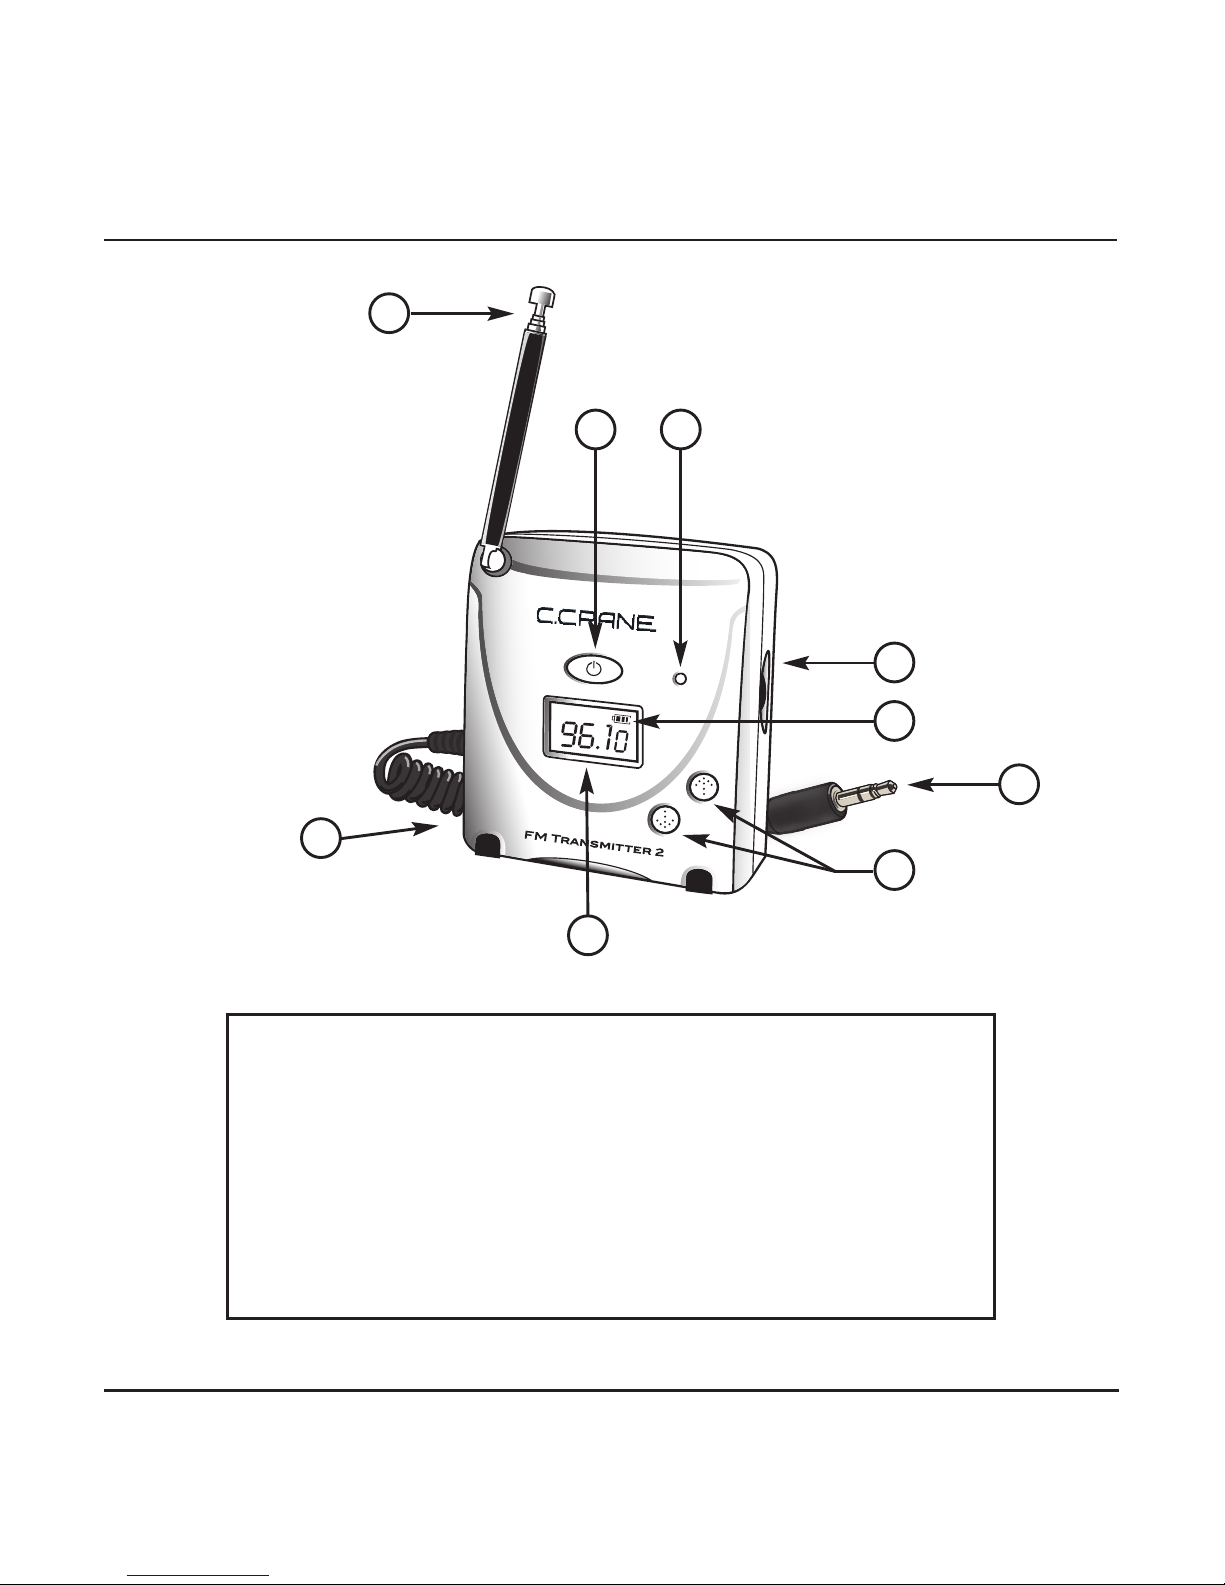
Adjust the Input Level Control on the side of the unit or adjust the volume
of your audio source until the Audio Input Indicator LED light goes back to
flashing green. (See page 5 for location of controls.)
Notes On Tuning
If you are using an analog (needle and dial) radio, tune the transmitter to the
general vicinity of where you think you are on your radio. Because you canʼt
match the frequency exactly, you may need to fine tune your radio to the
frequency. If you have a second radio to plug the FM Transmitter 2 into, you
can tune the FM Transmitter 2 until you can get the clearest signal on your
first radio.
age 8 FM Transmitter 2
Tuning (continued)
Location
Optimum placement for the FM Transmitter 2 is usually away from other
electronic devices and objects. The higher the transmitter is located the
better. The transmitter can be helped by placing it on something that will act
as a ground plane like a metal filing cabinet or a refrigerator. Try moving it
around for best performance.
Range is subject to many variables, including obstructions such as walls and
FM signal overload in your area. The range of the FM Transmitter 2 is
between 30 and 75 feet, line of sight with no obstructions.
Auto Shut-Off Timer
The “Auto Shut-Off” will not work until you activate it. Press and hold the
Power Button until the words Auto-OFF appear in the display and the
transmitter begins to cycle through the available shut-off times. You can
choose from 1, 2, 3, 4 or 8 hour shut-off times. If you miss the time you want,
just keep holding the Power Button down and it will start over. To select your
time, let go of the button. Turning the power off and back on clears the Auto
Shut-Off.
Tips To Make It Work Better
Antenna Orientation
Start with the antenna straight up and fully
extended. You can then orientate the antenna to
help transmit the signal a certain direction.
FM Transmitter 2 age 9
Trouble Shooting Guide
Audio is distorted:
Try adjusting the Input Level Control on the side of the FM Transmitter 2 (see
page 7, #3). If that doesnʼt help, try adjusting the volume of your audio
source.
No Audio:
1) Verify that the power on the FM Transmitter 2, your audio source, and
your receiver are on.
2) Try adjusting the Input Level Control on the side of the FM Transmitter 2.
If that doesnʼt help, try adjusting the volume of your audio source.
3) Check your cable and make sure it is connected to the right audio source
(see page 4).
4) Check your frequency and make sure you are tuned to the correct fre
quency.
If none of the above options work, try the FM Transmitter 2 on another
device.
If your unit requires service, call C. Crane Company at 1-800-522-8863.
Service Information
age 10 FM Transmitter 2
Safety Instructions
READ BEFORE O ERATING EQUI MENT
SAVE THESE INSTRUCTIONS
1. Read and understand all safety and operating instructions before the FM
Transmitter 2 is operated.
2. Retain Instructions: The safety and operating instructions should be retained
for future reference.
3. Heed Warnings: All warnings on this appliance and all operating instructions
should be followed.
4. Water and Moisture: The FM Transmitter 2 should not be used near
water. Do not use near a bathtub, washbowl, laundry tub, kitchen sink,
wet basement, swimming pool, etc. Risk of electric shock may result.
5. Unplug the FM Transmitter 2 from the DC Power Adapter before cleaning.
Only use a damp cloth for cleaning the exterior surfaces of the transmitter.
6. Heat: Never put the FM Transmitter 2 in direct sunlight or behind glass such
as a carʼs interior. The transmitter should be kept away from heat sources
such as radiators, heat registers, stoves, or other appliances that produce
heat.
7. DC Power Adapter: The DC Power Adapter should be positioned so it is not
walked on, pinched, or items placed on top of it. All power and other cables
should be routed away from walkways or areas of foot traffic to avoid being
tripped on. Always unplug the DC Power Adapter by gripping the adapter unit
and pulling it out of the wall socket. Never pull on the cord. Always operate
the FM Transmitter 2 using the supplied DC Power Adapter. Adapters that
are not correctly rated can damage the transmitter. If you are not sure of the
correct DC Power Adapter, consult your dealer.
8. Never insert objects of any kind into the FM Transmitter 2 through openings.
The objects may touch dangerous voltage points or short out parts, causing
damage to the transmitter.