C-lock SmartFeed Pro User manual


Table of Contents
Getting Started 3
Specifications 3
SmartFeed Pro Layout 4
Installation 5
Choosing a Location 5
Anchoring the Frame to the Ground 5
Powering SmartFeed On and Off 7
Installing the Control Feed Mobile Application 9
Setup 9
Adjusting the Closed Door Height 9
Manually Opening the Door 10
Engaging the Training Latch 11
Adjusting the SmartFeed Height 12
Connecting to a Network 13
WiFi 14
Ethernet 14
Cellular 14
Calibrating and Checking the Scale 14
Checking your EID (RFID) Tags 16
Control Feed Mobile App 17
Training Animals 21
1


1. Getting Started
1.1. Specifications
Operating Voltage:
11 - 15VDC or
120 - 240VAC 50/60Hz (Power supply included)
Power Consumption
~10 watts idle, up to 240 watts when closing gate
Dimensions:
Customizable to fit any animal or feed requirement
Bin capacity: 0.5 ~ 1.2 cubic meters
Larger bin sizes can be made to user specifications
Data Communications:
Standard: WiFi (802.11b/n/g)
Optional: 4G/LTE Cellular
Web-based online interface
Data processing: cloud-based server
Sensors:
RFID Tag Reader - (ISO 11784/5 134KHz)
Quad Load Cells - Bin weight
1-second resolution
Control:
Search “Control Feed” in your App Store
SmartFeed
Bin Type
Overall Dimensions
inches (cm)
Bin Dimensions
inches (cm)
Bin Volume
feet3(m3)
Small
42 x 40 x 72
(112 x 183 x 102)
38 x 26 x 30
(96 x 66 x 76)
17.1 (0.48)
Beef
50 x 40 x 72
(132 x 183 x 102)
41 x 28 x 34
(104 x 71 x 86)
22.6 (0.64)
Dairy
60 x 40 x 72
(158 x 183 x 102)
50 x 28 x 34
(127 x 71 x 86)
27.5 (0.78)
3
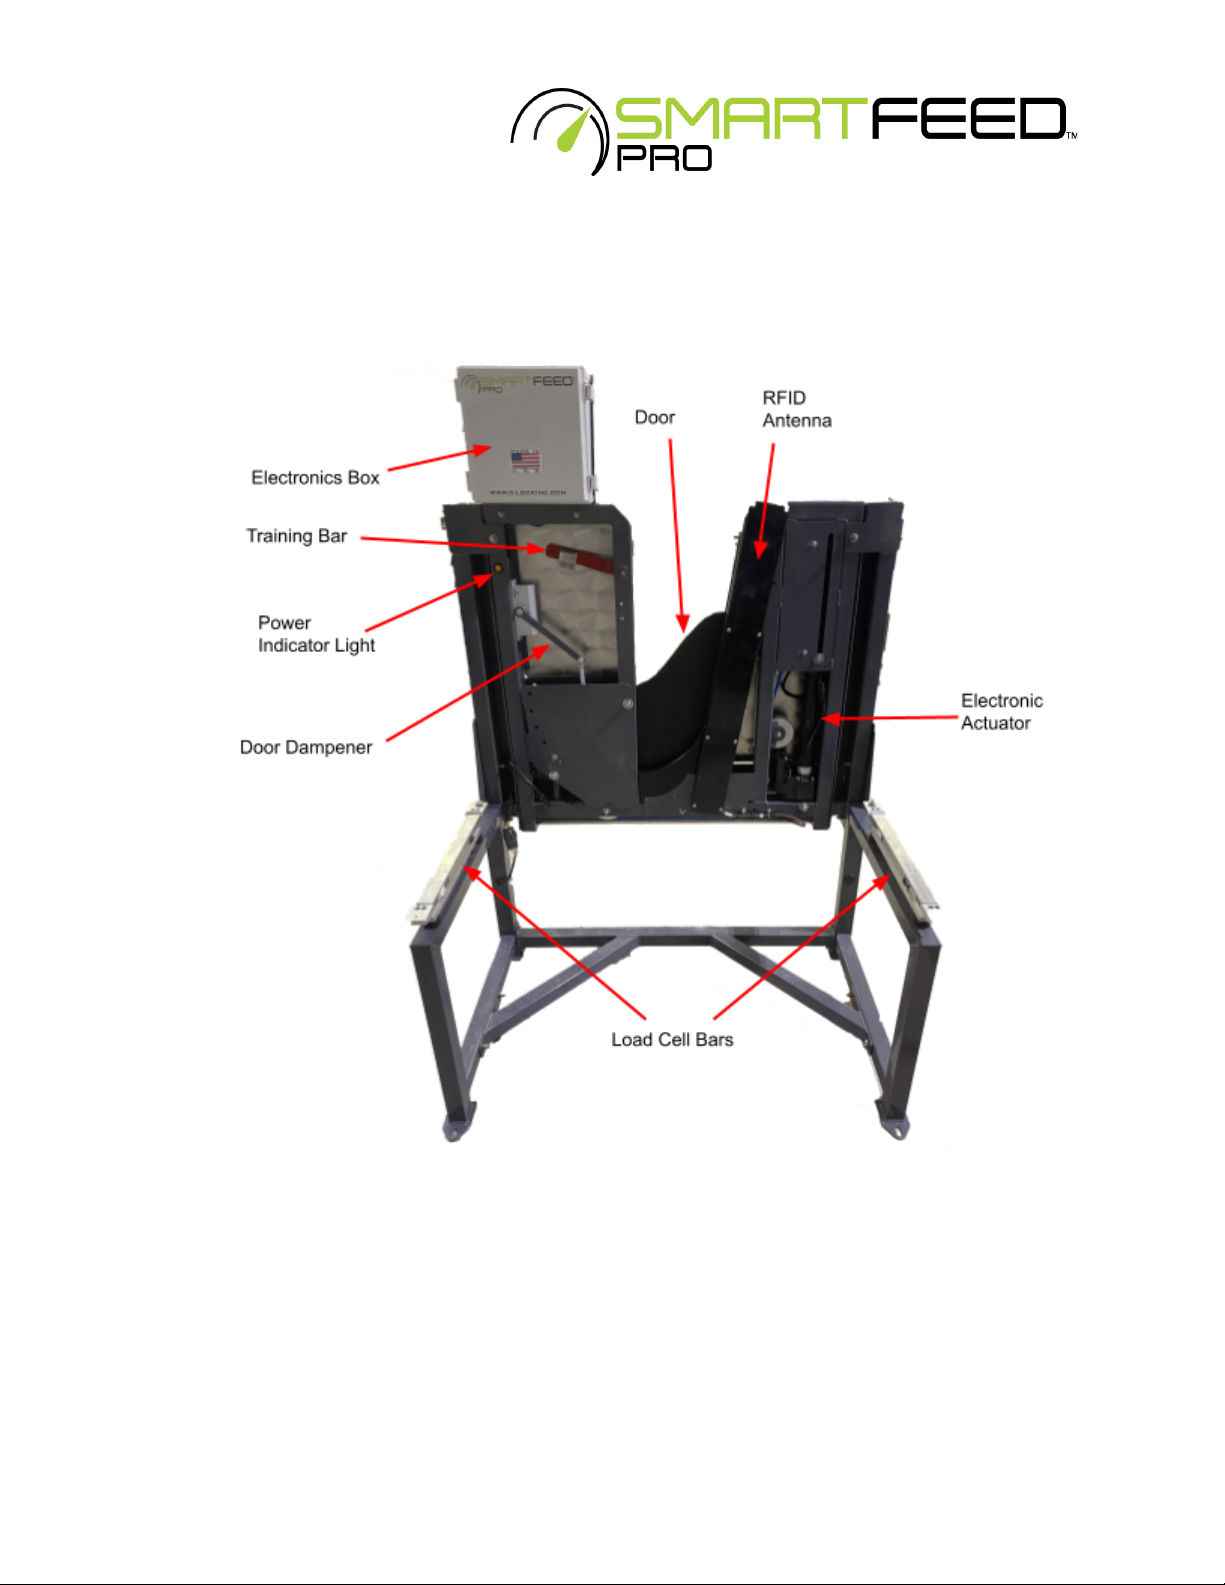
1.2. SmartFeed Pro Layout
Figure 1) Reflects the back of the SmartFeed Pro with the Bin Removed
4

1.3. Installation
Choosing a Location
Note: SmartFeed is very sensitive to weight fluctuations. To get as accurate of a
weight reading as possible, please follow these rules:
1. Choose a location where no grass or plants will grown under the bin
2. Ensure the bin is completely suspended by its load cell bars.
3. In windy environments, use solid obstructions, such as plywood, sheet metal, or
other types of shelter to block as much wind as possible.
4. Ensure nothing is leaning against the bin. This includes wires, plants, farm tools,
or other equipment.
5. Check regularly to ensure that feed has not fallen below the SmartFeed bin and is
piling up.
Anchoring the Frame to the Ground
Caution! SmartFeed is front-heavy and can tip over easily if not anchored
appropriately. Please use caution when moving or installing the system to prevent
from injury or damage. ALWAYS ANCHOR ALL FOUR CORNERS OF SMARTFEED
FIRMLY TO THE GROUND.
1. Select a location that will not allow the animals to access the feed bin from
behind. Alternatively, place a fence around the SmartFeed to prevent access from
behind.
2. Make sure the unit is on a level surface by placing it on flat pieces of metal,
wood, or concrete.
3. Use rebar or ground anchors to secure the frame to the ground. See Figure 2 for
reference.
5

Figure 2) SmartFeed Orientation and Mounting Reference
4. Your feeder may have been shipped with protection spacers. Once the frame is
anchored, remove the load cell protection spacers from each load cell bar.
These spacers can be removed by lifting the bin up on each side (one at a time),
then removing the spacer. Please save the spacers for future transportation.
Figure 3) Load Cell Protection Spacers
6

1.4. Powering SmartFeed On and Off
SmartFeed only requires a 12 volt DC power source to operate. This low voltage is
relatively harmless. However, if an external AC to DC power converter is used to power
the SmartFeed, the AC power going into the converter can be hazardous. Please protect
the AC power cord and exercise caution when using AC power.
Before you power on SmartFeed:
1. Connect the provided power cable to the SmartFeed power plug. The plug is
located directly below the gate latch mechanism. See Figure 4 for reference.
Figure 4) SmartFeed Power Receptacle
2. Ensure all power cables are protected from animals and other possible sources of
damage, such as vehicle or foot traffic.
3. Ensure the power cord is not a tripping hazard.
4. Contact C-Lock if the power cord is worn or wires are exposed.
7

To power on SmartFeed:
1. Depending on your SmartFeed setup, you may have a different method of
applying power to the unit, either a power switch or a power connector. Ensure
the power source is connected to your SmartFeed unit, and if applicable, turn the
power switch to ON.
2. The power indicator light on SmartFeed will illuminate, to signify that it has
power.
3. Once power is applied, please allow ~1 minute for the system to initialize.
4. Use the mobile Control Feed application to scan for your system to ensure it is
fully powered on and ready.
To power off SmartFeed:
1. Locate the power receptacle. (See Figure 8.)
2. Pull the white tab out.
3. Push down on the black latch and wiggle the connector back and forth while
pulling it outward. (See Figure 5)
Figure 5) Steps for Disconnecting the Power Cable
8

1.5. Installing the Control Feed Mobile Application
Controlling and monitoring the SmartFeed system is made possible using the Control
Feed mobile application. To install Control Feed on your mobile device, search for
“Control Feed” by C-Lock Inc. in the Google Play Store or Apple App Store, or scan the
QR code below.
Apple App Store Google Play Store
https://apps.apple.com/us/app/control-feed/id1524038899
https://play.google.com/store/apps/details?id=com.controlfeed
For instructions on using Control Feed, see Section 3.
9
2. Setup
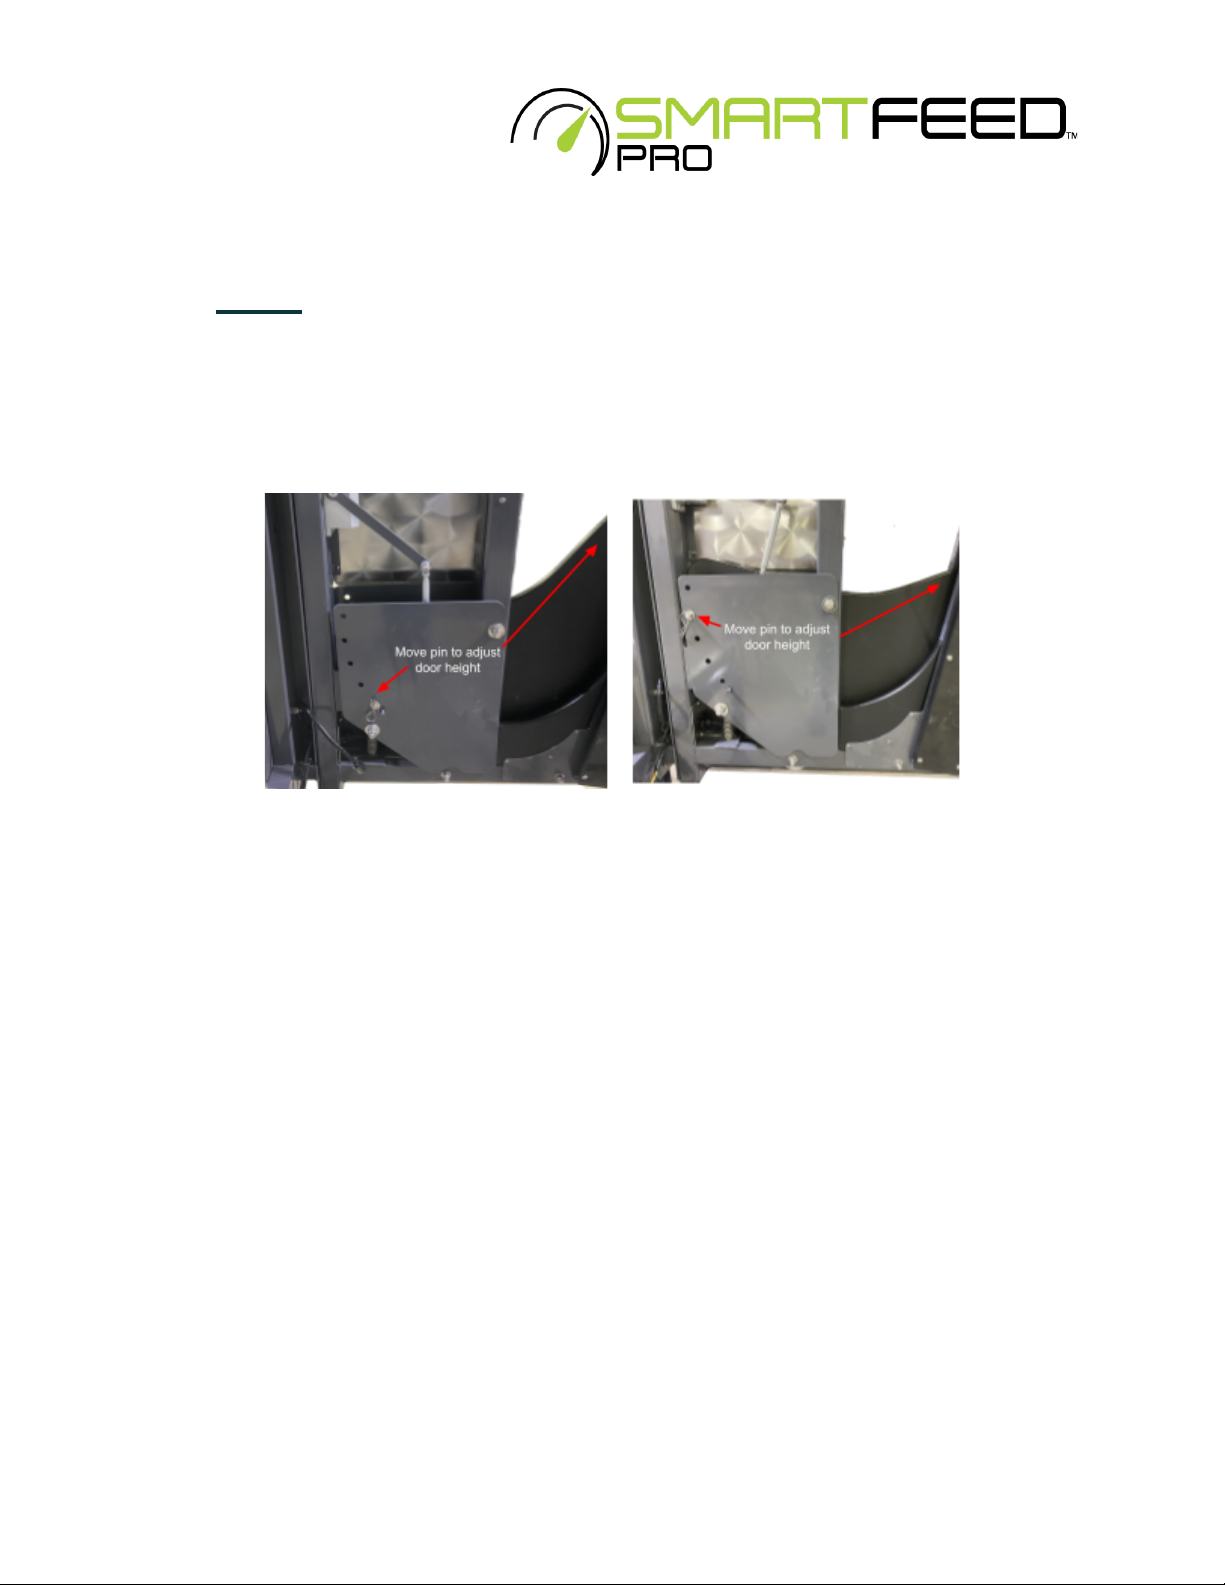
2.1. Adjusting the Closed Door Height
The closed-gate height can be adjusted to provide access to smaller or larger animals.
Perform the following to adjust the door height:
Figure 6) Gate Adjustment for Smaller or Larger Animals
1. Tap the “Unlock Door” button on the Control Feed app.
2. Open the gate far enough to be held open by the training latch.
3. Remove the gate-height adjustment pin and re-insert into the desired hole.
4. For smaller animals, place the pin in the highest hole. For larger animals, place
the pin in the lowest hole.
5. Remove the training latch and allow the gate to close.
6. Ensure that the gate successfully latches onto the pin, the Control Feed app
status should show “Door State: Closed”.
10
2.2. Manually Opening the Door
Caution! Unlatching the door manually using the latch release switch will cause
SmartFeed to automatically close the door with extreme force, which could result in
injury. The Control Feed App “Unlock Door” button *must* be used to unlock the
door if SmartFeed is powered on. (See Section 4 for instructions on using the
Mobile app.) The latch release switch should only be used if SmartFeed is powered
off.
To open the door manually:
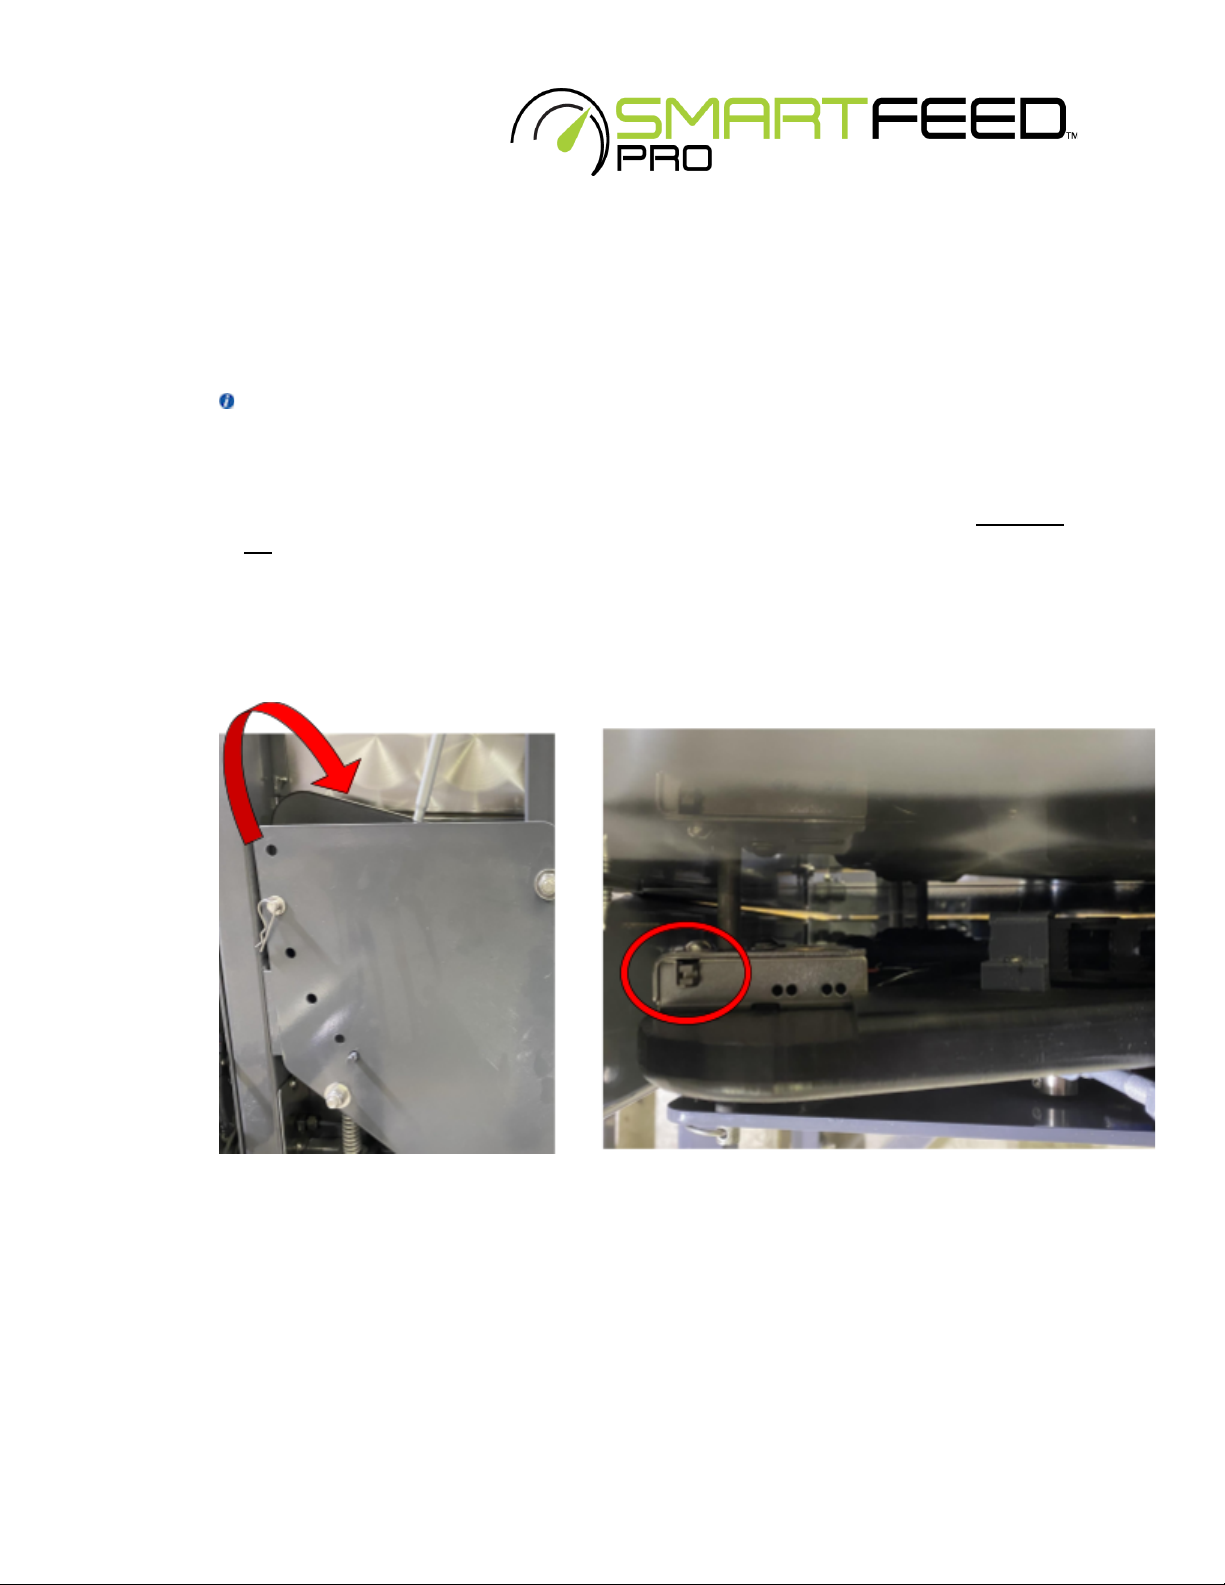
1. Locate the latch release switch. This switch can be found hidden between the
door and the back wall plate under the training bar.
Figure 7) Location of the Manual Door Unlock Switch
2. Place your hand between the gate and the front of the feeder. You will feel a
small lever sticking out the top of the latch housing. Push the lever towards the
outside of the machine.
11

2.3. Engaging the Training Latch
The training latch is meant to hold the door open so that animals can learn there is feed
in the bin. When the training latch is engaged, animals can eat as much and as often as
they want. The orange bar located beneath the electronics box allows you to place
SmartFeed in training mode.
Note: If you engage the training latch on the SmartFeed machine, you must also
switch SmartFeed into training mode online. See Section 5.2 for instructions.
To engage the training latch:
1. Tap the “Unlock Door” in Control Feed. If SmartFeed is powered off, you will have
to manually unlock the latch (see Section 2.2)
2. Push the gate as far open as it will go.
3. Remove the orange training latch from its holder and lower it down into position
so that the “fork” of the latch closes onto the orange pin.
4. Push the door latch into the training bar pin until it locks shut.
Figure 8) Engaging the Training Latch.
12

To return the SmartFeed Pro to regular operating mode:
Note: If you disengage the training latch on the SmartFeed machine, you must also
switch SmartFeed into normal operating mode online.
1. Tap “Unlock Door” in Control Feed. If SmartFeed is powered off, you will have to
manually unlock the latch (see Section 2.2)
2. Push the gate as far open as it will go.
3. Return the orange training latch to its holder.
4. Allow the gate to close until the latch engages the gate-height adjustment pin.
2.4. Adjusting the SmartFeed Height
2.4.1 - SmartFeed can be adjusted to accommodate a wide range of animal sizes.
Adjusting the height requires at least two people. To adjust the full height of the front
follow these steps:
Figure 9) Loosen four bolts to raise/lower the front of SmartFeed
Caution: At least two people are required to adjust the height of the gate system.
The only equipment that is holding the gate at its height are the four bolts shown in
Figure 9. Once these bolts are removed, the whole gate *will* fall (and is heavy), so
be sure to have support and/or multiple people to hold it in place.
13
1. Remove the bolts and washers from these four spots.
2. Raise or lower the bin supports to the desired height and place the four bolts
back in place.
3. Adjust the door height to accommodate the new front height. See Section 2.1
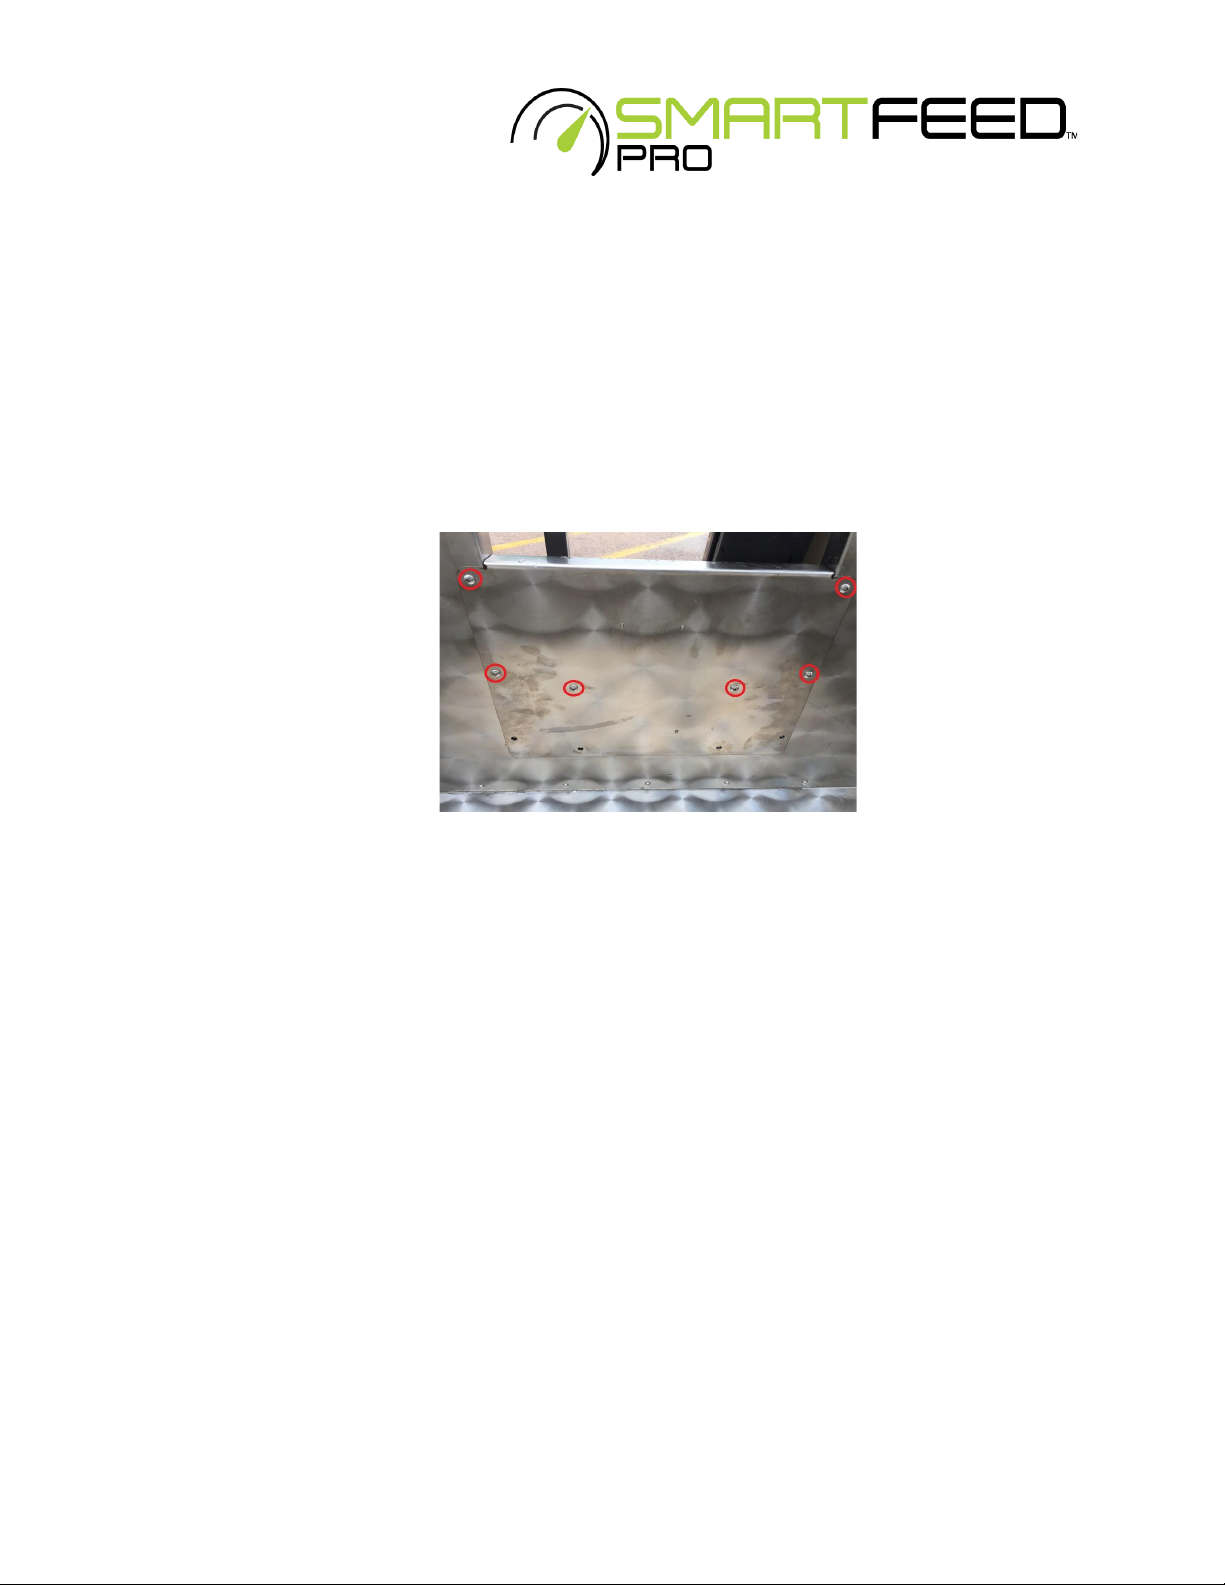
2.4.2 - The lip of the bin can also be adjusted up or down or removed completely by
removing the screws shown below:
Figure 10) Adjusting the Bin Lip Height
2.5. Connecting to a Network
SmartFeed must have at least one of the following types of connection:
●WiFi - requires configuration when connecting to a new WiFi network.
●Ethernet - requires additional equipment and an ethernet cable run to SmartFeed.
●Cellular - requires a cellular modem (available at additional cost). A monthly cellular
data plan charge may apply, depending on the cellular provider.
In order for multiple SmartFeed Pro systems to synchronize their feed intake records
with each other, they must communicate over an internet connection.
Failure to synchronize may result in animals being allowed more feed than the user
specifies. For SmartFeed systems that are within 100 feet of each other, it is
recommended to connect them to the same network (usually WiFi). This will ensure
14

synchronized feed intake records. Please contact C-Lock Inc. for assistance in configuring
your network.
2.5.1. WiFi
SmartFeed can be configured to connect to any WiFi network. Please see Section 3 for
instruction on using Control Feed to configure SmartFeed to use a new WiFi network.
2.5.2. Ethernet
Additional equipment must be installed into SmartFeed to allow for an Ethernet
connection. To use an ethernet connection, please contact C-Lock.
2.5.3. Cellular
If your SmartFeed(s) came with a cellular modem, they will already be configured to
connect to the modem. For US customers, the modem will also include a pre-installed
SIM card. No additional work is required.
For international customers, an activated 2FF “Mini SIM” card will be required. Please
ensure that the SIM card has a data plan allowance of at least 1GB per month of data.
For instructions on installing the SIM card, see Appendix B.
2.6. Calibrating and Checking the Scale
It is recommended to recalibrate the scale any time the feed bin is removed or the
system is moved or repositioned.
It is recommended to check the scale for accuracy every time the bin is empty - or on
a weekly or monthly basis. This will ensure accurate readings.
SmartFeed operates on the principle of bin weight changes. If at any time, the
operator must change the amount of feed in the bin, it is important to mark that
event so that it’s not interpreted as unknown intake. To mark an event as an empty or
fill event, please see Section 3, part 6g.
15

To check for accurate weight measurement:
1. Make note of the current weight in the feed bin using the Control Feed app.
2. Place the calibration weight in the feed bin. Every C-Lock provided calibration
weight will have the exact weight marked on it.
3. Ensure the SmartFeed bin weight increases by the correct amount.
4. If the weight increase is incorrect - check that the feed bin is fully suspended only
by the load cell bars. If it is suspended correctly, please calibrate the scale.
To calibrate the scale:
1. Remove all feed and debris from the feed bin. If needed, open the cleaning door
to remove the last bits of feed.
2. From the Control Feed app, tap Zero
3. When prompted to zero, ensure nothing is touching the bin. Then tap Yes.
4. tap Set Span and Calibrate
5. Type in the mass of your calibration weight, ensuring to select the appropriate
units of weight (lb or kg).
6. Type in the mass of your calibration weight, ensuring to select the appropriate
units of weight.
7. tap “Calibrate”
8. The correct weight should now be displayed on Control Feed.
16

Figure 11) Zeroing (Taring) and Calibrating SmartFeed
2.7. Checking your EID (RFID) Tags
To check if the RFID reader is working for your EID tags:
1. You will need a spare ear tag.
2. Open the electronics box by unlatching the 2 fasteners (Figure 12).
3. Hold the ear tag next to the RFID antenna (Figure 1).
4. Watch for the green “READ” light to blink on the RFID circuit board in the
electronics box. When you see the green ”READ” light blink, this means it
has detected an RFID tag.
Figure 12) Checking the RFID Reader
17

3. Control Feed Mobile App
Although SmartFeed is an online measurement system, most common tasks can be
performed from the feeder itself using the Control Feed mobile app.
To install Control Feed on your mobile device, search for “Control Feed” by C-Lock Inc. in
the Google Play Store or Apple App Store.
Initial Operation of Control Feed
1. Begin by tapping “Start Scanning for Systems”.
2. A list of nearby devices (within 50ft / 15m) will appear. See Figure 13.
3. Tap the System you wish to control.
4. A side-box will appear while it attempts to connect to the system.
Figure 13) Scanning and Connecting to a SmartFeed System
5. Once connected, tap the button on the side to launch the control interface.
18
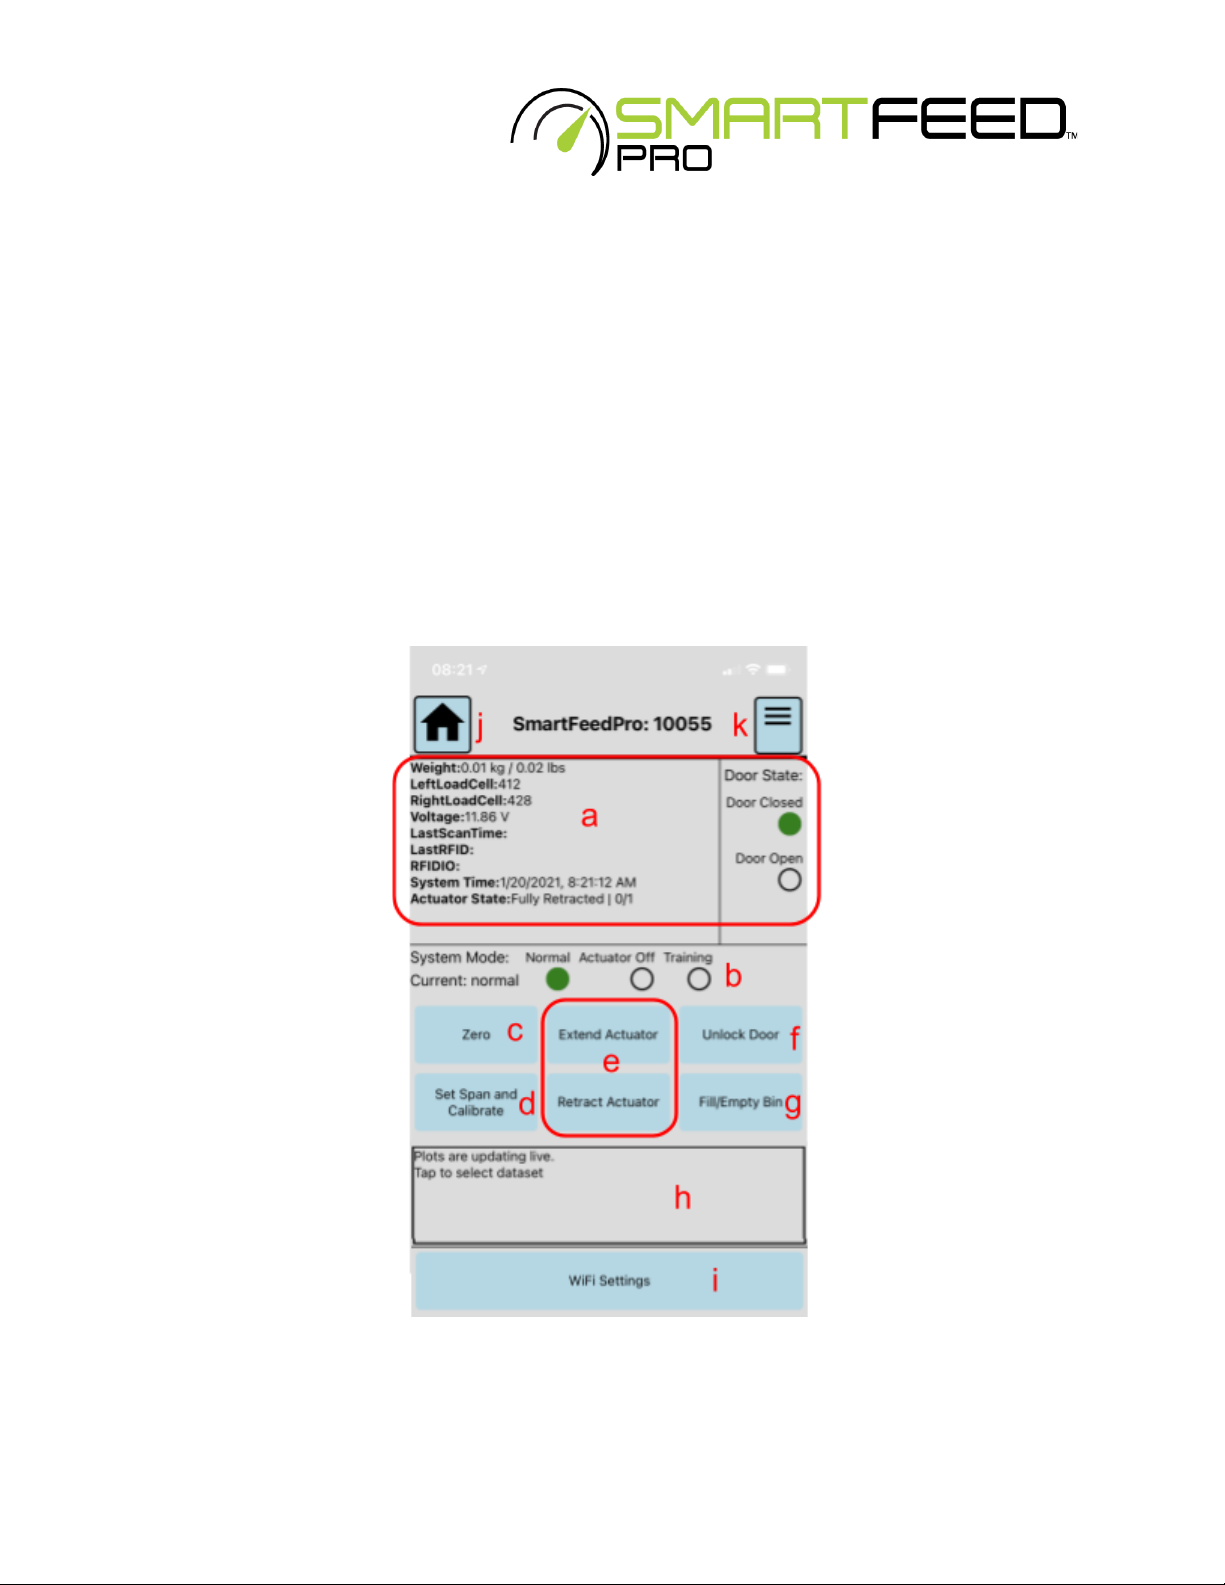
6. From this interface, you can:
a. see the current state of each sensor on the system.
b. Configure the system for training mode or regular mode *
c. Zero/Tare the bin
d. Recalibrate the bin
e. Manually move the high-power kick-out actuator
f. Manually unlock the door
g. Indicate that the bin is about to be emptied or filled
h. View a real-time plot of data
i. Change WiFi network credentials for the feeder
j. Return to the list of all scanned feeders
k. See which feeders are currently connected
Figure 14) Control Feed Main Interface Controls
19
This manual suits for next models
1
Table of contents
Popular Farm Equipment manuals by other brands


BSL
BSL STRAUTMANN Magnon CFS 430 Original instructions

AGI
AGI Batco BCX2 1544 Operator's manual

GREAT PLAINS
GREAT PLAINS MC5109 Max-Chisel Assembly manual

Monosem
Monosem TFC manual

sitrex
sitrex QRX 12 Assembly, use and maintenance

Agria
Agria Cyclone 5900 Translation of the original operating instructions