C4i SX-HE05 User manual

1
H.265/H.264 HDMI Encoder For IP TV
Max resolution 4K@30HZ 4:4:4

2
Catalogue
Dear Customer................................................................................................................. 3
1. Features........................................................................................................................ 3
2. Specifications...............................................................................................................3
3. Package Contents......................................................................................................... 5
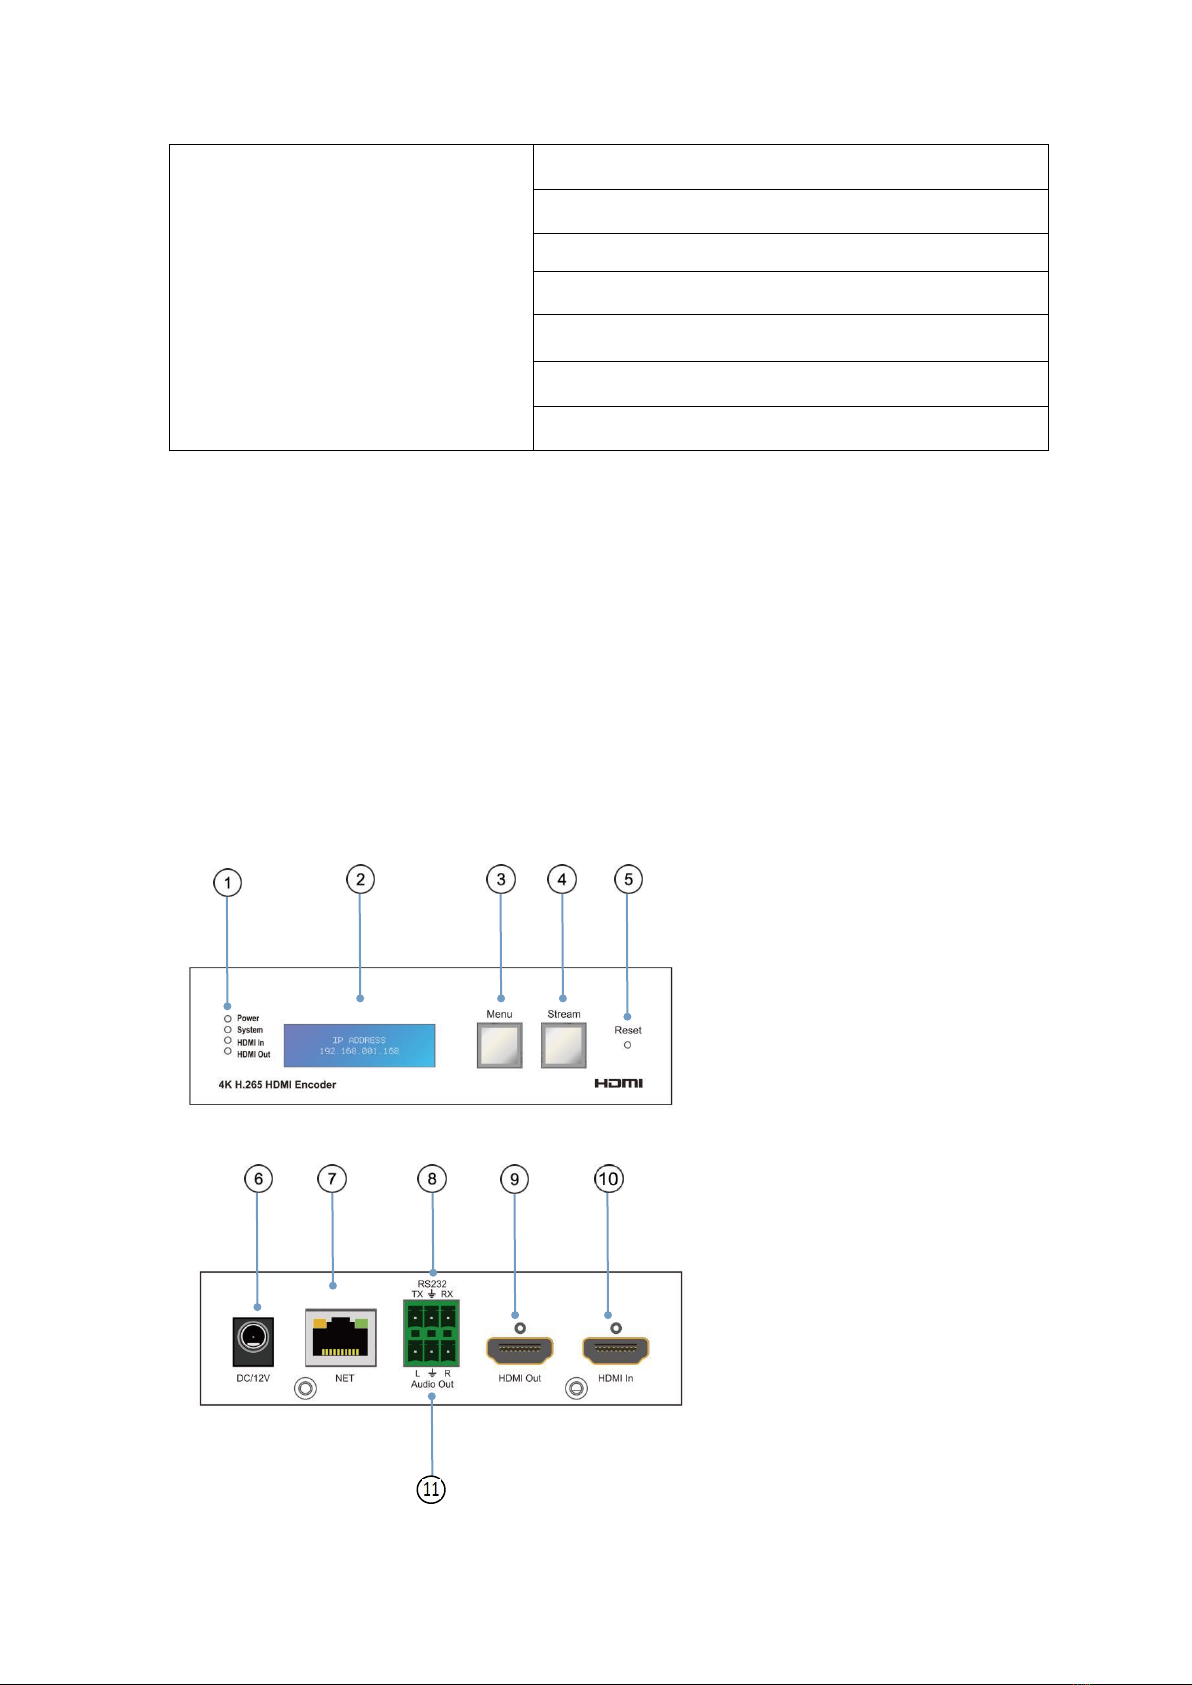
4. Panel Descriptions....................................................................................................... 5
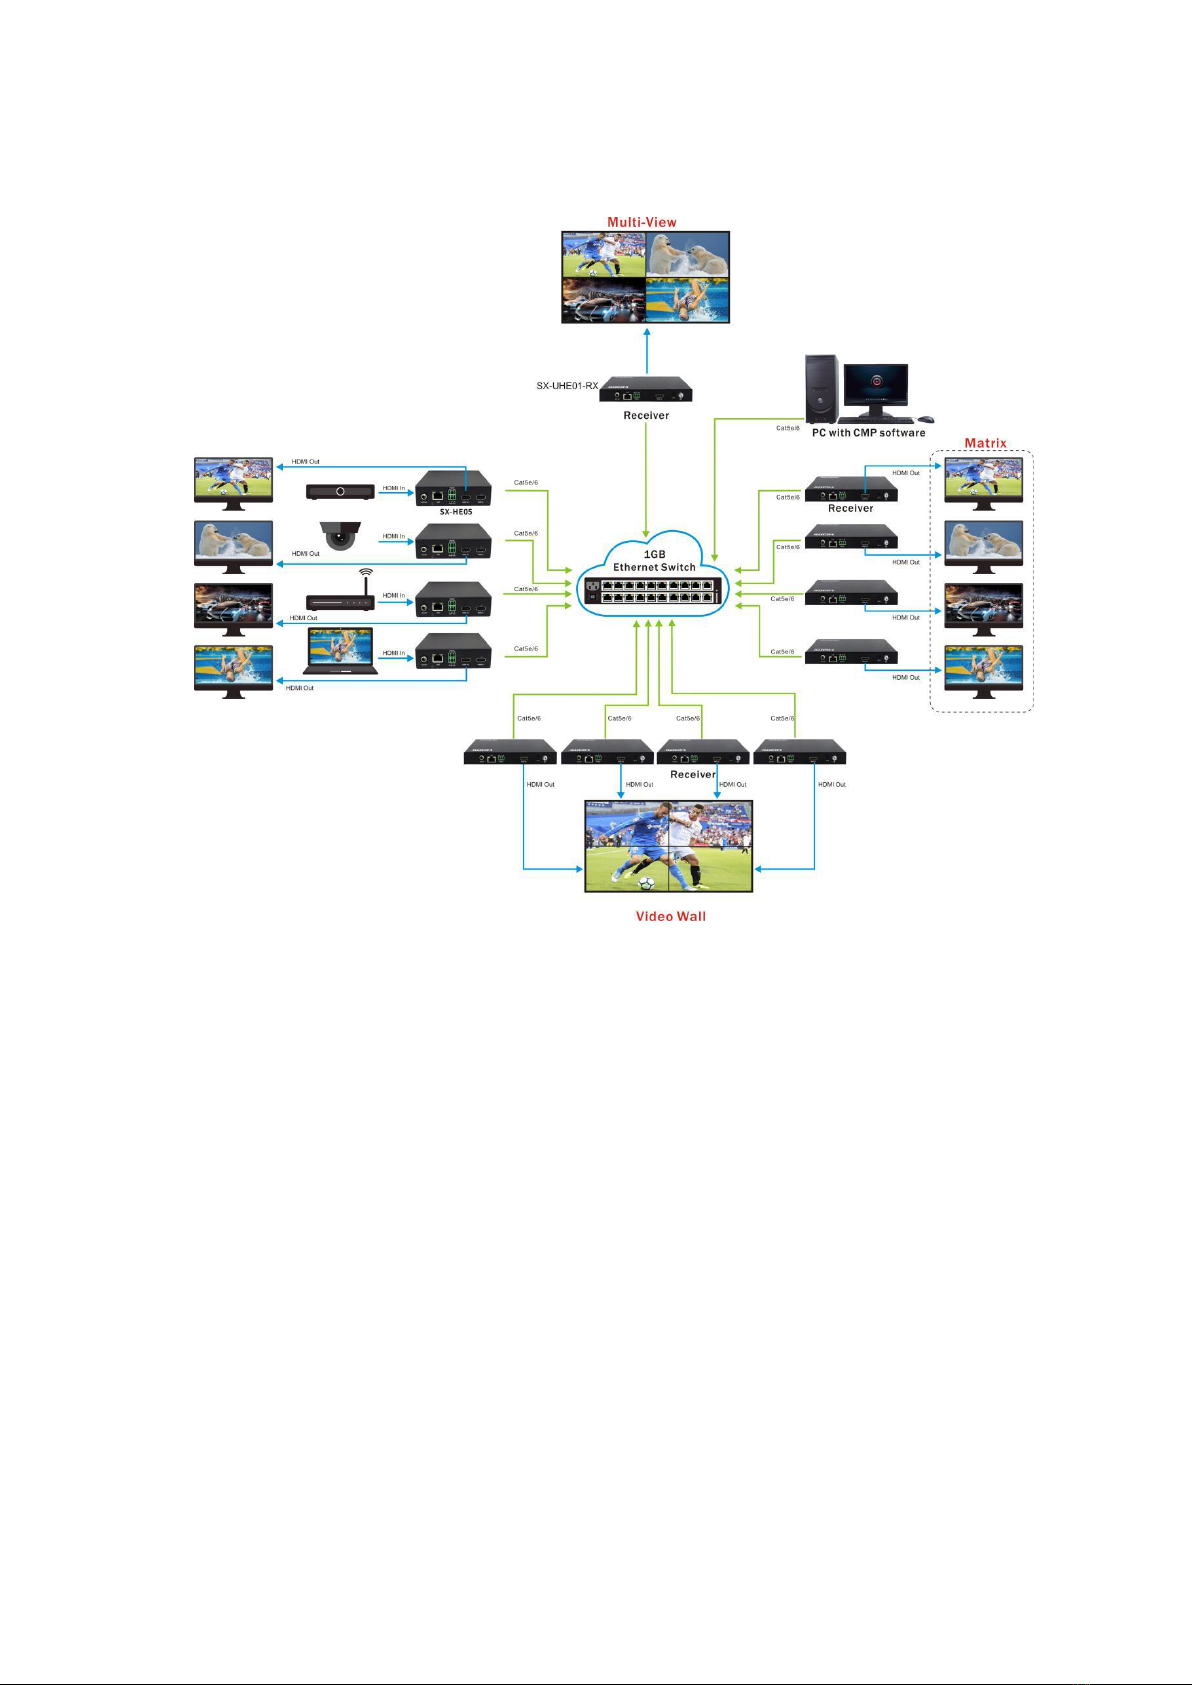
5. Typical Application...................................................................................................... 6
5.1. Application 1.....................................................................................................6
5.2. Application 2 Compatible with video player such as VLC etc......................... 6
5.3. Application 3 Work with SX-UHE01-RX........................................................ 7
6. WEB Instruction:......................................................................................................... 7
6.1. Change the IP address of your PC.................................................................... 7
6.2. System Setting:................................................................................................. 9
6.3. Network configuration.................................................................................... 12
6.4. Audio configuration........................................................................................ 13
6.5. Video configuration.........................................................................................14
6.6. Image settings................................................................................................. 15
6.7. OSD configuration.......................................................................................... 16
6.8. Time configuration..........................................................................................16
6.9. Serial port configuration................................................................................. 16
7. Video Scheme............................................................................................................ 17
7.1. Matrix Configuration...................................................................................... 17
7.2. Multi-View......................................................................................................18
7.3. Video Wall.......................................................................................................19
MAINTENANCE.......................................................................................................... 21
PRODUCT SERVICE....................................................................................................21
WARRANTY.................................................................................................................22
MAIL-IN SERVICE...................................................................................................... 22
LIMITED WARRANTY LIMITS AND EXCLUSIONS..............................................22

3
Dear Customer
Thank you for purchasing this product. For optimum performance and safety, please
read these instructions carefully before connecting, operating or adjusting this product.
Please keep this manual for future reference.
1. Features
Support H.265/H.264 encoding
Support HTTP, RTSP, RTMP/RTMPS, HLS, FLV, ONVIF(UDP/RTP) protocol
CBR/VBR rate: up to 100Mbps.
Support Audio encoding format: AAC
Max resolution 4K@30HZ YUV 4:4:4, Support HDCP2.2/1.4
Support WEB GUI Control, Support upgrade, reboot and reset by web page
Support NTP (Network Time Protocol)
Support video and audio parameter settings, Support audio and video
synchronization
Support network parameter configuration
Support 1x looping HDMI output , Support RS232 pass through
With LED to display firmware version, IP address, MAC address, Channel etc
Support one to one, many to many when working with SX-UHE01-RX, transmit
distance up to 120m over single Cat5e/6 cable. Support Video Wall, Multi-View,
Matrix work with CMP system.
DC12V Power supply
2. Specifications
Performance
Protocol
H.265/H.264
Video format
480P/720P/1080P/4K2K/800*600/1280*1024@6
0hz etc
Audio format
PCM2.0, Audio sampling rate 48KHZ. Analog
Extractor
HDCP
HDCP2.2/1.4
RS232 Baud Rate
2400\4800\9600\19200\38400\57600\115200bps
IP SETTING
Request for Switch/Router
Support IGMP, support DHCP
Environmental & Power Requirements
Operating temperature
-5 to + 40℃ (+23 to +95℉)
Operating Humidity Range
5 to 90%RH (No Condensation)

4
Power supply
12V1A
Power consumption
4.416W
Dimension
125*115*31mm
Net Weight
0.44 kg
2.1 Supported input resolution
Frequency
Resolution
50HZ
576P
720P
1080P
60Hz
/59.94Hz
480P
720P
1080P
30/29.97Hz
720P
1080P
4K2K
24Hz
720P
1080P
4K2K
25Hz
720P
1080P
4K2K
VESA Resolution
Frequency
Resolution
60Hz
800×600
1024×768
1280×768
1280×960
1280×1024

5
1680×1050
1920×1080
1280×720
1360×768
1400×1050
1920×1200
3840×2160(Yuv420)
3. Package Contents
1). Main Unit Encoder x1
2). Power Adapter DC12V1A x1
3). Fixed Hanger x2
4). Operating Instruction x1
5). 1*3 Phoenix Terminal x2
4. Panel Descriptions
60Hz

6
①Indicator of Power; Network; HDMI input; HDMI output
②LCD to display firmware version, IP address, MAC address, Channel etc
③The button to switch LCD display
④Video streaming buttons ⑤Reset button
⑥DC/12V input ⑦Cat5/6 output
⑧RS232 port ⑨HDMI Output
⑩HDMI Input ⑪Audio Output
5. Typical Application
5.1. Application 1
5.2. Application 2 Compatible with video player such as VLC etc

7
5.3. Application 3 Work with SX-UHE01-RX
6. WEB Instruction:
6.1. Change the IP address of your PC
Before configuring the device through the web side, it is necessary to configure the IP
address of the computer configured with the device (mainly to ensure that the
computer and the device are set in the same network segment).
1). Open the network control center and set the computer's IP address:

8
2). Choose to use Static IP, with the IP address set to 196.168.1.x (x ranges from 0 to
254, but cannot be consistent with the device's IP address),
3). Subnet mask set to 255.255.255.0
4). Gateway set to 192.168.1.1
5) . Enter the device's IP address in the web browser for the device configuration
interface.
Way to enter the device login interface:
(1) If the device IP is known, enter the device IP address in web browser to enter the
device login interface.

9
Enter the user configuration interface after you enter the correct user name and
password. You can view the relevant information of the device and Configure the
device.
Note: Encoder Static default IP: 192.168.1.168 (device and computer directly
connected by network cable).
Device DHCP default open, if there is a router will directly assign IP address. You can
view the IP address of the device by switching the third page on the LCD screen of the
product.
6.2. System Setting:
1) System Information
●In the "System", you can view the Device name, Device SN, Device type, Running
time, CPU usage, Memory usage, Device temperature, HDMI status, and Version in
real time.
●The device name can be modified within 32 bytes. After the modification is
completed, press “Save” to take effect immediately.

10
2) Language Switching
● In the "System" interface, the language of the interface can be switched
● Select the language we need, after the selection is completed, we can switch the
interface language (support Chinese and English)
3) Channel
● The channel of the device can be configured in advance in the "System" before
configuring to use the decoder;
● If the H.265 Encoder and decoder are configured on the same channel, the display
connected to the decoder can play the audio and video signals from the Encoder .
● Through channel configuration, Can set one-to-many, many-to-many video matrix
(Note: channels between Encoder and Encoder cannot be set to be consistent,
otherwise channel conflict will be caused).
4) Streaming switch
● "Stream" switch : When the "stream" switch is ticked, the video stream starts to
output; when it is not checked, the video stream stops output
NOTE: (1) The function of Switch is same as the Video streaming buttons of product.
When the video stream button is green, the video stream is output; when the button is
red, the video stream stops output.
(2) Long press 2S to switch the status of the " Video streaming buttons " on the
product , and the status of the "stream" switch on the web will also change in real time.
● "Stream button" switch: When the "Stream button" switch is checked, the "Video
streaming button" on the product becomes invalid.
● "Multicast" switch: When the "multicast" switch is checked, the channel starts to
transmit video streams; when the "multicast" switch is not checked, the channel stops
transmitting video streams.

11
5) Upgrade Equipment
In the "system configuration" interface, you can upgrade the firmware, EDID, Logo of
device.
● Firmware upgrade:
Select "Firmware" in the upgrade type
Find the file (bin format) to upgrade by selecting the path, and click the upgrade
button after confirmation.
The device can be upgraded for a moment, and you can view the current version in
the system information.
● EDID upgrade:
Select "EDID" in the upgrade type
Find the file of EDID to upgrade by selecting the path, and click the upgrade
button after confirmation.
The device can be upgraded for a moment. Enter the device's IP address + /
edid.txt in a web browser, such as 192.168.1.112/edid.txt, and you will view the
device’s EDID.
(3) No devices with the same name in the LAN
View looping EDID output: Enter the device's IP address + /loop_edid.txt in a web
browser, such as http://192.168.1.112/loop_edid.txt , and you will view the
looping EDID output.
Download looping EDID output: Enter the device's IP address + /loop_edid.bin in
a web browser, such as bin, and you will download the looping EDID output.
NOTE:(1) It is effective to view the downloaded EDID file when the corresponding
display device is connected to the looping EDID out.
(2) If the device is upgraded to a downloaded EDID file, it will cause the picture not
to be shown in the device when there is problem with the EDID file.
(3) When the upgrade causes the looping out without a picture, you can reset the
device to return normal.
● EDID upgrade:

12
Select "LOGO" in the upgrade type
Find the file to upgrade by selecting the corresponding path, and click the upgrade
button after confirmation.
The device can be upgraded for a moment, it will output the upgraded LOGO
image when the input source or input source is compatible.
6) Reset Device
● After confirming to Reset Device Settings, the device will restore factory Settings
and all parameters will be restored to the original state;
● Reset Device Settings, and the product will be re-assigned the IP address by the
router. If the original address is invalid, the device IP address should be re-entered in
the web browser address bar.
7) Reboot Device
● The parameters set before reboot will be saved when reboot;
● After Reboot Device, the platform and the device will be temporarily offline, and the
online state of the device will be restored automatically after the restart
8) User password
● The default password between the web server and the device is amdin
● The web browser will back to the user login interface after you change the password.
● Enter the user name and new password, you can re-enter the user configuration
interface.
6.3. Network configuration
1) In the "Network" configuration, UDP, RTSP, Network address, Sub-net Mask,
Gateway and Domain name server can be modified; After the network configuration is
confirmed, the device needs to be restarted manually to take effect. (note: only when
the static network address can be modified)
2) Two video streaming protocols are provided: primary and sub-code streams of
RTSP; RTMP live streaming protocol.
3) RTSP anonymous access: check the box to indicate that there is no need to enter the
account and password when receiving the video stream; otherwise, Need enter the
account and password when not checked.
4) Default account and password: admin
5) Note: the modified IP address cannot be the same as the IP address of all connected
devices in the network.

13
Note: 1)How to use RTSP and RTMP refer to the operating steps of the platform
2) The IP address used for communication between the network card and the device
needs to be changed to H.264 before using RTMP
6.4. Audio configuration
Digital audio (HDMI) and ANALOG audio (ANALOG) can be configured on the
"Audio" interface
HDMI: audio of the source (Default)
● ANALOG: ANALOG audio embedding
● Sampling rate: Self-adaption
● Coder: ACC
● Analog audio volume: used to adjust analog audio output volume, default is 50,
volume range 0-100
● 1)ANALOG embedding: access audio equipment (such as mobile phone) through
Phoenix terminal to 3.5mm female audio cable connected, connect to Encoder’s
ANALOG audio input, then open audio configuration, set the audio input as ANALOG
audio input, then output audio will be ANALOG audio.
2)Audio out, connect the Phoenix terminal to the 3.5mm audio female and then
connect the audio equipment.

14
6.5. Video configuration
In the "Video Configuration" interface,the detailed parameters are as follows:
1)Main Data Rate:
● Encoding: H.264、H.265(Default)
● Resolution: 3840×2160(Default),1920×1080,1280×720,640×360
● FPS:30(Default),1-60
● Control method: CBR、VBR
● Bitrate: 20480(Default),64-102400Kbps
● Gop: 60(Default),GOP5-300
2) Subprime Data Rate
● Encoding: H.264(Default)、H.265
● Resolution: 1280×720(Default)、1920×1080,640×360
● FPS:30(Default),1-60
● Control method: CBR(Default)、VBR
● Bitrate: 256(Default),64-4096Kbps
● Gop: 60(Default),GOP5-300

15
6.6. Image settings
1) In the "Image Settings" interface, you can adjust the brightness, contrast ratio, hue,
and saturation of the image
● Brightness: 0~100
● Contrast ratio: 0~100
● Hue: 0~100
● Saturation: 0~100
● System default : 50
2) In the "On Image Settings" interface, you can check the "Mirror" and "Flip"
switches to perform video image of "Mirror" and "Flip".
3) In the "Image Settings" interface, check the "Capture Image" switch to capture the
current image in real time, and set the frame rate (1 ~ 15)
4) In the "Image Settings" interface, click to open the picture, it will grab an image of
the current video in real time.

16
6.7. OSD configuration
6.8. Time configuration
6.9. Serial port configuration
1) Switch: Turn on, Turn off
2) Source port: 0~65535( Default 5000)
3) Target IP: fill in the IP address of the device to be communicated
4) Target port: 1~65535(Default 5000)
5) Baud Rate: 2400、4800、9600、19200、38400、57600、115200、230400、460800
(Default 115200)

17
Note: (1) It must to bind each other's IP addresses when serial communication is
required between two devices.
(2) The target address must be consistent with the IP address of the other party.
7. Video Scheme
When SX-HE05 work with SX-UHE01-RX, it support CMP system to realize the
function of Matrix, Multi-View, Video Wall.
7.1. Matrix Configuration
Before use Decoder with the platform, set up the matrix configuration on the platform.
Many-to-many or one-to-many can be preset as video matrix.
Factory default OSD interface is as follows:
The current software version information, Decoder IP address and Decoder MAC
address are displayed in the light blue background.
Specific steps are as follows:
1. Open the function panel and select matrix configuration
2. The top of the left column represents the preview window, and the bottom of the left
column represents the Encoder device list information
3. There are channel setting options below the left column and below the right column.
4. Click any device in the Encoder list once with the left mouse button, and the upper

18
window will take the real-time preview image as the current signal source
5. Customize the channel ID of Encoder device (click the blank in the list to unselect it
with the left mouse button)
6. The Decoder list corresponds to the Encoder device channel set to be consistent.
7. Completion of matrix configuration.
Note: The Encoder channel cannot be set to the same, otherwise it will cause conflicts.
In the case of connect to a switch, if the device is reset together and no new channel is
set, it will cause channel conflicts. At this time, the TV may cross-talk, etc. (After reset,
the default channels are 000)
7.2. Multi-View
Multi-View means that multiple groups of signal sources are displayed in one screen.
See the example image below:
1). Each group of video sources is presented as a sub stream within the Multi-View.
2). Up to 36 groups of signal source segmentation can be supported

19
Specific steps are as follows:
1) open the CMP integrated management platform and enter the main interface of the
functional panel;
2) select the "OSD switch" option, check the OSD switch and return to the main
interface of the functional panel;
3) select the "Multi-View" option to enter the large-screen divide interface;
4) set the required number of divide boxes (1, 4, 16, 25, 36);
5) select the Decoder device to be divided according to the IP address displayed by
OSD;
6) open the Decoder device list in the monitoring point area (left side), select the
required Decoder device, and long press the left mouse button to drag it into the divide
box;
7) open the Encoder device list in the monitoring point area, select the required
Encoder device, and long press the left mouse button to drag it into the divide box;
8) large screen divide operation is completed.
Note: if the Decoder returns to normal one-to-many or many-to-many, it can be
restored by re-entering the matrix configuration. Exit will prompt you to save the view.
7.3. Video Wall
Video Wall consists of a single signal source splicing multiple sets of Decoder (TV)
into a single image.See the example image below
1). Under Video Wall, the maximum resolution of each group of Decoder devices
supports 4K30.
2). The current maximum support is 9×9 splicing
3). Edge shielding (screen width, screen height, display width and display height) can
be set separately for each group of spliced images.

20
Specific steps are as follows:
1) Open the CMP integrated management platform and enter the main interface of the
functional panel;
2) Select the "OSD switch" option, check the OSD switch and return to the main
interface of the functional panel;
3) Select the "Video Wall" option to enter the big-screen splicing interface;
4) Select the required number of splicing boxes (1, 4, 16, 25, 36);
5) Select the Decoder device signal source required to be spliced first according to the
IP address displayed by OSD;
6) Open the Encoder device list in the monitoring point area, select the required
Encoder device, and long press the left mouse button to drag it into the splicing box;
7) Open the Decoder device list in the monitoring point area, select the required
Decoder device, and long press the left mouse button to drag it into the splicing box;
8) Large screen splicing operation is completed.
Note: if Decoder returns to normal one-to-many or many-to-many, that is, reentry into
matrix configuration can be restored, exit will prompt whether to save the view.
Table of contents
Other C4i Media Converter manuals
Popular Media Converter manuals by other brands

Advanced Technology International USA
Advanced Technology International USA QSP-660 Owner's manual & operating instructions

M-system
M-system JPR2 instruction manual

Dnake
Dnake IP-2WIRE quick start guide

CyberResearch
CyberResearch ETS 2404 user manual

Siko
Siko IV5800 quick start guide

evertz
evertz A-2410MD manual