Ca Go FS200 Vario User manual

EN
FS200 Vario
User manual

2
Safety notices ..............................................................................................................
General information ...................................................................................................
Legal requirements .....................................................................................................
Intended use .................................................................................................................
Before your irst ride ..................................................................................................
Transport of cargo ......................................................................................................
Sitting position ............................................................................................................
Brakes ............................................................................................................................
Wheels and tyres ........................................................................................................
Belt drive .......................................................................................................................
Gears .............................................................................................................................
Frame ............................................................................................................................
Suspension ....................................................................................................................
Kickstand ......................................................................................................................
Bosch Kiox .....................................................................................................................
Lighting system ...........................................................................................................
Rechargeable battery ................................................................................................
Safety notices for rechargeable battery and charging ......................................
Range .............................................................................................................................
Transport ......................................................................................................................
Inspections ....................................................................................................................
Tightening torques for bolt connections ................................................................
Technical data ..............................................................................................................
General notes on care ................................................................................................
Tips for the environment / disposal .........................................................................
Statutory warranty / guarantee .............................................................................
The present assembly instructions is the translation of the original assembly
instructions.
Contents

3
Notice
Provides information about how
to handle the product or refers to
a passage in the user manual that
deserves special attention.
Safety notices
This user manual contains various types of notice.
The notices are designed as follows:
Danger
Potential hazards for your health
and the health of your co-riders and
other road users if you fail to observe
the respective instructions or do not
take corresponding precautions.
Caution
Warns you about incorrect
behaviour that can result in
material and environmental
damage.
Separate instructions
Refers you to other assembly
instructions for your FS200 Vario,
which describe the respective
assembly step in more detail if
needed.

4
To ensure that you can use your FS200 Vario safely from day to day, please
pay particular attention to the following information:
Attentiveness
Only a damage can stop you. Therefore, please stay attentive and take care
of yourself, your bike and other road users.
Trafic rules
Even if it is taxing at times, please observe the trafic rules and pay attention
to your fellow human beings.
Fig.1
General information

5
Driving licence
Life is easier on the bike. You do not need a driving license to ride your
FS200 Vario. Since the motor stops providing support at 25 km/h, your
FS200 Vario is legally rated as a bicycle.
Fitness to ride
Respect yourself, be fair to others. Drugs, alcohol or medication that affects
your itness to ride are not compatible with your FS200 Vario and do not
belong in road trafic.
Helmet
Your head is your capital. For your own sake, and that of your loved ones,
always wear a helmet. This naturally also applies to all passengers you ride
with.
Weather
No matter the weather: Your FS200 Vario is easy to take care of and comes
equipped with high-quality components. Neither rain, hail nor snow can faze
your FS200 Vario, provided you give it the necessary care in accordance with
this user manual and the accompanying component manufacturers’ instructions.
Please note that the FS200 Vario may handle differently in adverse environ-
mental conditions and that the stopping distance increases if the road surface
is wet. Please drive carefully as is appropriate.

6
Legal requirements
If you want to use your FS200 Vario in road trafic, the bike needs to be
equipped in accordance with the rules and regulations in the country of use.
It is legally equivalent to a bicycle and therefore subject to the same rules and
regulations.
In Germany, these are codiied in the Road Trafic Registration Ordinance
(StVZO) and the Trafic Regulations (StVO).
Trafic rules and technical regulations are not the same in all countries.
If you plan to ride your FS200 Vario outside Germany: Please familiarise
yourself with the legal requirements in your country before your irst ride,
and make sure you observe them.

7
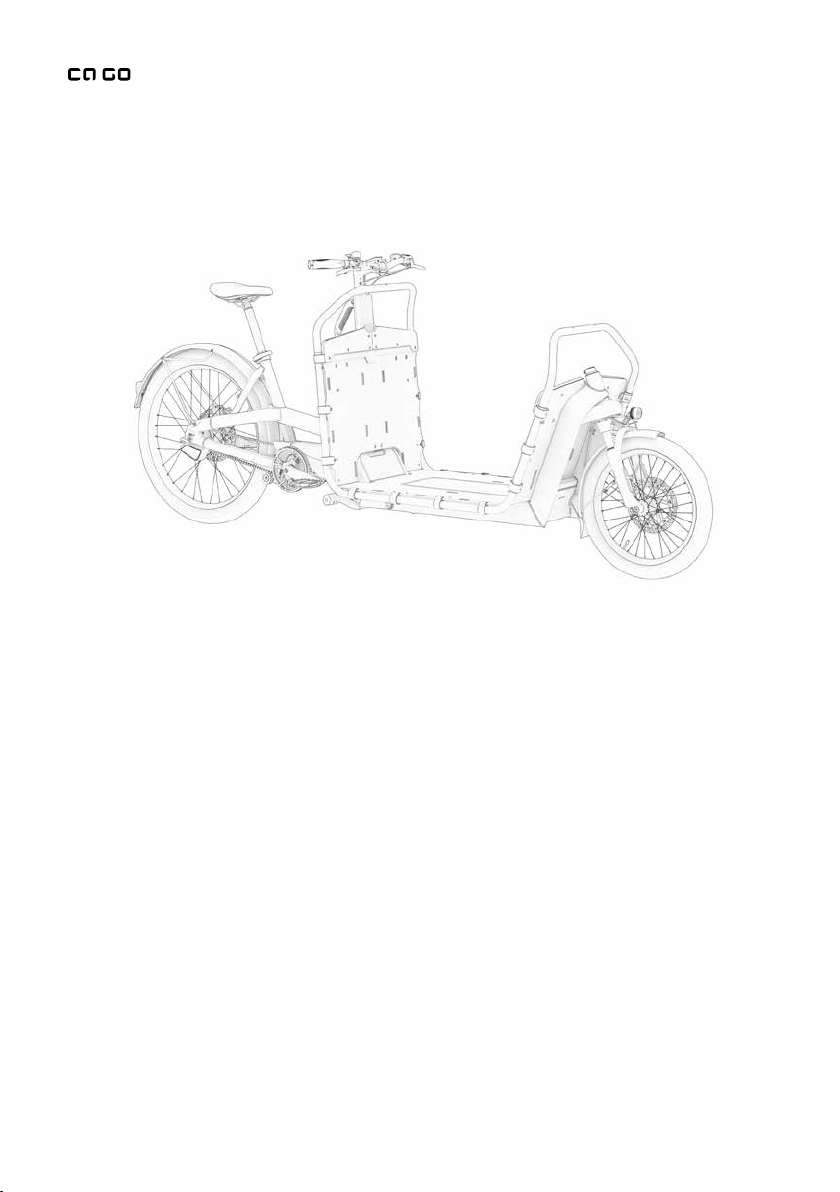
Your FS200 Vario is designed for use
on roads and surfaced paths only.
Therefore you should not ride it down
stairs, perform jumps or wheelies –
treat your bike with care and you will
be able to enjoy it for a long time.
Operating
, maintenance and servicing
conditions described in this
user
manual are part of the intended
use.
We are not able to provide you with
a warranty if
• your FS200 Vario is used outside
the scope of this intended use,
• safety notices are not observed,
• speciied maintenance
intervals are not observed,
• the bike is overloaded, or
• defects are or have been
eliminated incorrectly.
Intended use
Furthermore, we cannot assume any
warranty or liability in the case of
assembly errors and if a warranty
or liability case could have been
prevented by observing the require-
ments for maintenance and care.
Modiications of the gear system
and/or changes to the electric system
(tuning) will result in the loss of all
warranty claims, as well as any
guarantee issued. Your FS200 Vario
is not approved for use in competitions.
Permissible overall weight =
• Weight of rider +
• Bike weight +
• Additional load in transport box +
• Weight of optional pannier rack
Permissible overall weight: 225kg
• Weight of rider (in this example):
84kg max.
• Unladen weight of the
FS200 Vario: 55kg
• Additional load in transport
box
(children including luggage):
70 kg max.
• Additional load on Wingee
bag rails: 16kg max.
(8kg right, 8kg left)

8
Before your irst ride
Step1: Charging the battery
We ask that you read all warnings and notices in this manual and the
accompanying instructions before your irst ride. If you have questions
after reading them, the Ca Go team is available in the FAQ section of
www.cagobike.com.
To be able to start riding your FS200 Vario as soon as possible while staying
safe, here are the most important steps to follow imperatively before your
irst ride.
When you take delivery of your new FS200 Vario, the rechargeable battery
may not be fully charged. Before going on your irst ride, check the charge
state of the rechargeable battery. There are two ways to do this:
Press the button on the rechargeable battery. The charge state of the
rechargeable battery is indicated by the 5 integrated green LEDs. Each LED
represents approximately 20 % of a full charge. This means that if all 5 LEDs
light up, the rechargeable battery is fully charged.
Alternatively, you can see the charge state in
the Kiox display if the rechargeable
battery is
mounted and the system is switched on. Please charge the rechargeable
battery fully before your irst ride. You can monitor the charging process
through the LEDs on the rechargeable battery. The LED corresponding to the
segment currently being charged is lashing.
You can take the rechargeable
battery out of the battery safe to
charge it. Alternatively, you can also
charge it while it is mounted by using
the integrated charging port.

9
Step2: Safety checklist
To be able to ride safely, please check the safety-relevant parts listed here.
• Have saddle, seat post and handlebar been positioned and fastened
safely and correctly?
• Is the steering working and without play?
• Are you familiar with the platform pedals? (There is a risk of slipping off
the pedals in the wet)
• Are the wheels fastened and correctly installed in the frame and fork?
• Are you familiar with the control elements?
• Are the tyres inlated to the correct pressure to suit the cargo? You can
ind the recommended pressure values on the CE label on the battery
safe.
• Do the brakes work lawlessly?
• Are you able to reach the brake levers without problems?
• Are all important mounting bolts and nuts tightened correctly?

10
Step3: Proper it
Ensure that your sitting position on the bike is right for you.
We have compiled a few tips to help you ind the ideal position:
The FS200 Vario is designed to allow for a relaxed position when riding.
This means you can place both feet fully on the ground while still sitting in the
saddle. You can thus keep the FS200 Vario stable while standing, with both
hands on the handlebars.
You can check the correct saddle height while seated on your FS200 Vario.
Adjust the saddle to what you estimate is the correct height. Sit on your
FS200 Vario after placing it on the kickstand. Alternatively, have a second
person hold the bike for you or lean against a wall or railing. Position a pedal at
its lowest position and place your heel on it. Your leg should be fully extended.
Make sure that your back is not stretched too far forward. This would place
a lot of strain on your lower back and your wrists and is very uncomfortable.
You can ind more information on
the kickstand and the correct saddle
height in the following sections.

11
Step4: Switching on the Bosch eBike system
To be able to ride safely, please check the safety-relevant parts listed here.
If the rechargeable battery has a charge, the drive system can be switched
on and off from the Bosch Kiox display. This is where you can read the charge
state of the battery, your speed and the level of assistance you are using.
• To start the system, press the On/Off button on the bottom-left
of your display.
• Select the desired level of assistance from the control unit (satellite).
• For better visibility, we recommend keeping the lights switched on at all
times. Therefore we have programmed your FS200 Vario in the factory
to always have the light switched on automatically.
Before putting pressure on the pedals,
always pull both brake levers irst!
The drive support (motor) helps to
propel the FS200 Vario directly as
soon as you push a pedal. This push
can lead to dangerous situations if
you ignore or fail to adhere to this
safety notice on braking.

12
Before every ride (quick check)
Checklist
Wheels
Check the tyre pressure and the condition of the tyres. You can ind more
information on page 24. The wheels need to turn easily and run reasonably
concentrically.
Lighting
You should check that your front and rear lights are functional and that the
front light is adjusted so as not to blind oncoming trafic.
Brakes
Check the brakes by pulling both brake levers. It is important that you can feel
a deinite pressure point and that the levers cannot be pulled all the way to
the handle grip.
Additional cargo
Your cargo must always be safely fastened. Never load your FS200 Vario
lop-sided and make sure that no safety-relevant parts are covered or functionally
affected by the cargo. Putting cargo on the bike can change its handling
characteristics. Poor weight distribution can negatively affect riding stability.
Overall weight
Make sure to never exceed the permissible overall weight of 225 kg.
Rechargeable battery by Bosch
The rechargeable battery should have a suficient charge before every ride.
You should check the rechargeable battery for tight seat before every use.
Push the rechargeable battery into its mount until it engages in the battery
lock with an audible click.

13
Quick-release skewers and bolt connections
You should check all quick-release skewers and bolt connections for tight
seat before every ride. Only start a ride if all fasteners are irmly closed.
Once the quick check has been completed successfully, you can start your ride.
If this is not the case, please visit your Ca Go dealer or contact our support
team in the FAQ section at www.cagobike.com. We are looking forward to
helping you.
After a crash or accident, you may use your FS200 Vario only after your
Ca Go dealer has checked it for potential damage.
The drive support is activated as soon as you push the pedal. The amount of
assistance depends on the setting. Once you stop pushing the pedals or when
you have reached the maximum speed of 25 km/h, the drive will switch off.
The support will be reactivated automatically as soon as the speed has fallen
below this threshold and you push the pedals again.

14
The FS200 Vario has a lat cargo area. This makes it
ideal for transporting
various types of cargo fast and easily.
The cargo area (Fig. 2) consists of an
aluminium tubular frame and lightweight plastic boards, reinforced in strategic
places by aluminium plates. The tubes and boards are connected by clamps.
These clamps have cut-out sections, making it possible to use them for
securing cargo, as well.
The cargo area of the FS200 Vario
is in no way suitable for transporting
persons; therefore the transport
of persons on the cargo area is not
permitted.
Transport of cargo
Fig.2

15
When placing cargo on the bike,
make sure that it does not affect the
steering. This means the full pivoting
angle of the handlebar must remain
completely unobstructed and
available. The cargo should not
interfere with the movement of the
wheels. The crossbars outline the
cargo area that can be used safely.
Moreover, cargo must never affect
the unobstructed view forward.
Checklist
• Is the permissible overall weight not exceeded?
• Have you made sure that no objects can come between the spokes?
• Do the tyres have the correct tyre pressure?
• Is the cargo distributed evenly?
(Heavy objects at the bottom, lighter objects at the top)
• Are lights and relectors uncovered?
Poor weight distribution can have
negative effects on handling and
braking. Adapt your riding to the
weight of the cargo/passengers.
Cargo affects the handling charac-
teristics of your FS200 Vario.
Among other things, the braking
distance increases when you
transport heavy goods and the
steering can also be different.
Please adapt your riding to the
handling characteristics, i.e. brake
earlier, take corners with care and
generally expect the steering to be
more sluggish. Please transport
cargo on the cargo area intended
for this purpose.

16
When transporting objects, always
make sure that the cargo is sufi-
ciently secured to the bike. The max-
imum additional load on the cargo
area is 70kg. The handling charac-
teristics of the FS200 Vario change
due to the additional load. Please
ensure that the load is evenly
distributed.
Insuficiently secured cargo could
develop a momentum of its own,
which quickly results in uncontrollable
driving situations. The transport of
liquids, if these are able to move
freely (e.g. in open troughs, half-full
containers) can also lead to critical
situations.
The tensile stress per belt strap must
not exceed 150N (approx. 15kg);
if this value is exceeded the alumin-
ium frame can be damaged (plastic
deformation). If the cargo is secured
only to the lightweight board (Fig.6),
this limit is 100N (approx.10kg).
Commercially available ratchet
straps can exert much higher tensile
forces due to leverage. Therefore,
do not use these types of straps.

17
The aluminium frame is well-suited for ixing lashing straps and elastic
cords to it. The plastic boards have cut-out sections at various locations,
which allow for lashing straps to be placed all around the cargo (Figs. 3 & 4).
The rear
reinforcement plate also has a lead-through opening for a lashing
strap (Fig. 5)
.
An opening in the centre of the front board allows to hang in
a bag or backpack
(Fig. 6).
Fig.3 Fig.4
Fig.5 Fig.6

18
All in all, the clamps and the cut-out sections in the cargo area offer various
ways to secure objects individually for transport (Figs. 9 and 10).
Fig.7 Fig.8
Fig.9 Fig.10
Elastic cords can be hooked into the clamps. These cords can be lashed across
one or several clamps (Figs. 7 and 8). This is also how the Vario’s soft walls are
fastened.

19
Sitting position
Before you use your FS200 Vario for the irst time, you should adjust the
sitting position to suit your body size. Only then will you be able to ride safely
and in comfort.
To do this, the saddle needs to be set in terms of its height, horizontal
alignment and tilt, and the handlebar with the stem needs to be set in terms
of height and alignment.
Never pull the seat post further out
of the seat tube than is indicated
by the marking for the indented
maximum extension! If a maximum
marking is no longer visible, the seat
post must always be at least 75mm
deep in the seat tube (Fig.11).
Due to the higher weight when
loaded, the bike should allow you to
reach the ground with both feet at
all times. Otherwise, there is a risk of
your FS200 Vario tipping over when
you stop.

20
Saddle height
Adjust the saddle to what you estimate is the correct height. Mount your
FS200 Vario. To do this, put it on the kickstand, have another person hold
you or lean against a wall or railing. Position a pedal at its lowest position
and place your heel on it. Your leg should be fully extended. If you now place
the foot on the pedal in its proper riding position, the leg should be bent at
a slight angle. You assume the correct foot position for riding by placing the
widest part of the foot directly above the pedal axle.
Fig.11
The minimum saddle height depends on the size of the rider. You have to be
able to ride your FS200 Vario without any negative effect on riding safety or
health. The seat post must be extended only so far that it can still be safely
clamped by the seat post clamp (Fig. 11).
75mm min.
This manual suits for next models
1
Table of contents