Cabela's 08-2201 User manual

#1
SAVE THESE INSTRUCTIONS!
REFER TO THEM OFTEN AND USE THEM TO INSTRUCT OTHERS.
NEVER operate Grinder
without the Tray and the
Tray Guard secured in place.
To avoid serious or fatal injury,
NEVER reach into any
Grinder inlet.
ALWAYS use the Stomper to
push meat into the Grinder Head.
Read & fully understand
all instructions
& warnings prior to use.
WARNING!
ATTENTION
If any components of this unit are broken or
the unit does not operate properly, please
contact Cabela’s Customer Service.
Retail Store Purchases: 1-800-905-2731 (U.S. & Canada)
Catalog and Internet Purchases: 1-800-237-8888
All International: 1-308-234-5555
DO NOT RETURN THE UNIT TO THE STORE
WHERE IT WAS PURCHASED!
NEVER operate Grinder without the Tray and
the Tray Guard secured in place.
To avoid serious or fatal injury, NEVER reach
into any Grinder inlet.
ALWAYS use the Stomper to push meat
into the Grinder Head.
Read & fully understand all instructions
& warnings prior to use.
WARNING!

-23-
BAVARIAN PATTIES WITH SAUERKRAUT
1 ½ lb. (0.7 kg) beef 1 egg ½ cup applesauce
1 tsp. salt 1/3 cup dry bread crumbs ½ tsp. allspice
¼ cup chopped onion 16 oz. (0.5 kg) sauerkraut
. Grind the beef through the grinder plate of your choice using the grinding
instructions
.Combine the ground beef, egg, applesauce, salt, bread crumbs, allspice and onion
.Shape the mixture into patties about 3/4” (1.9 cm) thick
.Brown in a large skillet over medium heat, turning once, then drain
.Spoon sauerkraut over the patties
.Cover and simmer for 15 minutes
BAYOU BURGERS
1 lb. (0.5 kg) beef ½ tsp. garlic powder ½ tsp. dried thyme
¼ cup sliced green onion ¾ tsp. crushed dried basil 1 tsp. season salt
½ tsp. hot pepper sauce
. Grind the beef through the grinder plate of your choice using the grinding
instructions
.Preheat grill
.Combine all the ingredients
.Shape the mixture into 4 patties about 3/4” (1.9 cm) thick
. Grill 4” (10.2 cm) from heat, turning once 10-15 minutes, or until done
SPICY TURKEY BURGERS
2 lb. (0.9 kg) turkey 2 tbsp. minced garlic 3 tbsp. paprika
1 tsp. minced ginger root 2 fresh green chile pepper, diced
1 medium red onion, diced ½ cup finely chopped cilantro
1 tsp. salt ¼ cup low sodium soy sauce
1 tbsp. ground dry mustard 1 tbsp. freshly ground black pepper
1 tbsp. ground cumin 1 dash Worcestershire sauce
. Grind the turkey through the grinder plate of your choice using the grinding
instructions
.Preheat grill
.Combine all the ingredients
.Shape the mixture into 4 patties about 3/4” (1.9 cm) thick
. Grill 4” (10.2 cm) from heat, turning once 10-15 minutes, or until done
EASY MEATLOAF
1 lb. (0.5 kg) beef 1 lb. (0.5 kg) ground pork sausage
8 oz. package French onion dip 2 eggs
10 oz. package saltine crackers, crushed
. Grind the beef through the grinder plate of your choice using the grinding
instructions
.Preheat oven to 375oF (190oC)
.Combine all the ingredients
.Mix well and shape into a loaf
.Bake in a 5” x 9”(13 x 23 cm) loaf pan for 1 hour
IMPORTANT
SAFEGUARDS
When using electrical appliances, basic safety precautions should always be followed
including the following:
1. READ ALL INSTRUCTIONS BEFORE USING THE APPLIANCE.
2. To protect against risk of electrical shock, do not submerge or use this appliance near water or
other liquid.
3. Unplug this appliance from the electrical outlet when not in use or before putting on or taking off
parts and before cleaning.
4. Close adult supervision is necessary when any appliance is used near children. This appliance
is NOT to be used by children.
5. NEVER use any accessories or parts from other manufacturers. Doing so will VOID YOUR
WARRANTY and may cause fire, electrical shock or injury.
6. DO NOT operate any appliance with a damaged cord, plug or after the appliance malfunctions,
or is dropped or damaged in any manner. Return appliance to the nearest authorized service facility
for repair or adjustment.
7. Keep these instructions for use for future reference.
8. Check if the voltage indicated on the appliance corresponds to the local voltage before you
connect the appliance.
9. Thoroughly clean the parts that will come into contact with food before you use the appliance
for the first time.
10. DO NOT use outdoors.
11. DO NOT let cord hang over edge of table or counter.
12. DO NOT let cord come in contact with a hot surface. DO NOT use on an oven or stove.
13. DO NOT use fingers to scrape food away from the output chute while the appliance is operating.
Never feed food into the appliance by hand. NEVER reach into the appliance. ALWAYS use the
provided Stomper.
14. DO NOT operate the Grinder without the Tray and the Tray Guard in place.
15. Avoid contacting moving parts. Wait until moving parts have stopped running before you
remove the parts of the appliance.
16. NEVER let the appliance run unattended.
17. Switch the appliance off before detaching any accessory.
18. DO NOT attempt to grind bones, nuts or other hard items.
19. DO NOT operate the appliance for more than 15 minutes at one time. After 15 minutes of
continuous use, allow a few minutes for the appliance to rest before next use.
20. This appliance has a polarized plug (one blade of the plug is wider than the other). To reduce
the risk of electric shock, this plug will fit in a polarized outlet only one way. If the plug does not fit fully
in the outlet, reverse the plug. If it still does not fit, contact a qualified electrician. DO NOT modify the
plug in any way.
21. CAUTION: In order to avoid a hazardous situation, this appliance must never be connected to
a timer switch.
SAVE THESE INSTRUCTIONS!
Refer to them often and use them to instruct others.
WARNING!

-22-
VENISON SAUSAGE
6 lb. (2.7 kg) venison 6 lb. (2.7 kg) lean pork ½tsp. sage
½tsp. cayenne pepper 2 tsp. salt ½cup honey
2 tsp. pepper Sausage Casings (optional)
. Grind the venison and pork through the coarse grinder plate using the grinding
instructions
. Add all the ingredients to the meat and mix well
. Regrind the mixed meat through the fine grinding plate using the grinding instructions
. Stuff the sausage into casings or shape into patties
VENISON BREAKFAST SAUSAGE PATTIES
6 lb. (2.7 kg) venison ½lb (0.3 kg) bacon 1 tsp. pepper
½tsp. sage 1 tsp. salt
. Grind the venison and bacon through the fine grinder plate using the grinding
instructions
. Add all the ingredients to the meat and mix well
. Refrigerate the mixture for a few hours before use
. Shape the mixture into thin patties
. Pour a little oil into a skillet or onto a griddle and heat to medium high
. Grill the patties for a few minutes on each side
CHORIZO (MEXICAN) SAUSAGE
2 lb. (0.9 kg) lean pork trimming 2 medium onions, minced ½cup cider vinegar
1 tbsp. ground oregano 8 oz. (0.2 kg) beef/pork fat Sausage casings
¼cup ground red chili (mild or hot) 1 tsp. ground cinnamon
8 cloves garlic, pressed
. Grind the meat and fat through coarse grinder plate using the grinding instructions
. Add the onions, garlic, vinegar and seasonings (use chili to taste)
. Mix the ground meat and the seasonings, then place in a covered bowl and
refrigerate for at least one hour
. Stuff the sausage into casings to make 4” (10.2 cm) links
FRESH ITALIAN SAUSAGE - MILD/HOT
5 tsp. salt 1 tsp. sugar 2 tsp. caraway seeds
3 tsp. crushed hot peppers 1 tsp cracked fennel seed (omit if making mild sausage)
2 tsp. coarse ground black pepper 1 tsp. coriander 1 pint cold water
10 lb. (4.5 kg) boneless pork butts Sausage casings
. Grind the pork butts through the grinder plate of your choice using the grinding
instructions
. Add all the ingredients to the meat and mix well
. Stuff the sausage into casings to make 4” (10.2 cm) links
RECIPES
REV022609
COMMERCIAL GRADE
ELECTRIC GRINDER
INSTRUCTION BOOK
1 HP #22 Model No. 08-2201
1-1/2 HP #32 Model No. 08-3201
-3-

-21-
-4-
COMPONENT LIST
DIAGRAM #
1
2
3
4
5
6
7
8
9
10
11
12
13
14
15
16
17
18
19
20
21
22
23
24
25
26
27
28
29
30
31
32
33
34
35
36
37
38
39
40
41
42
43
44
PART DESCRIPTION #22 GRINDER #32 GRINDER
Front Ring Nut 08-2242 08-3242
4.5 mm Grinder Plate 29-2204 29-3204
Grinding Knife 29-2250 29-3250
Auger Pin 08-2246 08-3246
Auger 08-2202-N 08-3202-N
Auger Bearing 08-2247 08-3247
Head 08-2209-N 08-3209-N
Housing Bolt (4) 08-2035 08-2035
Gear Housing 08-3025 08-3025
Front Shaft Seal 08-2034 08-2034
Primary Bearing 08-2053 08-2053
Gear Housing Seal 08-3044 08-3044
Secondary Gear 08-2030 08-2030
Primary Gear 08-2032 08-2032
Secondary Bearing (3) 08-2052 08-2052
Motor N/A N/A
Motor Cover Bolt (4) 08-2079 08-2079
Stainless Steel Motor Cover 08-2243 08-3243
Rubber Feet (4) 08-2007 08-2007
Stainless Steel Base 08-2211 08-3211
Head Locking Knob 08-2005 08-2005
Base Bolt (4) 08-2027 08-2027
Tray 08-2225 08-3225
Stomper 08-2277 08-2277
Funnel 40 mm 08-1040 08-1040
Funnel 30 mm 08-1030 08-1030
Funnel 20 mm 08-1020 08-1020
Flange for Stufng Funnel 08-2229 08-3229
Funnel 10 mm SS High Speed 08-1011 08-1011
Stufng Star 08-2276 08-3276
Power Switch 08-3039 08-3039
Capacitor 08-2240 08-3240
Power Cord 08-2041 08-2041
Electrical Box Cover 08-2274 08-3274
Electrical Box Base 08-2275 08-3275
7 mm Grinder Plate 29-2207 29-3207
Fan Cover 08-2238 08-3238
Pin (Keyway) 08-2051 08-2051
Circuit Breaker 08-2278 08-3278
High Speed Plastic Auger Patented 08-2212 08-3212
Front Cover Screw Plug (5) 08-2080-A 08-2080-A
Tray Guard 08-2226 08-3226
Allen Screw (2) 08-2081 08-2081
Allen Wrench 08-3081 08-3081
Before beginning the assembly, check the package contents for all of the parts.
If you are missing any parts, or if any parts are damaged, contact
Cabela’s Customer Service- Retail Store Purchases 1-800-905-2731 (U.S. & Canada) /
Catalog & Internet Purchases: 1-800-237-8888 / All International: 1-308-234-5555
TYPES OF SAUSAGE
Most sausages fall into one of four categories: Fresh, Smoked, Cooked or Dried. All
sausages, except dried, require refrigerated storage. There is also a sub-category
of uncooked smoked sausages.
Among the fresh and uncooked smoked sausages, you will find such flavors as
kielbasa or Polish sausage, Italian sausage, breakfast sausage and many others.
Both fresh and uncooked smoked sausages require cooking before eating and also
require refrigerated storage.
Smoked and cooked sausages include salami, bologna, the ever-popular hot dogs
and many others. Proper smoking requires a smokehouse or smoker. These can be
simple home-built structures made from metal drums or even old refrigerators or they
can be elaborate manufactured units. Most smoked sausages are warmed before
serving. Many people think that a smoked sausage will last much longer without
spoilage, but this is not true. Smoked sausages should be treated the same as fresh
sausage in terms of storage.
Dried sausages require the longest processing time, as they are air dried over a long
period of time. Some types of dry sausages are pepperoni, prosciutto and a variety
of ham products, just to name a few. The conditions under which the meat is dried
are very exacting; temperature, time and humidity must all be carefully monitored for
a safe and delicious product.
STORAGE
It is important to remember that sausage will lose its flavor the longer that it is stored.
It is recommended that you only make as much sausage as you will need for 4-
6 weeks. Even frozen sausage will begin to lose flavor noticeably after 6 weeks.
Frozen sausage should be thawed slowly in the refrigerator before cooking or serving.
Quick thawing of the product will degrade the taste as well.
NEVER operate Grinder without the Tray and
the Tray Guard secured in place.
To avoid serious or fatal injury, NEVER reach
into any Grinder inlet.
ALWAYS use the Stomper to push meat
into the Grinder Head.
Read & fully understand all instructions
& warnings prior to use.
WARNING!

-20- -5-
128 29 40 57
HIGH SPEED STUFFING
AUGER ASSEMBLY
STUFFER ASSEMBLY
1
57
28 25, 26
or 27
30
78
9 10
11 12 13
14
15
16
17 18
19 20
21
22
23
24
31 32
33 34
35
37
38
39
41
25
26
27
28
29
30
36
40
12345
6
42 43 WARNING! Before cleaning, assembling
or disassembling the Grinder, make sure
the PLUG IS REMOVED FROM THE OUTLET/
POWER SOURCE! ALWAYS unplug the Grinder
when not in use.
SAUSAGE INFORMATION
MEAT SELECTION FOR SAUSAGE MAKING
Sausage making has evolved over many years and generations, and as a result
there are countless types of sausage you can make using the basic ingredients of
meat, fat and a few carefully blended spices. Following are a few simple guidelines
that will help you make the best tasting sausage possible.
Any type of meat can be used for making sausage: pork, beef, bison, moose and
caribou, even antelope make great sausage. It is important when preparing venison
or other red game meats to trim all the fat from the meat, as red game tallow will turn
rancid in as few as five days. Replace the fat with either pork or beef fat, depending
on the type of product you are making, at a ratio of 1 pound (0.5 kg) of fat for every
4 pounds (1.8 kg) of game meat.
The fat content of your sausage will affect the taste, texture, cooking characteristics
and shelf life of your product. Most commercially made sausage has a fat content
of about 20%. Using less than 12% fat will result in a very dry tasting sausage, while
using more than 20% may result in a sticky flavorless sausage that will be difficult
to cook.
CURING
It is important to properly cure meats to preserve meat and poultry, and to destroy
undesirable microorganisms on the meat surfaces that cause spoilage and food
born illnesses. There are many steps that help in this process, including smoking,
cooking, drying, chilling and the addition of cure ingredients. The oldest means of
accomplishing this is by introducing salt into the meat. The resistance of bacteria
to salt varies widely among different types of bacteria. The growth of some bacteria
is inhibited by salt concentrations as low as 3%, e.g., Salmonella, whereas other
types are able to survive in much higher salt concentrations, e.g., Staphylococcus.
Fortunately, the growth of many undesirable organisms normally found in cured meat
and poultry products is inhibited at low concentrations of salt.
Modern curing is based on Nitrates and is very scientific. The best way to ensure
proper curing is to purchase one of the many commercially available curing agents
from either a grocery store or your local butcher. A very common cure is Prague
Powder, which is available in two types (#1 and #2).
CASING
There are many different types of casings available, the right choice depends on
personal preference as well as the type of sausage you wish to make. For most
sausages, your choices are natural or collagen. Don’t let the names fool you;
collagen casings are not a synthetic product . They are made from beef skin and
other tissues. Collagen casings are uniform in size and texture and require almost
no preparation. “Natural” casings are the intestines of lamb, sheep, hogs or beef.
They are less uniform in size and require substantial preparation. For those reasons,
more than 75% of commercially made sausage in the U.S. is made with collagen
casing. There are also fibrous non-edible casings that are used for some varieties of
smoked sausages and bolognas.
NOTE: Special considerations must be made when using venison or other wild game,
since it can become heavily contaminated during field dressing. Venison is often held
at temperatures that could potentially allow bacteria to grow, such as when it is being
transported. Refer to the USDA Meat and Poultry Department for further questions or
information on meat and food safety.
Feed
Chute
44

-6- -19-
WARNING!
1. DO NOT use the Grinder without the Tray
and the Tray Guard secured into place.
2. ALWAYS DISCONNECT Grinder from
power source before servicing, changing
accessories or cleaning the unit.
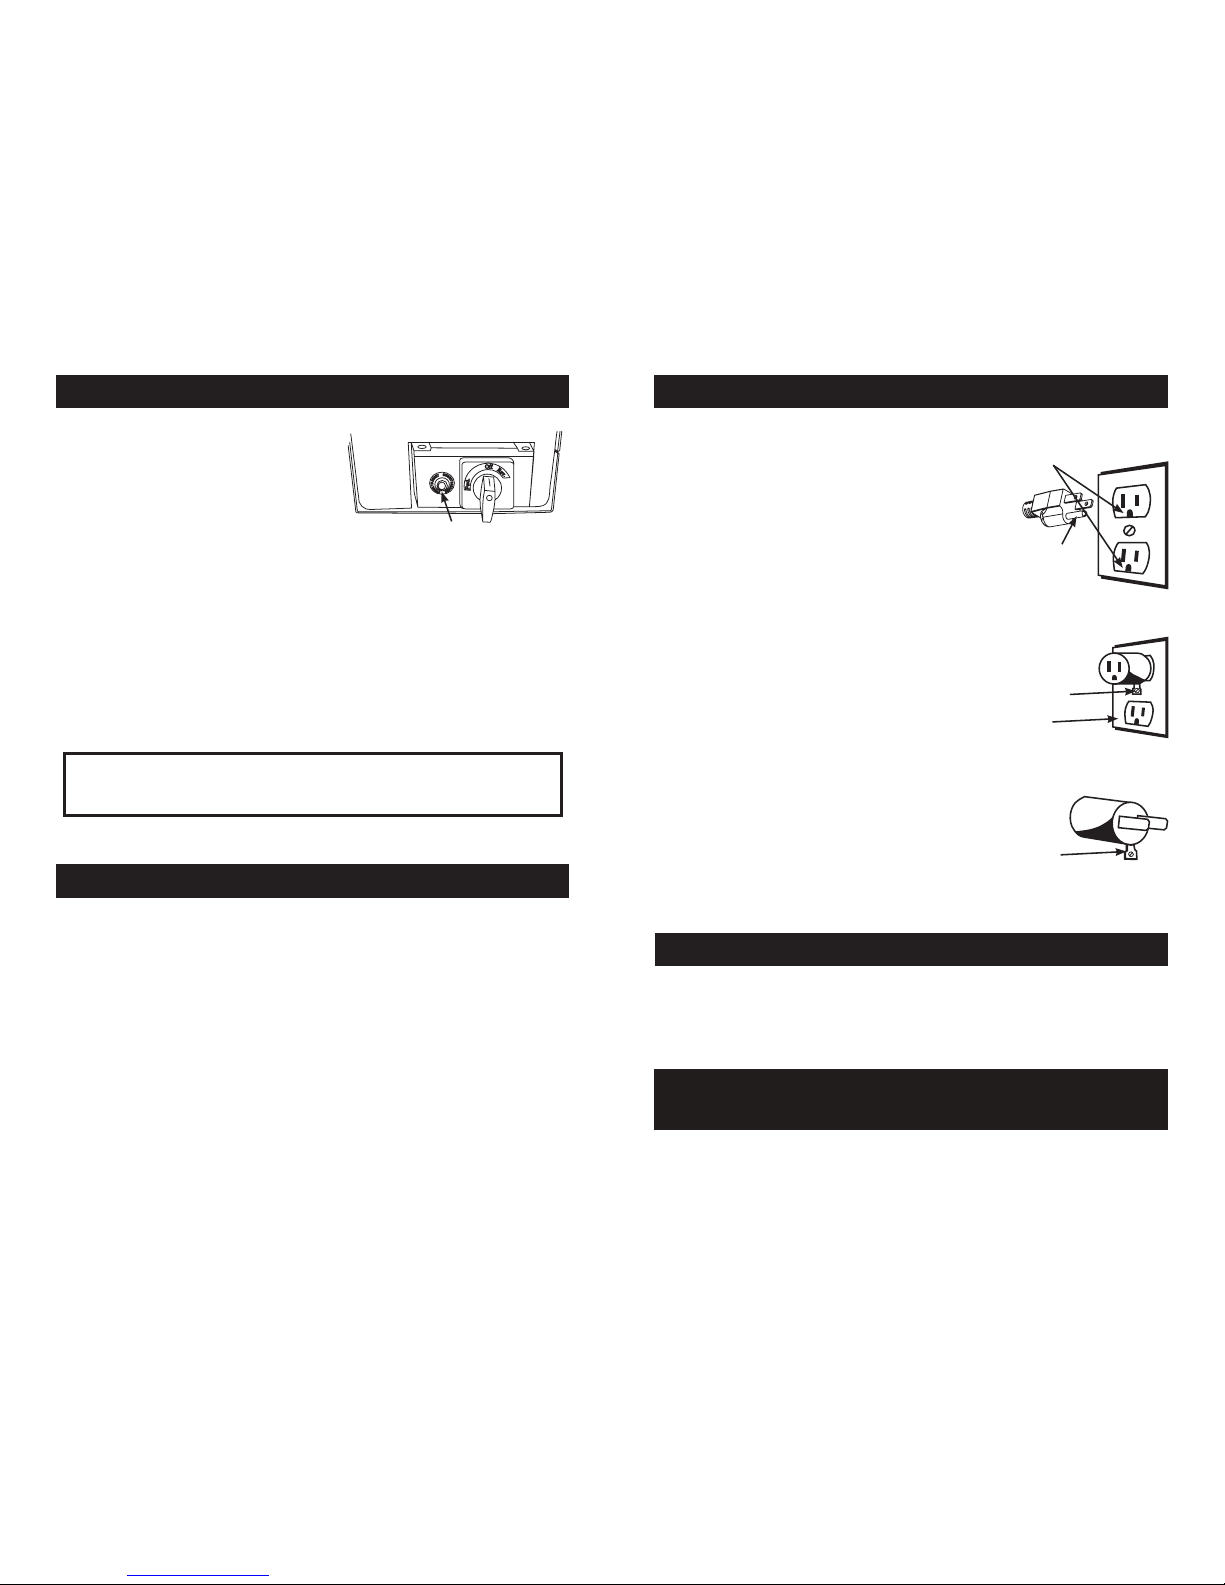
3. Plug the Grinder into a standard 120 Volt,
60 Hz wall outlet.
4. DO NOT USE the Grinder if the Power
Cord, Plug or any other parts are damaged. If
the Power Cord or the Grinder is damaged,
call Customer Service. DO NOT ATTEMPT TO
REPLACE THE CORD. Be sure to not allow
the Power Cord to drape into your work area.
Check that all parts are operating properly,
and perform the intended functions. Check
for alignment of moving parts or any other
conditions that may affect the operation.
5. NEVER use any accessories or parts from
other manufacturers. Doing so will VOID YOUR
WARRANTY and may cause fire, electrical
shock or injury.
6. TO PROTECT AGAINST RISK OF
ELECTRICAL SHOCK: DO NOT SUBMERGE
THE MAIN GRINDER BODY INTO WATER
OR LIQUID. BE SURE THE GRINDER IS
DISCONNECTED FROM THE POWER
SOURCE BEFORE CLEANING. Wash all
parts by hand and thoroughly dry. Thoroughly
clean all parts that will come in contact with
food before using the appliance. NEVER rinse
appliance Grinder Motor under tap, only use a
moist cloth to clean the Grinder Motor Unit.
7. Reduce risk of unintentional starting. Make
sure the Power Switch is in the “OFF” position
before attaching to the power source.
8. KEEP FINGERS CLEAR of the Auger
and Cutting Blades AT ALL TIMES. NEVER
REACH INTO THE GRINDER, doing so may
cause serious injury. ALWAYS USE THE
PROVIDED STOMPER, NEVER FEED FOOD
BY HAND.
9. NEVER use fingers to scrape food away
from the Grinding Plate while the Grinder is in
operation. SEVERE INJURY MAY RESULT.
10. NEVER LEAVE THE GRINDER
UNATTENDED. Be safe, DISCONNECT the
Grinder from power source before leaving the
work area. Close supervision is necessary
when any appliance is used near children. This
appliance is NOT to be used by children.
11. Wait until all moving parts have stopped
before you remove any part of the Grinder, or
before switching the Grinder in reverse.
12. TIE BACK loose hair and clothing, and roll
up long sleeves before operating the Grinder.
REMOVE ties, rings, watches, bracelets, or
other jewelry before operating the Grinder.
13. Be sure the Grinder is on a stable work
surface. Be sure all the Grinder Feet are
stable.
14. DO NOT attempt to grind bones, nuts or
other hard items.
15. DO NOT run Grinder without meat in the
Head. Severe damage to the Head and Auger
may occur.
16. WEAR EYE PROTECTION. Wear safety
glasses. Everyday eye glasses are not safety
glasses. Safety glasses conform to ANSI Z87.1
requirements. Note: approved safety glasses
have Z87 printed or stamped on them.
17. DO NOT use outdoors.
18. DO NOT use the Grinder while under the
influence of drugs, medications or alcohol.
19. DO NOT let the Power Cord hang over
edge of work surface.
20. DO NOT attempt to operate the Grinder
if the Grinder itself is cold. The Grinder
temperature should be at least 45oF (7oC)
before beginning.
21. The Gear Housing and the Motor Cover
may become HOT during operation. This is
normal. DO NOT touch these parts during
operation or until they cool after use.
IMPORTANT SAFETY RULES
SAVE THESE INSTRUCTIONS!
Refer to them often and use them to instruct others.
READ AND FULLY UNDERSTAND ALL INSTRUCTIONS
AND WARNINGS PRIOR TO USING THIS UNIT. YOUR
SAFETY IS MOST IMPORTANT! FAILURE TO COMPLY
WITH PROCEDURES AND SAFEGUARDS MAY RESULT
IN SERIOUS INJURY OR PROPERTY DAMAGE.
REMEMBER: YOUR PERSONAL SAFETY IS YOUR
RESPONSIBILITY!
There are basic rules to follow when handling food.
They are COOK, SEPARATE, CLEAN, and CHILL.
COOK
It’s crucial to cook food to a safe internal temperature to destroy bacteria that is
present. The safety of hamburgers and other foods made with ground meat has
been receiving a lot of attention lately, and with good reason. When meat is ground,
the bacteria present on the surface is mixed throughout the ground mixture. If this
ground meat is not cooked to at least 160oF to 165oF (71oC to 74oC), bacteria will not
be destroyed and there’s a good chance you will get sick.
Solid pieces of meat like steaks and chops don’t have dangerous bacteria like E.
coli on the inside, so they can be served more rare. Still, any beef cut should be
cooked to an internal temperature of at least 145oF (63oC) (medium rare). The safe
temperature for poultry is 180oF (82oC) and solid cuts of pork should be cooked to
160oF (71oC). Eggs should be thoroughly cooked too. If you are making a meringue
or other recipe that uses uncooked eggs, buy specially pasteurized eggs or use
prepared meringue powder.
SEPARATE
Foods that will be eaten uncooked and foods that will be cooked before eating MUST
ALWAYS be separated. Cross-contamination occurs when raw meats or eggs come
in contact with foods that will be eaten uncooked. This is a major source of food
poisoning. Always double-wrap raw meats and place them on the lowest shelf in the
refrigerator so there is no way juices can drip onto fresh produce. Then use the raw
meats within 1-2 days of purchase, or freeze for longer storage. Defrost frozen meats
in the refrigerator, not on the counter.
When grilling or cooking raw meats or fish, make sure to place the cooked meat on
a clean platter. Don’t use the same platter you used to carry the food out to the grill.
Wash the utensils used in grilling after the food is turned for the last time on the grill,
as well as spatulas and spoons used for stir-frying or turning meat as it cooks.
Make sure to wash your hands after handling raw meats or raw eggs. Washing hands
with soap and water, or using a pre-moistened antibacterial towelette is absolutely
necessary after you have touched raw meat or raw eggs. Not washing hands and
surfaces while cooking is a major cause of cross-contamination.
CLEAN
Wash your hands and work surfaces frequently when you are cooking. Washing with
soap and warm water for at least 15 seconds, then dry with a paper towel.
CHILL
Chilling food is very important. The danger zone where bacteria multiply is between
40oF and 140oF (4oC and 6oC). Your refrigerator should be set to 40oF (4oC) or below;
your freezer should be 0oF (-17oC) or below. Simple rule: serve hot foods hot, cold foods
cold. Use chafing dishes or hot plates to keep food hot while serving. Use ice water
baths to keep cold foods cold. Never let any food sit at room temperature for more than
2 hours - 1 hour if the ambient temperature is 90oF (32oC) or above. When packing
for a picnic, make sure the foods are already chilled when they go into the insulated
hamper. The hamper won’t chill food - it just keeps food cold when properly packed
with ice. Hot cooked foods should be placed in shallow containers and immediately
refrigerated so they cool rapidly. Make sure to cover foods after they are cool.
FOOD SAFETY

-18-
GROUNDING
This appliance must be grounded while in use to protect
the operator from electrical shock. The appliance
is equipped with a 3-conductor cord and a 3-prong
grounding type plug to fit the proper grounding-type
receptacle. The appliance has a plug that looks like
Figure A. An adaptor, Figure B, should be used for
connecting Figure A plugs to two-prong receptacles.
The grounding tab which extends from the adaptor must
be connected to a permanent ground such as a properly
grounded outlet box as shown in Figure C using a metal
screw.
EXTENSION CORDS
Use only 3-wire extension cords which have 3-prong
grounding-type plugs and a 3-pole cord connector
that accepts the plug from the appliance. Use only
extension cords having an electrical rating not less than
the rating of the appliance. DO NOT use damaged
extension cords. Examine extension cord before using
and replace if damaged. DO NOT abuse extension
cord and do not yank on any cord to disconnect. Keep
cord away from heat and sharp edges.
Figure A
Figure B
Figure C
Circuit
Grounding
Conductor
Grounding
Prong
Metal
Grounding
Screw
Cover of
Grounded
Outlet Box
Grounding
Means
AA2220
GROUNDING INSTRUCTIONS
. Remove all parts from packaging material and check to be sure there are no
missing parts.
.Retain packaging material for storage of the Grinder and Grinder parts when not
in use.
UNPACKING INSTRUCTIONS
If you are missing any parts, or if any parts are damaged, contact
Cabela’s Customer Service- Retail Store Purchases 1-800-905-2731 (U.S. & Canada) /
Catalog & Internet Purchases: 1-800-237-8888 / All International: 1-308-234-5555
CIRCUIT BREAKER INSTRUCTIONS
-7-
PLEASE NOTE: This Grinder features an all hardened steel gear
transmission. This causes the Grinder to operate at a higher volume and
temperature than other Grinders. This is normal and will not affect the
Grinder’s performance.
This Grinder is equipped with a Circuit
Breaker as a safety precaution. If the Grinder
should stop running follow these steps to
remedy:
1. Turn the Grinder to the “Off” position.
2. Press the Circuit Breaker Reset Button
(Figure 19).
3. Turn the Grinder back on and resume
grinding.
4. If the Grinder still does not turn on, check that the electrical wall outlet is properly
working. Plug in another appliance to see if that appliance works from the wall outlet.
Check that the household circuit breaker has not been tripped. If none of the above
steps remedy the situation, or if the Circuit Breaker repeatedly shuts off the Grinder
contact a customer service for further assistance.
WARNING! DO NOT continue to use the Grinder if the Circuit Breaker trips
repeatedly. Continued use may cause permanent damage to the Grinder and will void
the warranty.
Circuit Breaker
Reset Button
. DO NOT over-tighten the Front Ring Nut. It should be firmly tight.
. Make sure the Grinding Knife blades lay flat on the Grinder Plate.
. DO NOT operate the Grinder without meat in the Head. Running the Grinder
while dry could damage the Head and Auger.
. Always lubricate the Head, Grinding Plate and Grinding Knife with a food-grade
silicone spray after cleaning.
. DO NOT grind bones, nuts or other hard objects.
. If the Grinder Plate becomes clogged during operation, follow these steps to
restore normal output.
. Turn the Grinder “OFF” and disconnect the Power Cord from the electrical outlet.
. Remove the Front Ring Nut and Grinding Plate.
. Thoroughly clean the Grinding Plate. Make sure all of the holes are clear.
. Re-install the Grinding Plate and Front Ring Nut.
. Re-connect the Grinder to the electrical outlet.
. Continue with grinding.
. Repeat as necessary.
GRINDING TIPS
FIGURE 19

-8- -17-
Disassemble the Grinder Head and wash each part thoroughly in warm
water, taking particular care to remove all grease and oil from surfaces. Dry
all parts thoroughly before re-assembling.
DO NOT IMMERSE THE MOTOR IN WATER OR OTHER LIQUIDS!
CLEANING INSTRUCTIONS
1. Wash all parts that have come in contact with meat in hot soapy water. BE SURE
TO CLEAN IMMEDIATELY AFTER USE. DO NOT IMMERSE THE MOTOR IN
WATER OR OTHER LIQUIDS!
2. Rinse the Grinder parts with clear hot water, then dry them IMMEDIATELY.
3. Fully lubricate the Head, Plates and the Knife with a food-grade silicone spray
before and after each use.
4. Clean the Motor Cover and Gear Housing with a damp towel and wipe dry. DO
NOT IMMERSE THE MOTOR IN WATER OR OTHER LIQUIDS!
IMPORTANT: Any non-stainless steel parts must be coated with a food-safe silicone
spray to prevent rusting; if not properly protected, these parts will begin to rust very
quickly. DO NOT use rusted parts. Ordering information can be found on the last
page of this instruction manual.
WARNING! Before cleaning, assembling or disassembling the Grinder,
make sure the PLUG IS REMOVED FROM THE OUTLET/POWER SOURCE!
ALWAYS unplug the Grinder when not in use.
NEVER operate Grinder without the Tray and
the Tray Guard secured in place.
To avoid serious or fatal injury, NEVER reach
into any Grinder inlet.
ALWAYS use the Stomper to push meat
into the Grinder Head.
Read & fully understand all instructions
& warnings prior to use.
WARNING!
PRIOR TO USE 8. Hold the casing in place with one hand while feeding the sausage mixture through
the Grinder. As the meat fills the casing, gently lay it on a clean, dry surface.
NOTE: When using natural casings, use a wet surface.
9. Do not fill the last 3”-4” (7.5-10 cm) of casing. After the entire length of casing has
been stuffed, twist the open end to close, then tie off the ends of the casing tightly to
close. Twist into links.
10. Whenever stuffing sausage, fill the casing slowly to avoid air pockets. If air pockets
do appear in the sausage use a pin to prick the bubbles. The small holes will seal
naturally.
The reverse function only should be used
for brief periods of time to optimize meat
flow through the Grinder. Use it to help
clear a jam, for example.
1. Allow the Grinder Motor to come to
a COMPLETE STOP before engaging in
reverse “REV”.
2. Turn and hold the Power Switch in the
“REV” position (Figure 18).
NOTE: NEVER operate the Grinder in reverse for more than 5 seconds.
3. If the Grinder remains jammed after using the reverse function, turn the Grinder
“OFF”, disconnect the Grinder from the power source. Disassemble the Grinder
Head and clean it according to the “Cleaning Instructions.” Re-assemble the Grinder
and follow the “Grinding Instructions/ Stuffing Instructions.”
USING THE REVERSE FUNCTION
NEVER operate Grinder without the Tray and
the Tray Guard secured in place.
To avoid serious or fatal injury, NEVER reach
into any Grinder inlet.
ALWAYS use the Stomper to push meat
into the Grinder Head.
Read & fully understand all instructions
& warnings prior to use.
WARNING!
Reverse
Button
FIGURE 18

1. Insert the Head into the Gear Housing
with the Feed Chute facing straight up. You
will need to line up the slot in the Head with
the Pin inside the Gear Housing. Be sure the
Head is seated fully into the Gear Housing
(Figure 1).
2. Tighten the Head Locking Knob to lock
the Head into place.
3. Insert the Auger, with the Auger Bearing
attached, into the Head (Figure 2). Align the
Auger Splines with the Drive Shaft of the
Grinder.
NOTE: Periodically inspect the Auger
Bearing for wear. If the Auger Bearing is
worn excessively, replace it immediately or
Head damage could result.
4. Place the Knife onto the square portion
of the Auger Pin (Figure 2). Be sure the blades
of the Knife are facing outward.
5. Place one of the Grinder Plates onto the
Auger Pin; align the notch in the Grinder
Plate with the Pin in the Grinder Head.
6. Install the Front Ring Nut, DO NOT
OVERTIGHTEN. Turn the Front Ring Nut
untilit makes contact with the Grinder Plate,
then make 1/4 turn more to tighten into
place.
...INSTRUCTIONS CONTINUED ON NEXT PAGE
GRINDER ASSEMBLY INSTRUCTIONS
WARNING! Before cleaning, assembling or disassembling the Grinder,
make sure the PLUG IS REMOVED FROM THE OUTLET/POWER SOURCE!
ALWAYS unplug the Grinder when not in use.
Gear Housing
Head
Slot in Head FIGURE 1
Head Locking
Knob
FIGURE 2
Head
Auger Bearing
Auger
Auger Splines
Auger Pin
Knife
Grinder Plate
Front Ring
Nut
NOTE! Be sure the blades
of the Knife are facing out.
NEVER operate Grinder without the Tray and
the Tray Guard secured in place.
To avoid serious or fatal injury, NEVER reach
into any Grinder inlet.
ALWAYS use the Stomper to push meat
into the Grinder Head.
Read & fully understand all instructions
& warnings prior to use.
WARNING!
1. After grinding the meat following
the “Grinding Instructions”, mix the
ground meat with the sausage
seasonings.
2. Follow the “Stuffer Assembly
Instructions” or the “High-Speed
Stuffer Assembly Instructions” to
fully assemble the Grinder as a
Stuffer including the Tray and
Tray Guard.
NOTE: While one person can
stuff sausage with this Grinder, it
is recommended that two people perform this operation. For best results when using the
High-Speed Stainless Steel 10 mm Stuffing Funnel do not grind the meat through the
4.5 mm Grinding Plate.
3. Place seasoned ground meat into the Tray. Do not overfill the Tray, place just
enough meat to leave the Feed Chute area open.
4. Slide a sausage casing over the Stuffing Funnel. See the “Sausage
Information / Casing” section of this manual for more information.
5. Slide 4”-6” (10-15 cm) of casing from the end
of the Stuffing Funnel and tie a knot in the end
of the casing. If you are using large diameter
fibrous casing, hold the closed end of the casing
tightly against the end of the Stuffing Funnel
(Figure 17).
6. Make sure the Grinder is in the “OFF” position.
Attach the Grinder to the power supply.
7. Switch the Grinder to the forward “FWD”
position. Carefully start feeding ground meat into
the Feed Chute. ONLY USE THE STOMPER TO
PUSH MEAT INTO THE HEAD, DO NOT USE
YOUR FINGERS OR ANY OTHER OBJECT.
WARNING! The Tray Guard
helps protect the user from serious
personal injury. NEVER
reach under or around the
Tray Guard. ALWAYS
use the Stomper to
feed and push meat
into the Grinder.
...INSTRUCTIONS CONTINUED ON NEXT PAGE
STUFFING INSTRUCTIONS
WARNING! Before cleaning, assembling or disassembling the Grinder,
make sure the PLUG IS REMOVED FROM THE OUTLET/POWER SOURCE!
ALWAYS unplug the Grinder when not in use.
NEVER operate Grinder without the Tray and
the Tray Guard secured in place.
To avoid serious or fatal injury, NEVER reach
into any Grinder inlet.
ALWAYS use the Stomper to push meat
into the Grinder Head.
Read & fully understand all instructions
& warnings prior to use.
WARNING!
FIGURE 17
Tray
Guard
Stomper
-9-
-16-
Feed
Chute
Motor
Cover
Feed
Chute
The Gear Housing and the Motor Cover
may become HOT during operation. This is
normal. DO NOT touch these parts during
operation or until they cool after use.
HOT
DO NO T T OUCH!
Gear
Housing

FIGURE 3
Tray
Head
7. Insert the neck of the Tray into the Feed
Chute (Figure 3).
8. Loosen the Allen Screws in the Tray
Guard until the screw ends are flush with the
Tray Guard (Figure 4).
9. Align the curved ends of the Tray Guard
with the curved sides of the Tray. The hole on
the Tray Guard will line up with the hole in the
Tray.
10. The tabs of the Tray Guard will fit over the
sides of the Tray. Gently press down on the
Tray Guard until it fully seats onto the sides of
the Tray, curving into the Tray (Figure 5).
11. Tighten the Allen Screws with the Allen
Wrench to secure the Tray Guard onto the
Tray. DO NOT OVERTIGHTEN the Allen
Screws.
12. NEVER operate Grinder without the Tray
and the Tray Guard secured in place.
REFER TO “GRINDING INSTRUCTIONS”
FIGURE 4
Tray
Allen Screws
Tray Guard
FIGURE 5
Tray Guard
NEVER operate Grinder without the Tray and
the Tray Guard secured in place.
To avoid serious or fatal injury, NEVER reach
into any Grinder inlet.
ALWAYS use the Stomper to push meat
into the Grinder Head.
Read & fully understand all instructions
& warnings prior to use.
WARNING!
7. Insert the neck of the Tray into the Feed
Chute (Figure 14).
8. Loosen the Allen Screws in the Tray
Guard until the screw ends are flush with the
Tray Guard (Figure 4).
9. Align the curved ends of the Tray Guard
with the curved sides of the Tray. The hole on
the Tray Guard will line up with the hole in the
Tray.
10. The tabs of the Tray Guard will fit over the
sides of the Tray. Gently press down on the
Tray Guard until it fully seats onto the sides of
the Tray, curving into the Tray (Figure 5).
11. Tighten the Allen Screws with the Allen
Wrench to secure the Tray Guard onto the
Tray. DO NOT OVERTIGHTEN the Allen
Screws.
12. NEVER operate Grinder without the Tray
and the Tray Guard secured in place.
REFER TO “STUFFING INSTRUCTIONS”
FIGURE 14
Tray
Head
FIGURE 15
Tray
Allen Screws
Tray Guard
FIGURE 16
Tray Guard
NEVER operate Grinder without the Tray and
the Tray Guard secured in place.
To avoid serious or fatal injury, NEVER reach
into any Grinder inlet.
ALWAYS use the Stomper to push meat
into the Grinder Head.
Read & fully understand all instructions
& warnings prior to use.
WARNING!
-10- -15-
Feed
Chute
Neck Feed Chute
Neck
Allen Wrench
Allen Wrench

1. Follow the “Grinder Assembly
Instructions” to fully assemble the
Grinder including the Tray and Tray
Guard.
NOTE: It is best to grind the meat
using the coarse, 7 mm Grinding
Plate first. If a finer grind of meat is
desired, run the coarse ground meat
through the Grinder a second time
using the fine, 4.5 mm Grinding
Plate.
2. Trim the meat of all cords,
tendons, bones, shot, etc.
3. For best results, be sure that all meat
has been chilled to between 32-34oF (0-1oC)
before grinding. DO NOT ALLOW MEAT
TO SIT OUT AT ROOM TEMPERATURE
LONGER THAN ABSOLUTELY NEEDED.
Closely follow the “Food Safety” instructions
as outlined by the USDA.
4. Cut meat into sizes small enough to fit into
the Feed Chute. Approximately 1” (2.5 cm)
cubes.
5. Place cubed meat to be ground into the
Tray. Do not overfill the Tray, place just
enough meat to leave the Feed Chute area
open.
6. Place a dish or bowl to collect the ground
meat at the end of the Grinder Head (Figure 6).
7. Make sure the Grinder is in the “OFF”
position. Attach the Grinder to the power
supply.
8. Switch the Grinder to the forward “FWD”
position. Carefully start feeding cubes of
meat into the Feed Chute. ONLY USE THE
STOMPER TO PUSH MEAT INTO THE
HEAD, DO NOT USE YOUR FINGERS OR
ANY OTHER OBJECT.
WARNING! The Tray Guard helps protect
the user from serious personal injury. NEVER
reach under or around the Tray Guard.
ALWAYS use the Stomper to feed and push
meat into the Grinder.
GRINDING INSTRUCTIONS
WARNING! Before cleaning, assembling or disassembling the Grinder,
make sure the PLUG IS REMOVED FROM THE OUTLET/POWER SOURCE!
ALWAYS unplug the Grinder when not in use.
NEVER operate Grinder without the Tray and
the Tray Guard secured in place.
To avoid serious or fatal injury, NEVER reach
into any Grinder inlet.
ALWAYS use the Stomper to push meat
into the Grinder Head.
Read & fully understand all instructions
& warnings prior to use.
WARNING!
FIGURE 6
Tray Guard
Stomper
Grinder
Head
Bowl for
ground meat
WARNING! Before cleaning, assembling or disassembling the Grinder,
make sure the PLUG IS REMOVED FROM THE OUTLET/POWER SOURCE!
ALWAYS unplug the Grinder when not in use.
NEVER operate Grinder without the Tray and
the Tray Guard secured in place.
To avoid serious or fatal injury, NEVER reach
into any Grinder inlet.
ALWAYS use the Stomper to push meat
into the Grinder Head.
Read & fully understand all instructions
& warnings prior to use.
WARNING!
HIGH-SPEED STUFFER
ASSEMBLY INSTRUCTIONS
NOTE: The High-Speed Stuffing System
is designed for use with the 10 mm Funnel
ONLY. DO NOT attempt to use the High-
Speed Plastic Auger with any other Funnels.
SERIOUS DAMAGE to the Grinder Head
and other components may occur. Follow
the “Standard Stuffer Assembly Instructions”
located in this manual, when using the 20, 30,
or 40 mm Funnels.
1. Insert the Head into the Gear Housing
with the feed chute of the Head facing straight
up. You will need to line up the slot in the
Head with the Pin inside the Gear Housing.
Be sure the Head is seated fully into the Gear
Housing (Figure 12).
2. Tighten the Head Locking Knob to lock
the Head into place.
3. Insert the Auger, with the Auger Bearing
attached, into the Head (Figure 13). Align the
Auger Splines with the Drive Shaft of the
Grinder.
NOTE: Periodically inspect the
Auger Bearing for wear. If the
Auger Bearing is worn excessively,
replace it immediately or Head
damage could result.
4. Slide the High Speed Plastic
Auger onto the Auger Pin making
sure the square part of the Plastic
Auger fully seats on to the square
portion of the Auger Pin.
5. Slide the 10 mm Stuffing Funnel
through the through the Flange and
place it through the Front Ring Nut.
6. Install the Front Ring Nut,
DO NOT OVERTIGHTEN. Turn
the Front Ring Nut until it makes
contact with the Flange, then make
1/4 turn more to tighten into place.
...INSTRUCTIONS CONTINUED
ON NEXT PAGE
Gear Housing
Head
Slot in Head
FIGURE 12
Head Locking
Knob
FIGURE 13
Head
Auger Bearing
Auger
Auger Splines
Auger Pin
High-Speed
Plastic Auger
Front Ring
Nut
Flange
-11-
-14-
Feed
Chute
The Gear Housing and the Motor Cover
may become HOT during operation. This is
normal. DO NOT touch these parts during
operation or until they cool after use.
HOT
DO NO T T OUCH!
Motor
Cover
Feed
Chute
Gear
Housing

WARNING! Before cleaning, assembling or disassembling the Grinder,
make sure the PLUG IS REMOVED FROM THE OUTLET/POWER SOURCE!
ALWAYS unplug the Grinder when not in use.
NEVER operate Grinder without the Tray and
the Tray Guard secured in place.
To avoid serious or fatal injury, NEVER reach
into any Grinder inlet.
ALWAYS use the Stomper to push meat
into the Grinder Head.
Read & fully understand all instructions
& warnings prior to use.
WARNING!
STANDARD STUFFER
ASSEMBLY INSTRUCTIONS
1. Insert the Head into the Gear Housing
with the feed chute of the Head facing straight
up. You will need to line up the slot in the
Head with the Pin inside the Gear Housing.
Be sure the Head is seated fully into the Gear
Housing (Figure 7).
2. Tighten the Head Locking Knob to lock
the Head into place.
3. Insert the Auger, with the Auger Bearing
attached, into the Head (Figure 8). Align the
Auger Splines with the Drive Shaft of the
Grinder.
NOTE: Periodically inspect the Auger
Bearing for wear. If the Auger Bearing is
worn excessively, replace it immediately or
Head damage could result.
4. Slide the Stuffing Star over the
round portion of the Auger Pin.
5. Slide one of the Stuffing Funnels
through the Flange and place it
through the Front Ring Nut.
6. Install the Front Ring Nut, DO
NOT OVERTIGHTEN. Turn the
Front Ring Nut until it makes contact
with the Flange, then make 1/4 turn
more to tighten into place.
...INSTRUCTIONS CONTINUED ON NEXT PAGE
Gear Housing
Head
Slot in Head FIGURE 7
Head Locking
Knob
FIGURE 8
Head
Auger Bearing
Auger
Auger Splines
Auger Pin
Front Ring
Nut
Flange
7. Insert the neck of the Tray into the Feed
Chute (Figure 9).
8. Loosen the Allen Screws in the Tray
Guard until the screw ends are flush with the
Tray Guard (Figure 4).
9. Align the curved ends of the Tray Guard
with the curved sides of the Tray. The hole on
the Tray Guard will line up with the hole in the
Tray.
10. The tabs of the Tray Guard will fit over the
sides of the Tray. Gently press down on the
Tray Guard until it fully seats onto the sides of
the Tray, curving into the Tray (Figure 5).
11. Tighten the Allen Screws with the Allen
Wrench to secure the Tray Guard onto the
Tray. DO NOT OVERTIGHTEN the Allen
Screws.
12. NEVER operate Grinder without the Tray
and the Tray Guard secured in place.
REFER TO “STUFFING INSTRUCTIONS”
FIGURE 9
Tray
Head
FIGURE 10
Tray
Allen Screws
Tray Guard
FIGURE 11
Tray Guard
NEVER operate Grinder without the Tray and
the Tray Guard secured in place.
To avoid serious or fatal injury, NEVER reach
into any Grinder inlet.
ALWAYS use the Stomper to push meat
into the Grinder Head.
Read & fully understand all instructions
& warnings prior to use.
WARNING!
-12- -13-
Feed
Chute
Feed
Chute
Neck
Allen Wrench
This manual suits for next models
1
Table of contents
Other Cabela's Meat Grinder manuals