Cabela's GunDog GS-4100 User manual

GS-4100
TRAINER
OPERATING GUIDE
PLEASE READ THIS ENTIRE GUIDE BEFORE BEGINNING
MANUEL D’UTILISATION
VEUILLEZ LIRE L’INTÉGRALITÉ DE CE MANUEL AVANT DE COMMENCER

2
IMPORTANT SAFETY INFORMATION
EXPLANATION OF ATTENTION WORDS AND SYMBOLS USED IN THIS GUIDE
This is the safety alert symbol. It is used to alert you to potential personal injury hazards. Obey all
safety messages that follow this symbol to avoid possible injury or death.
WARNING indicates a hazardous situation which, if not avoided, could result in death or
serious injury.
CAUTION, used without the safety alert symbol, indicates a hazardous situation which, if
not avoided, could result in harm to your dog.
• Not for use with aggressive dogs. Do not use this product if your dog is aggressive, or if your dog is prone
to aggressive behavior. Aggressive dogs can cause severe injury and even death to their owner and others.
If you are unsure whether this product is appropriate for your dog, please consult your veterinarian or a
certified trainer.
• This device contains Lithium-Ion (Li-Ion) batteries; DON’T attempt to cut into or pry open the battery. Be
sure to discard any used battery properly.
• Never incinerate, puncture, deform, short-circuit or charge with an inappropriate charger. Fire,
explosion, property damage, or bodily harm may occur if this warning is not followed.
• There is a risk of explosion if a battery is replaced by an incorrect type. Do not short circuit, mix old and
new batteries, dispose of in fire, or expose to water. When batteries are stored or disposed, they must be
protected from shorting.
• The battery should be charged in areas with temperatures ranging from 32°F to 100°F. Recharging the
battery outside of this temperature range can cause the battery to overheat, explode, or catch fire.

3
Proper fit of the collar is important. A collar worn for too long or made too tight on the dog’s neck may cause
skin damage ranging from redness to pressure ulcers. This condition is commonly known as bed sores or
pressure necrosis.
• Avoid leaving the collar on the dog for more than 12 hours per day.
• When possible, reposition the collar on the dog’s neck every 1 to 2 hours.
• Check the fit to prevent excessive pressure; follow the instructions in this manual.
• Never connect a lead/leash to the electronic collar; it will cause excessive pressure on the contacts.
• When using a separate collar for a lead/leash, don’t put pressure on the electronic collar.
• Wash the dog’s neck area and the contacts of the collar weekly with a damp cloth.
• Examine the contact area daily for signs of a rash or a sore.
• If a rash or sore is found, discontinue use of the collar until the skin has healed.
• If the condition persists beyond 48 hours, see your veterinarian.
For additional information on bed sores and pressure necrosis, please visit the Support section for remote
trainers at support.sportdog.com.
These steps will help keep your dog safe and comfortable. Millions of dogs are comfortable while they wear
stainless steel contacts. Some dogs are sensitive to contact pressure. You may find after some time that your
dog is very tolerant of the collar. If so, you may relax some of these precautions. It is important to continue
daily checks of the contact area. If redness or sores are found, discontinue use until the skin has fully healed.
• You may need to trim the hair in the area of the Contact Points or switch to the longer Contact Points to
ensure consistent contact. Never shave the dog’s neck; this may lead to a rash or infection.
• You should not make the collar any tighter than is required for good contact. A collar that is too tight will
increase the risk of pressure necrosis in the contact area.

4
Thank you for choosing this Cabela’s training collar. Used properly, this product will help you train your
dog efficiently and safely. To ensure your satisfaction, please review this Operating Guide thoroughly. If
you have questions regarding this product’s operation, please see the Frequently Asked Questions and
Troubleshooting sections, contact the Customer Care Center at 1-800-732-0144, or visit cabelas.com
or basspro.com.
To get the most protection out of your two year warranty, please register your product within 30 days at
sportdog.com/cabelasgundog. By registering and keeping your receipt, you will enjoy the product’s full
warranty and, should you ever need to call the Customer Care Center, we will be able to help you faster.
Most importantly, your valuable information will never be given or sold to anyone. Complete warranty
information is available online at sportdog.com/support/warranty.
TABLE OF CONTENTS
COMPONENTS . . . . . . . . . . . . . . . . . . . . . . . . . . . . . . . . . . . . . . . . . . . . . . . . . . . . . . . . . . . . . . . . . . . . . . . . . . . . . . . . . . . 5
HOW THE SYSTEM WORKS. . . . . . . . . . . . . . . . . . . . . . . . . . . . . . . . . . . . . . . . . . . . . . . . . . . . . . . . . . . . . . . . . . . . . . . . . 5
KEY DEFINITIONS . . . . . . . . . . . . . . . . . . . . . . . . . . . . . . . . . . . . . . . . . . . . . . . . . . . . . . . . . . . . . . . . . . . . . . . . . . . . . . . . 6
PREPARE THE REMOTE TRANSMITTER. . . . . . . . . . . . . . . . . . . . . . . . . . . . . . . . . . . . . . . . . . . . . . . . . . . . . . . . . . . . . . .7
PREPARE THE COLLAR RECEIVER . . . . . . . . . . . . . . . . . . . . . . . . . . . . . . . . . . . . . . . . . . . . . . . . . . . . . . . . . . . . . . . . . . 8
FIT THE COLLAR RECEIVER . . . . . . . . . . . . . . . . . . . . . . . . . . . . . . . . . . . . . . . . . . . . . . . . . . . . . . . . . . . . . . . . . . . . . . . .11
FIND THE BEST INTENSITY LEVEL FOR YOUR DOG . . . . . . . . . . . . . . . . . . . . . . . . . . . . . . . . . . . . . . . . . . . . . . . . . . 12
GENERAL TRAINING TIPS . . . . . . . . . . . . . . . . . . . . . . . . . . . . . . . . . . . . . . . . . . . . . . . . . . . . . . . . . . . . . . . . . . . . . . . . 12
PROGRAM THE REMOTE TRANSMITTER. . . . . . . . . . . . . . . . . . . . . . . . . . . . . . . . . . . . . . . . . . . . . . . . . . . . . . . . . . . . .13
MATCH THE COLLAR RECEIVER AND REMOTE TRANSMITTER. . . . . . . . . . . . . . . . . . . . . . . . . . . . . . . . . . . . . . . . . 14
TEST LIGHT TOOL INSTRUCTIONS. . . . . . . . . . . . . . . . . . . . . . . . . . . . . . . . . . . . . . . . . . . . . . . . . . . . . . . . . . . . . . . . . 14
ACCESSORIES. . . . . . . . . . . . . . . . . . . . . . . . . . . . . . . . . . . . . . . . . . . . . . . . . . . . . . . . . . . . . . . . . . . . . . . . . . . . . . . . . . . 15
FREQUENTLY ASKED QUESTIONS . . . . . . . . . . . . . . . . . . . . . . . . . . . . . . . . . . . . . . . . . . . . . . . . . . . . . . . . . . . . . . . . . 16
TROUBLESHOOTING. . . . . . . . . . . . . . . . . . . . . . . . . . . . . . . . . . . . . . . . . . . . . . . . . . . . . . . . . . . . . . . . . . . . . . . . . . . . . .17
TERMS OF USE AND LIMITATION OF LIABILITY. . . . . . . . . . . . . . . . . . . . . . . . . . . . . . . . . . . . . . . . . . . . . . . . . . . . . . 18
COMPLIANCE . . . . . . . . . . . . . . . . . . . . . . . . . . . . . . . . . . . . . . . . . . . . . . . . . . . . . . . . . . . . . . . . . . . . . . . . . . . . . . . . . . . 18
BATTERY DISPOSAL . . . . . . . . . . . . . . . . . . . . . . . . . . . . . . . . . . . . . . . . . . . . . . . . . . . . . . . . . . . . . . . . . . . . . . . . . . . . . 19
IMPORTANT RECYCLING ADVICE . . . . . . . . . . . . . . . . . . . . . . . . . . . . . . . . . . . . . . . . . . . . . . . . . . . . . . . . . . . . . . . . . . 19

5
COMPONENTS
Lanyard and carabiner also included.
HOW THE SYSTEM WORKS
The Cabela’s GS-4100 has been proven safe, comfortable, and effective for all dogs over 8 pounds. Consistent,
correct use of this product allows you to reinforce commands and correct misbehavior from up to ¼ of a mile.
The Remote Transmitter sends a signal, activating the Collar Receiver to deliver a harmless stimulation. With
proper training, a dog will learn to associate this signal with a command. This model features adjustable static
stimulation levels so you can tailor the static stimulation level to your dog’s temperament, eliminating the
risk of over-correction.
IMPORTANT: The Cabela’s GS-4100 has a range of up to ¼ of a mile.
Depending on the way you hold the remote transmitter, the maximum
range may vary. For consistent results atlonger ranges, hold the remote
transmitter in a vertical position away from your body and above your head.
Terrain, weather, vegetation, transmission from other radio devices, and
other factorswill affectthe maximum range.
Do not use this product if your dog is aggressive, or if your dog is prone to aggressive
behavior. Aggressive dogs can cause severe injury and even death to their owner and others. If you are unsure
whether this product is appropriate for your dog, please consult your veterinarian or a certified trainer.

6
THE COLLAR RECEIVER IS CAPABLE OF DELIVERING FOUR TYPES OF STIMULATION:
CONTINUOUS: You control both when and how long static stimulation is delivered, up to a maximum of
10 seconds. After 10 seconds, the static stimulation will “time out” and the Left Button needs to be released
and then pressed again before additional static stimulation can be delivered.
MOMENTARY (NICK) : Static stimulation is delivered for 1/10 of a second, regardless of how long the button
is pressed.
TONE: The Collar Receiver will make a rapid beeping noise when a Tone Button is pressed.**
VIBRATION: The Collar Receiver will vibrate when a Vibration Button is pressed, up to a maximum of
10 seconds. After 10 seconds, the vibration will “time out” and the Left or Right Button will need to be
released and then pressed again before additional vibration stimulation can be delivered.**
* *Tone and vibration come preset and are not adjustable.
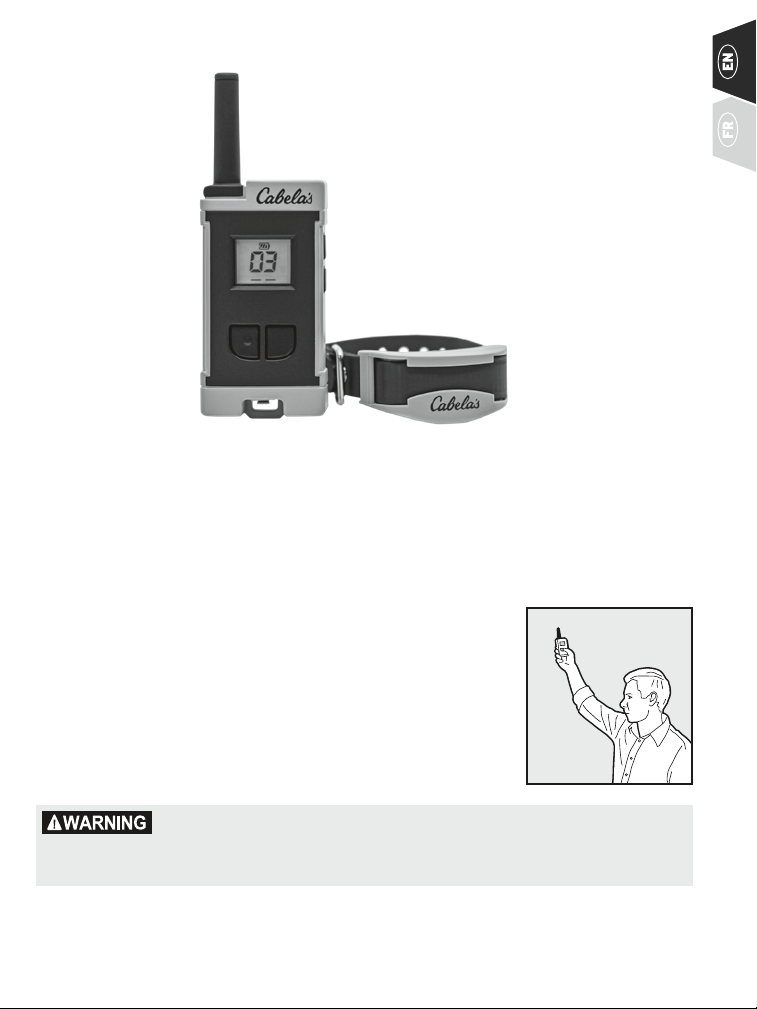
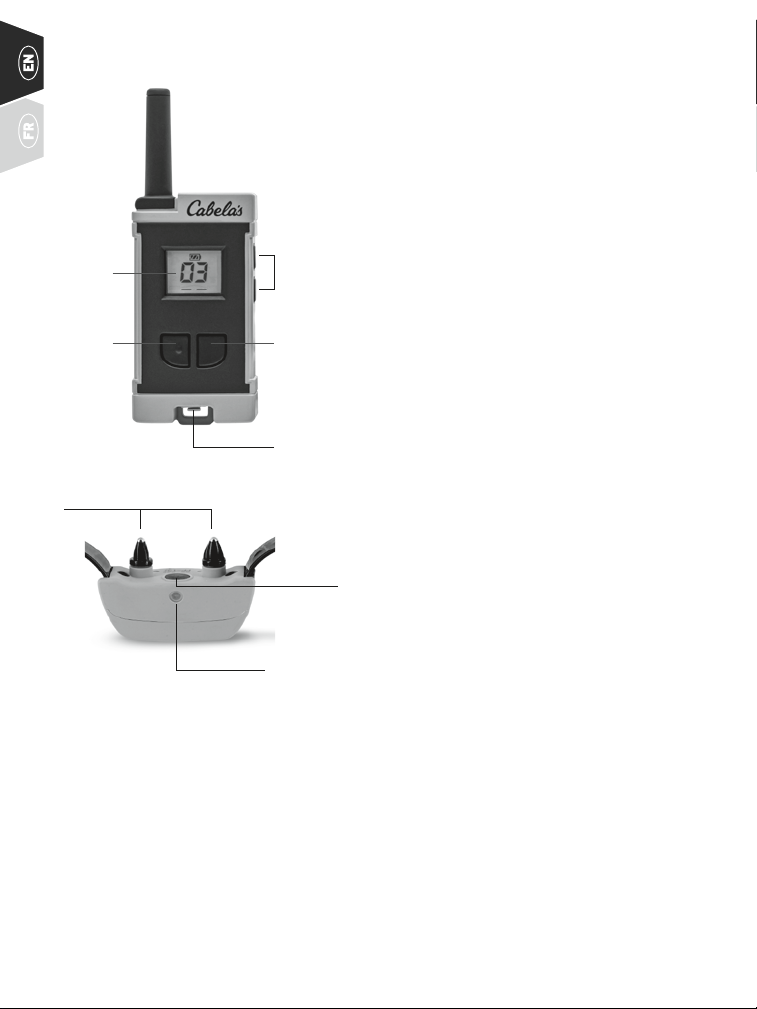
REMOTE TRANSMITTER: Transmits the radio signal to the
Collar Receiver. It is waterproof and can be submerged in
water to a depth of 3 feet.
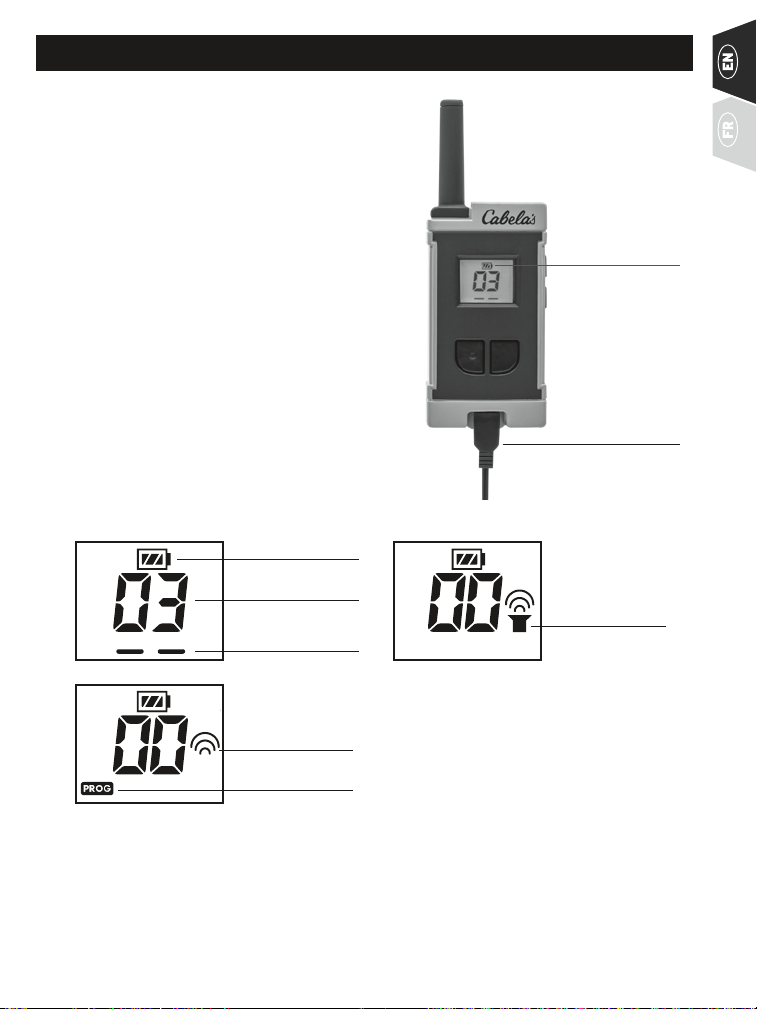
LCD: Indicates battery level and stimulation type/level
(00 = tone or vibration, 1-15 = static stimulation).
SIDE BUTTONS: These two buttons adjust the level
of stimulation (00 = tone or vibration stimulation;
1-15 = static stimulation level).
RIGHT BUTTON: This button is factory-set to deliver
momentary (nick) static stimulation; Level 00 will deliver
tone stimulation.*
LEFT BUTTON: This button is factory-set to deliver
continuous static stimulation; Level 00 will deliver
tone stimulation.*
*See STEP 5 for instructions on how to set these buttons to
vibration stimulation if desired.
CHARGING JACK: For connecting the charger. Although the
Remote Transmitter is waterproof without it, keep the cover
in place when not charging to keep debris out of the opening.
COLLAR RECEIVER: Receives the radio signal from the
Remote Transmitter and delivers the static, vibration, or
tone stimulation for correcting or cueing your dog. It is
waterproof and can be submerged in water to a depth
of 25 feet.
RECEIVER INDICATOR LIGHT: Indicates when the Collar
Receiver has been turned on or off, serves as a low-battery
indicator, and also indicates when continuous static,
momentary static, vibration, or tone stimulation is given.
CONTACT POINTS: The contacts through which the Collar
Receiver delivers stimulation.
ON/OFF BUTTON: Momentarily pressing and releasing this
button turns the Collar Receiver on and off.
CHARGING JACK
SIDE
BUTTONS
RIGHT
BUTTON
LCD
LEFT
BUTTON
TRANSMITTER
ANTENNA
KEY DEFINITIONS
CONTACT POINTS
ON/OFF BUTTON
INDICATOR LIGHT

7
STEP :: 01
PREPARE THE REMOTE TRANSMITTER
CHARGE THE REMOTE TRANSMITTER
1. Lift the rubber cover protecting the Charging Jack
2. Connect one of the charger connectors to the
Charging Jack.
3. Plug the charger into a standard120/240-volt AC
wall outlet.
4. Charge the Remote Transmitter for 2 hours for the
first charge and every charge thereafter.
Using Li-Ion technology, the Remote Transmitter only
requires a 2 hour charge. It is not harmful to let the unit
charge for more than 2 hours.
5. When charging is complete, remove the charger
connector, and replace the rubber cover. The unit
will preform a brief LCD test, and revert back to the
normal LCD screen.
NOTE: Approximate battery life between charges is
40 to 60 hours, depending on frequency of use.
BATTERY ICON:
CYCLES LOW, MEDIUM,
AND HIGH DURING
CHARGE. FULL BAR WHEN
COMPLETELY CHARGED.
CHARGER CONNECTOR
PLACED IN THE REMOTE
TRANSMITTER
CHARGING JACK.
TRANSMITTER LCD
NOTE: The Remote Transmitter’s backlight turns off after 5 seconds to conserve battery life; the LCD display
automatically turns off after approximately 30 minutes.
* Remains solid for continuous static stimulation; flashes once for momentary (nick) static stimulation
** See STEP 5 for instructions on changing modes.
BATTERY STATUS
TONE INDICATOR
STIMULATION LEVEL
STIMULATION INDICATOR*
VIBRATION INDICATOR
PROGRAM MODE**

8
STEP :: 02
PREPARE THE COLLAR RECEIVER
CHARGE THE COLLAR RECEIVER
1. Lift the rubber cover protecting the Charging Jack.
2. Connect one of the charger connectors to the
Charging Jack.
3. Plug the charger into a standard 120/240-volt AC
wall outlet.
4. Charge the Collar Receiver for 2 hours for the first
charge and every charge thereafter.
Using Li-Ion technology, the Collar Receiver only requires
a 2 hour charge. It is not harmful to let the unit charge for
more than 2 hours.
TO TURN THE COLLAR RECEIVER ON
Press and release the On/Off Button (located between the
Contact Points). The Receiver Indicator Light will come on
and the Collar Receiver emits a start up tone.
TO TURN THE COLLAR RECEIVER OFF
Press and release the On/Off Button. Ther Receiver Indicator Light comes on solid (red) and the Collar
Receiver emits an off tone.
To extend the life between charging cycles, turn the Collar Receiver off when it is not in use.
NOTE: Approximate battery life between charges is 50 to 70 hours, depending on frequency of use.
ON/OFF BUTTON
CHARGER CONNECTOR
PLACED IN THE
COLLAR RECEIVER
CHARGING JACK

9
COLLAR RECEIVER INDICATOR LIGHT
OPERATIONALMODE LIGHT
COLOR BATTERY
STATUS LIGHT FUNCTION SPEAKER
FUNCTION
Unit is turned on via
On/Off Button Green Good Light is solid in color
during the beep sequence Emits start up tone
Unit is turned on via
On/Off Button Red Low Light is solid in color
during the beep sequence Emits start up tone
Unit is turned off via
On/Off Button Red N/A Light is solid in color
during the beep sequence Emits off tone
Unit is on Green Good Light flashes every 2 seconds N/A
Unit is on Red Low Light flashes every 2 seconds N/A
Unit is delivering
continuous static
stimulation Red N/A Light quickly flashes for
as long as the button is pressed
(up to 10 seconds) N/A
Unit is delivering
momentary static
stimulation Red N/A Light quickly flashes once no
matter how long the button
is pressed N/A
Unit is delivering
tone stimulation Green N/A Light quickly flashes for
as long as the button is pressed
Unit will beep
for as long as the
button is pressed
Unit is delivering
vibration stimulation Green N/A Light is solid in color for as long
as the button is pressed
(up to 10 seconds)
Unit will vibrate
for as long as the
button is pressed
(up to 10 seconds)
Unit is charging Green Low Light is solid in color while on
the charger N/A
Unit is fully charged
(charger still
connected) Green Good Light flashes once per second
once the battery is
completely charged N/A

10
RECHARGEABLE BATTERIES
• This device contains Lithium-Ion (Li-Ion) batteries; DO NOT attempt to cut into or pry open the battery.
Be sure to discard any used battery properly.
• Never incinerate, puncture, deform, short-circuit or charge with an inappropriate charger. Fire,
explosion, property damage, or bodily harm may occur if this warning is not followed.
• There is a risk of explosion if a battery is replaced by an incorrect type. Do not short circuit, mix old
and new batteries, dispose of in fire, or expose to water. When batteries are stored or disposed, they
must be protected from shorting.
• The battery should be charged in areas with temperatures ranging from 32°F to 100°F. Recharging the
battery outside of this temperature range can cause the battery to overheat, explode, or catch fire.
• The rechargeable Lithium Ion (Li-Ion) batteries are not memory sensitive, do not require depletion before
charging, and cannot be over charged.
• The batteries come partially charged from the factory, but will require a full charge before the first use.
• When storing the unit for long periods, remember to regularly give batteries a full charge. This should
be done once every 3 to 4 months.
• You should expect hundreds of recharge cycles from your batteries. However, all rechargeable batteries
lose capacity over time relative to the number of recharge cycles they experience. This is normal. If your
operating time drops to half of the original life, contact the Customer Care Center to purchase a new
battery.
• The batteries should last for a period of 3-5 years. When a battery needs replacement, you can order a
new pack by calling the Customer Care Center at 1-800-732-0144. Please do not open the Collar Receiver
or Remote Transmitter until you have received the replacement.

11
STEP :: 03
FIT THE COLLAR RECEIVER
IMPORTANT: The proper fit and placement of the Collar Receiver is important for effective operation. The
Contact Points must have direct contact with your dog’s skin.
See page 3 for Important Safety Information.
To ensure a proper fit, follow these steps:
1. Make sure the unit is off.
2. With your dog standing (3A), center the Collar Receiver
so the Contact Points are underneath your dog’s neck,
touching the skin (3B). If your dog has a long or thick
coat, you have 2 options to ensure consistent contact:
either trim the hair around the Contact Points or switch
to the longer Contact Points included with your system.
3. Check the tightness of the collar by inserting your finger between the end
of a Contact Point and your dog’s neck (3C). The fit should be snug but
not constricting.
4. Allow your dog to wear the collar for several minutes and then recheck the fit.
Check the fit again as your dog becomes more comfortable wearing the collar.
• You may need to trim the hair in the area of the Contact Points. Never shave the dog’s neck; this may
lead to a rash or infection.
• You should not make the collar any tighter than is required for good contact. A collar that is too tight
will increase the risk of pressure necrosis in the contact area.
3A 3B
3C

12
STEP :: 04
FIND THE BEST INTENSITY LEVEL FOR YOUR DOG
The Cabela’s GS-4100 has 15 intensity levels. This allows you to choose the static stimulation that is best for
your dog.
NOTE: Always start at the lowest level and work your way up.
For training efficiency, it is important to find the right intensity level for your dog. This is called the
Recognition Level, at which your dog looks around in curiosity or flicks his ears.
FINDING YOUR DOG’S RECOGNITION LEVEL:
NOTE: Every dog is different and you cannot predict where your dog’s Recognition Level will be. Watch
closely for any slight change in behavior that demonstrates your dog is feeling the static stimulation.
1. With the Collar Receiver turned on and properly fitted to your dog, set the Remote Transmitter to Level 1
and press the Left Button (continuous static stimulation) for 1 to 2 seconds.
2. If your dog shows no reaction to Level 1, go to Level 2 and repeat the process.
3. YOUR DOG SHOULD NOT VOCALIZE OR PANIC WHEN RECEIVING STATIC STIMULATION. IF THIS HAPPENS,
THE STATIC STIMULATION LEVEL IS TOO HIGH AND YOU NEED TO GO BACK TO THE PREVIOUS LEVEL AND
REPEAT THE PROCESS.
4. Once you find your dog’s Recognition Level, this is the level you should use when you begin a training exercise.
5. If you have progressed to Level 15 while searching for your dog’s Recognition Level and your dog
continues to show no response, check to see if the Collar Receiver is snug against your dog’s neck.
Then go back to Level 1 and repeat the process. If your dog still does not indicate he is feeling the static
stimulation, you have two options: trim the hair beneath the Contact Points or switch to the longer
Contact Points included in your system.
If after completing all of these steps your dog still does not indicate he is feeling the static stimulation,
please contact the Customer Care Center at 1-800-732-0144.
GENERAL TRAINING TIPS
BEFORE TRAINING YOUR DOG WITH THIS PRODUCT:
You will have the most success using this remote trainer if you always remember to teach a command before
trying to reinforce the command with a remote trainer. In addition, always keep the following training tips
in mind:
• Eliminate one misbehavior or teach one obedience command at a time. If you move too fast with the
training, your dog may become confused.
• Be consistent. Give your dog a tone, vibration, or static stimulation with each misbehavior.
• Do not overcorrect your dog. Use as few stimulations as possible to train your dog.
• Restrict your dog from situations in which he has a history of misbehaving unless you can supervise him
and use the Remote Trainer for applying tone, vibration, or static stimulation.
• If you notice one situation in which your dog misbehaves repeatedly, set up this situation as a training
session. This will dramatically increase your chances of success.
• If your dog has a timid reaction to the tone, vibration, or static stimulation (especially the first couple
of times), do not be alarmed. Redirect his attention to a simple and appropriate behavior (i.e. a known
command, such as “Sit”).
• Never use the Remote Trainer to correct or eliminate any form of aggressive behavior. If your dog exhibits
such behavior, contact a professional trainer. Aggression in dogs is the result of many factors – it may be
a learned behavior or it may be brought on as a result of fear. Another factor contributing to aggression in
dogs is social dominance. Every dog is different.

13
At this point, your remote trainer is ready to use. The transmitter is factory set to Mode 1, but you may wish
to change the mode to fit your situation. See STEP 5, for an explanation of mode options.
STEP :: 05
PROGRAM THE REMOTE TRANSMITTER
NOTE: The Transmitter is factory set to Mode 1. The mode of the Remote Transmitter can be changed to fit
your type or style of training.
TO CHANGE THE MODE:
1. Press and hold both Side Buttons for approximately 3 seconds. The unit will
display the current mode number (1 to 7) and a “PROG” icon.
2. Release both Side Buttons.
3. Use the up/down Side Buttons to select the desired mode according to the
chart below.
4. Press and release the Left Button on the Remote Transmitter to make your
mode selection final. The mode selected will flash three times, and the unit
will return to the previously selected static stimulation level.
REMOTE TRANSMITTER PROGRAM MODES
MODE LEFT BUTTON
FUNCTION RIGHT BUTTON
FUNCTION
STIMULATION
LEVEL
(SET TO 00)
1 Continuous static stimulation Momentary static stimulation Tone
2 Continuous static stimulation Tone Vibration
3 Continuous static stimulation Vibration Tone
4Momentary static stimulation Tone Vibration
5Momentary static stimulation Vibration Tone
6Tone Vibration N/A
7
(ID Code)** N/A N/A N/A
NOTE: Modes 1 to 5 provide 15 levels of static stimulation, which correspond to the Side Button setting;
00 = tone or vibration depending on what mode is selected.
** An ID Code is the signal identification between the Remote Transmitter and Collar Receiver. The GS-4100
has the flexibility to program two or more Remote Transmitters to the same ID Code, allowing them to
control one Collar Receiver. There are 10 programmable ID Codes available.
TO CHANGE THE ID CODE:
1. Follow the instructions above for changing modes. At Step 3, use the up/down Side Buttons to select
Mode 7 (ID Code).
2. Press and release the Left Button on the Remote Transmitter to set the selection. The unit will display the
current user ID on the display or “--“ if the ID hasn’t been currently set.

14
3. Use the up/down Side Buttons to select the desired ID. There are 10 programmable ID Codes available.
4. Press and release the Left Button on the Remote Transmitter to set the selection (LCD will flash three
times). Unit will revert back to original display and the current mode will still be active after ID selection.
STEP :: 06
MATCH THE COLLAR RECEIVER AND REMOTE TRANSMITTER
To match the Collar Receiver to work with a new Remote Transmitter or to match a new Collar Receiver to
work with your existing Remote Transmitter:
A. Turn the Collar Receiver off.
B. Press and hold the On/Off Button. The Receiver Indicator Light will come on, then turn off after 4-5
seconds. If the On/Off Button is released too early, the Receiver Indicator Light will begin flashing as
normal. If this occurs, start over from A.
C. After the Receiver Indicator Light has turned off, release the On/Off Button.
D. Press and hold the Left Button on the Remote Transmitter until the Receiver Indicator Light flashes
5 times. Once the Receiver Indicator Light has flashed 5 times, the Collar Receiver has been matched and
will begin flashing as normal. If the Receiver Indicator Light does not flash 5 times, start over from A.
TEST LIGHT TOOL INSTRUCTIONS
You can verify that the Collar Receiver is delivering static stimulation to your dog by placing the Test Light
Tool, enclosed in your kit, on the Collar Receiver.
1. Turn the Collar Receiver on.
2. Press the Test Light Tool Contacts to the Contact Points of the
Collar Receiver.
3. Press the left static stimulation button on the
Remote Transmitter.
4. The Test Light will flash.
NOTE: At higher static stimulation levels, the Test Light
will flash brighter.
5. Turn the Collar Receiver off.
Save the Test Light Tool for future testing.
NOTE: If the Test Light does not flash, recharge the battery and retest.
If the Test Light still does not flash, contact the Customer Care Center
at 1-800-732-0144.
Test Light Contacts

15
ACCESSORIES
To purchase additional accessories for the GS-4100, contact the Customer Care Center at 1-800-732-0144.
COMPONENT PART NUMBER
3⁄4” Black Collar Strap SAC00-10816
Collar Receiver (does not include collar strap) SDT00-14215
Remote Transmitter SDT17-17698
Contact Points (Short) SAC00-12571
Contact Points (Long) SAC00-12570
Battery Kit (Collar Receiver) SAC54-13735
Battery Kit (Remote Transmitter) SAC54-13734
Wall Charger SAC00-13736

16
FREQUENTLY ASKED QUESTIONS
Is the static stimulation safe for
my dog? While static stimulation may be unpleasant, it is harmless to your
dog. Electronic training devices require interaction and training
from the owner to achieve desired results.
How old does a dog have to be
before using the GS-4100? Your dog should be able to learn basic obedience commands such as
“Sit” or “Stay.” The Collar Receiver may be too large for dogs under
8 pounds.
Once my dog is trained and has
been obeying my commands, will
my dog have to continue to wear
the Collar Receiver?
Your dog may need to wear the Collar Receiver from time to time for
reinforcement. Also, many hunters keep the Collar Receiver on their
dogs while hunting for maximum control.
Is the Collar Receiver waterproof? Yes. If the rechargeable battery pack ever needs to be replaced,
make sure the o-ring and o-ring groove are free from dirt
and debris.
Can my Collar Receiver be used
around salt water? Yes. However, if the Collar Receiver is used in or around salt water, it
should be rinsed with fresh water following each use.
Can I use the GS-4100 with more
than one dog?
No. The GS-4100 is only a one-dog system.
Can I use the GS-4100 on
aggressive dogs? We do not recommend any of our products to be used on aggressive
dogs. We recommend you contact your local veterinarian, or
professional trainer to determine if your dog might be aggressive.
Will I get exactly ¼ of a mile of
range with the GS-4100? The range you get with your GS-4100 will vary according to terrain,
weather, and vegetation as well as transmission from other radio
devices. To get the maximum amount of range, please refer to the
“How the System Works” section of this guide.
How long can I continuously
deliver static stimulation to
my dog?
The maximum amount of time you can press the Left Button and
deliver static stimulation to your dog continuously is 10 seconds.
After 10 seconds, the Remote Transmitter will “time-out” for 5
seconds. The Left Button must be released and pressed again.
What do I do if my dog’s neck
becomes red and irritated?
This condition is due to the Contact Points irritating the skin.
Discontinue use of the Collar Receiver for a few days. If the
condition persists beyond 48 hours, see your veterinarian. Once the
skin returns to normal, resume use, and monitor the skin
condition closely.
Can I attach a lead/leash to the
GS-4100? DO NOT attach a lead/leash to the GS-4100. You may put a separate
non-metallic collar on your dog’s neck and attach a lead/leash. Be
sure the extra collar does not interfere with the Contact Points.
My Remote Transmitter is sending
a signal to more than one Collar
Receiver unintentionally; what
should I do?
In the rare event this occurs, you can change your Remote
Transmitter’s ID Code. See STEP 5 on page 13 to solve this.

17
TROUBLESHOOTING
My dog is not responding when I
press a button. • Check to see if the Collar Receiver has been turned on and the
Indicator Light is flashing.
• If your range has reduced from the first time you have used
it, please check to see if the battery is low in either the Remote
Transmitter or Collar Receiver.
• Many factors can impact the range you have with the GS-4100.
For a list of these factors, please refer to “How the System
Works.”
• You can verify the Collar Receiver is delivering static
stimulation to your dog by placing the test light, enclosed in
your kit, on the Collar Receiver. Please refer to the “Test Light
Instructions” section for details.
• Increase the intensity level. Refer to “Find the Best Intensity
Level for Your Dog” for more information.
• Make sure the Collar Receiver’s Contact Points are placed
snugly against your dog’s skin. Refer to “Fit the Collar
Receiver” for more information.
• You may need to switch to the longer Contact Points included
with your system or trim the hair beneath the Contact Points.
• If you notice your operating time dropping to about half of the
original time, your Collar Receiver battery needs to be
replaced. Contact the Customer Care Center to purchase a
new one.
The Collar Receiver will not
turn on. • Make sure the Collar Receiver has been charged. The Collar
Receiver will charge in 2 hours.
The Collar Receiver is not
responding to the Remote
Transmitter.
• Make sure the Remote Transmitter has been charged. The
Remote Transmitter will charge in 2 hours.
• Verify the Collar Receiver has been turned on and the Indicator
Light is flashing. Refer to “Turning the Collar Receiver On
and Off.”
• Refer to “Match the Collar Receiver and Remote Transmitter.”

18
TERMS OF USE AND LIMITATION OF LIABILITY
1. TERMS OF USE: The use of this product is subject to your acceptance without modification of the terms,
conditions, and notices contained with this product. Use of this product implies acceptance of all such
terms, conditions, and notices. If you do not wish to accept these terms, conditions, and notices, please
return the Product, unused, in its original packaging and at your own cost and risk to the relevant
Customer Care location together with proof of purchase for a full refund.
2. PROPER USE: Proper Use includes, without limitation, reviewing the entire Operating Guide and any
specific safety information statements. The specific temperament or size/weight of your dog may not
be suitable for this product. If you are unsure whether this Product is appropriate for your dog, please
consult your veterinarian or certified trainer prior to use. For products used with dogs where training is
desired, Radio Systems Corporation recommends that these training products are not used if your dog is
aggressive and accepts no liability for determining suitability in individual cases.
3. NO UNLAWFUL OR PROHIBITED USE: This product is designed for use with dogs only. This product is
not intended to harm, injure, or provoke. Using this product in a way that is not intended could result in
violation of Federal, State, or local laws.
4. LIMITATION OF LIABILITY: In no event shall Radio Systems Corporation or any of its associated
companies be liable for (i) any direct, indirect, punitive, incidental, special or consequential damage and/
or (ii) any loss or damages whatsoever arising out of or connected with the use or misuse of this product.
The Purchaser assumes all risks and liability from the use of this product to the fullest extent permissible
by law.
5. MODIFICATION OF TERMS AND CONDITIONS: Radio Systems Corporation reserves the right to change
the terms, conditions, and notices governing this product from time to time. If such changes have been
notified to you prior to your use of this product, they shall be binding on you as if incorporated herein.
COMPLIANCE
FCC: US
This device complies with part 15 of the FCC Rules. Operation is subject to the following two conditions:
(1) This device may not cause harmful interference, and (2) this device must accept any interference received,
including interference that may cause undesired operation.
This equipment has been tested and found to comply with the limits for a Class B digital device, pursuant
to part 15 of the FCC Rules. These limits are designed to provide reasonable protection against harmful
interference in a residential installation. This equipment generates, uses, and can radiate radio frequency
energy and, if not installed and used in accordance with the instructions, may cause harmful interference
to radio communications. However, there is no guarantee that interference will not occur in a specific
installation. If interference does occur to radio or television reception, which can be determined by turning
the equipment off and on, the user is encouraged to try to correct the interference by one or more of the
following measures:
• Reorient or relocate the receiving antenna
• Increase the separation between the equipment and the receiver
• Connect the equipment to an outlet on a circuit different from that to which the receiver is connected
• Contact Customer Care or an experienced radio/TV technician for assistance
CAUTION: Modification or changes to this equipment not expressly approved by Radio Systems Corporation
may void the user’s authority to operate equipment.
IC: CANADA
This device complies with Industry Canada licence-exempt RSS standard(s). Operation is subject to the
following two conditions: (1) this device may not cause interference, and (2) this device must accept any
interference, including interference that may cause undesired operation of the device.

19
CUSTOMER CARE CENTER
USA & Canada – Tel: 1- 800-732-0144
support.sportdog.com/cabelas
BATTERY DISPOSAL
See Important Safety Information on pages 2 and 10 related to the battery.
This system operates on two Li-Ion battery packs (160mAh capacity for the Collar Receiver and 500mAh
capacity for the Remote Transmitter). Only replace with a battery received from calling the Customer Care
Center at 1-800-732-0144.
• Separate collection of spent batteries is required in many regions; check the regulations in your area
before discarding spent batteries.
• At the end of the product life, please contact the Customer Care Center at 1-800-732-0144 to
receive instructions on proper disposal of the unit. Please do not dispose of the unit in household or
municipal waste.
AT END OF PRODUCT LIFE, USE THESE BATTERY REMOVAL INSTRUCTIONS FOR FINAL DISPOSAL
(DO NOT OPEN THE COLLAR RECEIVER OR REMOTE TRANSMITTER UNTIL YOU HAVE RECEIVED THE
REPLACEMENT):
• Using a (T8) Torx Driver for your Remote Transmitter and/or a 3/32 hex key for your Collar Receiver,
remove the case screws.
• Remove the case back or cover.
• Remove the old battery.
• When removing the old battery pack, care must be taken when gripping the connector firmly to avoid
damaging the wires. Shorting the battery wires may cause fire or explosion.
• These instructions are not valid for repair or battery replacement. Replacing the battery with a battery
not specifically approved by Radio Systems Corporation may cause fire or explosion. Please call the
Customer Care Center to avoid invalidating your warranty.
IMPORTANT RECYCLING ADVICE
Please respect the Waste Electrical and Electronic Equipment regulations in your country. This equipment
must be recycled. At the end of the product life, do not place it in the normal municipal waste system. Please
check the regulations in your area or return it to where it was purchased so that it can be placed
in our recycling system. If these options are not possible, please contact the Customer Care Center for
further information.

20
CONSIGNES DE SÉCURITÉ IMPORTANTES
DESCRIPTION DES TERMES ET SYMBOLES UTILISÉS DANS CE MANUEL
Ce symbole est une alerte de sécurité. Il est utilisé pour vous alerter des risques de blessures.
Veuillez respecter tous les messages de sécurité suivant ce symbole pour éviter tout risque de
blessure ou décès.
AVERTISSEMENT indique une situation dangereuse qui, si elle n’est pas
évitée, risque d’entraîner la mort ou des blessures graves.
ATTENTION, utilisé sans symbole d’alerte de sécurité, indique une situation dangereuse
qui, si elle n’est pas évitée, risque de causer des blessures à votre chien.
• N’utilisez pas ce produit si votre chien est agressif ou a tendance à être agressif. Les chiens agressifs
peuvent provoquer chez leurs maîtres ou autrui des blessures graves ou la mort. Si vous avez des doutes
quant à l’emploi de ce produit sur votre chien, consultez votre vétérinaire ou un dresseur agréé.
• Ce dispositif contient des batteries au lithium-ion (Li-Ion) ; ne tentez JAMAIS de découper ni d’ouvrir la
batterie. Jetez toutes les batteries usagées conformément aux instructions.
• Ne brûlez pas, ne percez pas, ne déformez pas, ne court-circuitez pas et ne chargez jamais une batterie
avec un chargeur inapproprié. Le non-respect de cet avertissement risque de provoquer un incendie, une
explosion, des dégâts matériels ou des blessures physiques.
• Il existe un risque d’explosion si une batterie est remplacée par un type de batterie inapproprié. Ne court-
circuitez pas les batteries, ne mélangez pas les anciennes avec les nouvelles, ne les jetez pas dans le feu
ou ne les mettez pas en contact avec de l’eau. Quand les batteries sont stockées ou éliminées, elles doivent
être protégées contre les courts-circuits.
• La batterie doit être chargée dans des zones où les températures sont comprises entre 0 °C et 38
°C. Recharger la batterie en dehors de cette plage de températures peut entraîner la surchauffe ou
l’explosion de la batterie, voire causer un incendie.
Table of contents
Languages:
Other Cabela's Pet Care Product manuals

Cabela's
Cabela's GUNDOG GS-NB6 User manual

Cabela's
Cabela's GS-1501 User manual

Cabela's
Cabela's Gun Dog GS-7001 Instruction manual

Cabela's
Cabela's GS-2001Gun Dog Series User manual

Cabela's
Cabela's GS-100 User manual

Cabela's
Cabela's GUNDOG GS-8100 User manual

Cabela's
Cabela's Gun Dog GS-7001 User manual