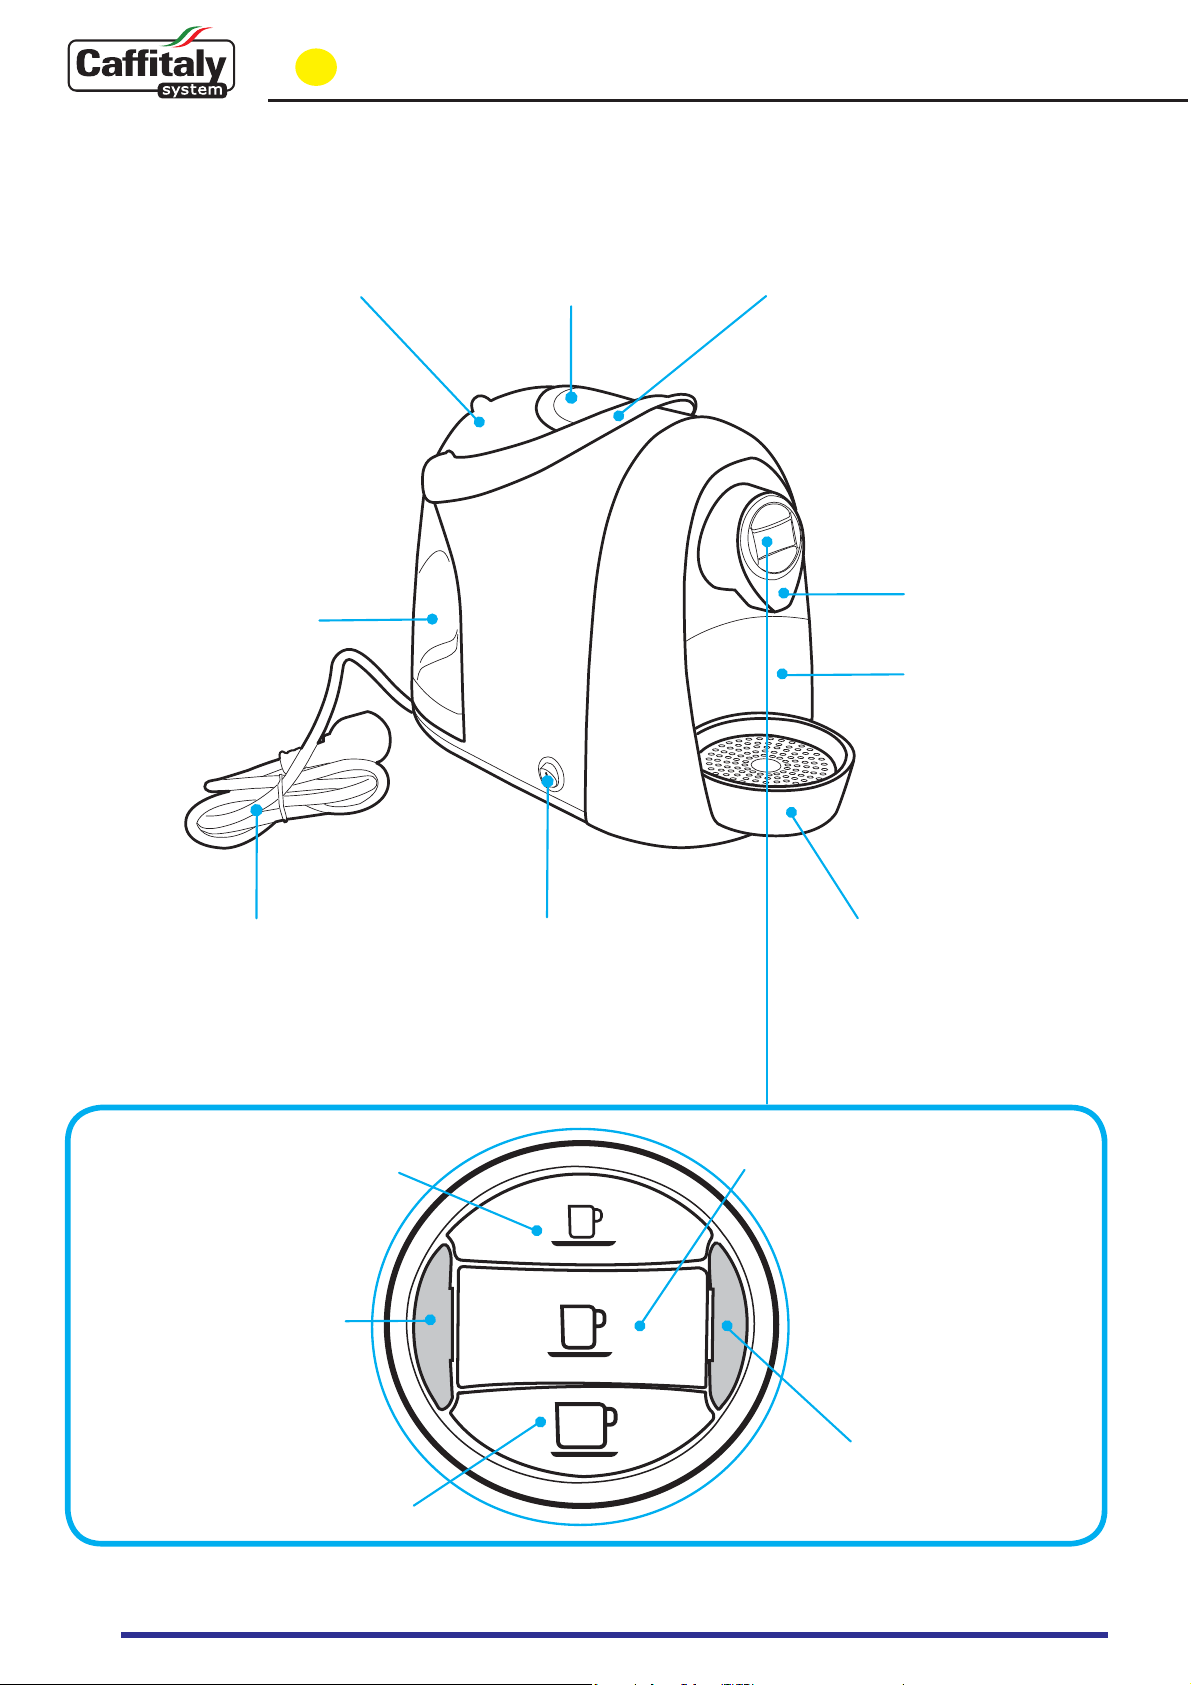
Caffitaly System S04 User manual

Model S04
Instruction book
Mode d'emploi
English Français

2
1
3
4
5
6
7
8
9
10
11
2
Table of contents
Introduction
Warning symbols.....................................................................................3
Your Cataly System contact ...............................................................3
Important Safeguards ............................................................................4
Caution......................................................................................................5
Instructions for the power supply cord...............................................5
Description of machine components .................................................6
Installation
First use or after a long period of disuse ............................................7
Turning on the appliance.......................................................................8
General operating indications..............................................................9
Adjusting the cup/mug height........................................................... 11
Dispensing the product
Dispensing coee.................................................................................. 12
Correct use of the buttons................................................................... 13
Programming the quantity of coee in a cup.................................. 14
Cleaning and Maintenance
Daily maintenance ................................................................................ 15
Descaling ................................................................................................ 16
Miscellaneous
Troubleshooting.................................................................................... 20
Technical data ........................................................................................ 20

3
Introduction
Your Cataly System contact
info@catalycanada.com
Dear Customer,
Thank you for having chosen our product and for your condence in our company.
You can savour your favourite hot beverages at any time of the day with our appliance by choosing one
of the capsules that Cataly oers you. For example: An espresso, a cocoa-avoured beverage or a tea
will be ready in just a few seconds.
Warning symbols
CAUTION
This is the safety warning symbol. It is used to call your attention to possible risks of
personal injury. Abide by the safety messages provided in order to avoid possible injury
or death.
NOTE
This is the symbol used to highlight some actions that will optimise use of the appli-
ance.
Not dishwasher safe Maintenance tips
This symbol is used to highlight a WHITE or BLUE light indication.
This symbol is used to highlight a RED light indication.
This symbol is used to highlight an ORANGE light indication.

4
Introduction
IMPORTANT SAFEGUARDS
When using electrical appliances, basic safety precautions should always be followed to
reduce the risk of re, electric shock, and/or injury to person, including the following:
1. Read all instructions and information in this instruction book and any other literature included
in the carton referring to this product before operating or using this appliance.
2. Do not touch hot surfaces (i.e. steam wand). Use handles or knobs.
3. To protect against re, electric shock, and personal inury, do not place cord, plugs, or aplliance
in water or other liquid.
4. This appliance must be kept out of the reach of children.
5. Unplug from outlet when not in use and before cleaning.
6. Allow to cool before putting on or talking o parts, and before cleaning the appliance.
7. The use of accessory attachments not recommended by the appliance manufacturer may result
in re, electric shock, or personal injury.
8. Do not use outdoors.
9. Do not let cord hang over edge of table or counter, or touch hot surface.
10. Do not place on or near a hot gas or electric burner, or in a heated oven.
11. This machine was designed to process normal household quantities only. Not suitable for
connuous operation or commercial use.
12. Do not operate any appliance with a damaged cord or plug, if the aplliance malfunctions, or has
been damaged in any manner. Return appliance to an authorized service facility for
examination, repair, or adjustment.
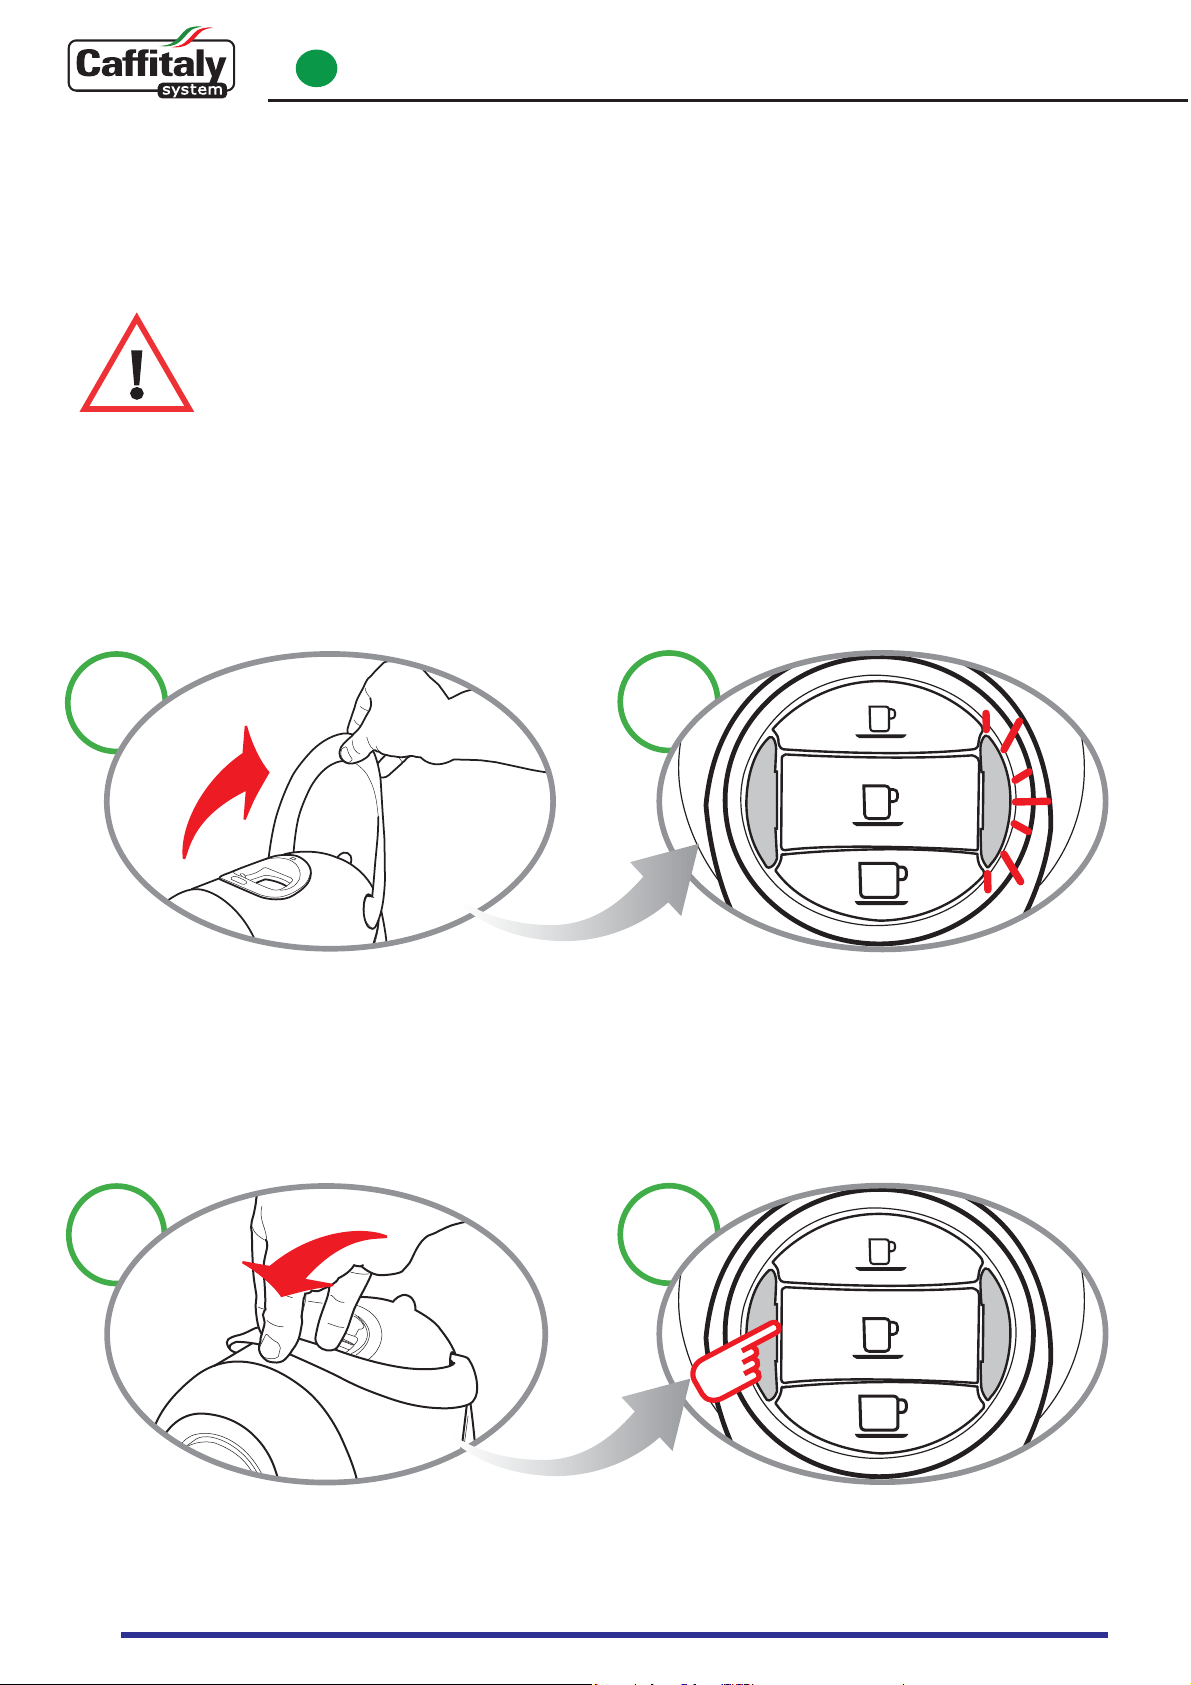
13. Do not use if the water tank is not lled.
14. Always use cold water. Warn water or other liquids could casue damage to the appliance.
15. When plugging in the machine, always turn appliance“OFF”, attach power cord to the machine
rst, then plug cord into wall outlet.To disconnect, always turn appliance“OFF”, then remove
plug from wall outlet.
16. Use extreme caution when using hot steam.
17. Do not use appliance for other than intended use.
SAVE THESE INSTRUCTIONS.

5
Introduction
CAUTION
This appliance is for household use only. Any servicing, other than cleaning and user maintenance,
should be performed by an authorized service centre. Do not immerse machine in water.To reduce
the risk of re or electric, shock, do not disassemble the machine.There are no parts inside the
machine serviceable by the user. Repair should be done by authorized service personnel only.
1. Check voltage to be sure that the voltage indicated on the nameplate corresponds with your
voltage.
2. Never use warm or hot water to ll the water tank. Use cold water only.
3. Keep your hands the cord away from hot parts of the appliance during operation.
4. Never clean with scrubbing powders or harsh cleaners. Simply use a soft cloth dampened with
water.
5. For optimal taste of your coee, use puried or bottled water. Periodic descaling is still
recommended every 2-3 months.
6. Do not use caramelized or avored coee beans.
INSTRUCTIONS FOR THE POWER SUPPLY CORD
A. A short power-supply cord (or detachable power-supply cord) is to be provided to reduce risks
resulting from becoming entangled in or tripping over a langer cord.
B. Longer detachable poer-supply cords or extension cords are available and may used if care is
exercised in their use.
C. If a long detachable power-supply cord or extension cord is used:
1. The marker electrical rating of the detachable power-supply cord or extension cord should
be at least as great as the electrical rating of the appliance.
2. If the aplliance is of the grounded type, the extension cord should be a grounding-type
3-wire cord.
3 The longer cord should be arranged so that it will not drape over the counter top or table
top where it can be pulled on by children or tripped over.

6
Introduction
Electric cord Power on/o switch
"Multifunction"
indicator light
"Descaling"
indicator light
"Filter coee"
dispensing button
"Long coee"
dispensing button
"Espresso"
dispensing button
Drip tray
Coee dispenser
Lever for opening capsule
compartment
Used capsule
drawer
Capsule compartment
Water tank cover
Description of machine components
Water tank

3
5 6
1
4
2
7
First use or after a long period of disuse
Fill the tank with fresh,
still water. Plug in the appliance and turn it on.
The buttons (espresso, long coee and lter
coee) and the multifunction indicator light
blink at the same time.
Place a large container under the dispensing
spout.
Press one of the coee buttons (espresso,
long coee or lter coee). Wait for the
machine to complete the priming cycle and ll
with water.The multifunction indicator light
switches o.
The buttons (espresso, long coee and lter
coee) blink at the same time; the machine is
warming up.
NOTE:
If the coee buttons and the multifunction indicator light continue to blink
after the lling procedure has ended, repeat the steps in point 5.
1

8
7
1 2
8
Turning on the appliance
2Turning on the appliance
At the end of this operation, empty out the
water from the used capsule drawer.
When the buttons (espresso, long coee,
lter coee) turn on and remain steadily
lit, rinse twice by pressing the lter coee
button.
Wait for the machine to complete the rinse
cycle.
Fill the tank with fresh,
still water.Turning on the appliance The buttons (espresso, long coee and lter
coee) blink at the same time; the machine is
warming up.When the buttons remain steadily
lit, the appliance is ready for operation.
2

3 4
1 2
9
General operating indications
Descaling signal Heating
When the water runs out during operation
The water tank is empty when the multifunc-
tion indicator light blinks in RED and the
appliance emits 3 beeps followed by a single
intermittent beep.
Fill the tank with fresh, still water.
When the buttons remain steadily lit, the ap-
pliance is ready for operation.
Press one of the coee buttons (espresso,
long coee or lter coee). Wait for the
machine to complete the priming cycle and
ll with water.
When the descaling indicator light blinks
ORANGE and the machine emits 3 beeps, it is
recommended to perform the descaling cycle
(see Ch. 9).
The buttons (espresso, long coee and lter
coee) blink at the same time.
3

3
12
4
10
General operating indications
CAUTION!
Raising the lever incorrectly while dispensing a product may cause brief
splashes of hot water.
Danger of scalding!
If the lever is raised
If the lever is raised while a product is being
dispensed.
The
multifunction
indicator light blinks in RED
and an intermittent beep sounds.The appliance
will immediately stop dispensing.
Close the lever. Press a button to reset the alarm.
The appliance is ready for use.
3

1
3
5
4
2
11
Adjusting the cup/mug height
The appliance can be adjusted for the use of
mugs or espresso cups. The appliance is initially set for the use of large
cups or mugs.
In order to use espresso cups, you must lift and
turn the grid on top of the drip tray. The grid must be positioned over the turned
drip tray.
In this way you can obtain the best results
when using small espresso cups.
4

12
3 4
5 6
12
Dispensing coee
Raise the lever to open the capsule compart-
ment. Insert the capsule, pressing it gently into place.
Close the lever rmly. Place a cup or mug under the coee dispensing
spout.
Press the desired coee button only once. The selected coee button will blink.The
appliance will stop dispensing on reaching the
programmed quantity and emit a beep.
Caution! Before you
start brewing, make
sure the capsule container is
not full.
5

78
13
Correct use of the buttons
Raise the lever to eject the used capsule into
the drawer. Close the lever.
Correct use of the buttons
To dispense“Espresso”or“Caè crema”, only use button espresso or long coee (the 1st and 2nd
from the top respectively, lit in WHITE). The same buttons, depending on the quantity, are to be
used for dispensing capsules of orzo, ginseng, cocoa or milk.
Button lter coee (3rd from the top, lit in BLUE) must be used solely for "Filter Coee" or
"Americano". This same button can be used for capsules of tea, chamomile tea or herbal tea.
Do not use button C for espresso or any other coee with an intense avour. In this function the
machine is set for low pressure and this reduces the "crema", diminishes the avour of the coee,
and could cause a break in the ow.
NOTE:
Traces of product just dispensed may remain in the circuit of the machine.
When switching from one product to another, in order to fully enjoy the avour of
the beverage we suggest rinsing the machine by pressing the coee button as if
to dispense a coee without inserting a capsule.
NOTE:
The quantity of coee dispensed can be reprogrammed according to
personal taste, and in accordance with the size of the cup or mug used.
Please refer to chapter 7 for reprogramming instructions.
6
6

12
3 4
5 6
14
Programming the quantity of coee in a cup
Raise the lever to open the capsule compart-
ment. Insert the capsule, pressing it gently into place.
Close the lever rmly. Place a cup or mug under the coee dispensing
spout.
On reaching the desired amount of coee in a
cup, release the button. Now the button is pro-
grammed. To reprogram the button or program
another button repeat the above steps.
The quantity of coee dispensed can be
programmed up to a maximum of 250 ml.
Press the desired coee button and keep it
pressed down.
Caution! Before you
start brewing, make
sure the capsule container is
not full.
7

21
3 4
15
Daily maintenance
Remove the drip tray and used capsule drawer.
Remove the grid. Empty the drip tray and rinse
it out with fresh water.
Lift the capsule drawer; empty and rinse it.
Remove the water tank. Empty and rinse out
the tank. The water tank is NOT dishwasher
safe.
Use a soft cloth and a neutral
detergent to clean the surfaces of the
appliance.
Do not spray the appliance with jets
of water when cleaning.
The plastic parts of the appliance are
not dishwasher safe.
8

1 2
16
Descaling
Turn o the machine. Empty and rinse out the used capsule drawer
and drip tray.
CAREFULLY read the directions for use on the package of the descaling agent. Avoid
contact with eyes, skin and machine surfaces. Switch the appliance o during descal-
ing, and do not lift the lever.
A person must be present during the operation.
Do not use vinegar: it could damage your appliance!
It is advisable to use the Cata System descaling agent. It has been studied to com-
ply with the technical characteristics of the appliance, in full observance of consumer
safety. The descaling agent must be disposed of in compliance with manufacturer
instructions and/or with current regulations in force in the country where the appli-
ance is used.
The machine features an
advanced program that moni-
tors how much water is used
to dispense beverages.This
measurement provides the user
with indications as to when the
machine needs to be descaled.
Specic indications are given in
chapter 3.
When the descaling indicator light blinks
ORANGE and the machine emits 3 beeps, it is
recommended to perform the descaling cycle
(see Ch. 9).
9

5
78
6
3 4
17
Descaling
Place a container (at least 250 ml) under the
coee dispensing spout.
Keep the buttons pressed down (espresso and
long coee) and at the same time turn on the
machine by pressing the power on/o switch.
Make sure the lever is lowered.
As well as the
As well as the long coee
button, the
button, the multi-
function indicator light also blinks alternately
(
(
RED
RED
and
and
ORANGE
ORANGE
).
). Press the long coee
button to start the descaling cycle.
Remove and empty the water tank.
Mix the descaling agent with water as
instructed on the package and pour the
solution into the tank.
9

10
9
12
11
13
18
Descaling
When the cycle is complete, as well as the
When the cycle is complete, as well as the long
coee
button, the
button, the multifunction
indicator
indicator
light also blinks alternately (
RED
RED
and
and
ORANGE
ORANGE
).
).
Carefully rinse out the water tank and ll it
with fresh drinking water.
As well as the
As well as the long coee
button, the
button, the multi-
function indicator light also blinks alternately
(
(
RED
RED
and
and
ORANGE
ORANGE
).
). Press the long coee
button to start the rinse cycle.
The appliance dispenses the descaling solution
at intervals (5 doses with a 10 minute
pause between each one, for a total dura-
tion of about 45 minutes). During this step,
when the buttons must not be pressed,
the multifunction indicator light blinks alter-
nately (RED and ORANGE).
If the container lls up, empty it out.
9
Empty and rinse out the used capsule drawer
and drip tray.
14

17 18
19 20
16
15
19
Descaling
Use a soft cloth and a neutral
detergent to clean the surfaces of the
appliance.
When the rinse cycle is complete, in addition
to the
to the long coee
button, the
button, the multifunction
indicator light also blinks alternately (
RED
RED
and
and
ORANGE
ORANGE
).
).
The machine will emit a beep.
Carefully rinse out the water tank and ll it
with fresh drinking water.
Empty and rinse out the used capsule drawer
and drip tray. Press the long coee button to quit the cycle.
Rinse water will be run through the machine.
During this step the multifunction indicator
light blinks alternately (ORANGE and RED
twice in a row).
If the container lls up, empty it out.
9

See the data plate on the bottom of the
machine
Max. 15 bar
about 4 kg
< 70dB A
1,2 litres
ambient temperature: 10°C ÷ 40°C
170 mm 260 mm 350 mm
20
The materials and
objects in contact with
food products comply
with the requirements
of European Regulation
1935/2004.
11 Technical data
Troubleshooting - 11 Technical data
10
PROBLEM CAUSE SOLUTION
- No coee is brewed. -The water tank is empty, the
multifunction indicator light
is lit in RED.
- Fill the tank with fresh water. Press
one of the coee buttons to ll the
circuit.
-The coee is not hot
enough.
- Cold cups / mugs.
- Scale build-up in machine.
- Preheat cup / mug.
- Descale.
-The lever cannot be
lowered.
-The used capsule drawer is
full.
- Capsule stuck inside the
machine.
- Empty out the used capsule drawer.
- Remove the used capsule.
Other manuals for S04
4
Table of contents
Languages: