CONSIGNES DE SÉCURITÉ
- Attacher une attention particulière aux indications précédées des men-
tions suivantes:
ATTENTION : Signale une forte probabilité de
blessures corporelles graves, voir un danger
mortel si les instructions ne sont pas suivies.
- PRÉCAUTION : Signale une possibilité de blessures corporelles ou de
détérioration de lʼéquipement si les instructions ne sont pas suivies.
- NOTE : Fournit des informations utiles.
Ce signe vous appelle à la prudence lors de certaines opéra-
tions.
- En cas de problème, ou pour toutes questions concernant la
machine, veuillez vous adresser à un concessionnaire agréé.
ATTENTION : La machine est conçue pour assurer un ser-
vice sûr et fiable dans des conditions dʼutilisation con-
formes aux instructions. Avant dʼutiliser votre machine,
veuillez lire et assimiler le contenu de ce manuel. A dé-
faut, vous vous exposeriez à des blessures et lʼéquipement pourrait
être endommagé.
1 - Formation / Informations
- Se familiariser avec l'utilisation correcte et les commandes avant d'utili-
ser la machine. Savoir arrêter le moteur rapidement.
- La machine doit toujours être utilisée suivant les recommandations
indiquées dans la notice d'instructions.
- Ne pas oublier que l'utilisateur est responsable des accidents ou des
phénomènes dangereux survenant aux autres personnes ou à leurs
biens. Il est de sa responsabilité d'évaluer les risques potentiels du ter-
rain à travailler et de prendre toutes les précautions nécessaires pour
assurer sa sécurité, en particulier dans les pentes, les sols accidentés,
glissants ou meubles.
- Ne jamais laisser les enfants, ou des personnes non familières avec ces
instructions, utiliser la machine. Les réglementations locales peuvent
fixer un âge minimal pour l'utilisateur.
- Ne pas utiliser la machine après avoir absorbé des médicaments ou des
substances, réputées comme pouvant nuire à sa capacité de réflexe et
de vigilance.
- Pour utiliser la machine, portez des équipements de protections ap-
propriés, en particulier des chaussures de sécurité, des pantalons longs,
des lunettes protectrices et un casque antibruit.
- Utiliser la machine pour l'usage auquel elle est destinée, à savoir le
débroussaillage. Toute autre utilisation peut s'avérer dangereuse ou en-
traîner une détérioration de la machine.
2 - Préparation:
- Inspecter minutieusement la zone sur laquelle la machine doit être uti-
lisée et éliminer tous les objets qui pourraient être projetés par la ma-
chine (pierres, fils, verre, objets en métal…).
- Avant utilisation, toujours procéder à un contrôle visuel de la machine
pour s'assurer que les outils et les déflecteurs ne sont ni usés ni en-
dommagés. Faire remplacer les pièces usées ou endommagées.
- Si la machine est équipée dʼun bouton dʼarrêt moteur, maintenir les
câbles électriques d'arrêt moteur en bon état de façon à garantir l'arrêt
moteur.
- Vérifier lʼabsence de fuite de liquide (essence, huile…)
- Ne pas utiliser la machine sans garde -boue ou capots de protection et
s'assurer que tous les dispositifs de fixation sont bien serrés.
- Avant dʼentreprendre le débroussaillage dʼune parcelle de terrain, déli-
miter le périmètre de zone dangereuse pour les tiers, en fonction des in-
dications ci -après. Délimiter à lʼaide de panneaux cette zone, en
indiquant lʼinterdiction de pénétrer à lʼintérieur pendant lʼouverture du
chantier.
La portée maximale dʼéventuelles projections dʼobjets pouvant atteindre
40mètres, veuillez délimiter le périmètre dangereux suivant le
schéma ci-contre.
Périmètre de débroussaillage = Aʼ - Bʼ - Cʼ - Dʼ
Périmètre de sécurité = A - B - C - D
Les couloirs de sécurité (zones hachurées) doivent avoir une
largeur minimum de 40m.
- Éviter de débroussailler à proximité de lieux habités, de passage ou de
stationnement.
- Ne jamais utiliser la machine en présence de tiers.
3 - Utilisation:
- Démarrer le moteur avec précaution en respectant les instructions du
fabricant et en maintenant les pieds éloignés de l'(des) outil(s).
- Arrêter le moteur quand la machine est sans surveillance.
- Marcher, ne jamais courir avec la machine.
- Tirer la machine vers soi ou inverser le sens de marche (si disponible)
avec beaucoup de précautions.
- Conserver la distance de sécurité par rapport aux outils rotatifs, donnée
par la longueur du guidon.
- Ne pas placer les mains ou les pieds près ou sous des éléments en
rotation.
- En cas de:
- vibration anormale,
- blocage,
- problème dʼembrayage,
- choc avec un objet étranger,
- détérioration du câble dʼarrêt moteur (suivant modèle),
- Arrêter le moteur immédiatement (si le câble dʼarrêt moteur est coupé,
actionner la commande du starter comme décrit au § "démarrage mo-
teur" pour arrêter le moteur), laisser la machine refroidir, débrancher le
fil de bougie, inspecter la machine et faire effectuer les réparations né-
cessaires par un réparateur agréé avant toute nouvelle utilisation.
- Travailler uniquement à la lumière du jour ou dans une lumière artifi-
cielle de bonne qualité.
- Ne pas utiliser la machine dans des pentes supérieures à 20%.
- Ne jamais débroussailler en tirant la machine vers soi
- Travailler les pentes dans le sens transversal, jamais en montant ou en
descendant.
- Ne pas sʼarrêter ni démarrer brutalement lorsque lʼon se trouve sur une
pente. Ralentir sur les pentes et dans les virages serrés pour éviter tout
basculement ou perte de contrôle. Être particulièrement vigilant lors des
changements de direction sur les pentes.
- Sur un terrain encombrés dʼobjets ou de débris naturels ou rapportés
(rochers, souches dʼarbres, débris métalliques, piquets, etc…) : tout
corps étranger pouvant se transformer en dangereux projectile et/ou
abîmer la machine doivent être évités.
- Sur terrains en pente et mouillés attention aux risques de chute.
- Lʼutilisation dʼaccessoires autres que ceux recommandés peut rendre
la machine dangereuse, et occasionner des dommages sur votre ma-
chine qui ne seront pas couverts par votre garantie.
4 - Maintenance / stockage
- Arrêter le moteur et débrancher la bougie avant toute opération de
nettoyage, de vérification, de changement d'outil(s), de réglage ou dʼen-
tretien de la machine.
- Arrêter le moteur, débranchez la bougie et utiliser des gants épais pour
changer l(es) outil(s).
- Maintenir tous les écrous et vis serrés afin d'assurer des conditions
d'utilisation sûres.
- Pour réduire les risques d'incendie, maintenir le moteur, le silencieux, et
la zone de stockage de l'essence dégagés de végétaux, d'excès de gra-
isse, ou de toute autre matière susceptible de sʼenflammer.
- Faire remplacer les silencieux d'échappement défectueux par un répa-
rateur agréé.
- Ne pas réparer les pièces. Faire remplacer les pièces par des pièces
d'origine.
- Pour votre sécurité ne pas modifier les caractéristiques de votre ma-
chine. Ne pas modifier les réglages de régulation de vitesse du moteur
et ne pas utiliser le moteur en survitesse. Un entretien régulier est es-
sentiel pour la sécurité et le maintien du niveau de performances.
- Laisser le moteur refroidir avant de ranger la machine dans un local.
5 - Attention danger lʼessence est hautement inflammable:
- Stocker le carburant dans des récipients spécialement prévus à cet effet.
Faire le plein à l'extérieur uniquement et ne pas fumer pendant cette
opération.
- Ne jamais enlever le bouchon du réservoir d'essence ou ajouter de
l'essence pendant que le moteur tourne ou tant qu'il est chaud.
- Si de l'essence a été répandue sur le sol, ne pas tenter de démarrer le
moteur mais éloigner la machine de cette zone et éviter de provoquer
toute inflammation tant que les vapeurs d'essence ne sont pas dissi-
pées.
- Entreposer la machine dans un endroit sec. Ne jamais entreposer la ma-
chine dans un local où les vapeurs dʼessence pourraient atteindre une
flamme, une étincelle ou une forte source de chaleur.
- Remettre correctement en place les bouchons du réservoir d'essence.
- Limiter la quantité d'essence dans le réservoir pour minimiser les
éclaboussures.
- Ne pas faire tourner le moteur dans un endroit confiné où les vapeurs
de monoxyde de carbone peuvent s'accumuler.
- Le monoxyde de carbone peut être mortel. Assurer une bonne ventila-
tion.
6 - Déplacement, manutention, transport.
- Toute action sur la machine hors du débroussaillage doit sʼeffectuer avec
les outils de coupe débrayée.
- Le déplacement (hors du débroussaillage) doit s'effectuer suivant les
instructions du §"déplacement".
- Manutention: ne pas soulever la machine seul. Le poids de la machine
est indiqué sur la plaque constructeur et à la fin de ce manuel. Utiliser
une méthode de manutention adaptée au poids de la machine et à la si-
tuation afin de garantir la sécurité.
- Le chargement et le déchargement de la machine dans une remorque
doit sʼeffectuer à lʼaide dʼune rampe de chargement adaptée.
- Arrimer correctement la machine pour un transport en toute sécurité.
- Le transportdoit sʼeffectuer moteur arrêté et bougie débranchée à lʼaide
dʼune remorque. Nʼutiliser aucun autre moyen de transport.
1 -FR
* MODÈLE 2 VITESSE
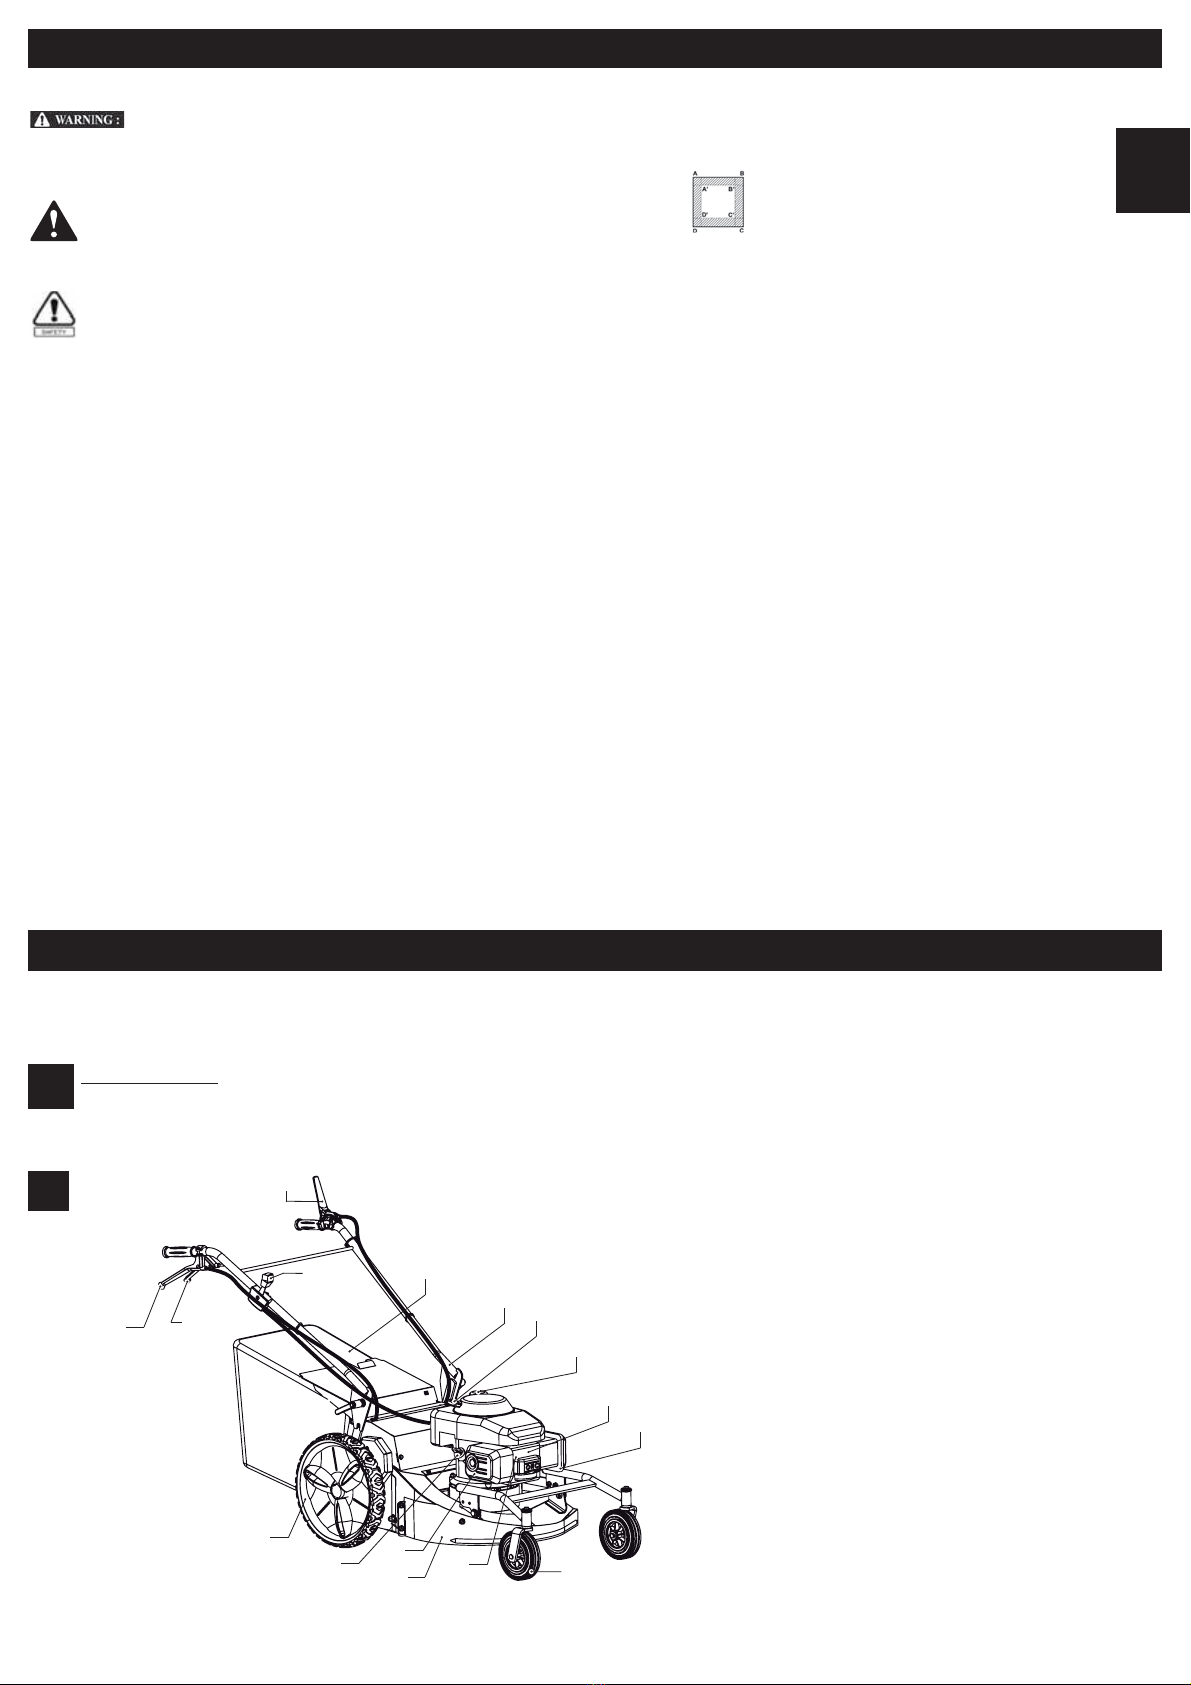
DESCRIPTION
A
A1
11 9
8
12
5
7
3
1
13
10
15
16*
26
4
14
PRÉPARATION MACHINE
1- Poignée de frein de lame
2- Manette de gaz
3 - Poignée marche avant
4 - Guidon
5 - Bouchon de remplissage dʼhuile et niveau
6 - Panier
7 - Roue
8- Carter de coupe
9 - Roue avant pivotante
10 - Bougie dʼallumage
11 - Pompe dʼamorçage essence
12 - Grille dʼéchappement
13 - Boîtier de filtre à air
14 - Bouchon du réservoir dʼessence
15 - Corde de lanceur à réenroulement automatique
16* - Manette lente /rapide d'avancement
FR