3
The brief operating instructions in this guide will make the system easier to
use. As with any surgical instrument, there are important health and safety
considerations.
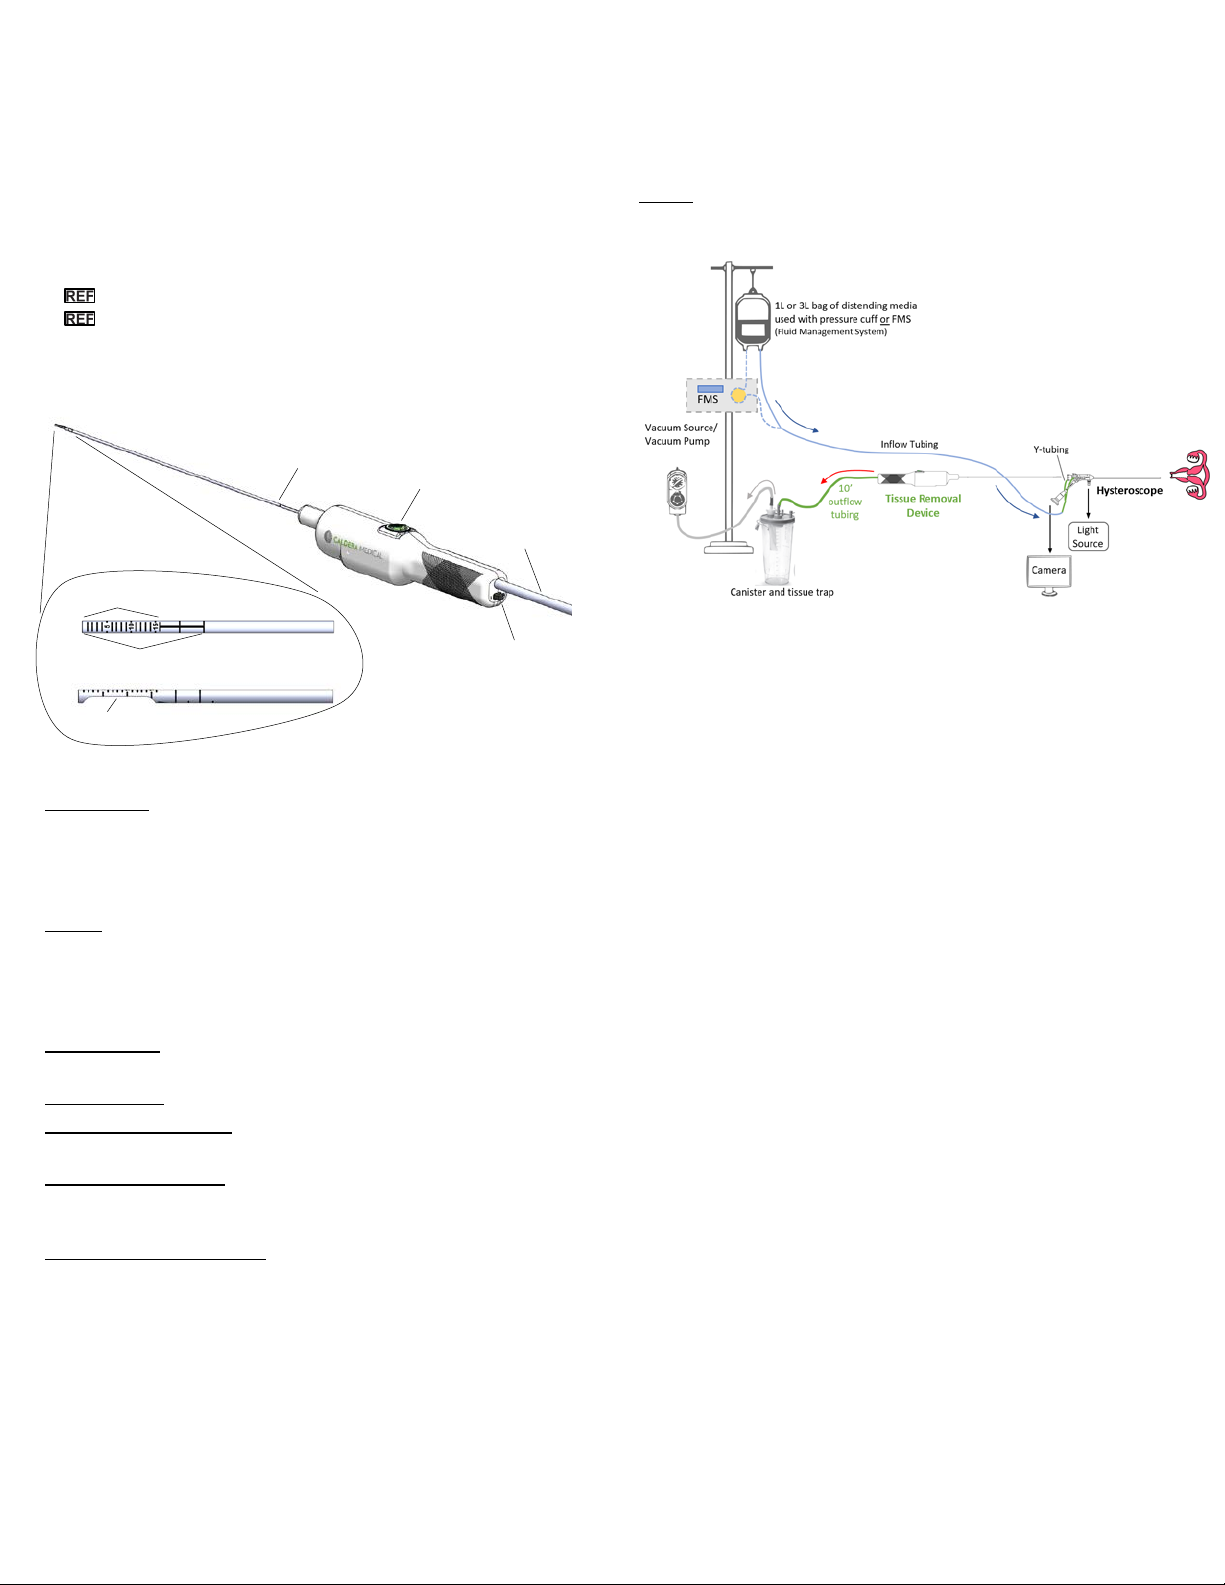
Device Description
The BenestaTM Tissue Removal Device is a sterile, single-use hand-held
device that is used to hysteroscopically remove intrauterine tissue. It is
battery-powered and primarily hand-operated through the use of a button
that controls the motor inside the handle and the resulting cutting action of
the blade of the device. Additionally, a safety switch is located on the
proximal end of the device handle that can be used to turn on or off the
device.
Indications for Use
The BenestaTM Tissue Removal Device is intended for intrauterine use by
trained gynecologists to hysteroscopically resect and remove tissue such
as: submucous myomas, endometrial polyps, and retained products of
conception.
Contraindications
The BenestaTM Tissue Removal Device is contraindicated in pregnant
patients or patients exhibiting pelvic infection, cervical malignancies, or
previously diagnosed endometrial cancer.
Warnings
•Before using the BenestaTM Tissue Removal Device for the first time,
please review all available product information.
•Before using the BenestaTM Tissue Removal Device, you should be
experienced in hysteroscopic surgery with powered instruments. Healthy
uterine tissue can be injured by improper use of the tissue removal
device. Use every available means to avoid such injury.
•Careful pre-operative assessment, including preoperative imaging,
should be performed on each patient prior to a hysteroscopic procedure
to evaluate for conditions which may, depending on their severity or
extent, affect the appropriateness of hysteroscopy. These include but are
not necessarily limited to: evidence and level of placental invasion of the
myometrium, acute pelvic inflammatory disease, cervical or vaginal
infection, known or possible viable pregnancy, carcinoma of the cervix,
placental invasion of the myometrium, or previously diagnosed
endometrial cancer.
•Removal of retained products of conception in the setting of known or
suspected placenta accreta, placenta increta, or placenta percreta poses
a risk of significant and potentially life-threatening bleeding with the
highest risk occurring in the immediate postpartum phase.
•Ensure that a compatible vacuum system that can develop a pressure of
at least 200 mm Hg is appropriately connected before commencing
surgery.
•Uterine tissue containing suspected fibroids may harbor an occult
malignancy. The safety of using mechanical tissue removal device has
not been evaluated in the potential presence of cancer cells. Exercise
extreme caution when resecting tissue in patients who have implants
that extend into the uterine cavity.
– Do not use the BenestaTM Tissue Removal Device to resect tissue
that is adjacent to an implant. When resecting tissue in patients that
have implants, assure that:
– The BenestaTM Tissue Removal Device cutting window is facing
away from (i.e., 180° opposite) the implant;
– The visual field is clear; and
– The BenestaTM Tissue Removal Device cutting window is engaged in
tissue and is moved away from the implant as tissue resection
proceeds.
•If visualization is lost at anypoint during a procedure, stop cutting
immediately.
•Periodically irrigate the device to prevent accumulation of excised tissue
in the surgical site.
•Operating the device inside the uterine cavity with no tissue contact may
result in the loss of uterine distension.
•Do not use in the presence of flammable or explosive materials.
•Not for use in an oxygen-rich environment.
•No modification of this equipment is allowed.
Precautions
•Do not use after expiration date.
•The BenestaTM Tissue Removal Device is sterilized by ethylene oxide.
Verify that the BenestaTM Tissue Removal Device is sterile prior to use.
Do not use the device if the sterile package is open or appears
compromised. Do not use the device if damage is observed.
•The BenestaTM Tissue Removal Device is intended for single use only.
Do not re-sterilize. Do not reuse. Use of a reprocessed, single-use tissue
removal device may permanently damage, impede performance, or
cause failure of the BenestaTM Tissue Removal Device. Use of such
products may render any warranties null and void.
•Discard all opened, unused devices.
CAUTION: Premature unpacking of the device may result in
additional and unacceptable risk
•Exercise care when inserting or removing the device. Insertion and
removal of the device should be performed under direct visualization at
all times.
•To avoid perforation, keep the device tip under direct visualization and
exercise care at all times when maneuvering it or cutting tissue close to
uterine wall. Avoid using the tip of the tissue removaldevice as a probe
or dissecting tool.
•Excessive leverage on the BenestaTM Tissue Removal Device does not
improve cutting performance and, in extreme cases, may result in wear,
degradation, and seizing of the inner assembly.
•Do not allow the cutting window of the tissue removal device to touch
any metallic object such as a hysteroscope. Damage to both instruments
is likely. Damage to the BenestaTM Tissue Removal Device can range
from a slight distortion or dulling of the cutting edge to actual fracture of
the tip in vivo. If such contact does occur, inspect the tip. If you find
cracks, fractures, or dulling, or if you have any other reason to suspect a
tissue removal device is damaged, replace it immediately.