Calix GigaSpire BLAST u6 User manual

1
Calix GigaSpire BLAST u6 System
Setup Guide for Employee User Group
This document updated as of July 16, 2020

What have I received? And why?
You have opted to take part in the Calix GigaSpire Employee Pilot Program. Depending on the answers that you provided on the
intake questionnaire, you will receive one (1) or two (2) GigaSpire BLAST u6 systems.
Note: If you have an existing GigaSpire BLAST system in your home, onboarding a new BLAST u6 as your gateway will reset your Wi-Fi network name
(SSID) to ‘Calix GigaSpire WiFi’. You will also lose customized configurations in CommandIQ, like Enhanced Parental Control profiles. These items can
be adjusted with CommandIQ when your BLAST u6 system is up and running.
How do I get started?
The following slides provide quick-start instructions to get you up and running. Please keep in mind, your experience is not the
same as a typical subscriber, whose GigaSpire BLAST system would be connected to a service provider network that has the back-
office integration to initially provide the management settings needed to fully setup the GigaSpire and all of its features. Instead,
you will be connecting your GigaSpire BLAST system to your existing service provider's gateway. This is referred to as an 'OFF-NET'
model and is not typical. Your experience will otherwise be identical to that of a typical residential subscriber of high-speed
Internet services.
If you need help along the way, reach out to the Technical Assistance Center (TAC) team:
Note: If you have already configured your GigaSpire, and want to change to another configuration, please contact the TAC team.

Please note a few things before proceeding with install and set-up of your GigaSpire BLAST system(s):
1. The instructions provided in this document are based on the assumption that your Internet service is being provided by a
router/gateway that was installed by your service provider.
2. If you received more than one GigaSpire BLAST u6 system, one will act as your primary residential gateway and the other(s)
will act as a Mesh Wi-Fi system.
3. Placement of your GigaSpire systems is important. Do not place your GigaSpire system:
•Behind a large mirror or in a room that is separated from the rest of the home by dense building materials, like
concrete or brick
•Next to other household devices that also emit signals that might interfere with your Wi-Fi signal, such as
microwaves, baby monitors and cordless phones
•Next to large metal household appliances, like a refrigerator, freezer, washer or dryer
•On or near the floor; try to install the GigaSpire BLAST systems at eye level (or higher), ideally on a shelf
Important Notes

Important Details
Here is some important information to keep in mind when setting up, and using, your new GigaSpire BLAST
u6 systems:
•The default network name for each BLAST u6 is the ‘SSID’ value that appears on the label found on the
bottom of the BLAST u6 (called ‘SSID’ on the sticker that came in your box, shown right).
•When your BLAST u6 connects, it will check in automatically to a Calix instance of Calix Support Cloud
(CSC). When this happens, the default SSIDs (of both the 5 GHz and 2.4 GHz radios) are changed to
'Calix GigaSpire WiFi’. As a result, you will have a single SSID (network name) for all devices in your
home.
•The ‘WPA Key’ value that appears on the label affixed to the bottom of the GigaSpire (or on the sticker
that came in your box, shown right) refers to the default password to the Wi-Fi network, required
when connecting your devices (e.g., smart phones, tablets, laptops, etc.)
•To avoid having to reconnect your existing devices (e.g., smart phones, tablets, laptops, etc.) to the new
Wi-Fi network, you might want to change your new SSID ('Calix GigaSpire WiFi’) to match the existing SSID
used by your previous router using the Calix CommandIQ app. Instructions to do this can be found on page
9 of this document.
•Note: When changing your SSID, note that it will be case sensitive, so be sure that it matches exactly.
•It is recommended that, once the BLAST u6 is up and running, you turn off the Wi-Fi on the router /
gateway provided by your service provider. For instructions on how to do that, visit your CSP web site.
•To enable advanced features (like Enhanced Parental Controls and ProtectIQ) in CommandIQ, please
contact the Calix Technical Assistance Center (TAC) @ gigahelp@calix.com.

5
5
Setting up your
BLAST u6 systems

Setting up your first GigaSpire BLAST u6 (as a residential gateway)
1
2
Connect the GigaSpire BLAST u6 to a power outlet.
Connect one end of the supplied Ethernet cable to one of the LAN ports found
on the back of the Internet access device provided by your service provider (e.g.,
modem, router, gateway) and the other end of the cable to the WAN port on the
back of the BLAST u6.
Ethernet
3
Note: The SSID (network name) of your new
GigaSpire will be 'Calix GigaSpire WiFi’ when the
system has checked into Calix Support Cloud. The
password remains the default setting; as found on
the bottom of your GigaSpire (or on the sticker
that came in your box) beside ‘WPA Key’.
Set up your Calix CommandIQ App
(see page 9 for details).
The solid blue LED indicates you have connectivity to the Internet.
Need help?
Contact support: gigahelp@calix.com
Boot-up time
~4m

Setting up your second GigaSpire BLAST u6 (as a satellite)
Using wireless backhaul
1Connect the GigaSpire BLAST
u6 to a power outlet.
2
3s
When the LED is red on the
second BLAST u6, you can begin
pairing it with the first BLAST u6.
Press and hold the WPS button
on the first BLAST u6 system for
3 seconds, then on the second
BLAST u6 system for 3 seconds
(less than 30 seconds apart).
Set up your Calix CommandIQ App
(see page 9 for details).
3
Note: The LED on both of the BLAST
u6 systems will flash GREEN when
pairing for wireless backhaul.
3s Note: Once pairing is successfully
complete, both BLAST u6 systems will
show a solid blue light (this may take
several minutes). You can then move
to step 3.
Otherwise, re-attempt until pairing is
successful.

Setting up your second GigaSpire BLAST u6 (as a satellite)
Using wired backhaul
12Connect one end of the
supplied Ethernet cable to the
LAN port found on the back of
the first GigaSpire BLAST u6
and the other end of the cable
to the WAN port on the back of
the second BLAST u6 system.
3m
Ethernet
NOTE: Once pairing is successfully complete,
both BLAST u6 systems will show a solid blue
light (this may take several minutes). You can
then move to step 3.
Set up your Calix CommandIQ App
(see page 9 for details).
3
Connect the GigaSpire BLAST
u6 to a power outlet.

Setting up your Wi-Fi and CommandIQ App
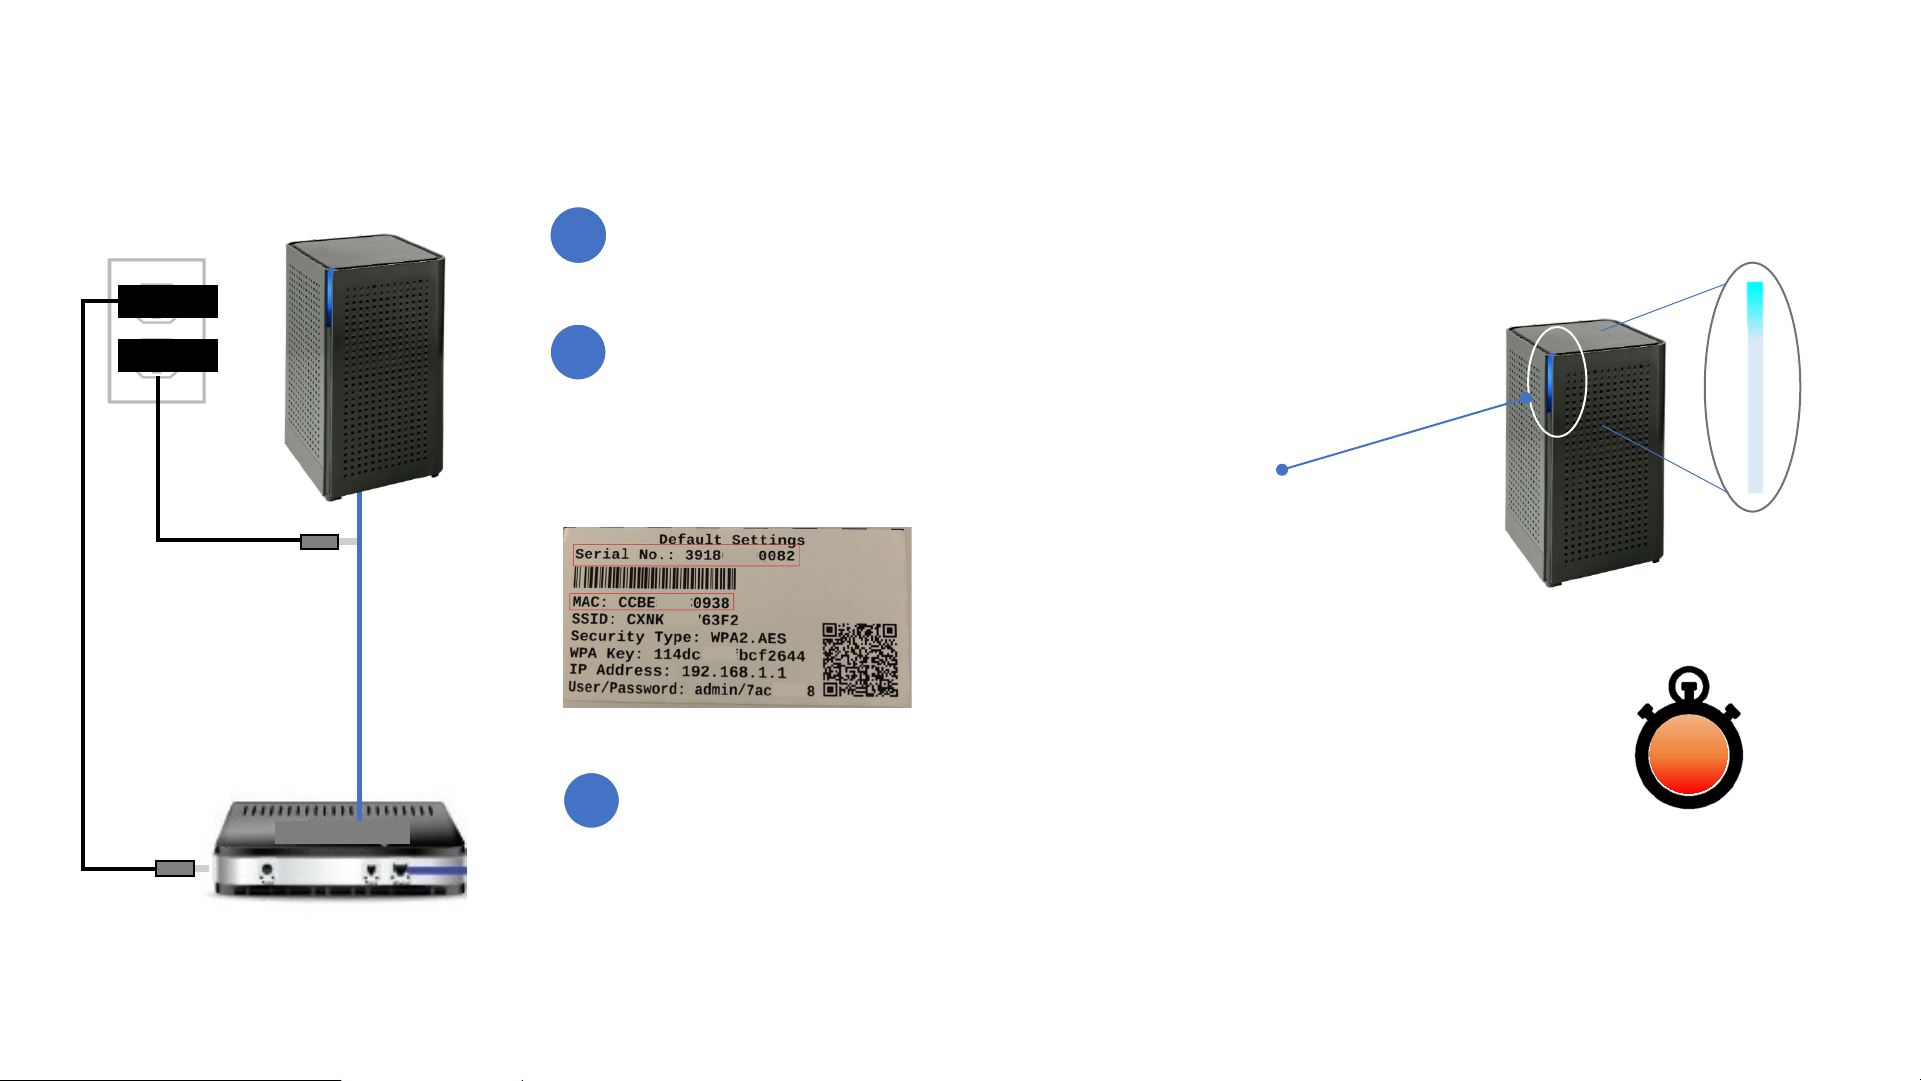
Note: Please wait at least 10 minutes after
plugging in your GigaSpire BLAST u6, before
selecting "Yes" to the question regarding your
system being plugged in and connected.
Proceeding to Step 4 earlier may result in this
error message: 'Please contact your service
provider to onboard your router.’
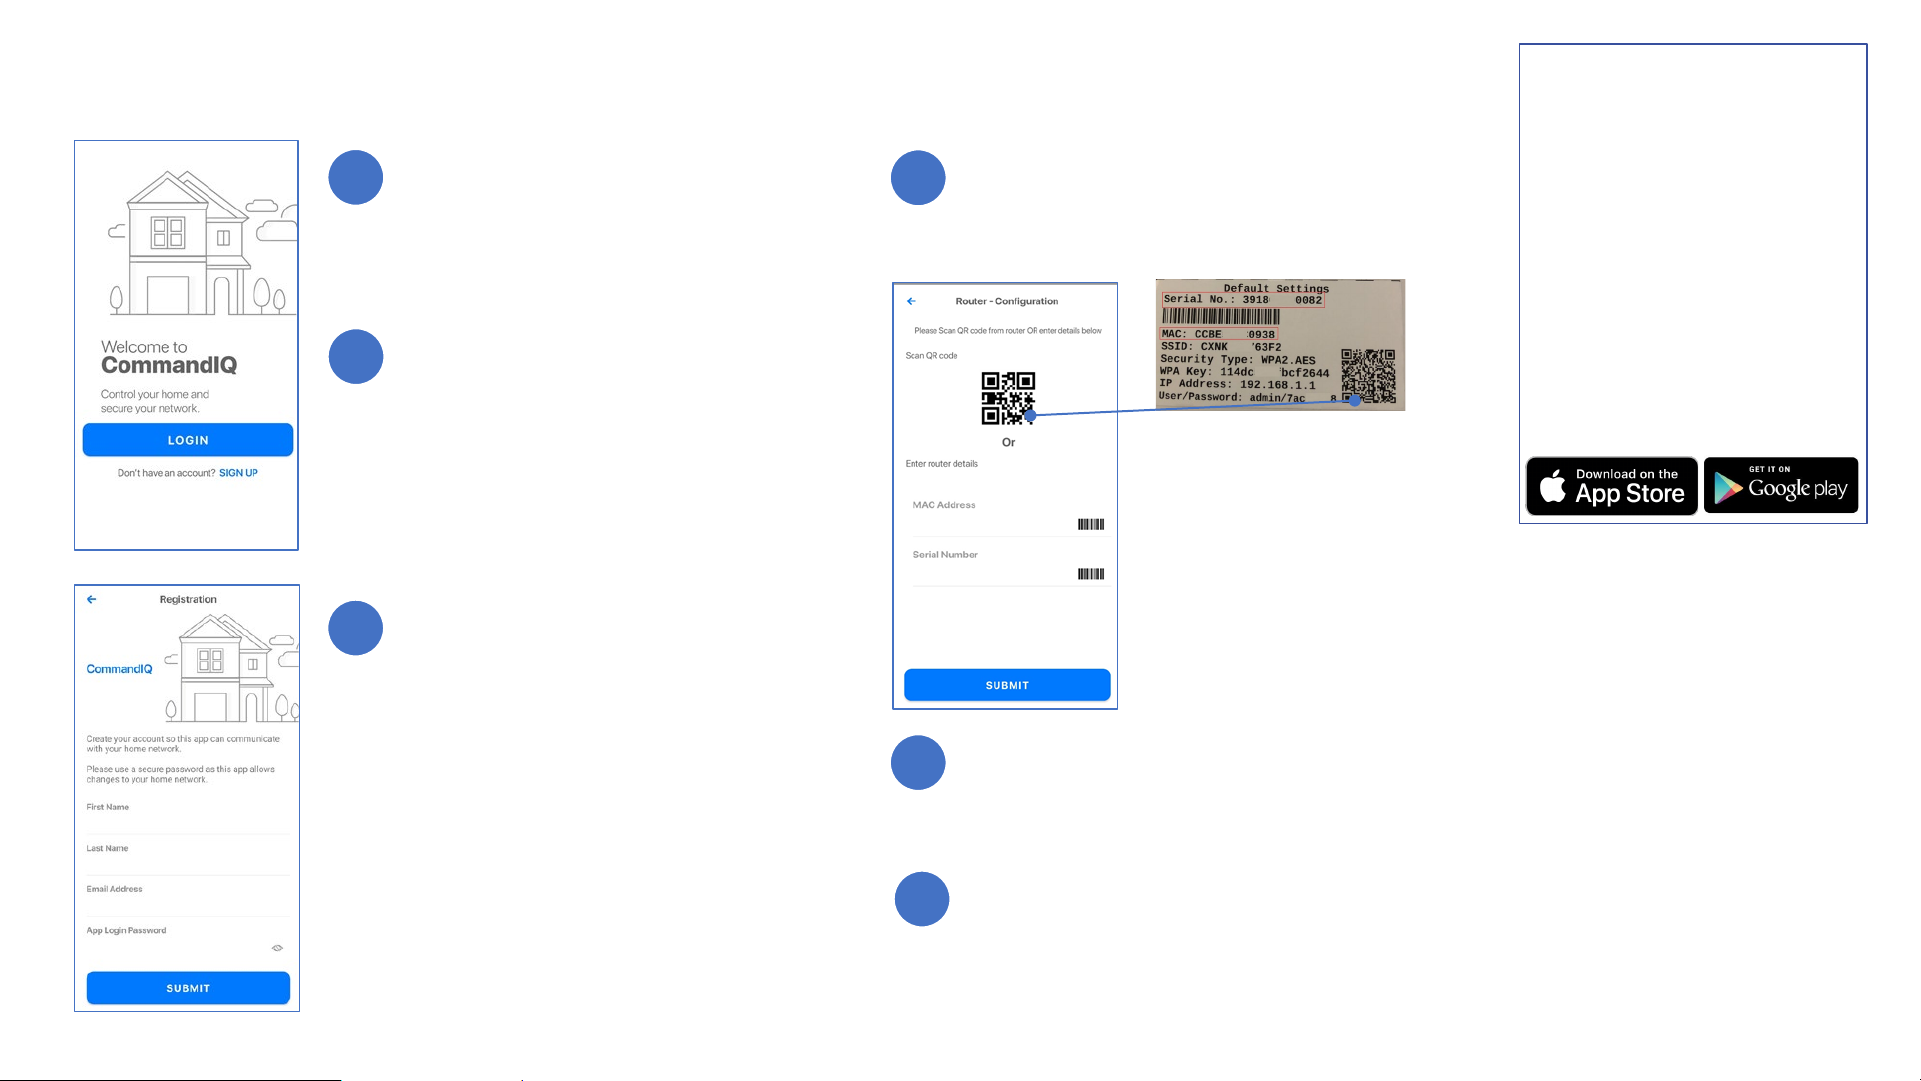
Download the app. Search either the
Apple App Store or Google Play Store for:
"CommandIQ" and install it on your
mobile device.
1
2
3
4
5
6
Select “Sign Up” (found at the bottom of
the screen).
Getting started with
CommandIQ
The CommandIQ App allows you
to easily set up and manage
your home Wi-Fi network.
Download the app and start
managing your home network
today!
Dive In: Refer to
www.blastwifi.com for details
and how to use specific
features.
Enter your personal information, then
press Submit.
The password you enter here will be used
to access the app.
Tap the QR code that appears within the
app, then scan the QR Code that is affixed
to the bottom of your GigaSpire BLAST u6
(or on the sticker that came in your box).
Note: You will be asked to
allow the “CommandIQ"
App to access your camera.
Select OK.
Point your phone’s camera at the QR code
(so that it is displayed on your screen) and
wait 1-2 seconds.
Name your network* and create a password.
(The ‘Router Name’ will be used throughout
the app.)
*Notes:
•The Network Name (SSID) is
what you will use as your
wireless connection name.
•If you do not want to change
your password on all
the devices in your home, use
your existing wireless SSID and
Password from your current
router when setting up the
new GigaSpire BLAST
network.
•To enable advanced features
(like Enhanced Parental
Control and ProtectIQ),
contact gig[email protected].
Other manuals for GigaSpire BLAST u6
1
Table of contents
Other Calix Gateway manuals