Callaway TRAVERSE User manual

TRAVERSETM
REMOTE CONTROL ELECTRIC CART

2
TABLE OF CONTENTS
Parts List............................................................................................................................3
Initial Setup: Wheel Installation....................................................................................4-5
Charging The Battery........................................................................................................5
Operation............................................................................................................................6
To Power Cart On..............................................................................................................6
Speed Control Knob.........................................................................................................7
Remote Control Layout.................................................................................................7-8
Cart Handle Adjustment...................................................................................................9
Securing Bag To Cart.......................................................................................................9
Remote Mount...................................................................................................................9
Transportation.................................................................................................................9
General Maintenance & Caution....................................................................................10
Warranty Info...................................................................................................................11

3
PARTS LIST
1
2
3
4
5
6
7
8
9
10
11
12
10
10
12
1
2
3
4
5
6
7
8
9
10
11
12
1
2
3
4
5
6
HANDLE
FEATURES
1
2
3
4
5
6
Handle
Speed Control Knob
Control Panel
Horizontal Arm
Adjustment Knob
Vertical Arm
Wheelie Bar
Battery Port
Battery
Bag Straps
Alignment Bolts
Bag Holder
Umbrella Mount
Scorecard Holder
Storage Compartment
Golf Ball Holders (2)
Tee Holder (4)
Drink Holder
Speed Control Knob
Control Panel
Remote Mount
INCLUDES
A. Traverse Cart
B. Battery
C. Charger
D. Remote
7
8
9
7
89

4
INITIAL SETUP: WHEEL INSTALLATION
The Traverse will require some assembly once it is removed from the package:
1. Remove all wrapping and rubber axle caps.
2. The wheels will need to be attached for use. In order to attach the wheels, Push and Hold the
silver push pins on each of the wheels.
3. Slide the wheel over the axle. On each of the wheels are 4 hex bolts. These bolts t into the
holes on the axle hub of each side. The wheel will install correctly when the 4 hex bolts t into
the 4 holes on the axle hub.
4. On each axle there are 2 grooves for the wheel pins to lock into:
a. The rst groove keeps the wheels on the cart but does not connect the wheels to the
motors. This allows the cart to be used as a traditional push cart in the event that
your battery dies or would like to push the cart manually.
b. The second groove connects the wheels to the motors.
5. The wheel will be correctly connected to the motor when the 4 bolts t into the 4 corresponding
holes on the axle hub. Also the wheel will sit ush against the axle hub rather than have a space.
Axle with 2 Grooves: FIG. 1: FIG. 2:
Wheel is installed on the rst axle groove. Motor is not engaged & the cart can be manually
pushed without resistance from the electric motors. The cart will not move using the motors
if the wheels are installed on the rst groove.
Wheel is installed on the second groove. The cart will now move using the motors. Notice
the wheel sits ush against the axle hub.
FIG. 1 -
FIG. 2 -
1st Axle
2nd Axle
4 Holes
on Axle Hub

5
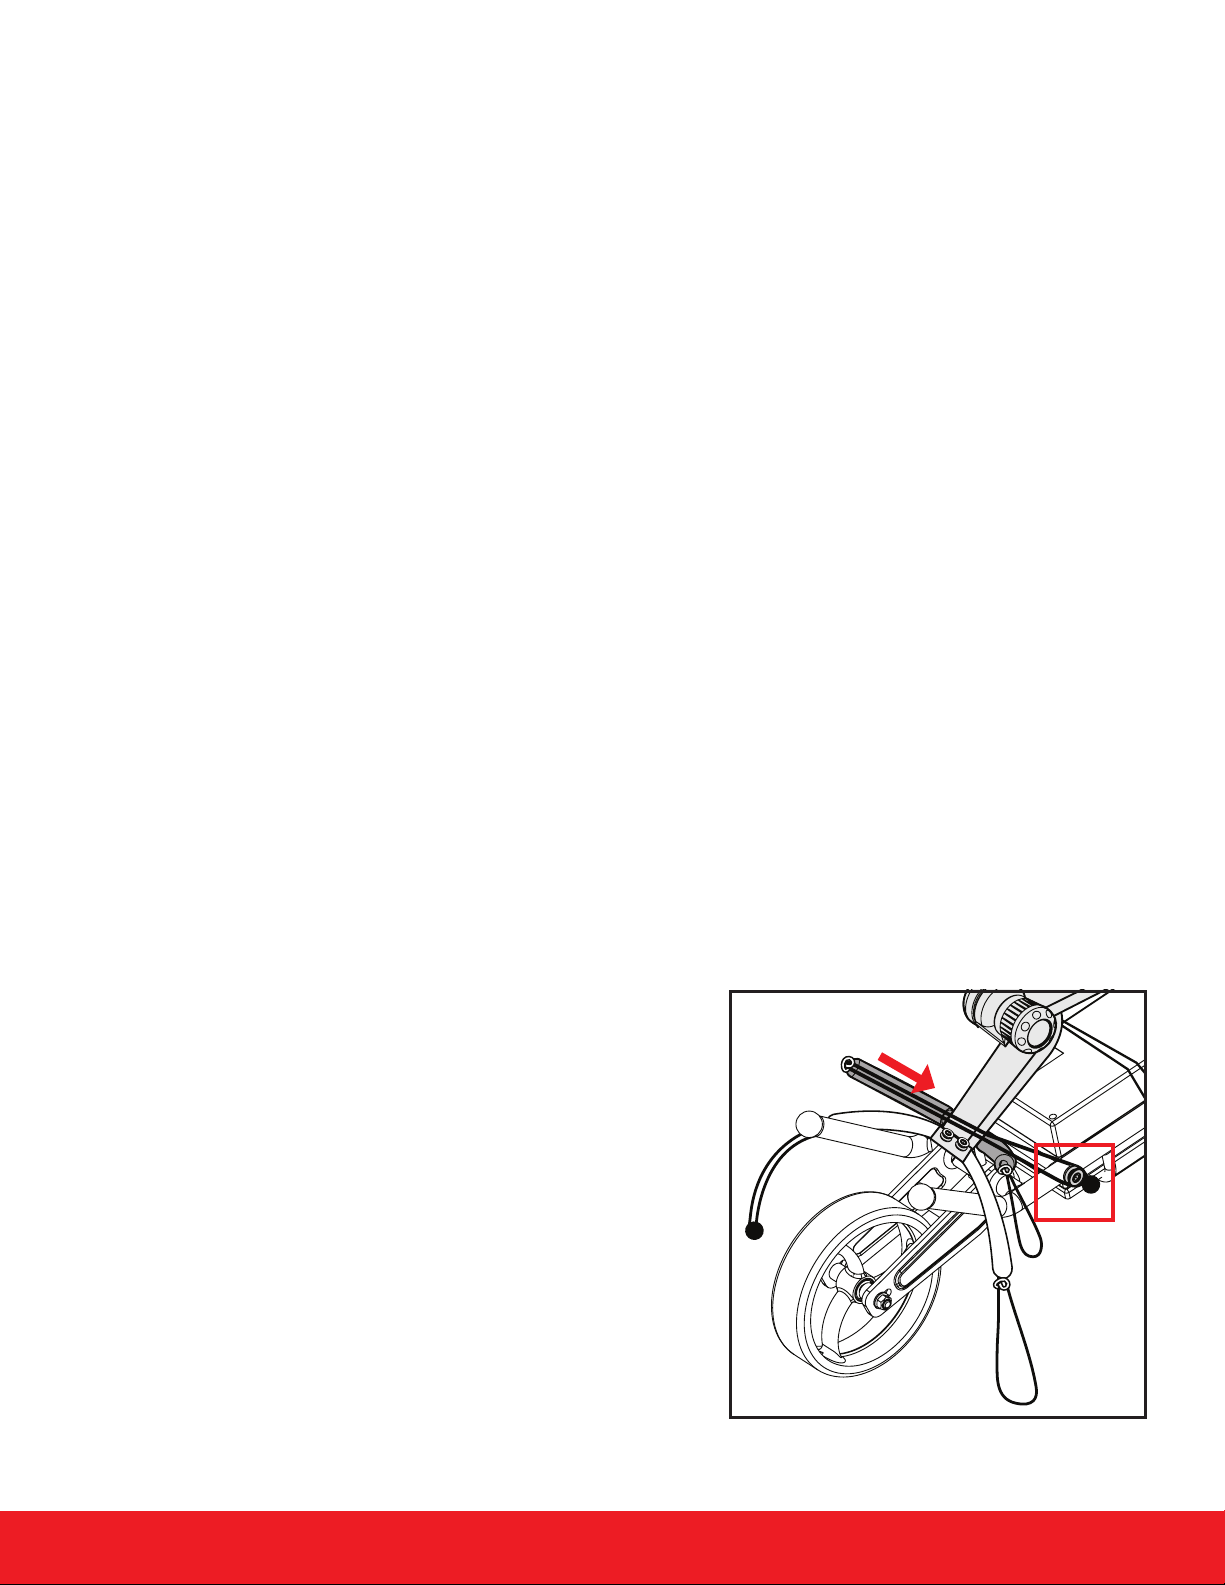
The rear wheelie bar will also need to be attached for use:
• In order to attach, pull up on the knob located on the wheelie bar and slide onto the square
bar located on the back of the cart.
• The Wheelie bar will lock into the corresponding hole on the back of the cart. The wheelie bar will
“click” into place.
• There are two angles for the wheelie bar:
• The lower position is recommended to keep the cart stable on all terrain.
• It is not recommended to use the higher wheelie bar setting unless the cart is being towed.
Once the wheels and wheelie bar have been installed, the cart is ready for use.
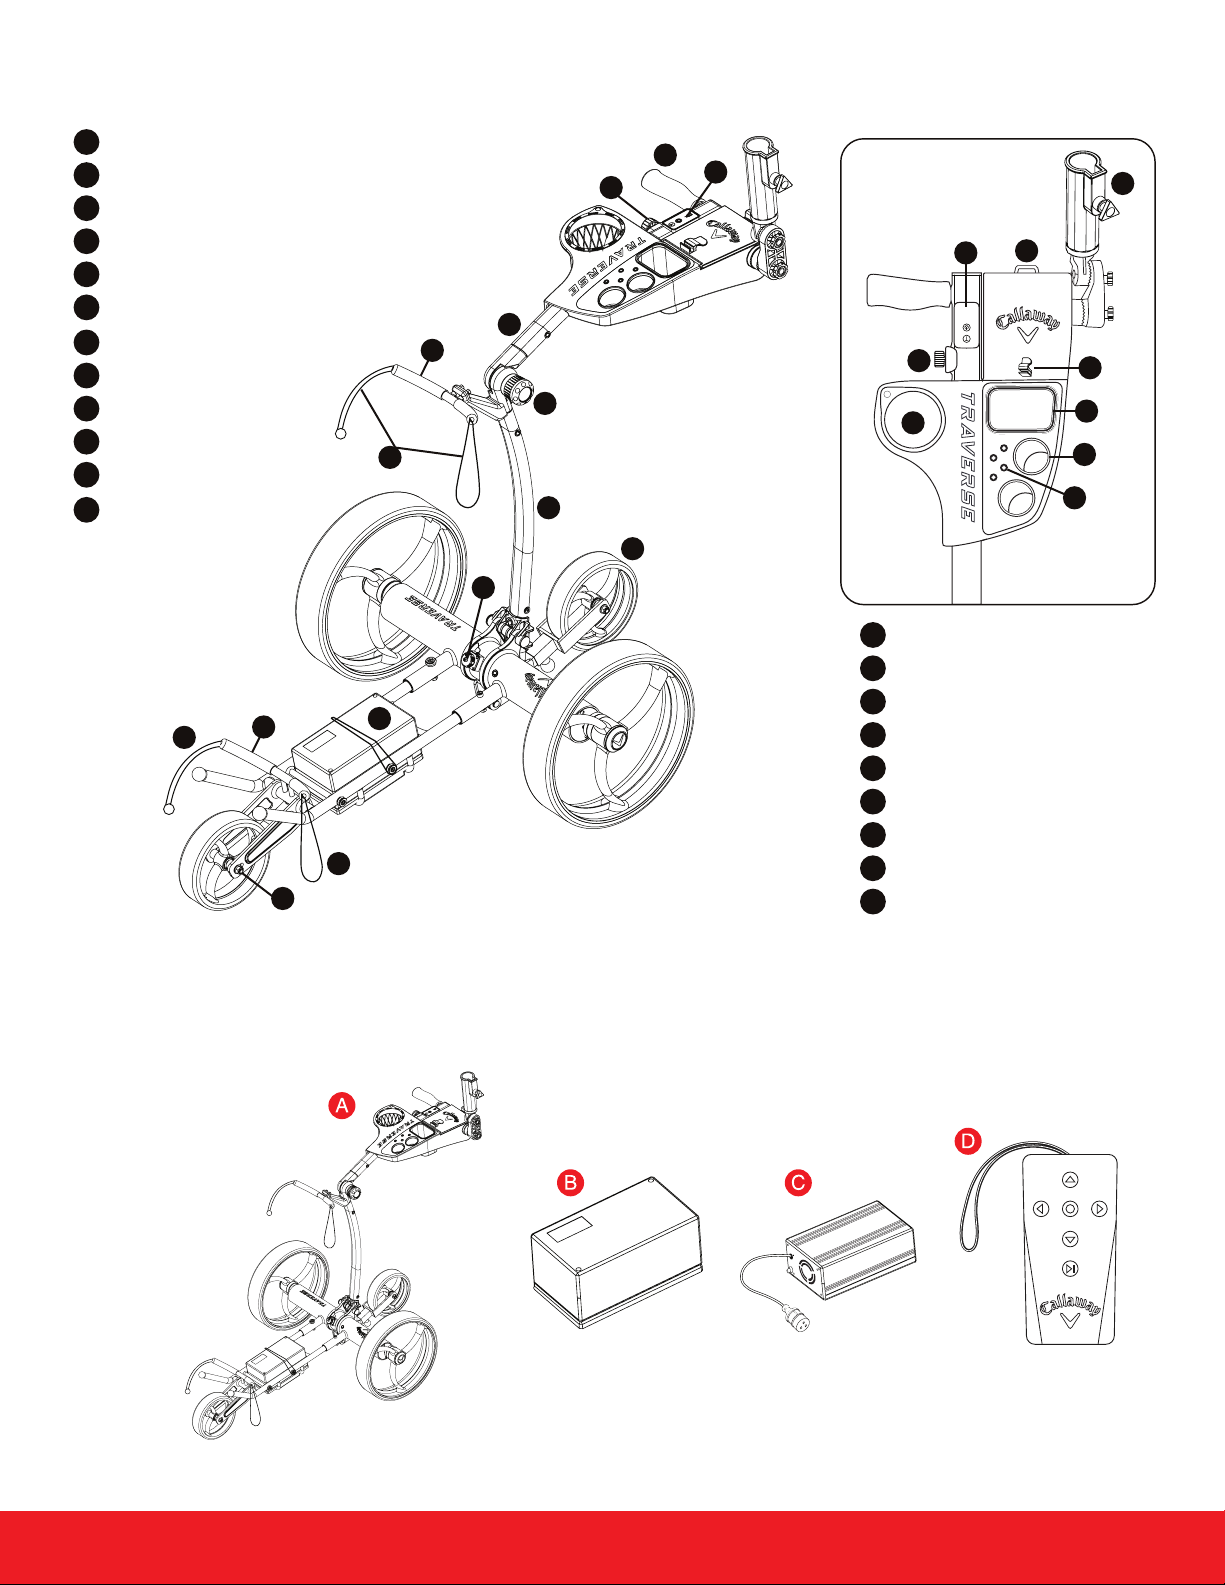
BATTERY SPECIFICATIONS:
CHARGING THE BATTERY
• Lithium Ion battery pack: 25.2 V, 10Ah output, 2000mA
• The Lithium ion battery will run the cart for 18-27 holes. It is recommended that you charge the
battery after every use.
•Store the battery with a full charge when not in use.
• Do not leave the battery connected to cart when the cart is not in use. Make sure the battery
port and plug are covered when not in use.
• To charge the battery:
• First, connect the battery to the charger.
• Next, plug the charger into outlet.
• The LED indicator on the charger will turn red when the battery is charging and will turn
green when the battery is fully charged.
• When the battery is fully charged, unplug charger from outlet.
• Next, disconnect the battery from charger.
• The battery is now ready for use.
• Charging time can range from 3 to 6 hours depending on previous use
• Do not store the battery completely drained. This can lead to a shorter lifespan of the battery.
• Do not overcharge your battery: charging will end when the indicator light on the charger is green.
• Only use the included charger to charge the battery.
• CAUTION: do not contact the battery plug pins to any metal object. This may cause electric
shock and possible injury.

6
OPERATION
• First, strap the battery down on the cart so it does not move during operation.
• Plug a fully charged battery to the cart. The plug and port have grooves to specically align the
battery into the cart battery port as well as a red line on the port and the plug. Align the red mark
on the plug and port to correctly install. Make sure you remove the port cover on the cart before
trying to connect the battery.
• Once you align the grooves on the battery plug and port, connect the battery to the cart port and
twist the silver locking collar to ensure the battery remains connected to the cart during use.
• When the battery is not connected, use the plug cover to protect the port from any debris.
TO POWER CART ON
Connect a fully charged battery to the cart & Hold the Power Button located on the cart handle until
the power indicator light turns green. To turn the cart o, Hold the Power Button until the green light
turns o.
• The “T” Symbol above the power button is the Timer
Button. Pressing this runs the cart for set distances:
• Pressed Once: T1: 15 yards
• Pressed Twice: T2: 23 yards
• Pressed 3 Times: T3: 37 yards
Below the power button are 2 indicator lights: a battery
symbol and a star symbol.
• The battery shaped Indicator light will emit green when
the battery has enough power and is okay for use.
• The star shaped indicator light will be red when the
battery is low and needs to be charged.

7
SPEED CONTROL KNOB
• The silver knob located by the power button & timer button is the Speed control adjustment.
• This knob controls how fast the cart runs without the remote.
• The remote can only be used to stop the cart: pressing the middle “circle” button once.
• This knob is used for walking behind the cart without using the remote. The cart will only move
forward when using the speed control knob.
• To increase speed, turn the knob clockwise; to decrease speed, turn the knob counterclockwise.
To stop the cart, turn the knob counter clockwise until the knob does not rotate any further.
Also, pressing the power button once on the cart handle will stop the cart.
Do not touch the knob if you are not ready for the cart to move. The Cart will continue to
move until the knob is turned to the o position. Also, pressing the power button once or
pressing the middle button on the remote will stop the cart.
REMOTE CONTROL LAYOUT
• To turn the remote on, slide the switch on the side of the remote towards the antenna. Make sure
to turn the remote control o when it is not in use. The remote will not shut o automatically.
The remote requires 2 AAA batteries.
•When using the remote, make sure your hand is not covering the antenna. The antenna needs
to move freely for optimal range.
Forward
Reverse
Left
Right
Stop
Play/Pause
On/O Switch
Clip/Mount
Antenna
LED Indicator
1
2
3
4
5
6
7
8
9
10
1
4
3
5
2
6
10
9
78
9

8
REMOTE CONTROL LAYOUT (continued)
• To Sync the remote: if the cart does not respond using the remote:
1. Check to make sure the battery is connected properly & that the green power light is on. Also
make sure the remote is switched on and the red LED indicator light blinks when buttons
are pressed.
2. Power the remote on rst, then power the cart on so the green light indicator on the cart handle is on.
3. With the speed control knob turned fully counterclockwise (o position): rotate the speed control
knob roughly 20 degrees clockwise until there is a “click”. Do not rotate the knob any further
once you hear the “click”.
4. Next, press any button on the remote. The cart should respond from the remote input.
5. After the cart and remote have synced and the cart is now responsive from remote input, turn
the speed control knob fully counterclockwise (back to o position).
6. The cart should now automatically sync with the remote whenever the remote and cart are
powered on.
7. If the cart becomes unresponsive again from remote input, repeat the process of syncing the
remote and cart.
• The cart has three speeds in each direction:
1. UP - Forward (3 speeds by pressing: once, twice, 3 times)
2. DOWN - Reverse (3 speeds by pressing: once, twice, 3 times)
3. Arrow L - Left Turn (single clicks or holding)
4. Arrow R - Right Turn (single clicks or holding)
5. ‘Circle’ (middle button) - Stop
6. Play/Pause: this button runs the cart in the forward direction for distances:
• One Press: the cart runs for 20 yards
• Two Presses: the cart runs for 35 yards
• Three Presses: the cart runs for 50 yards
• Note: you can stop the cart by pressing the “circle” button at any time as well as steer
the cart using the arrow buttons.

9
CART HANDLE ADJUSTMENT
• To adjust the angle of the cart handle, loosen (rotate counterclockwise) the black knob with the
Callaway Chevron located near the upper bag holder.
• Adjust the handle to the desired angle and rotate the knob clockwise to tighten
• Caution: When adjusting the handle, loosen the knob enough so there is a space between the
“teeth” on the cart handle. If the knob is not loosened enough, the “teeth” can wear and cause
adjustment issues.
SECURING BAG TO CART
• One end of the straps has a loop and the other end has a plastic ball attached. The loop goes
around the ball to secure your bag using tension.
• There is an upper bag strap and a lower bag strap.
• The bottom of your golf bag rests on the 2 angled frame pieces which have a plastic ball
attached to the ends.
• If you need more tension on the bag straps to hold your bag in place, tie knots in the straps to
increase the amount of tension.
REMOTE MOUNT
• On the back of the cart handle, there is a plastic “ring”. If you would like to secure the remote to
the cart, the remote clip can slide into the “ring” for convenient remote placement.
• Store remote control in closable compartment when the remote is not in use & during transportation.
TRANSPORTATION
• Fold the handle down & tighten the adjustment knob
• Securing arm to cart:
• With the cart handle folded down, use the lower
bag strap (the end with the ball attached) & loop
around the upper bag holder
• Secure bag strap loop to the silver ring mounted
on the cart frame. The silver ring is located in
front of the cart battery.
• Removing wheels: removing the wheels and wheelie
bar for transportation is based upon the users’ needs.

10
GENERAL MAINTENANCE & CAUTION
• Do not submerge the cart in water. The cart is water resistant but is not fully waterproof.
• Do not use pressured water to clean cart.
• The cart can be used in light rain.
• Store the battery in a warm and dry place (not on a concrete oor).
• The battery is not waterproof. Do not use cart in heavy rain.
• The cart remote is not waterproof. Use caution when using remote in the rain.
• When cleaning the cart:
• The best way to clean the Callaway Traverse is to wipe o any excess dirt/grass with a wet
towel. This reduces the risk of damaging the electronics in the cart.
• To clean the wheels: remove both rear wheels and rinse using water or wipe wheels using
a clean towel. Do not use high pressure water to clean the cart. Clean the front wheel by
using water and a clean towel to wipe excess grass and mud away.
• Do not store the battery completely drained. This can lead to a shorter lifespan of the battery.
• It is recommended that you store the lithium ion battery with at least 50% of charge.
• Do not overcharge your battery: charging will end when the indicator light on the charger is green.
• Do not completely drain the battery. Once the low battery light is on, do not use the motors. Put
the cart into manual mode by moving the cart wheels to the rst axle groove so the cart can be
pushed freely.
• Do not use any sort of lubricant on the cart axles or bearings. They are designed to be debris
resistant and do not require lubrication.
• CAUTION: do not contact the battery plug pins to any metal object. This may cause electric
shock and possible injury.

11
WARRANTY INFO
The Callaway Traverse comes with a 12 month warranty which covers defects from
manufacturing and premature wearing from use in accordance with the user manual.
The warranty will not cover any transportation accidents, water damage, or damage
caused by operator error. Any modication to the battery, charger, remote, or cart will
result in voiding the warranty. Only use the included battery, charger, and remote to
operate the cart.
For all warranty/use questions, do not return this product to the retailer.
Please call Customer Service at 1-800-456-2129 or Visit www.callawaytag.com.
© 2018 CALLAWAY GOLF COMPANY.
Callaway Golf and the Chevron device are trademarks of Callaway Golf Company. IZZO Golf
is an ocial licensee of Callaway Golf Company.

© 2018 CALLAWAY GOLF COMPANY.
Callaway Golf and the Chevron device are trademarks of Callaway Golf Company. IZZO Golf
is an ocial licensee of Callaway Golf Company.
Table of contents