Callaway ALLSPORT User manual


2INTRODUCTION

INTRODUCTION
The Callaway ALLSPORT Watch delivers elite performance
on the course in a sporty, fashionable design. Hit more greens
and minimize penalty strokes by knowing precise distances to
the front, center, and back of the green, as well as distances to
hazards and doglegs.
SPECIFICATIONS
Product Callaway AllSport Watch
# of Courses 35,000+
Battery 220mAh Lithium Ion Polymer
Battery Life Up to 9 hours / Time Mode Only: Up to 30 Days
Weight 1.92 oz.
Display Size 1.28” (128 x128 pixels)
Band Length 10.25”
Waterproof Yes 5 ATM Designation
ENGLISH 3

4INTRODUCTION
CHARGING
1. Attach the magnetic pins on the charging cord to the
magnetic charging ports located on the back of the watch.
2. Make sure the pins are aligned, then insert the other end of
the charging cord into a USB port or AC adapter (not included).
BUTTON DESCRIPTION
A. [POWER ]- HOLD to Power On/O, PRESS to turn
Backlight On/O.
B. [BACK ]- PRESS to
return to previous
screen, PRESS to toggle analog/digital
time display while on Time Screen.
C. [UP ]- Scroll Up
D. [OK ]- PRESS to Toggle Screens,
Select Options - HOLD to access
Main Menu.
E. [DOWN ]- Scroll Down
DESCRIPTION OF TERMS
• PRESS - Press & Release button quickly.
• HOLD - Press & Hold button until desired
screen appears or change happens.
CHARGING
PINS
CHARGING
PORT

ENGLISH 5
SET UP
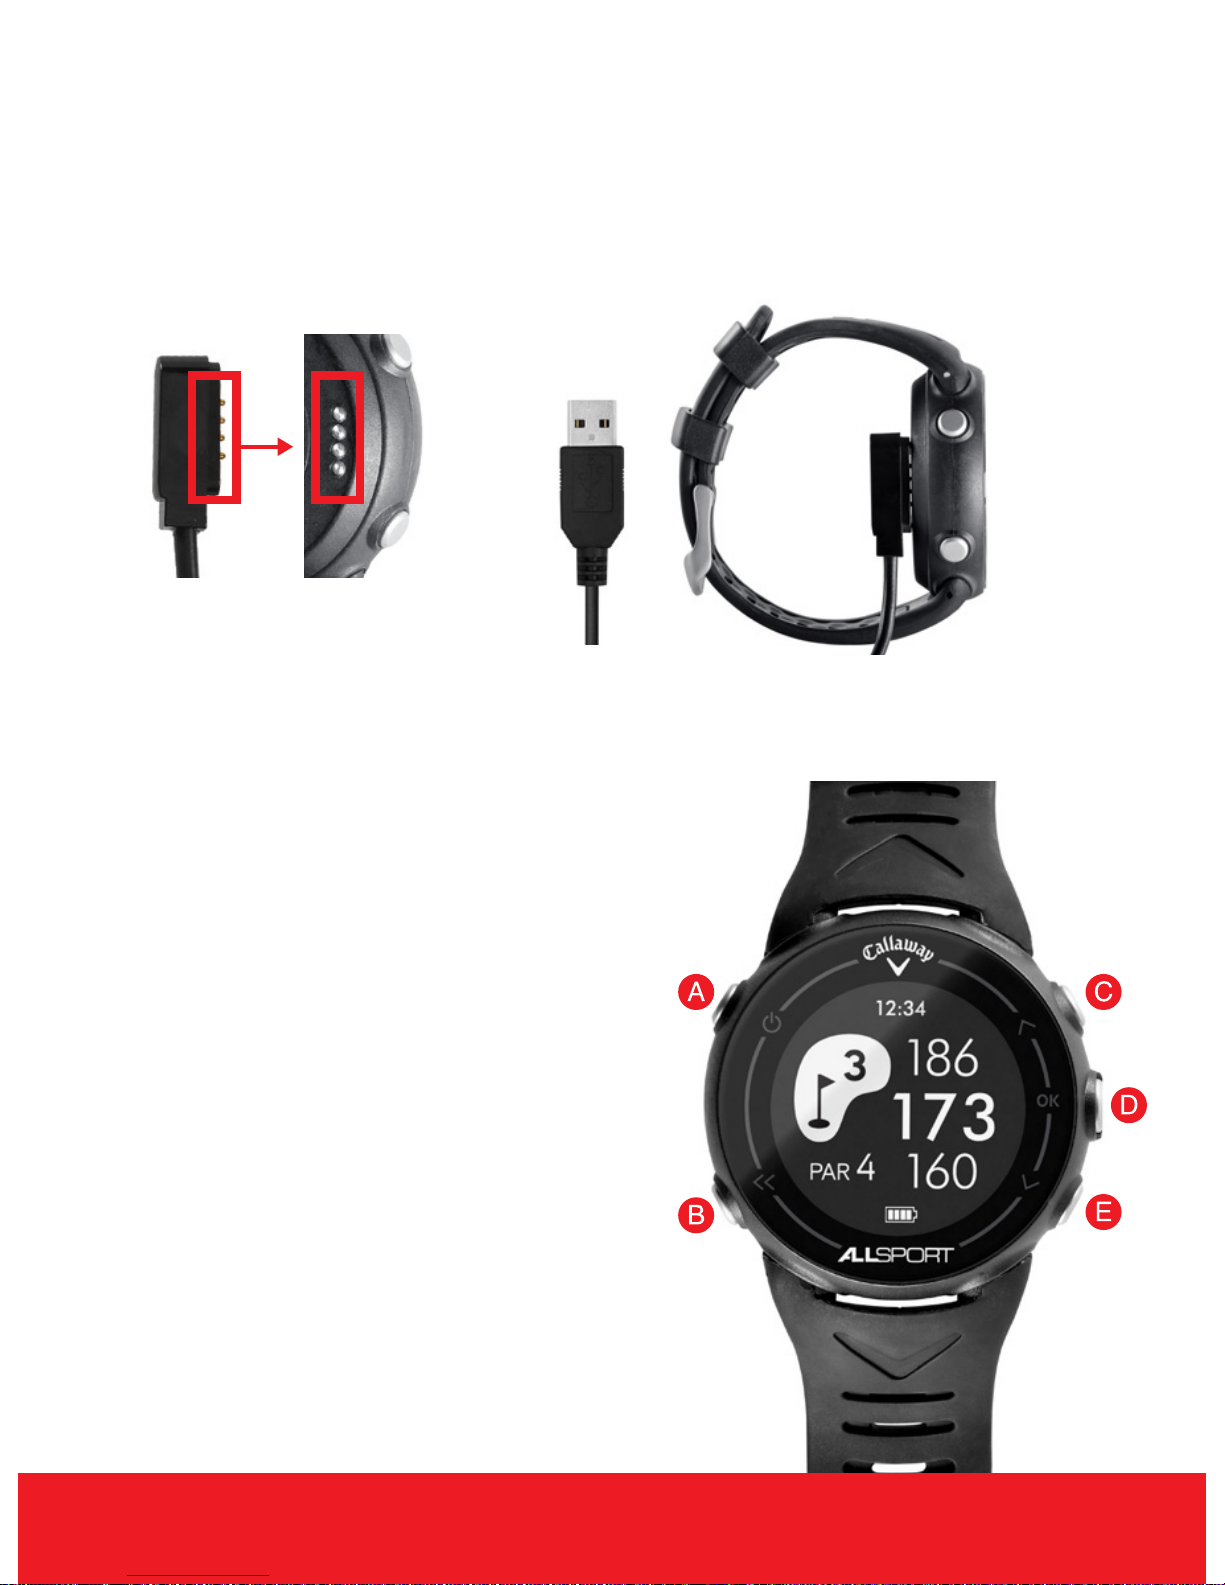
1. HOLD [POWER ]button until watch powers on.
2. Language - Use the [UP/DOWN ]buttons to scroll through the
language options then Press & Release the [ OK ] button to select.
3. Set Time - PRESS [OK ]button to connect to the satellites
(must be outside) and the watch will automatically set the
correct date and time. (This could take a few minutes) Press &
Release the [OK ]button to continue.
Note: If the time is incorrect by an hour, Daylight Savings Time must be
turned ON.
4. Gender - Use the [UP/DOWN ]buttons to toggle between Male
or Female, then Press & Release the [OK ]button to select.
5. Age - Use the [UP/DOWN ]buttons to scroll to your age then
Press & Release the [OK ]button to select.
6. Unit - Use the [UP/DOWN ]buttons to scroll to the desired unit
of measure, then Press & Release the [ OK ] button to select.
7. Height - Use the [UP/DOWN ]buttons to scroll to your height,
then Press & Release the [OK ]button to select.
8. Weight - Use the [UP/DOWN ]buttons to scroll to your weight,
then Press & Release the [OK ]button to select.
9. The watch will then return to the Time Screen & the set up
process is complete.
TURN ON/OFF DAYLIGHT SAVINGS
1. From the Time Screen, Press & Release the [ OK ] button.
2. Press & Release the [ Down ] button to scroll to Settings, then
Press & Release the [ OK ] button to select.
3. Press & Release the [ OK ] button again to select System.

6HOW TO USE
4. Press & Release the [ Down ] button to scroll to Clock, then
Press & Release the [ OK ] button to select.
5. Press & Release the [ Down ] button to scroll to Daylight Saving,
then Press & Release the [ OK ] button to select.
6. Press & Release the [ OK ] button then use the [ Up / Down ]
buttons to toggle ON/OFF. Press & Release the [ OK ] button
to save, then Press & Release the [ BACK ] button to exit.
TIME MODE
1. While on the Time Screen,
PRESS the [BACK]button
to toggle between Analog or
Digital Time Display.
2. PRESS the[POWER ]button
to turn Backlight on.
3. PRESS the [OK ]button to access Main Menu.
GOLF MODE
1. From the Time Screen, HOLD the [ OK ]
button to access the Main Menu.
2. Use the [ UP/DOWN ] buttons to scroll to
Golf, then Press & Release the [ OK ] button
to select and continue to the Golf Menu.
- Play Golf: Select to start your round of golf.
- Score History: Select to view saved rounds of golf (see pg 10).
- Scorecard: Select to toggle scorecard on/o (see pg 10).
- Shot Distance: Select to toggle shot distance on/o (see pg 11).

ENGLISH 7
PLAY GOLF
1. Use the [ UP/DOWN ] buttons to scroll to Play Golf, then
Press & Release the [ OK ] button to select.
2. Device will begin searching for satellite signal (PRESS the
[OK ]button to cancel).
3. Once satellite connection is established, the nearest golf courses
will be listed. Use the [UP/DOWN ]buttons to scroll to desired
course, then Press & Release the [ OK ] button to select.
ON THE COURSE
1. Play Mode will now display the distance to the
Front, Center & Back edge of the green for
the current hole.
2. PRESS [OK ]button to toggle between
Hazard, Scorecard & Shot Distance Screens.
3. To exit Play Mode at any time, HOLD the
[OK ]button.
HAZARDS
Note: If no hazards are present on that hole, the
hazard screen will be blank.
1. PRESS [OK ]button to access the
Hazard Screen.
2. Only 3 hazards will show at a time. If a hole
has more than 3 hazards, scroll by using
[UP / DOWN ]buttons. (Hazards that are
behind you will not be displayed).
3. To exit, PRESS [OK ]button to view Scorecard, Shot Distance
(if enabled), or return to distances to the green.

SCORECARD
Note: Scorecard must be turned On in the
Golf Menu (see pg. 4)
1. From the Hazard Screen, PRESS [OK ]
button to access Scorecard.
2. Use [UP/DOWN ]buttons until number of
total strokes for that hole is displayed.
3. HOLD the [DOWN ]button to scroll to Putts, use [UP/DOWN ]
buttons until correct number of putts is displayed.
4. HOLD the [DOWN ]button to scroll to GIR (Greens in Regulation).
Use [UP/DOWN ]buttons to select Y/N (Yes or No).
5. To exit, PRESS [OK ]button to return to Play Mode.
SHOT DISTANCE
Note: Shot Distance must be turned On
in Settings.
1. PRESS [OK ]button to access Shot Distance.
2. As you travel to your ball, the distance will
begin calculating.
3. Once you arrive at your ball, the distance displayed is the distance
of your previous shot (the distance you traveled).
4. To reset, PRESS the [DOWN ]button.
5. PRESS [OK ]button to view next/previous screen.
8HOW TO USE

ENGLISH 9
AUTO-HOLE ADVANCE
1. The device will automatically switch to the next hole if
Scorecard is turned OFF. If Scorecard is turned ON, a
score must be entered before the device will advance to
the next hole.
END ROUND
1. When nished with round, HOLD [OK ] button to return to
Main Menu.
2. If Scorecard is turned on, use the[ UP/DOWN ] buttons to scroll
to desired option, PRESS [ OK ] to select.
• Save & Exit - Save Scorecard, end round, and return to
Golf Menu.
• Discard & Exit - Discard Scorecard, end round, and return
to Golf Menu.
•Cancel - Select to return to Play Mode.

10 HOW TO USE
SCORE HISTORY
1. From the Golf Menu, use the [UP/DOWN] buttons to scroll to
Score History, then PRESS [OK] to select.
2. Use the [UP/DOWN] buttons to scroll to the scorecard you would
like to view, then PRESS [OK] to select.
3. Use the [UP/DOWN] buttons to view your score on the front nine
(1-9), the back nine (10-18), or the entire round (1-18).
4. PRESS the [OK] button to view the breakdown of your round
by hole.
5. To exit, HOLD the [OK] button to return to the previous screen.
SCORECARD
1. From the Golf Menu, use the [UP/DOWN] buttons to scroll to
Scorecard, then PRESS [OK] to select.
2. PRESS the [OK] button again, then use the [UP/DOWN]
buttons to toggle on/o.
3. PRESS the [BACK] button to exit and return to the Golf Menu.
SHOT DISTANCE
1. From the Golf Menu, use the [UP/DOWN] buttons to scroll to
Shot Distance, then PRESS [OK] to select.
2. PRESS the [OK] button again, then use the [UP/DOWN]
buttons to toggle on/o.
3. PRESS the [BACK] button to exit and return to the Golf Menu.

ENGLISH 11
RUNNING
1. Use the [UP/DOWN] buttons to scroll to Running, then
PRESS [OK] to select.
2. The watch will start searching for Satellite singal. Once
connected, PRESS the [OK] button and start your session.
3. Use the [UP/Down] buttons to scroll and view:
- Timer
- Distance
- Pace
- Calories
- Avg. Pace
- Stride Rate
- Heart Rate
- Avg. Heart Rate
4. PRESS the [OK] button to stop, then choose:
- Resume: Continue your session.
- Save: End session and save.
- Discard: End session and don’t save.
5. After ending your session you can view your stats, PRESS
the [BACK] button to exit and return to the Main Menu.

12 HOW TO USE
CYCLING
1. Use the [UP/DOWN] buttons to scroll to Cycling, then
PRESS [OK] to select.
2. The watch will start searching for Satellite singal. Once
connected, PRESS the [OK] button and start your session.
3. Use the [UP/Down] buttons to scroll and view:
- Timer
- Distance
- Speed
- Calories
- Avg. Speed
- Cadence
- Heart Rate
- Avg. Heart Rate
4. PRESS the [OK] button to stop, then choose:
- Resume: Continue your session.
- Save: End session and save.
- Discard: End session and don’t save.
5. After ending your session you can view your stats, PRESS
the [BACK] button to exit and return to the Main Menu.

ENGLISH 13
SWIMMING
1. Use the [UP/DOWN] buttons to scroll to Swimming, then
PRESS [OK] to select.
2. The watch will start searching for Satellite singal. Once
connected, PRESS the [OK] button and start your session.
3. Use the [UP/Down] buttons to scroll and view:
- Timer
- Distance
- Pace
- Calories
- Avg. Pace
- Heart Rate
- Avg. Heart Rate
4. PRESS the [OK] button to stop, then choose:
- Resume: Continue your session.
- Save: End session and save.
- Discard: End session and don’t save.
5. After ending your session you can view your stats, PRESS
the [BACK] button to exit and return to the Main Menu.

14 HOW TO USE
TRAINING
1. Use the [UP/DOWN] buttons to scroll to Training, then
PRESS [OK] to select.
2. Use the [UP/DOWN] buttons to scroll to Running or
Cycling, then PRESS the [OK] button to select.
3. The watch will start searching for Satellite singal. Once
connected, PRESS the [OK] button to start.
4. Use the [UP/Down] buttons to scroll and view:
- Timer
- Distance
- Pace
- Calories
- Avg. Pace
- Stride Rate
- Heart Rate
- Avg. Heart Rate
5. PRESS the [OK] button to stop, then choose:
- Resume: Continue your session.
- Save: End session and save.
- Discard: End session and don’t save.
6. After ending your session you can view your stats, PRESS
the [BACK] button to exit and return to the Main Menu.

ENGLISH 15
TRIATHLON
1. Use the [UP/DOWN] buttons to scroll to Triathlon, then
PRESS [OK] to select.
2. The watch will start searching for Satellite singal. Once
connected, PRESS the [OK] button to start.
3. To toggle between Running, Cycling, and Swimming,
PRESS the [BACK] button.
4. Use the [UP/Down] buttons to scroll and view:
- Timer
- Distance
- Pace
- Calories
- Avg. Pace
- Stride Rate
- Heart Rate
- Avg. Heart Rate
5. PRESS the [OK] button to stop, then choose:
- Resume: Continue your session.
- Save: End session and save.
- Discard: End session and don’t save.
6. After ending your session you can view your stats, PRESS
the [BACK] button to exit and return to the Main Menu.

16 HOW TO USE
HISTORY
1. From the Time Screen, HOLD the [ OK ]
button to access the Main Menu.
2. Use the [UP/DOWN] buttons to scroll to History, then
PRESS [OK] to select.
3. Use the [UP/DOWN] buttons to scroll to Running, Cycling,
Swimming, or Triathalon, then PRESS [OK] to select.
4. Use the [UP/DOWN] buttons to scroll to the session you
would like to view, then PRESS [OK] to select.
5. To exit, PRESS the [BACK]button.
RECORDS
1. From the Time Screen, HOLD the [ OK ] button to access the
Main Menu.
2. Use the [UP/DOWN] buttons to scroll to Records, then
PRESS [OK] to select.

ENGLISH 17
3. Use the [UP/DOWN] buttons to scroll to your personal best
Running, Cycling, or Swimming sessions, then PRESS [OK]
to select.
4. Use the [UP/DOWN] buttons to scroll to the Record you
would like to view, then PRESS [OK] to select.
3. To exit, PRESS the [BACK]button.
OTHER
1. From the Time Screen, HOLD the [ OK ] button to access the
Main Menu.
2. Use the [UP/DOWN] buttons to scroll to Other, then PRESS
[OK] to select.
3. Use the [UP/DOWN] buttons to scroll to the tool you would
like to use, then PRESS [OK] to select.
Alarm- PRESS [OK] to select Edit, then PRESS the [UP]
button to enable the Alarm (On). Then PRESS [OK].
Use the [UP/DOWN] buttons to set the hour to the desired time,
then PRESS [OK].
Use the [UP/DOWN] buttons to set the minutes to the desired
time, then PRESS [OK].
Use the [UP/DOWN] buttons to select AM or PM, then PRESS
[OK]. PRESS the [BACK] button to save and exit. The Alarm
is now set.

18 HOW TO USE
Navigation- PRESS [OK] to select New POI (Point of Interest).
Then use the [UP/DOWN] buttons to change the Latitude value.
PRESS [OK] to toggle to the next value.
After the Latitude/Longitude values are set, PRESS [OK], then
PRESS [OK] again to select save.
Pedometer- PRESS [OK] then start walking, your number of
steps will be displayed. To exit, PRESS the [BACK] button.
Bubble Level- Use to test how level a surface is.
Geolocation- Use to nd your Latitude/Longitude location
(must be outside).
SETTINGS
1. From the Time Screen, HOLD the [ OK ] button to access the
Main Menu.
2. Use the [UP/DOWN] buttons to scroll to Settings, then
PRESS [OK] to select.
3. Use the [UP/DOWN] buttons to scroll to the Setting you
would like to change, then PRESS [OK] to select.
SYSTEM
Language- Select from English, French, Spanish, German,
Japanese, or Chinese.
Clock- Change from 12 or 24 hour clock, manually adjust the
time and turn Daylight Savings Time On/O.
Backlight- Set the amount of time the Backlight stays on.
Alert- Change the button feedback settings. Select from Sound,
Light, or Vibrate (these can be selected in any combination).

ENGLISH 19
Unit- Choose the unit of measurement (Metric system or
Imperial).
Smartband- Turn Smartband On/O (Bluetooth, Calories,
Steps, and distance walked).
Geolocation- Change the format for displaying Latitude an-
Longtitude locations.
Key Lock- Temporarily disable the buttons on the watch.
Factory Reset- Return the watch to factory settings.
PERSONAL
User Prole- Change your gender, height, weight, and age.
Bike Prole- Change the size and weight of the bike you are
using.
SENSORS
Heart Rate- Use to connect to an external Bluetooth heart rate
monitor.

20 HOW TO USE
FREE APP
Search for ALLSPORT in the
Google Play Store™or iTunesTM
Upload and track your Golf Scores, Running, Swimming,
Cycling, and steps.
Receive text, call, and other Smartphone notications on the
watch (iPhone™ only).
Note: Compatibility depends on model of Smartphone and
version of operating software. Features may vary or could be
limited due to compatibility conicts.
Note: Text, Call, and other Smartphone notications are only
compatible with iPhone iOS™ (Not for Android™).
For AppleTM: Compatible with iOS 9.0 or above.
For AndroidTM: Compatible with OS 5.0 or above.
*ANDROID IS A TRADEMARK OF GOOGLE INC.
Table of contents
Other Callaway Watch manuals