CallingSYS ZJ-41E2 User manual

WATCH WIRELESS
CALLING RECEIVER
USER MANUAL

Watch wireless calling receiver
I Preface
The product concentrates the technology of wireless transportation,
digital identify, dot matrix LCD display and microprocessor together to
realize the functions of time display and wireless calling. The product
uses removable rechargeable battery with long standby time and safe
charging circuit.
The fashionable watch design makes it widely used in restaurants,
bars, cafes, hospitals, hotels, and factories and so on.
II Feature
RF wireless technology
Fashionable watch design
Dot matrix LCD screen
Up to 999 channels
Call button data pin support for custom
Call button words selectable
Single or list display mode
Accurate time display
Vibration/Buzzer prompt
Low-power indication
Built-in removable rechargeable battery
1

III Technical Data
1) Working voltage: DC3.7V rechargeable Li-poly battery
2) Working frequency: 433.92MHz
3) Working current: 57mA±10mA (buzzer mode)
95mA±10mA (vibration mode)
4) Standby current: <8mA
5) Power-off current: 180±5μA
6) Receiving sensitivity: -108dBm
7) Decoding: learning code
8) Modulation: AM
IV Diagram
1. Diagram of function
(Up)
(Down)
(Set/OK)
(Pow/Back)
Power capacity
Power in Date&Time
Prompt mode
LED Indicator
2
Battery cover
(back side)

Press the button 3s to enter settings;
In pairing setting, press the button to change the cursor position;
In deleting setting, press the button to delete one paired call button.
In calling status, press the button to delete one calling record.
Press the button 3s to power ON/OFF the receiver;
Press the button 3s to switch on/off the receiver module;
In settings, press the button to back previous setting or quit settings;
In pairing/deleting settings, press UP/DOWN to select the number
from 0 ~ 9, A ~ Z, :, -
in calling status, press the button to browse the calling records.
Note: in standby status, press any button to wake up the screen.
2. Diagram of display
Note: the software may be updated, in different versions, the
interface may be little different.
3
16:20
0009
0008
0123
08call
order
satisf.
03
01
call times 16:15
16:14
16:13
01/05
15
16:20 01/05
Order 16:15 calltime
call number
callfunction
call num.
calltime
callfunction
clock call records call records
Single display mode
List display mode
clock

3. Diagram of settings menu
Button define
Define call button pin function
Button word
Each button displayed word can be changed
Advanced mode
If off, only work 1/2/3/4-button call buttons
Back light time
Back light time 5~15s
Prompt times
Vibration or buzzer prompt time 1~10 times
General mode
Digits + letter mode, like A1b3
999 mode
No. 1~999 only
List del mode
All paired call buttons list our for deleting
Search del mode
Press some one call button and delete
Del all buttons
Delete all call buttons
Vibration
Vibration only
Buzzer
Buzzer only
Vibration&buzz
Vibration&Buzzer prompt
Single
Each screen only shows one calling record
List
Each screen can show 3 records in list
List all
For order mode
Ascend
The lastest one calling record is oldest
Descend
The lastest one calling record is newest
7Auto clear time 000
Calling records can be cleared automatically
English
English version
…
Other language
16:00
Time
16-01-08 Fri
Date and week
No
No
Restore part
Restore to default except pairing data
Restore all
All will be restored to default
9
10
Display mode5
Language
Date&Time
Restore
default
1
2
3
4
6
8
General
Pair buttons
Delete buttons
Prompt mode
Display order
4

V Using method
1. Wear the watch receiver to the wrist, and put the call buttons in
suitable place.
2. Press "POW" 1s button to power on.
3. Pair the call buttons with the watch receiver. (refer to below
instruction)
4. When need calling service, press the call buttons, the watch
receiver will receive the signal, and display number on the screen
with vibration or buzzer prompt.
If customer pressed wrong or no need just called service, press
“Cancel” button to cancel the calling service. The calling record
will be deleted from the calling records list on the screen.
Note: before calling service, the transmitter should be paired to the
receiver according its numbers.
VI Settings
Power on the watch receiver, then the LCD screen turns on and
displays the date and time, as well as other information. In standby
5

status, press “SET” button 3 sec to enter settings. The main settings
are:
1.General
In general settings, set the basic function of the watch receiver. Each
call button has one ID number, on the call buttons, there are one or
more press buttons, each buttons has different data pins as below:
1) Button define: this function can change the call button data pins.
Normally no need change it, if it is changed in error, please restore
to factory default.
2) Button word: when press the call buttons, the corresponding
word will be showed on the watch, like “Call”, “Order”, “Pay”...as
default, but the word can be changed for different occasions. For
example, select item A, press [SET] button, there is words list,
select one which you want to show.
6
Settings
Restore default
Delete buttons
1/10
General
Prompt mode
Display mode
Pair buttons
Settings
Auto clear time
Language
Display Order
Date&Time
8/10
Data pin D0 D1 D2 D3 D0+D1 D0+D2 … D0+D1+D2+D3
Items A B C Cenc D E … N
Default Order Call Pay Cancel Satisfied Dissatisfied … Check

3) Advanced mode: if not open advanced mode, the watch receiver
only receive the D0/D1/D2/D3 data.
4) Back light times: set back light time from 5s to 15s.
5) Prompt time: set vibration or buzzer times from 1 to 10tims.
2. Pair buttons
1) Pairing call button
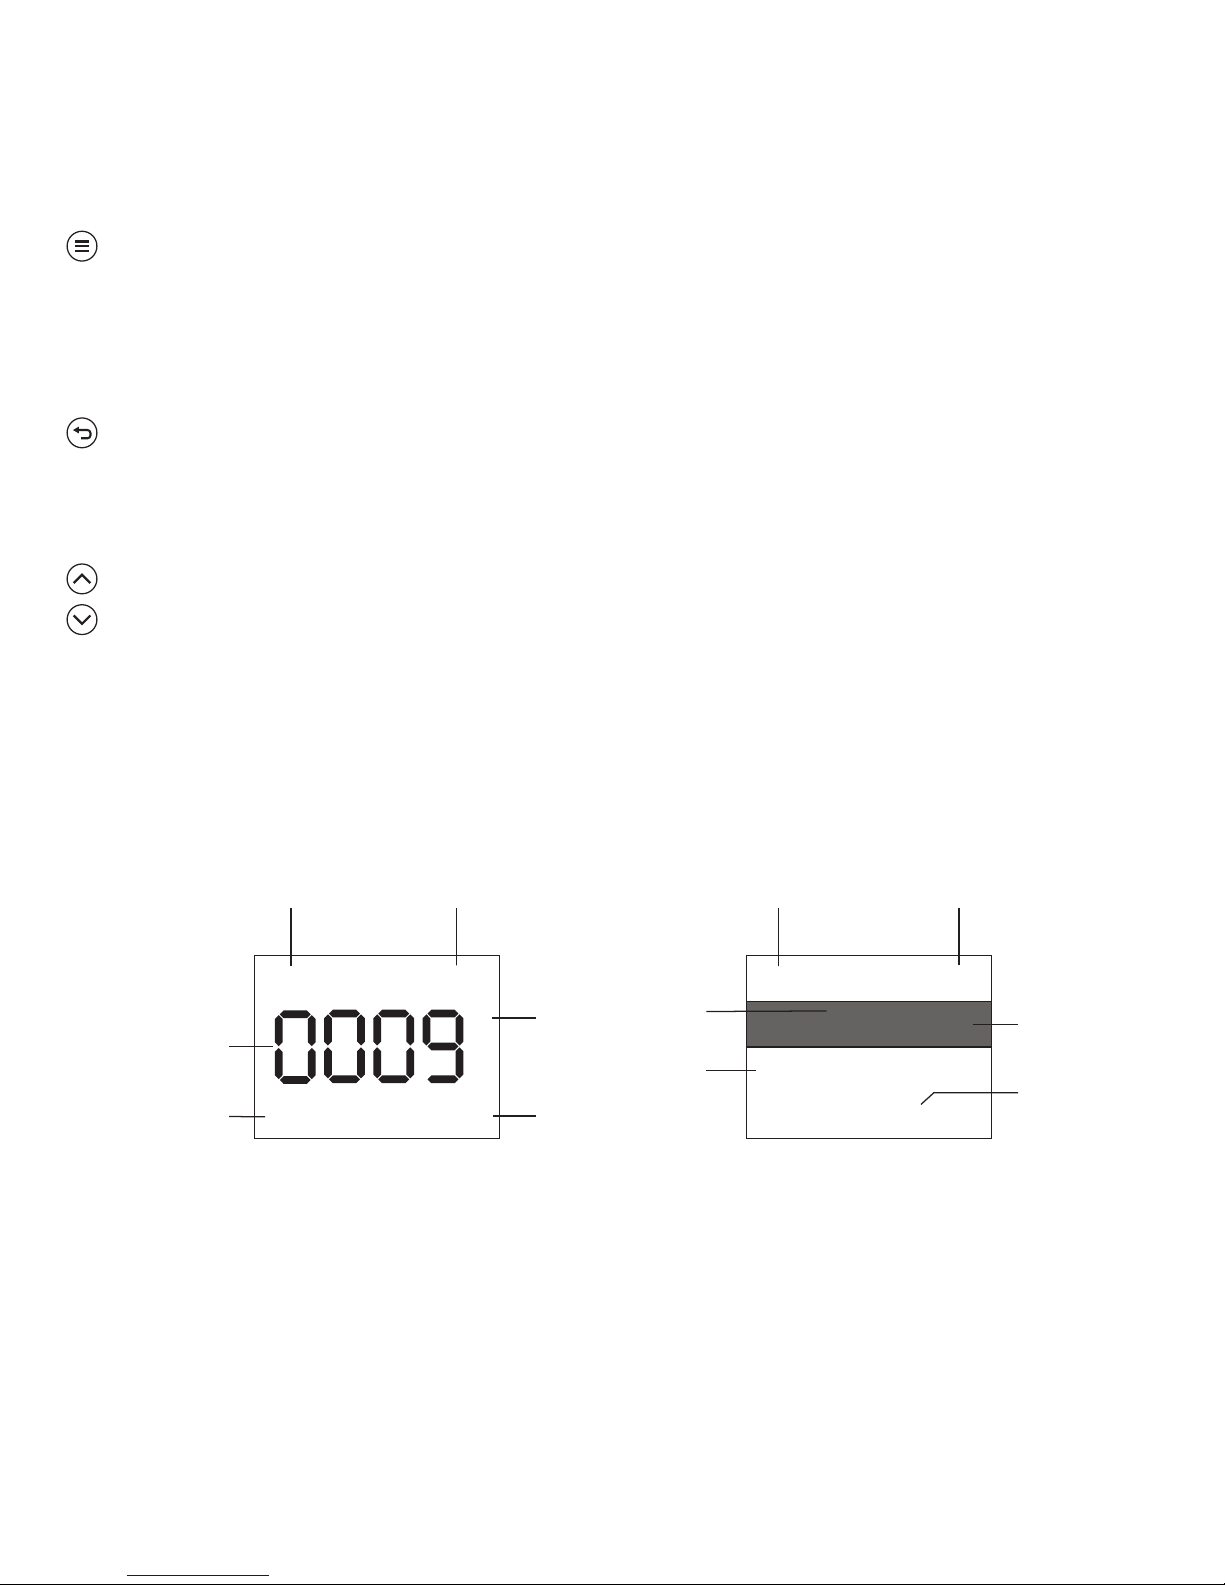
In pairing settings, there are 2 pairing mode, one is “General mode”,
another one is “999 mode”.
In “General mode”, there are 4 digital position, each position can be
select from “0~9, A~Z, - * # ” characters. You can set any words
or letter+digit, like 0001, 56-9, RM33, HELP, A1B2 etc.
Press [SET] button to select the position, then press [UP/DOWN] to
adjust the value to select a ID number, then press any button on the
call button (transmitter), the watch will receive the wireless signal
and record it on this number, the status will turn to “Paired” and
jumps to next number automatically.
If no need complicated using environment, please select “999 mode”
which ID is number only, from 1 to 999.
7
General mode
Paired
0000
001/999
General mode
Unpaired
0001
001/999

3. Delete buttons
There are 3 ways to delete paired call buttons:
1) List del button: in this mode, all the paired call buttons are
showed in the list, you can select one by one and press [SET] button
to delete.
2) Search del button: if there are too many paired call buttons, it is
hard to select one. In this mode, press the call button, it jumps to the
number, then press [SET] button to delete.
3) Del all buttons: in this mode, all the paired button will be deleted.
4. Prompt mode
There are 3 prompt modes when there is calling coming.
1) Vibration
2) Buzzer
3) Vibration & Buzzer
5. Display Mode
The calling records display has 3 modes.
1) Single: on each page, it only displays one record, press
[UP/DOWN] button to browse others.
8
16:20
0009
0008
0123
08call
order
satisf.
03
01
16:15
16:14
16:13
01/05
15
16:20 01/05
Order 16:15
Single display mode
List display mode

16-01-08 Fri
Date & Time
12:00
2) List: all the calling records display in the list, each page displays 3
records. press [UP/DOWN] button to page up/down. If one call
button called many times, only one record and calling times are
showed.
3) List all: same to “List” function, but if one call button called many
times, all records are showed in the list, not show calling times.
6. Display Order
The calling records display has 2 sequences:
1) Ascend – the latest calling record is shown in the below.
2) Descend – the latest is calling record shown on the top.
Note: the default is descend order.
7. Auto clear Time
The calling record can be cleared automatically from the calling
records list, the time is from 1 to 180s. Press [UP/DOWN] to adjust
the value.
Note: the default time is 000, that means no open auto clear function.
8. Language
The watch receiver supports multiple languages, select and press
“BACK” button to quit.
9. Date & Clock
Press [SET] button to change the cursor
position, then press [UP/DOWN] button to
adjust the value.
9

10. Restore default
There are 3 options, select one and press [SET] button to restore.
1) No – Nothing restored.
2) Restore part – only system settings are restored to factory default
except pairing information.
3) Restore all – all settings will be restored to factory default
including pairing information.
VII Other Functions
1. Receiver ON/OFF
When the watch receiver is not in use, the receiver module can be
turned off to avoid receiving the calling message.
Press [POW] button for 3s, there is receiver ON/OFF options. Select
one option and press [SET] button to turn off. On the top of main
interface, the signal icon shows \.
2. Low power indication and battery charging
When the power capacity icon is close to empty, please charge the
battery in time.
While connect to the power adapter, the red indicator in the below of
the screen will be on, when the charging is finished, the LED
indicator turns off.
Note: in first 3 times, suggest charging 8~12 hours; in normal use,
the charging time is about 4 hours.
10

VIII FAQ
IX Packing List
1) Watch receiver 1pc
2) Power adapter 1pc
3) USB cable 1pc
4) User manual 1pc
5) Warranty card 1pc
11
Some call button
has less distance
Battery of call button
is close to empty
The watch receiver
cannot be charged
Call buttons cannot
be paired
The frequency is not
same or OSC resistor
is correct.
Change the correct
frequency and OSC
resistor.
LCD has no display
Check the bat voltage;
Check the screen cable
Charge the battery;
Change the screen cable
Change the battery
of call buttons
Check power adapter;
The battery is broken
Change power adapter;
Change the battery
Table of contents
Other CallingSYS Watch manuals
Popular Watch manuals by other brands

V-tech
V-tech Kidizoom camera Connect user manual

Luminox
Luminox 7051 Specification sheet

V-tech
V-tech KidiZoom Smartwatch DX3 instruction manual

HERO
HERO Band III user manual

BOSSCO
BOSSCO Watches Care and maintenance, operating instructions warranty and service guide

Accusplit
Accusplit AX605 operating instructions